When printing problems arise, people think about how to clean their Canon printer. There may be several reasons for its failure. There are various printing elements that can dry out, become dirty, or completely fail. Sometimes problems can be fixed on your own, but there are situations when the help of a specialist is required.
Causes and signs of pollution
Signs of contamination of the internal elements of a Canon printer are as follows:
- lines on control printouts blur, lose clarity, and become uneven;
- when the printer is working, this is accompanied by the appearance of ink blots;
- colors are lost;
- When printing a photo on paper, streaks are visible.
First, you can reboot your device. If the problem persists after rebooting, you need to open the case and clean the cartridges. Cartridges are cleaned regularly because the ink inside them dries out, especially if the printer is rarely used. Dust gets inside the device, which gradually settles on the elements, clogging them. Most often you have to clean the cartridges and the print head.
Hardware cleaning
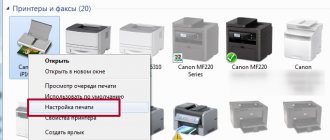
The hardware cleaning mechanism is easy to use. It is available in any printer equipped with the Windows operating system. To start hardware cleaning, select “Devices and Printers” in the “Control Panel”. Next, you need to find the model of your device and click on the inscription with the mouse. A sign will appear on the display with the “Maintenance” tab in the window. The tab is activated and the cleaning method is selected. The program may offer cleaning of all cartridges or black.
The operating principle of this method is based on the supply of ink to the nozzles under high pressure. This feed flushes dust and dirt out of the head. Cleaning requires a lot of ink.
Prevention
At the same time, it would not be amiss to carry out extraordinary cleaning, preventive maintenance and inspection of the printer itself. This will ensure that all other parts are in good working order and protect the equipment from serious damage. Check for dust, dirt, jammed paper, or foreign objects inside the device. Remove them if necessary.
When using continuous ink supply systems, you should check the ink pumping hoses from the containers to the head for clogging, air, kinks, and mechanical damage. An important point will be that there is sufficient paint above the average level, which will prevent air from being sucked into the system.
Regular program cleaning will help avoid the need for physical washing over a long period of use of the printing device.
Cleaning a Canon printer manually
Manual cleaning of the internal elements of the printer is used if the hardware turns out to be ineffective. There are also printer models that do not provide a hardware method.
External surfaces
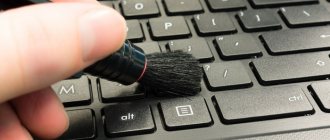
Clean the inkjet printer body using a dry and soft cloth. Before cleaning, disconnect the printer from the power supply. Do not use rough paper napkins. This may damage the surfaces. Also, do not use chemicals, even with severe contamination.
Attention! Gasoline or acetone can lead to permanent damage to the device.
Use a soft cloth to remove dust and dirt from all external parts of the printer. It is lightly moistened with water, and then the clean printer is gently wiped dry.
Scanner cover and feed rollers
The built-in scanner consists of a cover and an inner side. If these elements are dirty, print quality will deteriorate. Clean the scanner with a dry cloth. It is important that there is no lint on it, because it can remain on glass surfaces.
Rollers feed the paper into the printer. If they are dirty, it may get stuck during the feeding process. Cleaning the rollers is done as follows:
- connect the device to the network;
- remove all sheets of paper from the tray;
- gently press the “Stop” button;
- the emergency system will start flashing;
- you need to wait for it to blink seven times;
- After this, the “Stop” button is released and wait for the end of the rotation of the rollers.
Once the rollers stop rotating, the first cleaning stage is complete. Now the procedure must be repeated using paper sheets:
- a small pack is placed in a tray;
- hold down the “Stop” button;
- wait until the emergency system flashes seven times;
- release the “Stop” button;
- wait until the paper is completely ejected.
Sometimes the rollers are wiped with a cotton swab slightly moistened with water. Both rollers are accessible from the rear of the printer. You cannot touch them with your fingers.
Steaming
Let's say that your printer's ink has dried out, what should you do? The high temperature steaming method will help you. The cartridge must not be empty. If this is not the case, it needs to be at least partially refilled.
We turn on the kettle, wait for the water to boil, open the lid and hold our cartridge for 30 seconds with the nozzles down. Then we remove and wipe the nozzles with a soft cloth.
Repeat the procedure as many times as necessary.
If this does not help, there is a more radical method - immersion in boiling water. To do this, pour just boiled distilled water into a plate to form a layer of about 1 cm, and place the cartridge there with the nozzles down. Let it lie there for 20-30 seconds. If necessary, repeat.
In this way, it was possible to revive even cartridges that dried out a hundred years ago.
Methods for cleaning cartridges
There are two ways to clean a Canon printer cartridge:
- cold;
- hot.
Cold cleaning
For the cold cleaning method, you will need rubber gloves, a disposable syringe, soft rags, a pipette and water. You will also need a glass cleaner containing isopropyl alcohol or ethylene glycol (for example, Mister Muscle or Glitter).
Remove the cartridge from the Canon printer and place it on a previously prepared cloth (so that the nozzles are positioned upward). Apply the cleaning agent to the nozzles for 10-12 minutes. After this, all nozzles should be blotted with a soft cloth and wiped dry with a soft, lint-free cloth.
If superficial cleaning does not help, more time and cleaning agent will be needed. The container is filled to 3 mm with liquid, then the cartridge nozzles are immersed in it and left for 3-4 hours. After exposure, the cartridge must be removed and wiped dry. If cleaning is successful, a trace of soaked ink will remain on the fabric. They are gradually taken out.
There is another method of dry cleaning, using a rubber plug. Sometimes it is included with the printer. You need to pull back the syringe plunger and fill it with air. After this, put a plug on the needle and squeeze out all the air from the syringe into it. The high pressure releases the dried ink out. After cleaning is completed, the cartridge must be wiped, refilled and a test sheet printed.
Application of the hot method
The algorithm of actions for the hot cleaning method looks like this. Pour some hot water into the container and place the nozzles of the cartridge to be cleaned into it. Change the water without waiting for it to cool down. The water will be constantly colored until all the ink is washed out of the nozzles.
After the first cleaning, the detergent is mixed with water in a 1:1 ratio and poured into a container. The cartridge is kept in the solution for 2 hours, after which it must be rinsed with hot water and wiped dry.
Helpful advice! You can make the solution yourself. You will need a little ammonia, distilled water and glycerin. You will also need isopropyl alcohol. Water is thoroughly mixed with all components in a 1:1 ratio and filtered through a strainer.
Flushing fluids
Flushing fluid OPC RSL100
Specialized ink stores also sell washing liquids. For example, OCP RSL100 or more concentrated Bursten PDK . But they are quite expensive, and washing a very dry head may require a large amount of product.
You can make your own alkaline solution using the following recipe. For 7 parts distilled water, take one part:
- ammonia,
- isopropyl alcohol,
- glycerin.
Flushing fluid Mister Muscle
Mix the resulting mixture thoroughly and strain. It makes no sense to use distilled water separately, since it is ineffective for water-based ink and does not dissolve pigment paint at all.
Important : Do not wash clogs with alcohol and vodka. Dried or curdled paint releases remaining liquid into ethyl alcohol, making further soaking difficult or impossible.
Mister Muscle glass cleaner in blue or green color has proven itself to be the best. Its effect is comparable in results to specialized flushing fluids, but the price is significantly lower. You can use other window cleaners whose composition is similar to Mister Muscle and contains ammonia.
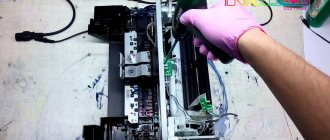
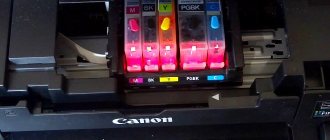
How to remove the print head
To remove the print head, you need to lift the top cover and turn on the printer. Next, observe the movement of the cartridges. When they are in the middle, they are carefully removed one after another. It is important to remember their original location in the device.
The print head is located under the locking lever. Sometimes they don’t lift him, but pull him towards himself. The head is removed and cleaning begins.
Preventive actions
In order to avoid having to clean the print head for as long as possible, you should follow some household recommendations when using the device.
- Eliminate printer idle time. Printing should be done at least 2 times a week.
- Limit use of the device at low or high temperatures. In the first case, the viscosity of the oil increases and the mechanical parts of the printer work worse. With the second option, the device may quickly overheat.
- Ensure the cleanliness of the unit itself and the area around it, as dust is a serious problem for printers.
- It is better to refill with original ink or other compatible, but of good quality. Cheap paint is likely to clog the head.
Considering the above, special care should be mentioned when working with the print head: in some cases, replacing it does not cost much less than the printer itself. And in order to avoid such difficult and painstaking work as cleaning the head, you should adhere to the recommendations of the device manufacturer and carry out all the above preventive measures.
How to clean the print head
To wash the head you will need:
- small wide bowl;
- several napkins or a bandage;
- syringe (from 20 to 50 ml);
- tube for a medical dropper (or cambrics);
- latex gloves;
- rinse liquid (for example, Mr. Muscle").
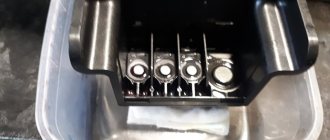
The bottom of the saucer is covered with a bandage or cloth. The material is pre-folded in several layers. Liquid for washing is poured onto the bandage so that a thin layer is formed. The head is placed on the fabric, and tubes are put on the fittings. The rubber gaskets are first removed from the fittings and washed. The length of the tubes should be from 4 to 5 cm. Liquid for washing is poured into them and left for a couple of hours. At the same time, you need to monitor the level of liquid in the tubes. If it does not become smaller, the solution is extracted under pressure. Insert the end of a medical syringe into the tube and gently begin to pull its piston towards you.
The dirty water is drained, the bandage is replaced with a clean one and the steps are repeated until the liquid becomes transparent, without ink coloring. The bottom of the head is blotted, clean gaskets are put on the fittings and placed back into the printer. After installing the head in its original place, return the cartridges and do a test print.
Software cleaning
Every printing equipment manufacturer offers washing software. The program is installed on the computer when connecting and setting up the printer automatically or from the installation disk.
Cleaning with software involves running ink through the head nozzles. Ink pressure removes light ink plugs and air pockets.
Before more complex physical cleaning, do a software one according to the scheme below.
The required settings and the item responsible for cleaning depend on the brand and model of the equipment. Install the software that comes with the device upon purchase and study its interface in detail. We are confident that you will find the function you need and clean the part.
For the Epson brand, you can install the PrintHelp utility, which also has this functionality.
Removing severe head blockage
If the head is heavily clogged, fluid will not pass through the holes. You will need a lot of flushing fluid. A thin tube is cut into pieces of 6 cm, put on each hole and filled with liquid.
If the blockage is severe, the liquid will not pass through the sluices. In this case, it is worth repeating the procedure several times. If liquid penetrates inside, the procedure is continued, with gradual addition of the product. This may last 1-2 days.
There is another way to remove severe blockage. A small amount of product is poured into a plastic container and the head is placed on a napkin, pressing it firmly to the surface of the fabric. Using a syringe without a needle, draw the liquid out of the tube, repeating the action 4-5 times, adding a cleaning solution.
Installation and configuration process
Before assembling the printer, the head is dried and placed back. The latch is lowered and the cartridges are installed in their original place. After installing the head and cartridges, print a test page. At first, extraneous lines may appear on the piece of paper. The text may be faded and unclear, and the pictures may be too, but don't worry. Once installed, the head often becomes misaligned and requires additional calibration. Calibration is carried out as follows:
- place a small stack of paper sheets in the tray;
- connect the printer to the PC;
- in “Control Panel” find the “Devices and Printers” item;
- open the menu;
- select the “Properties” item and the “Advanced” tab;
- in the tab there is an option “Align manually”, check it and save it;
- after saving, go to the “Maintenance” item;
- find the inscription: “Alignment of heads”;
- After this, questions are answered and the calibration comes to an end.
Advice! A test print must be done once every seven days. This is relevant if the printer is not used for a long time.
When cleaning is needed
You don't need to clean the head every time you want. At the very least, you should not use manual cleaning methods unless necessary.
There are clear signs when nozzle cleaning is required:
- if the printing device has been idle for a long time, after printing several sheets the quality has noticeably deteriorated and does not return to its original state;
- if you are sure that there was still ink in the cartridge at the time of the last print, but now the printer produces completely white sheets;
- when the inkjet machine heavily stains the sheets, smears them with spots, skips lines, prints palely, colors are distorted or unclear;
- Cleaning is also necessary after the next refill of the cartridge.
Even if the printer prints a regular text document normally, this does not mean that there are no problems. You can verify normal printing or detect problems by performing a nozzle test. Each device has a test sheet printing feature. You can download full-fledged test sheets from the Internet and check the printing of all colors, gradients, characters of different sizes.
For example, Canon printers have a Nozzle Check option that will print a test pattern to evaluate quality. The function is located in the device’s print settings on the “Maintenance” tab.
Epson printers have a similar option. Also located in the settings window, but on the “Service” tab, and is called “Nozzle check”.