Most often, cleaning procedures are carried out by owners of Epson, HP, and Canon equipment. This manual contains several options for cleaning the printer head. All steps are described in detail and contain explanations for the most inexperienced.
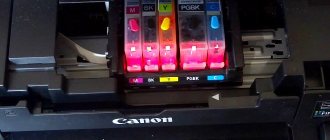
Cleaning the printer print head is required for any model of inkjet machine when the quality of its operation begins to deteriorate over time. Cleaning involves a kind of direct physical washing of the nozzles, the nozzles through which ink flows onto sheets of paper. Their clogging leads to poor printing and wear on the printer itself. You can wash the head, like any other unit of the device, with special liquids that can be easily purchased at any computer store.
Which manufacturer's device is causing the problem?
Why might Epson L120 ink need to be pumped?
Despite the fact that the system is not “China”, but seems to be from the factory, nevertheless, thanks to the negligence of users, problems arise with them.
It all starts with something, with the fact that we don’t like to read the operating instructions for any new purchased device, it doesn’t matter if it’s a printer or a washing machine.
- The first reason why factory system dampers run out of ink is an incorrect first start. When you first turn on an Epson printer with a built-in CISS, the user must fill the CISS donors with ink and allow the printer to bleed the system for about 20 minutes. I don’t know how to make sure this doesn’t happen, but users manage to do this. Then regular cleanings begin in the amount of 100,500 pieces and, as a result, the diaper counter in the new printer is blocked.
- The second reason is the closed air holes in the CISS device. I don’t know why, but for some reason users close these holes and start using the printer; naturally, ink does not get into the system cartridges (dampers) and the printer does not print.
- The third reason is that they missed refilling the ink on time. Everything is clear here, they typed, typed and bang. It doesn’t print, you look, and the ink has run out. It's sad, but you need to be more careful and monitor the amount of ink. This case is excluded if you always use original ink, because... Having printed a certain number of sheets, the printer asks to fill it with ink and enter codes, otherwise it will not print. If you use non-original ink and do not enter codes, then this problem cannot be ruled out.
Manually cleaning the print head
The easiest way to wash the print head is to soak it. It is relevant only if the PG is easily removed.
- Remove the print head from the printer.
- Pour a small amount of service fluid into a saucer.
- Immerse the PG with nozzles into the service liquid approximately 2 mm.
- Keep the PG in the liquid for 7-10 minutes (do not allow the PG to be completely immersed in the liquid or any electronic parts except the bottom platform with the nozzles to get wet).
- Wipe the PG, reinstall it and run a nozzle test.
- If the test is unsatisfactory, try 2-3 additional cleanings and, if there is no positive dynamics, move on to more complex methods.
If the print head is not removable, cleaning may require a technique using a syringe and a large number of wipes.
+7 multichannel
we are here
With constant workload of printing devices, problems with print heads often occur. This occurs when documents are printed with streaks or gaps on the paper. Basically, inkjet printers produced by well-known companies Epson, HP and Canon suffer from this problem.
Contaminants and ways to eliminate them
Even under normal operating conditions of printing equipment, you cannot be sure that all elements will work perfectly. If the use of consumables cannot be properly controlled, unexpected equipment failures often occur. We can name several variants of events in which the most sensitive working parts of the printer, namely the head, are affected. Nozzle clogging occurs when:
- the ink inside the head has dried out;
- paint supply channels are clogged;
- the level of ink supply to the cartridge has increased;
- The ink supply system has become depressurized.
To solve problems with a clogged head, the creators of printing equipment included a special utility in the system for monitoring its operation. In most cases, it helps get rid of printing defect problems.
Soaking in washing liquid
If the cartridge begins to streak or stops printing altogether, it can be cleaned with a special cartridge wash prepared according to one of three recipes:
acidic (HP color cartridges): 10% acetic acid essence, 10% alcohol, 80% distilled water;- neutral (suitable for any printer): 10% glycerin from a pharmacy, 10% ethyl alcohol, 80% distilled water;
- alkaline (Epson, Canon): 10% ammonia/ammonia solution, 10% ethyl alcohol, 10% glycerin, 70% distilled water.
Before you revive a dried cartridge using this composition, it must be thoroughly filtered by any available method.
Under no circumstances should cartridges be washed with ordinary water (not distilled)! This leads to scale formation in the nozzle area and cartridge failure. Don’t be too lazy to go to the nearest auto store and spend 80 rubles for a 5-liter bottle of distilled water!
If one type of acidification does not give results, try another.
An excellent result is achieved by using green “Mr. Muscle” as a washing liquid for cleaning glass (the one with ammonia).
Mister Muscle is diluted with dist. water in a 1:1 ratio and use as a rinse.
How else can you clean the printer head at home? Instead of Mister Musk, you can use a cheaper glass and mirror cleaner “Every Day”:
Recovery technique
Printer cartridges from different manufacturers need to be washed differently. We will discuss below how to wash the head of an Epson inkjet printer. For now, let's start with the most common ones - Hewlets, Lexmarks, Canons and the like.
How to clean a Canon, HP, Lexmark (and similar) printer cartridge?
So, your HP cartridge is dry, what should you do?
Pour the cleaning solution generously onto the napkin and place the cartridge with the nozzles directly on it.
Make sure that the napkin is always moistened thoroughly! Add liquid as it dries.
If the cartridge is empty and very dry, then you can put it directly into the solution entirely (not for foam cartridges!) and pour it inside and let it sit for 1-3 days.
How to clean the Epson printer head?
Epsons are restored differently : move the head to the side, make a sponge out of a napkin or a thin piece of fabric of a suitable size and place it in the place where the head is parked. Soak generously in acidifying agent and park the head. Leave for 10 or more hours.
As a last resort, you can completely dismantle the head and immerse it with nozzles in the composition by 1 cm. Then select cleaning heads in the menu (a couple of times). After this, if the cartridge is working properly, it should start printing.
You will find interesting discussions about the composition of the washing liquid and how to soak a Canon and HP cartridge at home in this video:
Well, the simplest rinsing for any cartridge is clean distilled water. The next two methods will be just using it.
How to clean the printer from dust?
Frequently cleaning the printer from dust will allow the device to work properly without breakdowns or difficulties.
What to do:
- Turn off the power to the car
- Remove the cover (open)
- Gently wipe the paper roller with a dry cotton sponge or swab.
- Take out the cartridge, be sure to wipe it carefully without turning it over (the paint should not spill). Also, under no circumstances should you leave the cartridge in direct ultraviolet rays.
IMPORTANT: You can also wipe the inside of the printer with a special cleaning liquid, which is sold in stores (where they sell printers, software for them, ink and cartridges).
Canon diaper reset
1. Turn off the printer (using the “Power” button). 2. Hold down the “Resume” button and turn on the printer (using the “Power” button). 3. While holding the Power button, release the Resume button (the Power/Ready indicator will turn green) 4. While holding the Power button, press the Resume button twice and release both buttons - each time you use the Resume button, the Power/Ready indicator changes color (one press – yellow, second press – green). For printers that have more than one indicator - the indication switches (power/ready indicator - green, error indicator - yellow) - after the buttons are released, the power/ready indicator will blink green for a while (the blinking time depends on the printer model ), and then green will light up constantly
Severe blockage
If the head does not allow liquid to pass through at all, then the blockage is severe. But you can get rid of it too.
- As in the previous instructions, place the part on a napkin.
- Take the IV tube.
- Cut it into small pieces. About 5–7 centimeters.
- Place them on the paint intake pipes.
- Pour washing liquid into them.
- Refill and change wipes periodically.
There are also extreme methods. For example, you can insert a syringe without a needle into the nozzle and squeeze out the liquid. Or fill the cartridges with washing liquid instead of ink. But it's risky.
Using the Service Tool
There are several versions of the Service Tool for resetting the counter. The newer the printer model, the more recent version of the program is needed. If you are not sure, download and try them all - they have the same interface.
Correspondence of Service Tool versions to printer models (the completeness and accuracy of the list is not guaranteed, the program is not documented and is unstable, including due to differences in OS and drivers):
- v700: iP1200, iP1300, iP1600, iP1700, iP1800, iP2200, iP2500, iP1900, iP2600.
- v2000: iP2700, iP3600, iP4600, iP4700, iP4840, iP4850, Pro9000 MarkII, Pro9500 MarkII, IX7000, MP240, MP250, MP260, MP270, MP480, MP490, MP540, MP550, MP560, MP620, MP63 0, MP640, MP980, MP990, MX320, MX330, MX860, MG2400, MG2440, MG5140, MG5150, MG5340.
- v3400: iP4940, MG2140, MG2245, MG3240, MG4240, MP230, MG3540, MX494
- v3600: iP7240.
- v4720/v4740: G1400, G2400, G3400.
Important! Service Tool may conflict with different versions of operating systems. If errors occur, try running the program in compatibility mode for Windows XP.
Service Tool working window
- After turning on the printer's service mode, launch the ServiceTool program. If the program does not see the printer, make sure it is connected to the computer. If more than one printing device is connected, select the one you need.
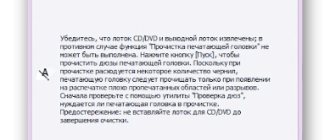
- In the “Main” tab of the program there is a “Print” item with the “Test Print”, “EEPROM” and “Nozzle Check” buttons. Print a test page to make sure the program detects the device correctly.
- In the “Ink Absorber Counter” section there is a “Counter Value” column that displays the percentage of the “diaper” fullness. In the “Clear Ink Counter” column, press the “Main” key so that the value in “Counter Value” becomes zero. If the value is not reset, try also pressing “Platen”.
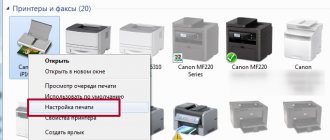
- After resetting the counter, close the Service Tool. From the “Printers and Faxes” folder, remove the copy of the device installed in service mode.
How to clean a laser printer?
You can clean not only an inkjet printer yourself, but also a laser one.
You will need:
- Cotton sponges and swabs (lint-free)
- Office paper
- Dry cloth
- Dry thick art brush
IMPORTANT: The printer should be cleaned in a room with the windows closed, the fan or air conditioner turned off, and always wearing a protective mask. Wear rubber or latex gloves.
How to clean:
- Unplug the machine
- Open the printer
- Remove the toner cartridge
- Stretch the “fabric” tape under the toner, pulling it in different directions.
- Wipe the surface of the cartridge with a clean cloth.
- Using a small attachment on a vacuum cleaner, remove all dust from the cartridge and other internal parts of the printer.
- Using a dry brush, carefully clean all internal compartments and crevices of the printer from dust.
- Assemble the printer and start printing
How to clean your printer at home?