The problem when the printer prints poorly is typical for many printer models from Canon, HP, Epson and many others. The situation is misleading when it happens after refilling the cartridges and although there is ink, the printing still comes with gaps, is blurry, blurry, the black text is poorly printed, and low-quality color images are obtained. The problem can also occur with a new cartridge that has just been purchased and installed.
Let's consider all the options that can be done in such a situation to improve the print quality of laser and inkjet printers. Thanks to detailed explanations and pictures describing all the steps, you can fix the problem at home without having any experience in repairing computer equipment.
If the printer does not print at all, although there is ink, follow the instructions from our other article to fix the problem.
Turning off economy mode
The user, through ignorance or carelessness, can turn on the printer's economy mode. But such a switching of settings can also happen automatically by the device itself. In some models, when the level of powder or ink is low, a similar mechanism is built into the behavior algorithm. This fact is worth checking first, since correcting it is much simpler than other methods of “curing” bad printing.
Read also: Sakura, what kind of tree is it?
- Open the list of all connected printers through the Quick Launch window (Windows + R). In the prompt, enter "control printers".
- Find your model and open Print Settings.
- In the window that opens, on one of the tabs you will be able to change the print quality, which can be easily changed to suit your needs.
Dried ink
If the user has not printed for a long time, the ink in the nozzles may dry out, which will undoubtedly lead to printing problems. Streaks may appear, or the image on the sheet of paper may be completely absent. To solve this problem, you need to clean and rinse the cartridge.
To check if the ink is truly dry, touch the ink cartridge nozzles to the paper. If there is a fingerprint, immediately proceed to the next section of the article. If the print is missing or very unclear, then the cartridge needs to be restored:
- Cleaning the nozzles. Use recovery fluid to clean the nozzles. If you don’t have it, you can get by with a window cleaner (it should be alcohol-based and dissolve stains and dirt well). Soak the nozzles in the liquid, leave for a few minutes and wipe off with a napkin. After that, check if there are any fingerprints on it.
- Soaking. If the first method does not help, move on to soaking the nozzles. Take some of the restoration fluid into a small container (warm distilled water or alcohol will also work) and place the cartridge in it with the nozzles facing down. Leave it to soak for an hour or two. Take out the cartridge, wipe it and check the print.
- Blowing out the cartridge. To clean dried ink, you can use a regular syringe and a rubber seal. Place the nozzle cartridge on a napkin or toilet paper (the nozzles should be free). Fill the syringe with air, trim the needle, put a rubber band at the base of the needle and insert it into the filling hole. The rubber band will prevent air from escaping back through the filling hole, and the resulting pressure will blow the cartridge through the nozzles.
- Cleaning the interior compartment. If neither method works, remove the top of the cartridge cover and fill the sponge inside with restoration fluid. After settling, pour out the liquid and refill the cartridge; Check to see if ink is flowing through the cartridge nozzles.
If none of the above helps, we recommend replacing the cartridge with a new one. To prevent the problem from recurring in the future, print regularly from the printer. If there is a possibility that the printer will not be used for a long time, remove the cartridge and place it in a small airtight container.
When consumables may be affected
- Fake or non-original consumables. If the cartridge is filled with non-original ink or toner, then print deterioration is not the worst thing that can happen. Counterfeits or poor quality dyes can cause damage to other printer components. You can only purchase consumables that are fully suitable for a specific cartridge model. It is better to use only original materials. Compatible ones are also allowed for use, but the quality of the printed image is likely to decrease.
- If at some point you decide to change the manufacturer of consumables, then before refilling, be sure to completely clean the cartridge and head. Mixing two different consumables can lead to chemical reactions. reactions between them. This is due to the use of different components in production, which can give a reaction when interacting.
After changing the manufacturer, it is advisable to update the color profile. This is done using a file that contains information about the exact proportions for mixing ink of different colors to obtain the desired shade when printing. The file is available for download on the manufacturer's official website.
Utilities for adjusting color
This measure is, in fact, the simplest to implement. It is recommended to use it after checking the paint level in the tank. If the red ink has not yet run out and the printer does not print, then the driver for cleaning the PG is launched. This measure is effective if the Canon, HP or Epson inkjet printer is rarely used for its intended purpose.
Color setting
But neither software cleaning nor other restorative measures will help those cartridges whose jaws have hardened, the electronics are damaged, and the sealing of the nozzles is broken.
Rinsing a cartridge containing an absorbent sponge
To begin with, the sponge is brought back to its normal state. To do this, you need to remove the PG from the printer, which is not printing, and place it in a pre-prepared solution of distilled water or cleaning liquid. The cartridge is placed with the nozzles down.
The next step is to refill the cartridge. It is advisable to do this using a special suction cup or syringe. It is slowly pulled back through smooth movements. Before installing the element back into the peripheral device, it is cleaned of excess paint.
At the same time, pay attention to the condition of the contacts. They must not be damaged or stained with ink.
Cleaning the print head
If after 3 cleanings the printer does not print or the quality of the resulting print is poor, then all that remains is to replace the cartridge. Unfortunately, Epson printers with a similar design require frequent replacement, since they cannot be restored. The procedure is shown in the photo.
Remanufacturing of vacuum ink cartridges
What to do in this case? PGs characterized by vacuum paint retention are easier to revive. To begin, 10 ml of cleaning solution is poured into the cartridge. After a couple of minutes you should shake it out. The procedure is repeated 3-4 times. Afterwards, the cartridge is placed in the rinsing solution for a day (nozzles down).
Refilling the printer
Next, you need to fill in the ink, stop the air from entering the cartridge, and use a special suction to extract no more than 10 ml of ink through the nozzles. If the process occurred without complications, then all that remains is to carry out 3 cleanings of the PG and check the result by means of a test print.
Cleaning separate steam generators
If problems are diagnosed with the ink tank, then there is no point in repairing it. The print head can still be revived. This is done using special utilities that are on the installation disk included with the Canon (Epson) printer when you purchased it.
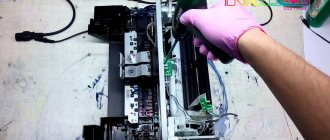
If this is useless, the PG is dismantled. In this case, you must follow the instructions. Otherwise, it is useless to hope for further operation of peripheral equipment. Afterwards, 10 program cleanings are required. If the printing result is not satisfactory, then replace the main element of the Epson inkjet printer.
Epson printer
Ultrasonic cleaning of a separate print head is considered effective, but it is used only in a service center. If the situation cannot be corrected at home, then they turn to professionals.
Refueling nuances
After refilling the cartridge, poor printing may occur for the following reasons:
Read also: What is laminate, how to choose it
- Poor toner or ink quality. If you changed the supplier of consumables, bought a product from a different place than usual, or purchased a counterfeit, then the low-grade product can affect not only the printing, but also damage the device itself. Immediately stop using paint whose quality you suspect. The problem is relevant for inkjet and laser printers.
- Mixing paints from different manufacturers in some cases leads to uncontrolled chemical reactions due to the use of different components in manufacturing. If you have changed the manufacturer of consumables, then before using new ink, the printer and containers with old inks must be washed. The same applies to cartridges and print heads.
- Select consumables that are guaranteed to fit your printing device model. The use of compatible ones is highly discouraged.
Checking cartridge leaks
For various reasons, the printer cartridge can become physically damaged. This is a rare situation for inkjet inkwells, but this often happens with laser inkwells. Also, after refilling, the laser cartridge may be poorly assembled or not assembled correctly at all. As a result, the seal is broken, and this fact negatively affects the print quality.
Checking for a defect is very simple. Having previously prepared the place, or better yet, do it on the street or balcony, shake the cartridge. Make a detailed inspection for any falling toner. If there is a problem, it should be corrected immediately.
Streaks when printing on a laser printer
What is the reason for the stripes
- Toner level is low.
- Cartridge depressurization.
- Filling the container for waste powder dye.
- Incorrect squeegee installation.
- Damage to the magnetic or photo shaft.
How to fix
When the amount of toner is low, uniform white streaks appear on the paper.
It is better to buy certified powder, and when refilling yourself, carry out all work in a well-ventilated area due to the high toxicity of toner.
To identify leaks in a cartridge, remove it from the printer:
Technical reasons
There are several reasons why the printer does not print. Conventionally, they can be divided into software failure and technical reasons. Technical reasons include cases when the printer, due to current circumstances, is a priori unable to perform the tasks assigned to it.
No contact between PC and printer
No matter how trivial it may sound at first glance, very often inexperienced users fall into the trap of asking to print material, but forgetting to connect the device itself. Without a connection to the power supply, looking for the reason why the printer does not print, although there is ink, is certainly not only stupid, but also useless.
Likewise, some users forget to connect the printing device to the computer using a special cable.
If all the indicated connections are established, the ready buttons are lit, but no action occurs, you should try to figure out why the printer does not print from the computer.
It happens that the USB cable fails, then a message should appear in the lower right corner of the computer screen that the USB device is not recognized. In specialized stores you can purchase a high-quality cable with additional noise immunity, thanks to which you can establish excellent contact between two devices and forget forever about the unfortunate problems when there is ink, but the device mercilessly refuses to print, although the user makes every effort to correct the technical failure.
Paper Feed Problems
In some cases, paper may be the problem. The most common reason is its absence in the tray, which is also indicated by a special indicator on modern devices. By adding white sheets and clicking on the continue printing button, everything will work safely.
When the user, not understanding why the printer stopped printing, asked to print several times, he himself complicates the operation of the device in the future. Having already dealt with the paper, you have to perform additional manipulations related to canceling established tasks and clearing the queue of documents that previously needed to be printed.
In some cases, even if there is paper, the device refuses to work, indicating a sheet jam. The user must carefully inspect the tray on which the sheets are placed, as well as the roller where they go when printing starts. Often a small piece of paper gets in the way and acts as a serious obstacle.
If there is ink, the sheets are prepared and laid out on the tray, there is no jam, but the printer does not work, and the indicator indicates a problem with the paper, you will have to take the device to a service workshop, since a possible cause will be failure of the paper feeding mechanism or sensor.
Cartridge problem
A printer is a device whose operation is entirely dependent on cartridges. Therefore, it is quite simple to understand why the printer prints white sheets, just by first inspecting the cartridges.
If there is ink, but the device still produces white sheets of paper, although all contacts have been checked, then the problem may lie in low-quality ink. Sometimes users mistakenly refill ink that is not suitable, or the paint sold in specialized stores was not of very high quality, and therefore caused the printer to stop printing or produce only blank sheets, although there is ink in the cartridges.
If the printer stops printing, although the request from the computer is carried out correctly, the reason may lie in a malfunction of the cartridges themselves. However, the correctness of such conclusions can only be confirmed by a service center.
In this regard, if the printer has stopped printing without responding to requests coming from the computer, it means that there is some more serious reason that only qualified craftsmen can recognize. Therefore, the best option is to take it in for repair or maintenance.
Inkjet printer prints poorly
A common cause of poor print quality in an inkjet printer is a problem with the cartridge. If you do not print for a long time, the ink dries out, so when you resume printing, there may be no result at all. At best, you will see various defects on the sheet - blurriness, stripes, omissions, and the like. Both black and white and color cartridges can dry out and fail.
- Remove the cartridge from the machine.
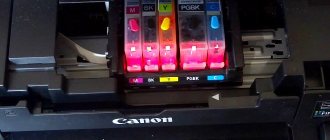
- Take a white, clean napkin or paper towel. On the bottom side of the cartridge there is a print head, which contains nozzles (nozzles). During printing, ink comes out of them onto the paper. Blot the head with a napkin.
- If you see a clear trace of ink, then everything is fine with the cartridge, the ink has not dried out. A colored inkwell should leave a trail of three colors - yellow, blue and red.
- If there is no normal ink trace, it is necessary to clean the printer’s print head using one of the possible methods - software or physical using washing liquids. The latter is used in advanced cases when software cleaning does not help and the cartridge has dried out or is completely clogged.
A bad ink mark on a napkin may also indicate that the cartridge is clogged, which is likely due to too frequent intensive printing without preventive cleaning.
The removable printer head (Epson) or continuous ink supply system (CISS) most often produces poor printing in one color. For CISS, the actual problem may be the formation of an air lock in the loop, and for the head - the same drying of paint or clogging. In the first case, air is expelled from a tube of a certain color, in the second, washing is done, first by program, and then manually with cleaning agents.
A more serious malfunction in the operation of the cartridge will be the burning of the head, which leaves a normal mark.
Cleaning methods
First, the printer is always given the opportunity to clean its components itself through the program. In some cases, this method helps to make printing better and restore quality to the previous level.
For Canon printers, cleaning functions are located in the “Maintenance” tab in “Printer Properties”.
Do a regular clean first, then a deep clean if the first step doesn't fix the seal.
For other manufacturers, the set of cleaning parameters may be radically different and located in a completely different place. So, for the HP Deskjet 2050A printer there is nothing in the printer properties. But, in the full-featured software, which is installed along with a complete driver package, there are some functions responsible for cleaning.
Therefore, there is only one recommendation here - always install a complete set of drivers on your computer from the disk that comes with the equipment, or download the software from the manufacturer’s official website. If the necessary settings described in the article are not in the device properties, then look for the reason in the absence of the necessary driver or run proprietary software, within the interface of which, most likely, you can perform the necessary actions.
When you are absolutely sure that the software method did not produce results, you need to move on to the manual method. The actions depend on the type of print head, which can be built into the ink tank (typical of Canon and HP brands) or removable (Epson printers).
Instructions for the built-in head. Open the printer cover. Move the cartridge carriage to the center position. Take out the containers. Fill the syringe with a small amount of cartridge cleaner. Place a drop on the nozzles and wipe dry, pressing slightly. Check the print by placing the nozzles against a tissue.
If the mark does not become clearer, then you need to soak the head in liquid. Pour the head cleaning fluid into any flat container. Place the cartridge, nozzles down, directly into the liquid for an hour.
Afterwards, wipe the nozzles dry with a napkin, place the ink tank back into the carriage and try to print. Additionally, software cleaning is launched. You only need to pour a little liquid into the container. The cartridge contacts should not come into contact with the product.
If the described methods are unsuccessful and there is a fuzzy trace, you can try to blow out the cartridge. Remove the needle from the syringe or shorten it by at least half. Carefully insert into the filling hole. Push the plunger of the syringe in firmly to create pressure inside the container, which will squeeze out the dry, dried ink.
It is important that the air intake hole, if there is one, is closed. Air should only come out from the head.
An extreme option is to soak it overnight, after which, if unsuccessful, purchasing a new cartridge is almost inevitable.
Instructions for heads that are separated from cartridges. All methods are similar to each other.
- Maceration. Fill the syringe with cleaner. Apply several drops onto each fitting. The cleaning time depends on the degree of contamination or drying. Mild cases are resuscitated within a couple of hours, complex cases within a whole day.
You can put tubes on the fittings and fill them with liquid so that you can do the rinsing yourself. - Flushing. Place the head in a plastic lid or short jar. Place tubes of suitable diameter onto the fitting. Remove the needle from the medical instrument and insert the end of the syringe into the tube. Gently begin to push in the plunger. As a result, the liquid should begin to pour into the container through the PG.
You need to rinse until the cleaner comes out in a natural color. - Broach. Proceed similarly to the previous one, only pour the cleaner into the lid, and use an empty syringe to draw it through the head (pull the piston towards you).
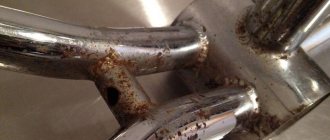
Problems with the paper feed rollers
With prolonged use of any equipment without the necessary regular maintenance and cleaning of all parts, problems may arise. In our case, this may be due to contamination inside the printer or due to dust settling on the paper feed rollers. On cleaning the printer on our website you can find detailed instructions on how to perform all the necessary actions with an explanation of each individual step. Cleaning the rollers is a little easier: using software or manually.
Option 1:
- Use the same utility as for cleaning the nozzles. Detailed description in the first section of this article.
- Perform the “Cleaning rollers” item several times.
- It would be a good idea to clean the tray.
Option 2 (if the first one didn’t help):
- Unplug the device from the outlet.
- Rinse the rollers with warm water and cotton swabs or a napkin.
- You can use dishwashing detergent or liquid powder.
- Wait until completely dry or use a hairdryer.
How to diagnose?
Check the connections of all wires and their integrity
Connect the equipment to your computer. Log in and make sure you have the software and drivers. Inspect the outer casing for various damages and defects. Look inside the printer, review all the parts, their presence and condition. Check the cartridge, paying special attention to the print heads and ink compartment. Perform the test by printing a test sheet, look at the hardware settings in the computer system. After opening the program and running the test, the system itself will indicate the shortcomings
Wait for the results, then eliminate the defects to the best of your ability
After opening the program and running the scan, the system itself will indicate the shortcomings. Wait for the results, then eliminate the defects to the best of your ability.
Indicator signal meanings
The HP DeskJet 2130 MFP LEDs will blink in accordance with emerging situations. Combinations of these can also be used. Below is a breakdown of their meanings:
- The Resume light and two ink level LEDs blink. This error occurs when, for one reason or another, the carriage is stuck.
- The task resume indicator blinks. The paper in the printer has either run out or jammed.
- The power indicator blinks quickly. This may mean that the housing unit with cartridges is open.
- The ink level lights are blinking or on. There could be several reasons for this. Cartridges may be inserted incorrectly, missing, or mismatched with the printer. Also, the ink level may not meet the minimum level.
The photoconductor is worn out
If you are using a laser device, then you should pay attention to the condition of the photodrum. As a result of careless behavior with the cartridge, it could be exposed in some places (there will be missing lines) or simply worn out over time. While wear can be determined visually, light is difficult to see. There is only one option - replace it, but don’t throw away the old one.
Low ink or toner
The reason for missing text on sheets can be quite trivial - the ink in the cartridges simply runs out. To make sure of this, you can turn off the printer and then take out the ink tanks and do a visual inspection. If they are made of transparent plastic, you can easily notice the level of paint. If any of the cartridges is less than half full, then it is worth replenishing its supply.
There is another way to find out the amount of consumables remaining. There is a corresponding menu in the printing equipment software settings, but not for all models. This option is not ideal, since it uses software rather than physical verification.
You can shake the laser printer cartridge several times and try printing again. If it begins to print normally, then it is worth replenishing the toner supply in it now.
Software cleaning
Control PanelHardware and SoundDevices and Printers
- Right-click on the Epson L210 and select “Printer Properties”.
- On the “General” tab, click “Settings...”.
- In the window that opens, go to the “Service” tab and select “Print head cleaning”.
- In the window that appears, click “Start”. (On the printer, you can start cleaning by holding down the “Cancel” button for 3-4 seconds.)
- We are waiting for the cleaning to complete (until the power indicator on the printer stops blinking). We perform a nozzle test.
- If the test is printed perfectly, you don’t have to read any further.
- If the nozzles are clogged, clean it 2 more times and print the test. If the test shows stripes, read on.
The print head is dirty
If the damage is not confirmed, but serious contamination of the print head has been detected, then you can clean it as follows:
- Check the ink level in the printer. If there are few or none at all, then add to the required level.
- Make a test print.
- If unsuccessful, rinse the head with a special liquid (sold in computer hardware stores) and leave for 10-20 minutes.
- In the printer settings, activate the automatic head cleaning mode.
If the problem was really a dirty print head, then after these manipulations the printer will begin to print well.
Check alignment lines and green blocks for defects
Inspect the alignment lines and green blocks on the Print Quality Diagnostic report.
Make sure the lines are straight and connected and that there are no black lines or white gaps on the green block. If the print quality diagnostic report shows no defects, the print engine and ink cartridges are working properly. If print quality remains unsatisfactory, use the following general guidelines to improve print quality. There is no need to complete any further troubleshooting steps in this document. Make sure the image you print is of sufficient resolution. Enlarged images may appear blurry or unclear. If the defect is located near the edge of the printout, change the print settings to rotate the image 180 degrees. The other edge of the printout may not have this problem. Do not leave unprotected ink cartridges outside the printer for long periods of time. Always use the power button to turn off the printer. This helps protect the ink cartridges from exposure to air. If any of the alignment lines do not appear straight and connected, or the green block contains dark lines or white gaps, continue to the next step to align the printer.