The structure and equipment of all Samsung washing machines have common features.
The set of structural elements includes both complex electronic modules and sensors, as well as mechanical parts necessary to maintain the smooth operation of the unit.
Knowing the structure of a household appliance allows you to understand the problems that arise and fix them yourself. We will tell you in this article what the structure of a Samsung automatic washing machine is.
How to disassemble a Samsung machine yourself?
Instructions for disassembling a Samsung washing machine:
Remove the cover.- Remove and distribute for detergents.
- Remove the control module.
- Remove the service panel.
- Remove counterweights.
- Dismantle the heating element.
- Remove the belt.
- Detach the center and rear panels.
- Remove the tank with the drum, disconnecting it from the springs.
- Remove the bottom cover and unscrew the motor with counterweight.
The wires must be disconnected carefully, being careful not to damage them. It is better to record the entire disassembly process on camera so as not to get confused during subsequent installation. Detailed instructions for disassembly are here.
Samsung washing machine device
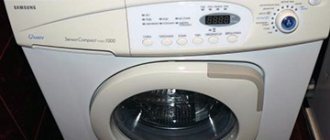
Let's get acquainted with the structure of a washing machine using the example of the well-known Sensor Quick model. Main front elements of the model:
- removable front panel;
- distribution hopper for powder and special products;
- control Panel;
- electric valves;
- level relay;
- laundry tank;
- adjustable stand legs;
- drain pump with filter;
- drain hose;
- drain hose plug.
Rear elements:
- power cable;
- counterweights;
- tank suspension springs;
- shock absorber;
- engine;
- pulley with drive belt.
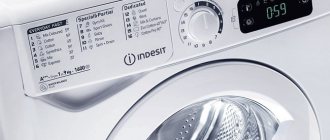
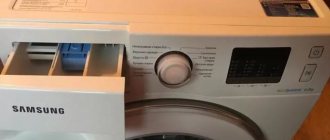
The control panel is a board with buttons and indications that turn on the washing mode, change the temperature, spin speed, washing time, and delay start. It is also possible to manually set all these parameters with the “Manual program setting” button. The display shows the current washing status and error codes.
When does the drain hose need to be replaced?
Replacing the drain hose is required in three cases:
- the hose is too short, connection difficulties arise;
- there is mechanical damage on the hose;
- the hose is so clogged with debris and scale that the blockage cannot be removed.
If the blockage is minor, you can get by by cleaning the hose. Read about replacing the drain hose here.
Preparation
Disassembling a washing machine is not difficult if the owner of the device has minimal skills in electrical engineering and plumbing. In Samsung brand models, such as, for example, S821, WF-S861, S803J, WF6458N7W, it is easy to access the main mechanisms.
To disassemble and subsequently repair the washing machine, you need to choose a bright and spacious place where nothing will interfere with the work.
Whatever machine you are going to repair, first it is important to prepare a workplace and tools that will be useful during the disassembly process. Of course, you can get started with a few screwdrivers and wrenches. But if the machine requires a detailed inspection and subsequent repairs, it is better to prepare everything you need at once. So, you may need:
- hammer;
- wire cutters;
- screwdrivers (slotted and figured);
- open-end wrenches;
- heads (socket wrenches);
- pliers;
- hacksaw;
- pliers;
- mites;
- soldering iron
It is important to prepare auxiliary materials in advance - liquid for softening nut fasteners WD-40, silicone sealant and lubricant for hinge elements. It is convenient to have a clean rag on hand to wipe your hands or any remaining liquid from the machine. Experienced craftsmen advise beginners to photograph each stage of disassembling the unit to make it easier to reassemble the device after completion of the repair, therefore, you need to prepare a camera.
It is convenient to disassemble the unit when all the tools are at hand
The preparation stage may not seem so important, but the result largely depends on the quality of its implementation.
What to choose: fix it yourself or call a repairman to your home?
If a breakdown occurs, the owner of a Samsung washing machine is faced with the question of whether to repair it himself or call a technician. To make the right decision, you need to carefully analyze the situation.
If the device is under warranty
If the device is under warranty, you should not attempt to repair it yourself . There is also no need to pay for the services of private masters.
Damage that occurs through no fault of the buyer is subject to warranty service. It is free, at the expense of the manufacturer.
If the device breaks down due to external factors, for example, it was dropped or connected incorrectly, you will have to pay for repairs yourself.
Repair it yourself
You can handle minor breakdowns on your own, for example:
- Replacing the pressure switch.
- Clearing the blockage.
- Rebooting the machine due to a controller malfunction.
- Replacing a pump, door hinge or hatch, etc.
If you have experience and capabilities, you can try to carry out more complex repair work, including:
- replacing the heating element,
- hatch cuffs,
- motor,
- shock absorbers.
The cost of repairs on your own is affected only by the price of the part and amounts to 2-3 thousand rubles.
If during the repair process you realize that something is not going according to plan, it is better to call a specialist.
At the service center
to entrust your washing machine to professionals in the following cases:
- controller is faulty;
- bearing replacement is necessary;
- dismantling of the tank or cross is required;
- The tank support broke.
Repairs that require complete disassembly of the washing machine are complex and time-consuming. Only experienced craftsmen can cope with it. If you try to intervene on your own, you can completely damage the washing machine.
The cost of repair by specialists will be from 2 to 7 thousand rubles for each breakdown, depending on the cause.
You will find all the most important and useful information about Samsung washing machines in this section of the site.
Fault codes and main breakdowns
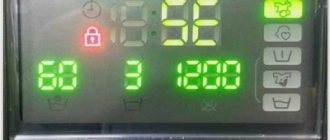
The self-diagnosis system is designed to make repairing the washing machine easier. Therefore, if there is a malfunction in the operation of the equipment, an error code is displayed on the control panel (1E, 3E, 3E1, 3E2, 3E3, 3E4, 4E, 4E1, 4E2, 5E, 8E, 9E1, 9E2, Uc, AE, bE1, bE2, bE3, CE , dE, (door), dE1, dE2, FE, HE, HE1 (H1), HE2, HE3, LE (LE1), OE (OF), tE1, tE2, tE3, EE, UE, Sud/SUdS). If your model does not have a display, then the machine will indicate a breakdown by flashing indicators.
The most common codes:
- 5E (SE), E2, 5C - problems with draining water from the tank.
- H1, H2, NOT, HE1, HE2, E5, E6, NS, NS1, NS2 - the heating system is not working correctly.
- DE, ED, DOOR, DE1, DE2, DC, DC1, DC2 - problems with opening/closing the hatch door.
- 4E (CHE), E1, 4C - water intake error.
- LE, LE1, E9, LC, LC1 - a leak has been detected, the water drains by itself.
- tE, Ec, tE1, tE2, tE3, tC, tC1, tC2, tC3, tC4 - temperature sensor problems.
- 1E (IE), E7, 1C (IC) - pressure sensor (pressostat) error.
Based on the listed codes, as well as statistics from service centers, most often the following components and parts break in Samsung washing machines:
- drain pump;
- heating element (heating element);
- solenoid valve;
- drive belt.
Filler and drain systems also become clogged. It is worth noting that electronics in equipment of this brand break down half as often.
To repair a Samsung washing machine, you need to understand how it works. The design is not particularly different from other washing machines. This is what it looks like in the picture:
Having examined the device, you can carry out repairs yourself, without calling a technician.
List of required tools
You can’t take a “Korean” with your bare hands - you need to prepare something:
- a set of screwdrivers or a screwdriver with a replaceable tip;
- a set of socket and open-end wrenches;
- adjustable pliers (the grip width can be adjusted);
- pliers;
- side cutters;
- two tweezers: one with increased length, the second with curved tips;
- soldering iron with a power of 30 - 40 W;
- knife;
- mirror with long handle;
- flashlight or small electric lamp;
- low power gas burner;
- crimping pliers for fixing wires in lugs and contact connectors;
- a flexible metal ruler with a length of 70 cm or more (using this tool, it is possible to rotate the drum into its normal position, the flaps of which were left open by mistake by the user when starting the machine);
- a magnet on a nylon thread or nylon cord (helps to remove small metal objects that have gotten inside the unit);
- hammer weighing from 300 to 400 g;
- pliers for dismantling spring clamps that secure flexible hoses to fittings.
You will also need the following measuring instruments:
- multimeter;
- voltage indicator in the form of a screwdriver;
- current clamps or ammeter for alternating current at 20 A (used to estimate the power consumed by the heating element during heating).
In addition to the indicated devices and tools, you may also need some materials:
- Super glue;
- silicone sealant;
- sealing/insulating compound;
- wire lugs;
- rosin for soldering or flux LTI-120;
- heat-shrinkable tubes of different diameters;
- stranded wire;
- metal and plastic clamps;
- fuses for current 4 - 5 A;
- insulating tape.
Prepare a liquid for treating rusted connections, for example, “Liquid Key”.
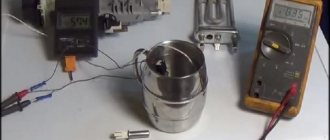
Often during repairs it is necessary to understand whether power is supplied to the heating element. To do this, just turn on the machine to warm up and look at the electric meter: the rotation speed of the disk or the blinking frequency of the LEDs (for electronic meters) should increase.
Disassembly
When the repair site, equipment and washing machine are prepared, you can begin to work.
The first step is to remove the top panel of the machine. On the back side of the unit, in the upper corners, there are two self-tapping screws on which the panel is attached. Unscrew them with a screwdriver (or screwdriver), lift the back of the cover, move it towards you and remove the panel.
Disassembling front-loading washing machines begins with removing the top panel
Then you need to remove the detergent tray . To do this, press the locking clip and pull out the container in the same way as you do for cleaning. Behind the powder tray there are fasteners that hold the control panel; By removing the tray, you can easily unscrew the bolts and disconnect the latches that secure it (usually one fastener is located under the tray and two more on the back of the panel). Carefully disconnect the control panel so as not to damage the wires leading from it into the mechanism. To prevent the part from interfering with further work, it is hung from the right side of the unit using a special hook or simply carefully placed on the top of the machine.
You can easily replace the pressure switch (water level sensor) yourself by removing the top panel of the washing machine
When disassembling the washing machine, carefully inspect all parts for damage. For example, quite often the water level sensor fails. It is easy to access the part if you remove the top cover of the unit: the sensor is located, as a rule, on the side wall of the machine, closer to the top, and is secured with 1-2 bolts. Unscrew the fasteners, disconnect the hose and contacts from the pressure switch (the hose is held in place with a clamp that needs to be unscrewed or pulled apart with pliers) and inspect them. If necessary, clean the contacts and remove blockages in the tube, and check the sensor itself with a multimeter.
Next you should remove the hatch cuff . Gently pry the rubber collar clamp (retaining ring) with a flathead screwdriver, pull lightly on it, and then move the screwdriver around the entire circle to release the ring. Remove the rubber cuff and place it in the drum. Proceed as carefully as possible so as not to damage the integrity of the rubber. Close the drum door tightly.
When removing the cuff, check its condition and clean it if necessary: mold often forms on it
Next, proceed to dismantling the bottom panel . In Samsung washing machines it is fixed with latches that need to be disconnected from the body. On newer models, the panel is secured with screws; They are easy to find and unscrew.
It's time to dismantle the front wall. How to remove the front panel of a Samsung washing machine? This is quite simple to do: you need to unscrew the screws that secure the front panel to the body of the car (they are located in the upper and lower corners, under the dashboard and above the lower panels). Next, you need to remove the front wall along with the loading hatch from the hooks/latches. First disconnect the wires of the locking lock.
Removing the back panel is even easier: unscrew the four screws and remove the part. Immediately disconnect all hoses that are attached to the machine tank: filler, drain, as well as from the pressure switch and powder tray.
Now you should disconnect the wires of the heating element and temperature sensor or, if necessary, completely remove the tubular heater (for replacement). It is usually located in the lower front part of the tank under the drum. Unscrew the nuts and remove the heating element from the socket. At this point you should also disconnect the motor wires and wiring. Be sure to take a photo of the pin locations so you can connect them correctly when reassembling. The terminals can be marked with colored markers.
During the disassembly process, do not be lazy to check the condition of the heating element and clean it of scale.
To get to the tank, you will have to remove the counterweights (balance stones); they are located at the top and bottom of the washing machine. Unscrew the mounting bolts and carefully remove the weights (they are quite heavy). When performing this work, an electric impact wrench will be useful, which will significantly speed up the process of removing fasteners.
Check the condition of the counterweights and its mounting bolts. Loose fastenings and destruction of stone are the causes of rattling, knocking and bouncing of the machine during the washing process
In order to remove the washing machine tub , you will need two pairs of hands. After removing the counterweights, disconnect the shock absorbers, and then, together with an assistant, carefully remove the tank from the springs and remove it from the unit. Then disconnect the motor from the tank, to do this, first remove the drive belt, then unscrew the motor fasteners. Finally, remove the pulley by removing the bolt in the middle.
The photo shows a disassembled washing machine tank
To replace the bearings on the drum, you need to disassemble the tank . The task will become more complicated if it turns out that your washing machine has a non-separable (soldered) tank. In this case, you will need to either completely change the part (which is not cheap) or saw it (the procedure can take several hours, and it is also quite painstaking work).
Do not cut the tank unless you are confident in your abilities. A car service mechanic can provide this service for a small fee.
Replacing the bearing assembly in washing machines with a collapsible tub (for example, in the Samsung Diamond 6 kg model) is much easier. The two halves of the tank are held together by coupling bolts and latches that need to be separated. To dismantle the bearing assembly, you can use a special automotive puller or carefully knock down the metal rings with a hammer and chisel. Then you should thoroughly clean the seat and install new bearings and oil seal.
Not all washing machine breakdowns can be fixed on your own. For global repairs, you will need the help of a professional and a special tool.
After replacing and repairing all elements of the device, reassemble the machine in the reverse order of dismantling. Notes, photographs and notes made with a colored marker will be useful to you.
Now you know how to disassemble a Samsung washing machine. Follow our recommendations, do not forget about the instructions, check the diagrams and record your actions. We hope that our article will be useful to you. Happy renovation!
Spin
In spin mode, the rotation of the drum reaches maximum speed, and water is removed from the fabric through holes in the sides under the influence of centrifugal force. If the laundry is incorrectly distributed around the perimeter of the drum during spinning at high speeds, significant vibration of the drum occurs, sometimes leading to the machine moving along the floor surface.
The operation of the washing machine may be accompanied by noise and vibration. To soften them, a counterweight system consisting of concrete blocks is placed at the top and bottom of the tank. At the end of the full washing cycle, the loading hatch lock is automatically unlocked.
Control module problems
If the equipment turns off when washing starts, the cause of the defect may be the control unit located in the upper part of the housing. The controller contains electronic components that can move away from the contact paths or fail due to vibration or moisture. Service center employees note poor soldering of electronics and poor quality of printed circuit boards, from which the metal substrate peels off.
The unit is checked under the service conditions. The user cannot find microcracks in the elements or determine an incorrectly functioning diode or transistor. To remove damaged parts and install new parts, special soldering equipment is required. A controller with fatal damage must be replaced.
Recommendations from professionals
- Before disassembling, check again whether the water supply is stopped and whether the device is turned off from the network.
- There are many plastic parts in the machine that are easy to damage. Make sure that they do not break during disassembly.
- Take photographs of each dismantling step so you don’t forget the sequence later during assembly.
- Another way to help yourself during assembly: use felt-tip pens to mark the parts that you remove at a particular stage. You can write the number on the part itself, you can put it on a sheet (or sheets) of paper and sign the stage number next to it.
READ MORE: Monolithic console for washing machine 2.0 | Peekaboo
Final Thoughts
Disassembling Samsung washing machines is a labor-intensive process that requires a responsible approach. The principle of disassembly is practically no different from different manufacturers, since the units themselves are designed approximately the same. Some differences in the procedure are typical only for Samsung washing machines with a vertical loading type. The main thing is to accurately remember the location of each of the parts while installation is underway. Then it will be easier to reassemble in the reverse order, following the manufacturer’s requirements
It is important to assess your own strengths in advance so that disassembly later does not turn out to be overwhelming.
special instructions
For efficient and trouble-free washing, the following recommendations must be carefully followed:
- Before starting work, it is necessary to sort the laundry by color, degree of color fastness, fabric structure, and the presence of decorative elements.
- When stowing things, it is necessary to check them for the presence of foreign objects in the pockets. Even a small metal object during machine operation can cause irreparable harm.
- It is recommended to stack dirty laundry taking into account the permissible load of the drum.
- Clothes are placed with all buttons and zippers fastened. To better preserve the accessories of products and the drum of the washing machine, you can use a special bag.
- Before storing items, it is recommended to study the labels and marks on the tags in order to make sure that the manufacturer allows machine washing, or to find out the special conditions specified by him.
Do you wash your shoes in the machine? Oh yes! No - Be sure to use a special powder that does not form a lot of foam.
- Detergents are placed in accordance with the purpose of the tray compartments. There is a left compartment for pre-wash, a middle compartment for the main wash, and a compartment on the far right for rinsing.
- For optimal balance, large and small items of clothing are best placed together.
- Before pressing the “Start” button, you must make sure that the unit is connected to the power supply.
- When washing in cold water, half the amount of powder is required.
- To avoid damage, program selection can only be made when the unit is stopped.
Expert opinion
I work in the household appliance repair industry. Extensive experience in restoring washing machines and dishwashers.
Ask a Question
Be sure to unplug the plug from the socket! The fact is that the design of the Indesit SMA is designed in such a way that when the machine is turned on, part of the control module is energized. And during surges in the electrical network, it can be damaged!
Indesit equipment does its job flawlessly if used correctly. The management of the washing machine should be treated with the utmost responsibility. A thorough study of the capabilities of the unit and its functions will not only allow you to achieve high quality work, but will also keep the device in good condition for a long time.