The Korean company LG has become a pioneer in the creation of direct drive washing units. The innovative connection between the engine and the drum has improved the functionality of the equipment and reduced the number of breakdowns. But, like any other unit, an LG direct drive washing machine can break down over time.
LG was the first to introduce direct drive units to the market
In this article we will talk about washing units with a new type of engine and their malfunctions, and also present to your attention reviews of LG washing machines with direct drive.
How to repair a board yourself
To determine the breakdown, inspect the board for traces of damage and burnout of elements.
When to change the entire module
A complete replacement of the control board is required if it cannot be repaired. Controllers for popular models are sold in hardware stores. You can purchase and replace it yourself. In all other cases, it is better to contact persons competent in this matter.
The most common types of controllers: Arcadia / Arcadia, AKO, Computime / Computertime, Invensys / Invensis, Samsung MFS.
Where is the controller located
The control unit is located behind the front panel of the washing machine. You can see it when you remove the top cover. The location may vary depending on the type of laundry load, but in general it should not be difficult to find.
Dismantling
To remove the processor from the machine body, you need to perform several steps:
- be sure to unplug the power cord from the outlet;
- turn off the water supply;
- remove the top cover;
- remove the powder compartment;
- disconnect the chips with wires;
- unscrew the fastenings of the board to the case;
- get the part.
To facilitate the subsequent installation process, we recommend taking photographs and notes on the parts.
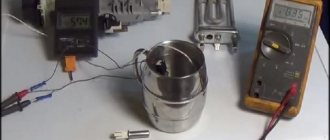
Functionality check
It is impossible to check the board's functionality when removed, without special instruments. You can only visually assess the presence of burnouts, oxides, and mechanical damage. Any part can fail. Most often these are diodes, resistors, thyristors, relays and other small components.
An example of checking a board with a multimeter:
We fix soldering ourselves
Due to the enormous vibration load on the machine during operation, the soldering of electronic elements may fail. To eliminate defects you will need a soldering iron, solder, flux and the ability to solder.
Capacitors
The capacitor performs voltage stabilization. You can determine the breakdown by swelling of the element or with a multimeter. If the device displays:
- "0" - short circuit
- "1" - break
When replacing, be sure to note that the capacitor has polarity.
Resistors
Checking resistors is divided into two stages according to the order of the elements:
- 8 Ohm, up to 2 A - first order resistors,
- 10 Ohm, up to 5 A - second order resistors.
If the specified parameters do not comply, mandatory replacement of the elements is necessary.
Thyristor block
The unit fails due to frequent changes in the network or impulse noise. Carry out the test only after you are sure that the capacitors are working properly. For the operation, you will need to install a negative resistance. The voltage of first order diodes should not exceed 20 volts. The burnout of the output contacts is checked with a multimeter in continuity mode. The voltage on the filter should be within 12 volts. Observe the polarity of all elements and handle the thyristor ports with care, otherwise repairs will result in large financial expenses.
Checking trigger status
Often its failure is also due to problems with capacitors. The trigger itself breaks quite rarely. Poor or vibration-damaged soldering leads to problems with the assembly. To eliminate them, solder the output contacts. The output voltage should not deviate too much from 12 volts. If the module has been replaced, before commissioning, measure the threshold voltage and output resistance, which should fluctuate within 12 volts 20 ohms, respectively.
How to re-flash the controller of an automatic machine
If the control board is intact, but problems remain, you can try to reflash the machine program. To do this, the module must have connectors for connecting equipment (if they do not exist, new firmware will be installed only in a service center, but directly into the processor).
You will also need a program or driver for flashing. They can be downloaded from the official websites of manufacturers or special resources - for example, bineep.ru and eeprus.ru.
To flash via USBDM:
- Connect the programmer to the appropriate connector and then to the computer.
- Install the driver that comes with the programmer on your computer.
- Open Windows Device Manager. Find the ESBDM item.
- Select the Target tab. Click Detect Chip to have the system detect the board model. If the model is not recognized, check the controller, semiconductors, triacs and other elements again with a multimeter - perhaps it is damaged after all.
- If everything is fine, click Load Hex Files... and select the program for the machine.
- Click Program Flash and wait for the process to complete.
https://www.youtube.com/watch?v=qaIXqShtdZQ
Electrics
Carrying out electrical repairs yourself without sufficient knowledge is difficult. The main actions in this case come down to checking all the wires and terminals present in the assembly, going from the control module to all elements, parts and assemblies.
The test is carried out using a multimeter - this way you can find out basic information about the condition of a particular device. It is also necessary to carry out visual inspection. It will help you find torn clamps, fragments of wires that are without insulation, the presence of burning and melted contacts. All wiring problems can be resolved by replacing failed conductors or terminals.
Features of LG washing machines
The quality of LG washing machines is determined by the technologies used:
- The direct connected inverter motor has a warranty period of 10 years. The principle of innovation is to attach the drum directly to the motor, so the design is reliable and provides a low noise effect.
- The “six caring movements” principle is based on an inverter motor and the absence of a drive belt. This allows you to maintain the rotation of the drum in different variations, based on the mode, fabric and level of dirt.
- On-line diagnostic methods help save money when a device fails. To determine the type of malfunction, just call technical support or use a special application installed on your mobile phone.
- The TurboWash feature reduces the standard work cycle from 95 minutes to 59.
- The True Steam option involves applying hot steam to things. In this case, steam mixes with water, softening clothes and ensuring 100% dissolution of the powder. Additionally, bacteria and allergens are neutralized and odors are eliminated, facilitating easy ironing without the use of chemicals. A simple version of this function is three modes - hypoallergenic, cotton + steam, children's clothing.
It is noteworthy that almost all automatic devices have points 1-3, and the rest depend on the specific model.
Device diagram
The design diagrams of LG washing machines may differ slightly, depending on the specific model. However, their main nodes are located the same way.
Each device is equipped with the following parts:
- lid;
- Front Panel;
- back wall;
- control Panel;
- tank and drum;
- control board;
- inlet valve;
- drain pump;
- shock absorber;
- pressure switch;
- powder receptacle;
- heating element;
- belt and motor - machines with an inverter motor do not have a belt;
- sensors, counterweights, shock absorbers.
In addition to the main circuit of the washing machine, during the repair process you may need a control board circuit. It is needed when the part does not work properly and needs soldering. There is no universal scheme; they differ for each model of household appliance.
Possible difficulties and ways to overcome them
When trying to disassemble an LG washing machine on their own, a person without experience may encounter some difficulties.
Tips to help overcome them:
- If you have little experience working with household appliances, then it will be difficult to put the washing machine back together. In order to correctly connect all the wires and screw the parts, the entire disassembly process must be captured on a smartphone camera.
- Sometimes when you remove the top cover it gets jammed. However, you should not pry it with sharp objects. The cover can be removed by short swings without applying excessive force.
- If any metal parts are stuck or rusty, they can be treated with a lubricant such as WD-40.
Sometimes during the process of assembling a washing machine, people are faced with the fact that they cannot find suitable bolts, since there are many of them. To avoid such a problem, they can be placed in bags, making appropriate notes.
Preparing for work
To disassemble an LG washing machine, regardless of the loading method, you will need the following tools:
- screwdrivers of different shapes;
- hammer;
- pliers;
- open-end and socket wrenches;
- any lubricant;
- screwdriver
After the tools have been collected, they begin to prepare household appliances. To do this, perform the following steps:
- Disconnect the device from the power supply.
- Remove the drain hose from the sewer and turn it over so as to remove any remaining water.
- Move the machine away from the wall and interior items.
Basic criteria for choosing a washing machine
If the future owner is faced with a dilemma - an LG washing machine, which model to choose, then first you need to identify the main parameters of the equipment:
- The type of loading in LG representatives is divided into two options - frontal and vertical.
- The drum volume in some models reaches 12 kg, the standard one is 5 kg.
- Models come in three types - classic, narrow and super narrow, equipped with direct drive.
- Energy saving class from A+ to G.
- The devices are mainly represented by an electronic type of control, but there are models with mechanical program switching.
- The tank is made of plastic or stainless steel.
Conclusions and useful video on the topic
The following video will tell you about the essence of LG 6 motions:
Stylish-looking washing machines from the LG brand are easy to use and well-equipped technically. The brand has conquered and confidently maintains its niche in the market. Is it worth attention? Each buyer will be able to choose a model whose functionality can satisfy his needs.
Are you looking for a high-quality and reliable washing machine? Or do you have experience using equipment from LG? Tell our readers about the efficiency of operation and maintenance of such units. Share your personal experiences, participate in discussions and ask questions - the comment form is located below.
Basic malfunctions of Lg washing machines
If there is no intelligent control, you will have to analyze the state of the machine yourself. Eg:
If the machine does not turn on, check whether the plug is inserted into the outlet and whether there is voltage in the electrical network.
If the machine does not draw water, check whether the inlet tap is open and whether there is water in the pipeline.
If the washing machine takes a long time to wash and the wash cycle has increased, check whether there was a power outage, etc. during the wash.
In addition, you can interrupt the cycle yourself and drain the water, clean the filter, and check the contents of the drum for foreign objects. Some problems can be solved on your own, but not all. If you need more in-depth diagnostics, or even more so, disassembling the front panel or case, you should contact a professional.
1.Test mode of models WD-6021, WD-8021, WD-1021, WD-6022, WD-8022 and WD-1022:
— After pressing the “Spin” (spin) and “Temp” (temperature) buttons simultaneously, press the power button. The signal should sound twice, you are in service mode.
— Press the “Start/Pause” button to move to the next stages of the test.
— To exit the test, press “Start” more than four times!
Start button | Checking devices | Display indications |
| No | All indicators are on | Board code displayed |
| 1 once | Rotate the drum counterclockwise | Revolutions per minute |
| 2 times | Low rotation speed | Revolutions per minute |
| 3 times | High rotation speed | Revolutions per minute |
| 4 times | Pre-valve operation | Pressostat frequency |
| 5 once | Main valve operation | Pressostat frequency |
| 6 once | Water intake | Level relay frequency |
| 7 once | Air Conditioning Valve Operation | Level relay frequency |
| 8 once | Rotate the drum clockwise | Engine speed |
| 9 once | The heating element operates for 3 seconds. | Water temperature |
| 10 once | Pump operation | Level sensor frequency |
| 11 once | Auto power off operation | All indications are turned off |
2.Diagnostics of models WD-1021, WD-1041, WD-8030, WD-1223 WD-1220 WD-1020 and WD-1050:
To enter, press the “POWER” button, and then simultaneously the “SPIN” and “RINSE” buttons and press the “START/PAUSE” button.
The device verification test is similar to previous models.
Press the “Start/Pause” button to move on to the next steps.
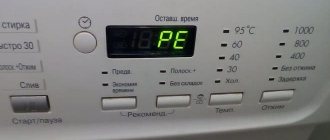
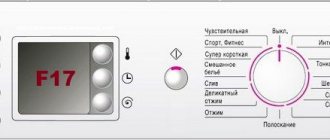
Error code | Description of the error | Causes |
| I.E. | Water does not enter the tank The water has not reached the first level in allotted time (4 minutes). | 1. There is no water in the water supply. 2. Low water pressure. 3. The water inlet valve is faulty. 4. The water level switch (pressure switch) is faulty. |
| P.E. | Error in water level sensor (pressostat) An error code is displayed if within for a certain time, the tank was not filled with water to the nominal level (after 25 minutes) or filling with water occurred faster than the allotted time (4 minutes). | 1. The water level sensor is faulty. 2. Unacceptably low or excessively high water pressure in the water supply. |
| F.E. | Tank overflow An error code is displayed if the maximum water level in the tank has been reached. | 1. The causes of the error may be caused by defects in the electronic controller, level sensor or water inlet valve. |
| dE | The hatch door is closed | 1. In most cases, to reset the error, you need to close the hatch again. 2. If this does not help, check the serviceability of the hatch locking device, as well as the electronic controller itself. |
| O.E. | No water draining An error occurs if, 5 minutes after the drain pump started operating, the water has not been drained from the tank. | 1. The water drain path (drain system) is clogged. 2. The electronic controller is faulty. 3. The drain pump is faulty. 4. The water level sensor has failed. |
| UE | Drum imbalance | 1. In most cases, to reset the error, you must manually distribute the laundry in the drum (remove lumps) or add laundry if there is not enough of it. 2. Otherwise, check the functionality of the electronic controller or identify defects in the drum drive (bearings, etc.). |
| tE | Unacceptable water temperature | 1. The error occurs if the temperature sensor in the SM is faulty (break or short circuit). |
| L.E. | Lock error | 1. In most cases, such an error is caused by low voltage in the supply network. 2. It is also necessary to check the serviceability of the electronic controller and drive motor. |
| PF | Lockout error Low voltage | 1. In most cases, such an error is caused by low voltage in the supply network. 2. It is also necessary to check the serviceability of the electronic controller and drive motor. 3. PF means that there was a power failure while the program was running. When mains voltage appears after pressing the power button (on some models without pressing), this message appears - PF. When you press the START/STOP button, the previously set program continues from the point before the mains power failure. It is necessary to check the serviceability of the electronic controller. |
| C.E. | Electric motor overload A similar error most often occurs when the SM is overloaded with laundry. | 1. If, after removing excess laundry from the drum, the error occurs again, check the serviceability of the electronic controller and drive motor. 2. In a direct drive SM (with index DD), the defect also manifests itself in “twitching” of the drum. |
| E3 | Load detection error | no information |
| A.E. | Auto shutdown error | no information |
| E1 | Water leakage into SM pan | 1. Water leaked into the SM pan due to depressurization of the tank, hoses or other elements of the SM. 2. The water leakage sensor is faulty. |
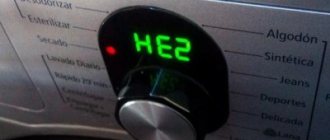
| HE | The water heating element is faulty | 1. Check the heating element and its power supply circuits. |
| S.E. | Drive motor Hall sensor error | 1. Check the Hall sensor (installed in direct drive vehicles with the DD index), as well as its wire connections. |
To check the spin cycle, look at the block diagram:
Simultaneously press the “WASH” and “RINSE” buttons
Electrics: tips and tricks
Wiring is an important element in any device. It is very difficult to carry out diagnostic measures on your own, but if you suspect a problem, it is important to take all necessary actions to eliminate the breakdown. It is the wiring that is responsible for the performance of 90% of the elements in the unit. Contact failures lead to a variety of consequences, including the possibility of fire.
The most important tip to remember is that if there is any doubt about which element has failed, the electrical is checked first. You should follow the rules of safe work:
- Before performing any diagnostic or repair actions, it is necessary to de-energize the device - remove the electrical plug from the outlet.
- Then you need to open the top and bottom covers.
- If there are problems with draining water, you will also need to remove the plastic panel.
- A visual inspection and control of electrical elements is carried out - the terminals in working condition should be clean and shiny.
- The wires must have insulation without damage. Its color is bright and uniform.
- Do not allow water to be present on wires and contacts.
Wiring problems include the following:
- Presence of oxidized contacts (plaque color white, green).
- White or dark insulation.
- Insulation that has lost its integrity (presence of cracks, burnt areas, collapsed areas).
- Wet contacts.
If even a small amount of water comes into contact with the contacts, they must be wiped or dried immediately. The next step is to fix the leaks. Oxidized terminals must be thoroughly cleaned. Additionally, you will need to look for a possible leak location to prevent oxidation from happening again.
If darkening occurs on the wires, then this is a sign of overheating (the brighter they are, the stronger the heating). The main cause of the problem lies in poor contact. In order to avoid breakage, it is required that the insulation be intact, as well as the clamps that secure all the wires.
Oxidized contacts also need to be thoroughly cleaned. It is recommended to find the opposite end of the problem wire and replace it entirely. The work should be carried out using a soldering iron with a power of 60 watts. A temporary measure is allowed - cleaning the contact and then inspecting it after 1-2 weeks.
If the wire insulation is damaged, replacement becomes inevitable. The problem is identified by the appearance of darkening. It can be caused by overheating of the wire or poor contact. Immediate repair work is required because melting insulation can cause a short circuit and possible fire. If you have any problems or doubts about the causes of the breakdown, the source of the malfunction, or the quality of the work you did yourself, it is recommended not to use the machine, but to contact a specialist for qualified help or competent advice.
Manual, forced opening of the washing machine door
In any case, if the door of a Bosch washing machine does not open, in order to detect a malfunction, test it and subsequently repair or replace the defective part, you must first open the door in order to gain free access to the mechanisms of the unit.
This is not at all difficult to do after carefully studying the provisions of the manufacturer’s instructions regarding the repair of this model of washing machine. If instructions are missing, you should use the following rules, common to all modifications of such household appliances:
- Turn off the power supply to the device.
- Open the drain filter door. It is located at the bottom of the machine on its front part.
- In the picture that opens to you, find the cable (orange) intended for emergency opening of the drum receiving hatch. After locating the cable, gently pull it, thereby unlocking the door.
- First of all, handle any household appliances with care. When closing and opening the hatch of the washing machine, do not apply more force than is required. And don't do this unless absolutely necessary.
- Secondly. Do not load the maximum amount of laundry into the tank. Especially if it prevents the door from closing.
- Third. Respond promptly even to apparent operational problems. A minor malfunction that is not corrected in a timely manner can lead to larger and more serious breakdowns, up to and including complete failure of the entire washing machine.
If you are not confident in your ability to repair the device yourself, use the services of a specialist, which will definitely save you nerves, money and time.
The indicator signaled to you that the laundry has already been washed, but the washing machine door does not open? And he doesn’t heed the requests “Sim-sim, open up”? Don’t despair, and most importantly, don’t try to use excessive physical force on the machine! Better use our tips!
First of all, check to see if there is any water left in the washing machine after finishing work? If there is standing water in the tank, the hatch will not unlock to avoid a flood. This is true? Then your problem most likely lies in the fact that the machine does not drain the water: we discussed this issue in detail in the article “Wet business”.
- If there is no water in the drum, the wash has completed a full cycle, but the door has not unlocked, wait a while
: in modern machines, the unlocking command can be sent to the control panel within 3-5 minutes after finishing work. Therefore, first of all, just wait a little, and then try to open the door again. - If it still remains locked, it is recommended to unplug the washing machine from the power supply for 20-30 minutes
(be sure to unplug it!), then turn it on and try to open the door again. This measure is due to the fact that sometimes failures occur in the control board, and the signal to unlock the hatch does not reach the UBL (Hatch Locking Device). - If suddenly it is not possible to wait, there is an alternative option in case of such failures - start the washing program again
. The machine will check whether the door is closed: first it will unlock it, then it will lock it again and then begin the washing cycle. Without waiting for the moment when the door is locked again, interrupt the program (it is easy to understand that the machine has unlocked the door - you will hear a characteristic click).
Our advice did not help and your attempts to “free” the laundry remained unsuccessful? Then, most likely, the machine is faulty.
Description
Household washing appliances with direct drive are deservedly popular among users. The direct drive principle itself is not new, but it was not used in washing units until LG developed its Direct Drive system. The use of a motor combined with a drum (instead of a motor without direct drive, in which torque is transmitted using a belt and pulley) provided the technology with the following advantages:
- reduction of noise and vibration during operation;
- improved washing quality;
- economical power consumption;
- reduction of engine-related breakdowns;
- spin at high speeds.
In this photo you can see the difference between a belt drive and a direct drive motor.
These indicators have become decisive for many consumers when choosing a home assistant. Who will remain indifferent to the high efficiency and reliability of household appliances declared by the manufacturer? But is everything so perfect in advertised washing machines?
It should be noted that other than replacing the motor, there have been no major changes in the design of LG units. In turn, the introduction of an innovative durable motor into a standard model of a washing machine led to an increase in the number of malfunctions of some other parts. We'll talk about them further.
Emergency opening
After the water leaves the tank, the automatic door lock is released. However, in the case of manual draining, it happens that the water has not completely drained and the water control sensor does not allow the lock to be opened.
It also happens that due to a failure in the software settings, the lock gets stuck and the door cannot be opened even if there is no longer any water in the drum. Sometimes the cause is a mechanical failure of the latch.
Manufacturers have provided such options, so you can deal with a stubborn lock yourself, without the help of service workers. You can read about them and the necessary algorithm of actions in the instructions for the device.
But before using these methods, the machine must be unplugged. If it was not possible to drain the water first, you need to make sure that a huge puddle does not form on the floor after the emergency measures taken.
Emergency opening rope
Many washing machines come with a cable that can be used to open a locked door. You can find it at the bottom of the device, next to the filter.
Usually this cable is made in a contrasting color, red or orange, so it is impossible not to notice it. To outwit the lock, you need to pull it smoothly, without jerking.
Opening with a cord
If there is no cable in the car, but you have a thin synthetic cord or strong fishing line at hand, you can try to open the car with their help. This method is a folk one, so the possibility of its use depends on the design of the lock.
This method of breaking the lock will only work if the lock tongue snaps towards the body of the machine. If the tongue is directed in the other direction - away from the body or up - it will not be possible to open the door using the cord.
It’s unlikely that you’ll be able to understand exactly how the lock works when the door is closed, but if you don’t have time to wait for the locksmith and other methods don’t help, you can try this one. You will need to put the cord around the edges of the hatch around the entire perimeter and pull its ends up, as a result of which the cord will compress the latch and allow you to open the door.
https://youtube.com/watch?v=a9xm8uHm1Xc
Opening with a spatula
If you don’t have a cord at hand, but have a thin flexible spatula, you can use it. The principle of operation is the same as when opening the door with a cord. The end of the spatula must be inserted into the gap between the hatch and the car body and, pressing it, try to open the door.
Removing the panel
This method is practically fail-safe, but requires certain technical skills, tools and physical strength. In addition, to use it, you must drain the water from the unit by any available method. After there is no liquid left in the drum, the machine is disconnected from the network and the top cover is unscrewed.
In rare cases, the bolts can be removed using a standard screwdriver, but most often manufacturers secure the parts with special bolts, and to unscrew them you need to use TORX keys. The difficulty lies in the fact that even the presence of a key of the required model does not guarantee the ability to remove the bolts - their size may not fit the key model. Most often, manufacturers use the T15, T20 and T25 options.
Did the keys fit? Great. You need to carefully remove the top cover and then tilt the machine back slightly. This will allow the drum to move away from the hatch and make it easier to access the lock. After that, sticking your hand inside and pressing the latch is no longer difficult. When the door is open, the lid is returned to its place. But if you have doubts that you will be able to perform the described steps yourself, it is better to wait for the wizard.
Most methods of emergency interruption of washing and subsequent opening of the door are not only quite troublesome, but also unsafe for equipment. After pressing the “Start” button, the program installed in the machine begins to work and its sudden interruption is undesirable.
Of course, any manufacturer provides a certain safety margin in case of emergency situations, so a one-time intervention will most likely not cause harm to the equipment. But if you do this regularly, the electronic boards may fail, which will lead to a serious failure of the settings or a complete failure of the machine.
Therefore, it is worth asking yourself the question of how critical the situation is and whether emergency intervention is really required, since it can result in equipment failure and subsequent expensive repairs.
Common types of breakdowns
The components of a washing machine are electromechanical devices that move under the influence of current. They work under load and are exposed to tap water and temperature changes.
Here is a list of what can break:
- electric door lock;
- fill valve;
- pressure switch;
- heating element;
- temperature sensor;
- electric motor;
- speed sensor (“Hall sensor”);
- drum bearings;
- water pump;
- electrician (wire connections);
- seals and hoses.
If the machine has drying and steam processing functions, then several more items are added: a steam generator, an air heater, a fan, an air temperature sensor.
The modern generation of washing machines is equipped with direct drive. The engine in such systems fails much less often than other components
But the most popular reasons for calls to service centers are the failure of the pump, heating element, fill valve, pressure switch, electrics and bearings.
In general, LG washing machines are very reliable and, compared to other brands common in Russia, break down much less often.
When does it need to be replaced?
LG washing machines with commutator motors are equipped with graphite electric brushes. They are needed to transmit electricity to the motor armature. The parts are represented by small rectangular cylinders with copper contacts and steel pressure springs.
When the motor rotates, the surface of the brushes comes into contact with the rotor, so they are subject to wear. Despite the fact that special alloys are used for their manufacture, spare parts are subject to abrasion.
Their average service life is 5 years, subject to active use of the washing machine. The wear process of carbon brushes is accelerated by dust getting into them.
They change shape, causing the engine to malfunction. As a result, the washing machine begins to function improperly.
Signs indicating wear:
- Noise and crackling. It appears when the engine is running. Extraneous sounds are heard most strongly from the place where the motor is mounted.
- Wet laundry after spinning. The washing machine does not have enough power to cope with this task.
- Stop washing. This can happen when running any program.
- The appearance of smoke, sparks and a burning smell.
- An error code appears on the display. If the electric brushes malfunction, the CE code may appear on the display of the LG washing machine.
Faulty brushes cannot be ignored. The sooner they are replaced, the better. If you continue to operate the device in this mode, serious damage cannot be avoided.
Disassembling the washing machine. Step by step instructions
Now the unit is disconnected from all communications (drainage, water supply and power supply) and you can begin disassembling:
- The top panel is removed. On the back panel, in the upper part, there are two screws that secure the cover. After unscrewing them, lightly pressing on the lid, you can easily remove it.
- The bottom panel. Behind it there is a drain filter and an emergency drain hose. Therefore, easy removal of this panel is provided by the manufacturer. The panel is held in place by three latches. By pressing on the panel on the sides and top, it can be separated manually (or pry it off with a screwdriver). Newer models may add one screw.
- The detergent distribution hopper is removed (there is a plastic button inside, when you press it, the tray comes out easily, you just need to pull it towards you).
- Top control panel. Under the powder hopper is the first of the screws that secure the panel. The second screw is usually located at the opposite end of the panel, at the top. The fasteners are removed, the panel is pulled towards itself and removed. On the reverse side of the panel there is an electronic control module. For convenience, it can be placed on the top of the machine.
- Rubber clamp. Sometimes it may be necessary to free the front wall from the rubber ring clamp. On the cuff you need to find the place where the clamp connects. As a rule, this is a small spring that needs to be tucked. Now you can pull back and pull off the clamp in a circle. The cuff is tucked inside. To remove the clamp, you can use round nose pliers, pliers, or a screwdriver (depending on the model of the clamp).
- Front panel. At the bottom of the front element (where the bottom panel was), four screws are unscrewed. 2 screws are located in the hatch lock area. Under the top control panel there are 3 more fasteners, by unscrewing which you can remove the front part of the machine. It is usually held on by hooks, and to remove the panel you need to lift it up a little. To completely separate the part, you need to remove the electrical connector from the hatch locking device.
- Back wall. Attaching the back of the case are a few more screws, unscrewing which you can gain access to the back of the device.
Disassembling the LG washing machine
This is how the main parts of the frame are removed, allowing access to the internal parts. We can say that this is a preparatory operation, and further actions will depend on the inspection performed and the malfunction identified.
When the top panel is removed, many wires prevent it from being completely removed. Some models are equipped with service hooks where you can secure the unit during repairs. You can also disconnect all the wires, but first mark them with a marker so as not to confuse them.
Disassembly of individual elements and assemblies
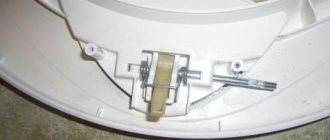
If you need to remove the drum, you need to disconnect all the hoses from it (use a screwdriver to unscrew the clamps):
- At the top, closer to the rear wall, there is a liquid level sensor in the tank, or pressure switch. Its hose is disconnected.
- There is another hose coming from the detergent bin; this is also disconnected.
- Now the drain and fill pipes.
The wires are disconnected from the engine (you need to take care in advance how not to mix them up when the time comes to put everything back together).
You also definitely need to twist the counterweights (removing the tank along with them is almost impossible). Weights can be in the front or back of the body. These are concrete elements, sometimes colored. As a rule, they are secured with long bolts.
heating element. Under the tank (front or back), there is a heater - heating element. It is not visible to the naked eye - its end part with terminals is accessible. When removing wires from it, they must first be signed, or even better, photographed. In some cases, you can remove the entire heating element (along with the wires), then you need to unscrew the central nut, and then “sink” the pin into which the nut is screwed. Now, using a screwdriver, you need to pick up the rubber seal on which the heating element is mounted from different sides and gradually remove the heater.
When you need to change the heating element, you need to determine whether it is located in the front or rear part (this determines which housing element to remove). Even if the instructions have not been preserved, it is advisable to start the “search” from the rear panel. It is much easier to remove and even if the heating element is not there, it’s not a problem - screwing the 4 screws back is not a problem.
Using a socket wrench, the shock absorbers (legs on the left and right) supporting the tank are unscrewed.
After the tank is freed from all parts and components, it can be carefully removed from the springs.
LG washing machine tank
Disconnecting the engine. When the engine has already been disconnected from all wires and removed along with the tank (which is not necessary, the engine can be removed without touching the tank), the drive belt is removed (passes from the engine to the pulley, which is located on the tank) and then the engine itself and shock absorbers are twisted.
Disassembling the tank . To disassemble the tank itself, first unscrew the screw securing the pulley and remove it. The shaft must be pressed inside the tank. The clamp is removed and one part of the tank is pulled out from the other.
Bearings. When the tank is “halved”, the seals are pulled out of it and the bearings are knocked out. The place where the bearings were is cleaned. The oil seals are lubricated with a special lubricant, and to make the new parts fit better, you can heat the installation site with a hairdryer.
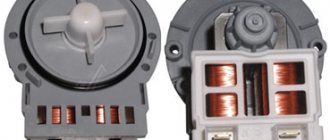
Pump. It is located in the front lower part of the unit. It is secured with three screws for a shaped screwdriver and three clamps. There is also an electrical connector at the bottom. The clamps are disconnected using pliers (they need to press the clamps and disconnect the hoses). To disconnect the connector, press it with a screwdriver. There is dirt around the pump, it is better to wipe it off immediately.
When it is necessary to remove the pump, this can also be done through the bottom of the housing. To dismantle it, the machine is placed on its side.
And further. Lay something under the unit and prepare a container where you can drain the water remaining in the pump.
So. If you have skills in repairing household appliances, you can save money on servicing your washing machine. Replacing, for example, bearings yourself will cost about half as much as repairs in a workshop.
Reasonable price, nice design and reliability are the main advantages of Hansa washing machines. But minor breakdowns of washing machines, unfortunately, are not uncommon for this brand. Hans washing machine: do-it-yourself repair of the most common breakdowns, read carefully.
You will find useful information about repairing Samsung washing machines in this topic. Why doesn't the washing machine turn on, makes a lot of noise or doesn't heat the water? You will learn about all this in the article.
What are the reasons for how to remove the blocking?
If the LG washing machine issued a CL code, but the owner of the household appliance did not activate the child lock mode, perhaps one of the family members did this.
Or the function was turned on accidentally during the previous use of the device. The peculiarity of the Child Lock mode is that if you do not disable it, then even after turning off the machine from the network, it will still remain active. This happens automatically.
To disable Child Lock mode on an LG washing machine, you need to press a combination of keys located on the front panel. Their set differs for different models of household appliances. This can be clarified in the Operating Instructions for the device.
If for some reason you don’t have the user manual at hand, you can solve the problem using the selection method. You don't have to press all the buttons in a row. There are three most common options to remove the blocking.
Three keyboard shortcut options to resolve the CL error:
- Super rinse + prewash.
- Extra rinse + intensive wash.
- Temperature + optional button.
It is not always possible to resolve a CL code using this set of buttons. Sometimes you need to press a special key to unlock the front panel. Next to it can be a picture of a child’s face, or a castle with a smile.
Despite the fact that the CL code most often indicates that the front panel buttons are blocked, sometimes it can still signal a malfunction of the LG washing machine.
This can be understood by two signs:
- the lock was not turned on, and the inscription appeared in the middle of the wash cycle;
- The code cannot be eliminated by pressing the keys listed above.
The video will tell you what the CL error on an LG washing machine means and how to fix it:
How to fix the problem?
If it has been determined that the CL error code does not indicate the activation of the child lock function, you need to solve the problem in another way. Experts say that there can be two reasons for the appearance of such an inscription on the screen - the wires were broken, or the control module failed.
To understand what exactly the problem is, you will have to disassemble the LG washing machine. The procedure is as follows:
- Disconnect household appliances from the network.
- Remove the top panel. It is attached to two screws, which are located on the back wall, in its upper part.
- When the cover is removed, you can see the wires underneath. If they are killed or chewed by mice, it will not be difficult to detect this. In this case, the wires just need to be replaced.
If the wiring is intact, then most likely the control module is faulty. It will not be possible to repair it on your own. You will need the help of a technician who understands electronics.
Prevention of recurrence
To prevent the CL error from appearing in the future, you must follow simple recommendations:
- Before you start using your LG washing machine, you should read the User Manual.
It describes the rules for using the device. After reading the document, a person will not have any questions about what the CL sign on the screen means and how to eliminate it. - If the machine is in a country house or country house, you need to take care to remove rodents. They can cause serious damage to household appliances.
- It is necessary to maintain normal humidity in the bathroom. If the room is too damp, the parts of the washing machine will fail faster.
- To prevent the control module from breaking and causing an error in the operation of the equipment, you must use the machine according to the instructions for use. It is unacceptable to interfere with the operation of the device if it has not finished executing a particular program.
Preparatory work
Please note that LG washing machine models are equipped with an inverter motor. Therefore, the procedure for removing it will be different from other cars - with a commutator motor.
To effectively dismantle the washing machine, select the following tools:
- Screwdrivers. Three types are required: flat, cross, hexagonal.
- Pliers.
- Hammer.
- Socket wrenches.
- Open-end wrenches from 8 mm to 17 mm.
Make sure all tools are at hand. Also provide additional space so that during disassembly there is room to turn around and where to put parts.
Before you disassemble the LG automatic washing machine, you need to prepare it for repair.
First of all, disconnect the SM from the network. Prepare a container for collecting water in advance. Unscrew the inlet hose from the housing and drain the remaining water from it. Do the same with the other end of the hose.
Unscrew the drain filter, which is located at the bottom of the front panel, behind the hatch. Place the container and drain the water. If necessary, empty the tank of laundry.
Now move the machine away from the wall so you can freely approach the back panel.
Time to find out how to disassemble an LG washing machine.