Problems with such an important household appliance as a washing machine can turn into a real disaster for a person. But you shouldn’t immediately panic, sound the alarm and turn to expensive service services. A common situation: there is water left in the washing machine after washing. In most cases, the problem can be easily solved with your own hands, which takes a few minutes in total. What should you do if the washing machine stops draining water from the loading drum after washing?
If water remains in the detergent dispenser
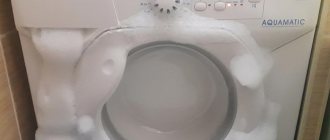
A little water in the conditioner compartment after washing is normal, nothing needs to be done. It’s a completely different matter if the rinse aid compartment is full of water after washing or water remains in the powder compartment. Here you need to find out what the reason is and eliminate it, fortunately, in most cases this can be done on your own. Below is a list of reasons why water may remain in the detergent dispenser:
- Improper care of the detergent tray. Washing machine manufacturers recommend regularly washing the hopper to remove any residual detergent. If you forgot about this recommendation, the tray may have become clogged; it needs to be removed and thoroughly rinsed with water.
- The car is not level. If the washing machine is installed tilted forward, water may remain in the conditioner compartment. It is necessary to study the user manual and install the unit strictly at level.
- Poor quality detergents (powder, conditioner, etc.). Perhaps the reason is a low-quality washing powder or rinse aid, which has clogged the holes in the dispenser grid of the washing machine. Rinse the tray with running water, and next time try using a different brand of detergent.
- Too much washing powder. Perhaps you pour too much washing powder into the machine tray, it clogs the flush, hence the water in the powder compartment after washing. Try reducing the amount (check the machine manufacturer's recommendations for the amount of washing powder).
- Weak pressure in the water supply. As a result, the powder and/or conditioner are not completely flushed out of the compartment and clog the holes in the dispenser. In this case, water and detergent remain in the tray. Check whether the water supply valve to the washing machine is fully open. If so, then this is probably the reason for the low pressure.
How to prevent breakdowns
Turning to the statistics, you can see that breakdowns of the drain system occur already in the second or third year of intensive use of the washing machine. Most likely, this is due to the use of low-quality parts during assembly. In an attempt to save on production, companies purchase parts from cheap materials, which ultimately causes malfunctions.
Incorrect installation and connection to the sewer can also shorten the service life of a household appliance. Exceeding the standard length increases the load on the system several times, leading to its wear. To avoid such problems, experts recommend strictly following the requirements of the technical passport.
The occurrence of blockages can also be prevented by following fairly simple tips:
- Check the pockets of items before loading them into the drum; remember, it is unacceptable for debris and small objects to get into it.
- Periodically clean the drain filter to remove any remaining debris and sediment.
- Arrange sessions for complete cleaning of the automatic machine. Experts advise using citric acid or specialized detergents.
To summarize, we can say that liquid retained in the loading drum at the end of the washing algorithm is a clear signal of a problem. Do not delay in eliminating them: this can lead to serious accidents. Carry out independent diagnostics or call competent repair service specialists. Take care to promptly remove waste fluid from the tank to avoid the occurrence of unpleasant odors. There is no need to stop cleaning and checking system parts after a long period of perfect operation. The washing machine system needs regular maintenance, don't forget about it, and it will work like a clock.
If the washing machine does not finish washing and there is water left in the drum
First, check which wash program you have selected. Many washing machine models have a water-stop wash cycle (for delicates or woolen fabrics). Perhaps you have washed using such a program? Then just turn on the drain mode.
If the machine does not drain and there is still water in the tank, most likely the pump is faulty. You can learn more about other possible malfunctions and how to eliminate them from the article “Wet case: the washing machine does not drain water.”
Water removal and repair work
Before starting any preventive or repair procedures, it is necessary to disconnect the household appliance from the power supply and shut off the water supply. After this, be sure to check whether the hose running along the back panel of the washing machine is not bent. It should be in its normal position, without obstructing the flow of clean and waste water. Next, you can begin to remove the remaining liquid after work. Prepare a bucket, shallow container and dry rags in advance.
You can also drain the water accumulated in the drum through the drain system hose. Disconnect it from the siphon and simply lower it into the basin prepared in advance. This way you can make sure the hose is working and check whether it is clogged.
Water coming out without any difficulties serves as a signal that the hose is working, and after this procedure it can be returned to its place.
Hose clogged
If the problem is still a blockage, it must be eliminated. Disconnect the hose from the washing machine, then, using a special brush and cable, thoroughly clean its internal walls from accumulated deposits. After completing the procedure, rinse the hose with clean water and return it to its place.
Drain filter clogged
After draining the water through the hose, you can begin diagnosing the drain filter. As a rule, it is located in the lower compartment, directly behind the outer panel or special plate. When removing the filter, unscrew it counterclockwise and pull it towards you. If you find a blockage, remove it with a brush and running water. After thorough cleaning, reinstall the drain filter. There should be no debris or foreign bodies left on it.
Pump failure
If you do not find any faults in the filter, you will have to check the drain system pump. The pump of different models of washing machines is installed in different places. On devices such as Samsung and LG, I mount it closer to the bottom panel. In German analogues, you will have to tinker with disassembling the dashboard and dismantling the hatch. Read about where the pump is located here.
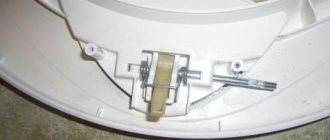
Pressostat failure
In addition to those described above, the cause of water retained in the drum may be incorrect operation of the pressure switch. In this case, you will have to diagnose it. A worn out water level sensor may not correctly alert the control processor. This may cause some liquid to remain in the drum. You can check that it is working properly as follows:
- remove the top panel of the washing machine;
- get to the pressure switch, as a rule, it is located in the upper compartment of the system;
- disconnect the wiring and hoses leading to the sensor;
- check the tubes for blockages, microcracks and kinks;
- check and clean the electrical contacts of the device;
- using a multimeter, examine the resistance of the pressure switch;
- If the slightest malfunction occurs, replace the sensor with a new one.
Replacing this part in a timely manner will help you prevent serious damage in the future.
Where is?
Its location depends on the brand of washing machine. Below is a list with the most popular brands and locations of the required part.
| Electrolux and Zanussi top loading | Washing machine drum rib. Removable from the inside. |
| Atlant | Bottom right corner, hidden behind a small hatch |
| Top-loading machines (except Electrolux and Zanussi) | The lower left corner is usually behind the plastic panel |
| Samsung | Lower right corner, usually hidden behind a plastic panel, but there may also be a small hatch |
| Classic washing machines Electrolux and Zanussi | Lower right corner, covered with a plastic false panel |
| Bosch and Siemens | Lower right corner, covered with a plastic false panel or small hatch |
| Candy | Lower left corner, hidden behind a metal hatch |
| LG | Lower left corner behind plastic or metal hatch |
| Indesit | Behind the lower removable panel on the right |
| Ariston | Behind the lower removable panel on the right or behind the plastic hatch |
Cleaning Frequency
The frequency with which filters need to be cleaned depends on the frequency of washing.
It is also worth focusing on the recommendations of manufacturers , who advise carrying out the procedure at least once every 2-4 months.
But if the family is large and the machine works every day, then it is better to deal with filters at least once a month.
The type of fabric also affects the amount of dirt. The more lint it contains (wool, flannel, fleece), the faster blockages occur.
Animal lovers know how much fur remains on clothes, especially during the shedding season. Therefore, owners of furry pets should be even more careful about the cleanliness of the insides of the washing machine.
Advice! After washing especially downy or fleecy items (plaids, blankets, down jackets), you should immediately clean the machine.
Signs that cleaning is needed
It is necessary to immediately begin cleaning the system if the following problems are observed:
- The laundry rinsing function has stopped working;
- when you try to put the machine on spin, it turns off or is blocked;
- The water drain does not work well or is completely turned off;
- a puddle of water appeared under the machine;
- the unit has completely failed, this happens rarely, more often when the filter is clogged with large debris.
In the instructions or documents for the washing machine, the drain filter may also be called drainage or garbage.
Choosing cleaning products
If you notice that the rubber band in the washing machine has turned black, first find the source of the fungal infection. Check the cuff and if there is an infection there, proceed with cleaning using a pre-selected product.
Don't know how to remove mold from the rubber band of your washing machine? Most housewives use the following means:
If you are more concerned about the question of how to clean the cuff of a washing machine from scale, use proven products with positive reviews. These include:
- citric acid (regular, food grade);
- 9% vinegar;
- special anti-scale products.
Preventive measures for equipment breakdowns
To prevent malfunctions you need:
- check things before washing, remove small items and garbage from pockets;
- clothes decorated with sequins and rhinestones should be washed only at low speeds and on the wrong side;
- periodically run a wash cycle with warm water without clothes and add a descaling agent to the drum;
- after the end of the cycle, close the outlet valve to prevent wear of the membrane;
- regularly inspect and diagnose the ECU according to the manufacturer's recommendations.
To prevent the collection of waste from the sewer, it is recommended to install a check valve at the junction of the siphon and the drain hose.
How to properly clean a rubber band?
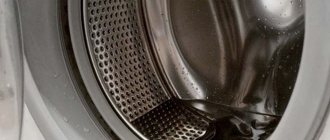
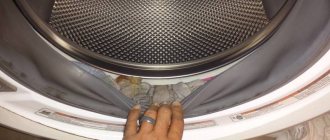
Mold most often appears in the folds at the bottom of the cuff because it is in this part that water accumulates. To remove it, you must perform the following steps.
- Bend the edge of the elastic to the side.
- Wet a rag or sponge with cleaning agent and wipe the entire cuff. Carefully walk through hard-to-reach places.
- Close the washing machine door without rinsing off household chemicals. Leave for 30 minutes.
- Then rinse the folds again and wipe them dry.
To make the treatment even more effective, you can run the “Cotton” or “Quick Wash” program. When the washing machine has finished operating, leave the door ajar. Aggressive detergents should not be used to clean the rubber cuff. They may damage the part.
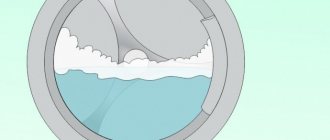
Signs and causes of the problem
Please note when you find that there is water left in the washer:
- After the wash cycle, while removing laundry from the drum. Things didn't work out well.
- When the car froze, a fault code appeared on the display. In this case, the hatch door does not open.
Why do such breakdowns occur? There may be the following reasons:
- The drain hose is kinked or there is a blockage in the drain system.
- The drain pump is broken.
- The pressure switch (pressure switch) is faulty.
- The electronic board is faulty.
What chemicals should I buy?
If fungus has recently appeared on your washing machine, getting rid of it is easy. To do this, you should take a cleaning sponge, dip it in a solution of vinegar, bleach or soda solution and wipe all the folds of the cuff. It is more difficult to combat mold that has become deeply embedded in the rubber. To do this you will have to buy special household chemicals. Among the products available in retail stores, the following brands are considered the most effective.
- Mellerud. Available in the form of a concentrated spray, contains chlorine. The composition is intended to destroy fungi. It can be used to disinfect walls, tiles, ceilings, and wooden surfaces. The product is also suitable for wiping the cuffs of washing machines. It’s easy to use: spray the spray at a distance of 5 cm from the dirt, leave for 15–20 minutes, then wash off with water. The cost of the bottle is 520 rubles.
- H.G. A universal action spray based on surfactants and chlorine to remove fungus and odor and prevent the re-development of mold. The method of using the product is standard: it is sprayed onto the cuff of the washing machine. 10 minutes is enough to destroy fungal spores. After this time, the surface is washed abundantly with water. To combat stubborn dirt, the seal is cleaned several times. The cost of a bottle of spray is 400 rubles.
- Bagi. The brand produces a spray called “Anti-mold” and offers an effective and quick way to remove mold. The product is sprayed and after 10–20 minutes, depending on the intensity of the contamination, it must be washed off. Due to the presence of nonionic surfactants and chlorine, it has an antifungal and antibacterial effect without damaging equipment parts.
- Cillit BANG. Concentrated antifungal agent "Black Mold", safe and suitable for everyday cleaning, can be used if water accumulates in the hatch cuff and it needs to be cleaned and protected from mold. Also intended for washing shower cabins, bathtubs, sinks, kitchen sinks. The composition is sold in 750 ml containers. The price in stores is about 300–350 rubles.
- Sion. Instant spray to combat fungus, remove spore stains and eliminate odors. It can be applied without pre-treatment.
- BON. A product with antibacterial components and contains non-ionic surfactants. It fights not only fungus and putrid odor, but also limescale. The manufacturer recommends using the spray as follows: spray it at a distance of 20 cm from dirt, wait 20 minutes, clean the surface with a rag or brush, rinse well with clean water and wipe dry. The price of the bottle is about 500 rubles.
- Unicum. A universal composition designed to remove fungus and unpleasant odors. Can be used without additional cleaners. It sells in stores for 200–300 rubles.
Most household chemicals against mold are made based on chlorine and surfactants. Many of them also have antibacterial properties.
Note! The products are safe for treating rubber seals.
Breakdowns and ways to solve them
- If you detect water a few days after the “washing” procedures
So, first you need to turn off the tap that supplies water to the machine. If nothing has changed and the water continues to “visit” the drum, then the problem lies in the malfunction of the creamer. If you turn off the tap and after that the water stops bothering you, then you will have to disassemble the machine.
In this case, you need to check the drain filter. In all washing machines it is located at the bottom and is closed with a lid. If after opening you notice dirt there, then just clean it and everything will work. Otherwise, read the paragraph below.
This is the worst option. If the machine is trying to drain water and is buzzing, then the pump will need to be replaced or, at best, repaired. If the machine doesn’t even try to drain the water, then you need to call a technician, because you probably won’t be able to do it yourself.
- The water drains, but not completely
In this case, the culprit is the sensor that is responsible for the water level in the machine. Maybe the problem lies with the pump, but it's unlikely. To find out which of these two options has disturbed your car, position the drain hose a little lower. If the problem lies in the pump, then the water will drain.
Premium service in our online store
Our branded online store sells original Miele household appliances in the Russian Federation. You can get acquainted with the range of VIP-class washing machines and order the model you like directly on this website through the online form or by calling the specified contact numbers.
All household appliances are covered by an extended warranty from the manufacturer - 24 months. A list of authorized Miele service centers located in all major cities of Russia can be opened by following the link from the “Warranty” page on our website. There you can leave a request for equipment maintenance or a request for spare parts and accessories for it. Delivery of goods throughout Moscow, St. Petersburg and regions of Russia is provided.
Preventing malfunctions
If you want to avoid problems with blockages, then follow these recommendations:
- it is necessary to systematically process (clean) the drainage filter;
- Before throwing any item into the drum of the washing machine, be sure to check its pockets for debris;
- Clean your washing machine using, for example, citric acid (or another detergent of your choice).
Well, in any case, if there is water left in the drum, then your washing machine requires repair. This is your business, but we strongly recommend using the services of professionals and calling a specialist. As statistics show, in most cases, independent actions lead to the complete failure of the device.
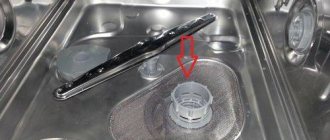
How to remove the drain filter: step-by-step instructions
Proceed as follows:
- Turn off the power to household appliances - this is a mandatory step for any repair or maintenance.
- Shut off the fluid supply fittings.
- Open the decorative panel or hatch door. Behind it is a part that is held on hinges.
- Disconnect the pipe, do not forget that liquid will flow out of it.
- Place a container under the hatch, tilt the equipment itself slightly for easier draining.
- Next, you need to remove the screws with a screwdriver and unscrew the snail.
- After cleaning, reassemble in reverse order.
Damage to loading hatch
First of all, you should pay attention to the location of the puddle. So, if water collects closer to the front side of the machine and its amount increases during the spin cycle, the hatch seal is most likely damaged. Punctures or cuts can be caused by sharp edges of accessories on clothing or items forgotten in pockets. Over time, under the influence of water and detergents, any seal can lose its properties and allow water to pass through. If it is damaged, the sealing rubber must be replaced - it is useless to seal the cuff, since it can shrink and stretch during washing.
Sometimes leaks are also caused by a washing machine hatch that does not close tightly.
The integrity of the cuff can be damaged by exposure to aggressive substances contained in detergents or by fungal infection. You can replace the cuff yourself. Its outer part is slightly recessed into the hole in the front wall and is fixed there using a wire or plastic clamp.
It is easier to put on a clamp with an adjusting screw - after putting it in place, the clamp is gradually tightened and the screw is tightened in a certain position. After installation, the cuff should be checked for fresh leaks.
The plastic clamp can be removed by pulling towards the area where the latches meet. To remove the wire clamp, you need to pry the spring or unscrew the fixing screw. The next step is to locate the installation mark on the cuff. It is necessary to determine the fixed position of the cuff according to the tank. If there is no such mark, use a marker to mark where the cuff is located to the tank. The mounting edges must be cleaned of dirt and deposits and thoroughly lubricated with soapy water. The more slippery the surface, the easier it will be to install the new cuff. Before installation, you need to align the cuff with the applied installation marks. The cuff is taken from the inside and placed in a circle on the edge of the tank. When the replacement is completed, you need to examine the perimeter of the ring with your fingers to check the tightness of the cuff with the edge. The next step is to put on the outer and inner clamps. To install the spring clamp, you need to use a screwdriver, with which it is fixed in the initial position.