Any household appliance, even the most reliable, breaks down over time. And many owners do not know, for example, how to disassemble a Tefal iron with their own hands in order to find out and eliminate the cause of the breakdown. But in most cases, you can repair electric irons of this brand yourself, without resorting to the services of service centers.
One of the Tefal smart irons, Ultimate Autoclean 300 series
In the article, readers will find information on how to disassemble Tefal electric irons of popular models, as well as common defects and ways to eliminate them.
Iron design
Starting with the simplest Soviet irons, the design includes the following elements:
- Housing with regulator.
- Sole.
- Spiral rolled into the sole.
- Set of electrical connections.
Boiler equipped with heating element
An ordinary iron is equipped with two removable parts. Sole, back wall with cord. They always install bolts; the art lies in finding the fasteners. Old Soviet irons had their heads hidden under the knob of the regulator. Moreover, removing the latter was sometimes a problem. More often it was possible to do what was necessary with a slotted screwdriver operated by skillful hands. The back wall could be bolted or simply snapped into place. In the latter case, the connection became short-lived. But behind the back wall you can find a block where the power cord is attached. Cable failure causes 20% of malfunctions. Accordingly, we will ring the wires immediately.
It is convenient to repair irons by discarding the Chinese tester. The regulator changes the tension of the bimetallic plate. Rotate the knob, try to understand whether the sensor is working properly and how smoothly it works. If potholes have formed, some areas do not pass electric current well, it will be immediately visible. Of course, irons equipped with the function of automatically adjusting to the fabric do not have a regulator; in most cases, like half a century ago, a round rotating plate is located under the handle. And what about the sole?
The bolts are unscrewed, we get access to the heating element and the regulator mechanism. In modern irons, the body hides at least two interesting details:
Tefal iron thinking about us
The first one occupies an arbitrary place and is determined by the design. The second one liked the nose. Of course, away from the sole. The action scheme is as follows:
- the sole reaches the desired temperature;
- liquid is automatically supplied from the reservoir;
- under the influence of temperature, water becomes steam;
- The steam boost is released with a special button, which pumps a slightly larger amount of liquid.
The calorific value of the soleplate of the iron is below infinity. Time will pass between two bursts of steam. There are schemes where emissions occur separated by short time intervals in twos and threes. Like semi-automatic shooting. Then - the inevitable pause. There are devices with preheating of water by a boiler. It’s clear that there is no boiler inside, but the water heater is there. A higher temperature will make it easier to produce steam. The FreeMove cordless irons, which work in cycles, look great. Heating - 4 seconds, operation 25 seconds. Heat is stored by the sole, water (water heat accumulators based on swimming pools of private houses will help explain the principle of operation). The process is controlled automatically, enough energy has been accumulated, the green light begins to blink, indicating that you can start ironing.
We can talk about cordless irons separately. The design is not very different from conventional ones with steam. Many manufacturers have an option with fastening a cord, but the peculiarity of Tefal irons is that cordless means no wire.
Temperature controller malfunction
Another key element of Tefal irons is the temperature regulator. In order to simplify access to the regulator, first of all, you should try to remove its handle from the outside of the case. If this cannot be done, you will have to completely disassemble the case and unscrew the fastening elements to access the desired part of the device.
Diagnostics of the regulator is performed in several stages:
- Set the regulator to its extreme positions; if this is impossible, use pliers;
- Ring the element using a tester, periodically switching the regulator to different positions;
- If the tester light is on in the extreme positions of the regulator, the element is working.
In cases where there is a malfunction of the element, you will need to clean the contacts. To do this, it is recommended to use sandpaper, a nail file or a similar abrasive product. After cleaning, you can wipe the contacts with alcohol and let them dry, which will increase the cleaning efficiency.
This is interesting! Modern technology - steam cabinet for clothes and ironing equipment
Tool
To successfully repair an iron, let's first prepare some homemade tools; It will not take much time and will not require significant expenses:
- 2-4 lid squeezers;
- squeezer for hidden latches;
- a cheap LED flashlight (namely LED) and a magnifying glass;
- a strip of suede, a nail file, alcohol;
- or, instead of step 4 - a pencil eraser, an ink eraser, a piece of a clean cloth, alcohol.
Push-ups
Opening the top cover of the iron with a table knife
The lid squeezer is made from the top, strongest layer of bamboo, the size and thickness of an ice cream stick; one end of it is cut into a wedge. The covers on the body of irons are often placed on latches without fixing. At the service center, such a cover is compressed with special pliers and removed. To remove it using a makeshift method, you need to pry off the cover: the teeth of the latches without fixing are beveled on both sides and come out of the grooves intact. But open the lids on tight latches with a table knife or a wide screwdriver, as in Fig. on the right, don’t: the steel will leave marks on the plastic. The flexural strength of the surface layer of bamboo is higher than that of plastics, and the shear strength is lower. Therefore, a bamboo squeezer will remove the lid if it is properly lifted, but perhaps it will be crushed from the surface on its own without damaging the plastic. If the lid is not lifted correctly and does not give in, the bamboo squeezer will break without damaging the iron. They use bamboo squeezers in pairs, prying the part from both sides.
A good thin squeezer for fixed latches is obtained from a plastic coffee stirrer cut into a wedge, which are issued by coffee machines. The squeezer from the stirrer fits into any gap and gently removes the latches with fixation, without scratching or breaking either them or the body parts.
Flashlight and magnifying glass
Cheap mini LED flashlights produce very hard light with harsh shadows. In this case, this is an advantage: such light penetrates deeply into thin cracks, and under a magnifying glass you can see what the part is holding there. To do this, first they pry off the lid, which is not clear how to remove, with bamboo squeezers, highlight it and look at what is holding it there.
How to handle latches
It is best, of course, to find a diagram for disassembling the iron of this model, but try it! And don’t look for typical layouts of secret locks either: they can be different for the same model from the same manufacturer. Have you read in the instructions: “The manufacturer reserves the right to make changes to the design that do not affect the performance of the product”? That is, when disassembling the iron, you will most likely have to look for hidden connections yourself.
It must be said that Western companies are gradually moving away from the principle: “Do you want to fix it yourself? Well, break it and buy a new one!” But Asians stubbornly cling to it. For example, if your iron is Chinese, then the nose mounting screw (see below) will most likely be not under the filler cap, but... under the water and steam supply buttons!
Hidden latches in the iron buttons
Let's light it up and see. Do you see the green circle in the pic? So, this is not a latch, but a sliding tenon in a groove. The latches are on the other side of the buttons. To remove the buttons and disassemble the iron, you need to:
- Push forward button.
- Insert the wringer from the mixer behind it.
- Release the latch.
- Without removing the wringer, lift the button up until it stops. You should hear a faint click of the latch tooth coming out of the groove.
- While holding the button so as not to fall, remove the wringer.
- Continuing to hold the button, move it forward with an inclination so that the sliding tenon turns out of the groove.
- Do the same with the other button.
Shaped fasteners
The screws in irons from Western manufacturers are most often either ordinary with a Phillips or hexagon head. For the latter, there is no point in buying a special screwdriver with a set of bits for a one-time repair: a screw with a hexagonal slot can simply be unscrewed with a flat screwdriver with a thin blade of a suitable width. It can also be used to unscrew screws with a trefoil slot, which the Chinese are very fond of (on the right in the figure), but without strong pressure: this creates a significant lateral force and the screw in the thread can simply jam. If the screw is tight, it is torn off with a series of small jerks, moving the screwdriver to other pairs of slots.
Shaped screws
The most difficult thing will be to unscrew the screw with the TORXX slot (on the right in the figure): scissors or tweezers will only take it if the screw is loose in the thread. It is most convenient to unscrew TORXX screws without a special key using small duckbill pliers; You can also use side cutters, but then there will be dents on the slot bridge. They won’t do anything to the screw, but if an experienced master suddenly gets his hands on this iron, he’ll charge him for repairs for previous unskilled access.
Power cord
Failure of an electrical cord is a fairly common type of breakdown. With such damage, the iron may not turn on at all or work in fits and starts, and the sole may not heat up well. The cord may bend or curl, the insulation may be damaged at the bends, and some wires may fray completely or partially. If there is such damage, it is better to replace the cord, regardless of whether it is the cause or not. In any case, all places with damaged insulation must be insulated.
In case of any damage, any iron repair begins with checking the cord. To accurately determine whether it is in normal condition or not, you need to ring it. To do this, just remove the back cover. The terminal block to which the cord is connected will become accessible. You will need a tester or multimeter. We put it in the dialing mode, press one probe to one contact of the plug, and touch the second one to one of the wires on the block. When you touch the “correct” wire, the multimeter should make a squeaking noise. This means that the wire is intact.
The color of the conductor insulation can be any, but yellow-green is necessarily grounding (it must be checked by installing a probe on a small metal plate at the bottom of the plug). The other two are connected to the pins of the plug. One of these two wires should be connected to the pin to which you pressed the multimeter probe. We repeat the same operation with another pin.
To be completely sure that the cord is in good working order, you need to wrinkle/twist it during testing. Especially in places where there are problems with insulation. If the squeak from such actions is interrupted, it is better to replace the cord. It must also be replaced if one or both pins “do not ring.” You may be lucky and you won’t need further repairs to your iron.
Disassembly process
Disassembling a Tefal iron, especially the newer models, is a little more difficult than regular irons. It's all about hidden screws, hidden plastic latches and multiple body parts.
The device is French, so you need to take into account that the screws that secure the case usually have heads with six-pointed recesses, so it is advisable to have the necessary set of attachments. The disassembly should begin by unscrewing the screws in the back of the iron body, which hold the back cover, respectively.
Next, remove the upper part of the housing, where the steam supply system regulators and the funnel for filling water are located. In more modern models, this entire structure is held on one part of the body and secured with latches. For example, to disassemble the Tefal Ultimatum Auto Clamp iron, unfasten two latches that are located on each side of such a case. By pulling towards you and upward, the handle, or rather its upper part, is removed from the back of the iron.
Screws
But in most running models, you first need to remove the buttons under which the mounting screws are hidden. When removing the buttons, you must take into account that other small parts, such as springs or rubber bands, are also hidden under them, so try not to lose them. We unscrew the opened screws and remove the freed parts of the case. We also carefully remove the thermostat disk, which may also hide screws, and disconnect the cord from the terminal block, which hides two more screws.
Fasteners
After unscrewing all the screws, remove the plastic case. We do this carefully, because... In addition to screws, it can also have other fasteners - fixed with plastic latches. By applying excessive force to the case when unscrewing the screws, or by sharply pulling, you can break them, so during the disassembly process it is better to be extra careful and feel the joints for the presence of latches. If this cannot be done tactilely, you can use flat, strong objects, such as a knife.
Sole
If disassembly was successful, you will see a separate plastic case and metal sole. The base can also be covered with a separate metal cover that hides the contacts and terminals.
Lid
The cover is usually secured with screws. Having removed it, we open all the insides and connections of the heating element. But if this is a modern model, such as Tefal Ultimatum Auto Terminals, then the sole will be solid, with a built-in heating element and all contacts.
Frame
The separately removed plastic case should not be disassembled, since all plastic parts are glued. After disassembly, it will only contain a water tank, steam lines and grooves for fastenings.
The cover of the Tefal iron is most often immediately removed separately from the plastic body and consists of a part with steam supply regulators, a water funnel and a handle.
Electrical diagram
Tefal irons are almost no different in the electrical part.
The electrical circuit is standard: cord, fuse, heating element (heating element) and thermostat. The cord supplies electric current to the heating element - a nichrome spiral with ceramic or metal rings, which heats up and transfers heat to the sole. The heating temperature of the sole is regulated by a thermostat. Externally, it looks like a dial switch with a scale. It records the set temperature value and stimulates the circuit to open, stopping the supply of voltage. The fuse protects the iron from overheating.
DIY repair
If you have a Tefal steam generator model, then you can make repairs yourself, eliminating simple faults. All models have the same design; differences exist only in some nuances.
Let's look at the most common faults and ways to repair a steam generator yourself:
- The station reports that it is ready for use, but when you press the button, there is no steam supply - the button needs to be replaced.
- The steam generator is not supplied with steam - in this case, you should check the functionality of the heating element, fuse, solenoid valve, and clean the steam outlet pipe. In case of damage, it is necessary to clean the boiler tank from scale, replace the thermostat or the hose that serves to supply steam to the iron.
- The pressure switch is characterized by incorrect operation - using a multimeter, you need to check the serviceability of the part. In the event of a breakdown, it is necessary to replace and install a working microswitch or toggle switch.
- The control panel does not respond to pressing a button - the integrity of the wiring is checked, if the problem is not found, then the wiring should be replaced.
- The low water level indicator is constantly lit in the container - it is necessary to check the water level in the container; if it corresponds to the norm, then the reason is in the liquid volume sensor, it needs to be replaced.
- There is a weak steam pressure on the perforated soleplate of the iron - to resolve this problem, it is recommended to check the regulator, and if it malfunctions, replace it with a new one.
It is impossible to foresee all cases that may arise during the operation of the device and cause malfunctions. This list can be replenished with new problematic situations.
Important! This list considers only those breakdowns that the consumer is able to fix on his own. At the same time, the home master must have generally available skills in working with household electrical appliances.
Device Features
All Tefal irons are steam, i.e. have a water tank. They also feature a Teflon ultraglider sole, which ensures perfect gliding in all directions. A Tefal brand iron can be regular or cordless.
Regular irons
For operation, ordinary irons are plugged into the network as standard. They can be simply steam or with a steam generator, in which the water tank is located at a separate station, in the boiler. In the case of Tefal irons with a steam generator, the device and the station are connected by a tube through which heated steam from the boiler is continuously supplied to the soleplate.
Cordless irons
Cordless irons are characterized by the absence of wires. Tefal is probably one of the first companies to introduce such a variety of cordless irons. They can be divided into three types:
- with a sole that accumulates heat;
- with contact pads;
- with cable shooting.
It is not recommended to repair cordless irons yourself, especially the first and second types. In addition to the standard electrical circuit, they have many electronic sensors. Therefore, repairing such an iron requires complete disassembly and special equipment.
But no one forbids making independent repairs to the non-electrical part: replacing the handle, dial control or some parts of the body in the Tefal cordless iron.
Common problems and their solutions
When repairing an iron yourself, you first need to know what problems may arise with it and how to make the device work again.
The device does not turn on
The iron does not turn on mainly due to the cord, which may be damaged in one or more areas. If the cord has brown areas, it means that it is burnt out in these places and they need to be cut off and replaced.
When there are no visible violations, the cable is checked with a tester. If it cannot be repaired, it is replaced with a new one.
Heating element does not work
The heating element is the most important part of the iron. To understand whether it works or not, use a tester. If the heating element is not working properly, you will have to buy a new iron.
Before throwing away the old one, remove the cord, regulator and fuse. They will come in handy in the future.
The device turns itself off
This happens due to the operation of the temperature sensor. Having set the required temperature on the device during ironing, it will dial it up and turn off, protecting the iron from burning out.
Modern Philips and Tefal models have an automatic shutdown function. Built-in sensors help avoid fire if the iron is forgotten in a horizontal position.
"Spits"
If the device “spits”, this may be due to a broken valve. To make sure of this, you need to close the valve and turn on the device (but not in the “supply steam to the iron” mode). Now you should rock it.
Are there any drops of water? So it's the valve. To solve this problem, you should contact a service center.
Rusty water flowed
The reason for this may be the high content of hardness salts, that is, the water contains a lot of iron; to eliminate the defect, it is necessary to use a water filter.
The steam generator itself must be rinsed with clean water, and at the same time prevent plaque and scale using Anti-scale or citric acid. In especially severe cases, you will have to figure out a mechanical cleaning device.
Stagnant water may also be one of the reasons. It is highly not recommended to leave it for a long period of time, because it will deteriorate and plaque will form. It's better to fill it fresh every time.
Thermostat does not work
You can check the operation of the thermostat with a tester by switching heating modes. If the element is faulty, it is repaired by removing the handle from the body or disassembling the entire device.
Reasons for thermostat failure:
- Formation of carbon deposits on contacts. It is removed with a piece of suede cloth, previously soaked in alcohol or sprinkled with citric acid. Do not use sandpaper for cleaning, this will lead to the formation of a large number of scratches;
- The bimetric plate burned out. It cannot be repaired and will have to be replaced with a new one;
- The rod broke. It is difficult to repair, so it is easier to completely change the entire thermostat.
Replacing a thermostat is not a complicated process that does not require a lot of money or effort.
Checking the electric heater
The heating element in modern models is a reliable unit and rarely breaks. When this problem occurs, it is better not to buy a new heater. It's easier to buy a new iron. But first you should make sure that the problem is in the heating element.
In all models, the heater contacts are soldered to the device contacts and connected to an indicator lamp. If the lamp is on, but the iron does not heat up, then the malfunction is related to the heating element.
On some models, the thermal fuse is included in one heater circuit, and the regulator is included in another. If the fuse is faulty, then a false “diagnosis” can be made, suspecting a faulty heating element. To accurately determine the cause of the device failure, it should be completely disassembled.
Thermostat
The soleplate temperature regulator is the most important component of the iron and one of the most susceptible to breakdowns; It is a mechanical trigger device driven by a bimetallic plate. There are no “magnets, like in a refrigerator regulator,” in the iron’s thermostat. Like the refrigerator thermostat, there is also a mechanical trigger, only of a different design. The principle of its operation is simple:
- The part with the movable contact is pressed against the fixed one by a reversible spring. The contacts are closed, the heating element is heating up. The degree of compression of the spring is regulated by the temperature setting knob.
- On the other hand, the movable contact is connected by a dielectric pusher rod to a bimetallic plate.
- The bimetallic plate, bending from heat, presses through the rod onto the movable contact until it overpowers the spring.
- The spring is thrown over and opens the contacts.
- The heating element turns off, the sole of the iron with the bimetallic plate cools down.
- The bimetallic strip is straightened. When its pressure weakens sufficiently, the spring is thrown back and returns the regulator to its original state.
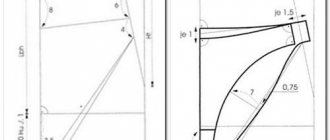
The heating element heats up again, the cycle repeats. In old irons and some new ones, the thermostat is assembled according to the scheme with a free rocker arm (item 1 in the figure):
Diagrams of iron thermostats
Its disadvantages are 2 pairs of contacts susceptible to burning and large hysteresis, i.e. difference between the response and return temperatures of the regulator. Therefore, in regulators with a free rocker there is always an adjustment screw under the handle, which is turned if the iron heats too much (tighten it by 1-2 turns) or weakly (unscrew it the same amount). To access the calibration screw, you need to remove the temperature control knob. It sits on the axis by friction, but is held in the body by claws with stops, see fig. on right. To remove the handle, you need to turn it all the way to the minimum (at the first point) and pull it up.
Iron temperature control knob
Most modern irons are equipped with a unified double-spring thermostat, pos. 2: it works very clearly and almost never requires adjustment during operation. Its weaknesses, firstly, are the same as in the previous one. case, contacts, see below. Secondly, there is a ceramic rod (indicated in blue), which sometimes cracks. The rod length is 8 mm, and a new one can be made from an MLT-0.5 W resistor, pos. 2a. The resistor leads are bitten to a length of 1.5-2 mm, the paint is washed off with dichloroethane or a surfactant remover, and the conductive layer is cleaned off with sandpaper. If the resistance of the resistor is more than 620-680 kOhm, some people install it instead of the rod as is, the paint burns without smoke or stink. However, then the sole of the iron may unpleasantly “pinch” with electricity. And what is much worse, the resistance of a resistor with an unprotected conductive layer can decrease several times, and the leakage current through it can increase to a dangerous value.
Note 3: sometimes the insert washers in thermostats crack. A new one can be machined from fluoroplastic instead; drawing see pos. 2b.
How to clean contacts
There is no need to clean the burnt contacts of the iron temperature regulator with sandpaper, as many sources advise: they operate under high current and after cleaning with sandpaper they quickly burn again. In the regulators of modern irons, the contacts are thin-walled stamped, and in this case they burn through to holes. To clean the contacts, you need to wrap a nail file along the suede moistened with alcohol, insert it between the contacts and rub until the suede stops getting very dirty with carbon deposits. An alternative is to cut a thin wedge out of an ink eraser and use it to clean the contacts. Then - with the same wedge made from a pencil eraser. Finally, wrap the nail file in a rag moistened with alcohol instead of suede and use it to remove any adhering particles of the eraser from the contacts.
Note: due to the thermostat, the following situation is possible - the iron heats at maximum, regardless of the position of the temperature setting knob; Adjusting the calibration screw does not help. This means that the contacts of the regulator are welded and it needs to be replaced.
Chemical descaling agents
Pencil
You can buy a pencil for cleaning your iron at any hardware store. The structure of the product involves removing carbon deposits from the outside of the sole, but the product also helps to clean the steam vents
The only thing you need to know when treating the surface is safety precautions, because cleaning is carried out when the working surface is heated
Fill the iron reservoir with water and heat the device to maximum. Use the working side of the pencil to work on the soles. The product will begin to melt, and the resulting plaque will come off with it. Wait 30 seconds, then gently wipe off any melted residue with an old rag. Run the steam cleaner to clean out the holes with steam, and finish by wiping the soleplate dry.
Despite the ease and simplicity of manipulation, keep in mind that the processing process will be accompanied by the release of an unpleasant odor, which can cause dizziness. To avoid negative consequences, carry out the procedure in a well-ventilated area.
It is not recommended to use aggressive household chemicals if the iron is intended for ironing children's clothes.
"Antinakipin" or analogue
Antiscale is considered the most popular commercial anti-scale product. It will easily dissolve mineral deposits, after which removing them will not be difficult. The product is diluted with clean water, following the instructions, after which the solution is poured into the tank. Next, the device needs to be heated to maximum, unplugged and left for half an hour.
Then the device is strongly heated again, and after cooling, all the liquid is removed along with pieces of plaque. Next, the container must be rinsed under running water, dried and replaced. After the procedure, be sure to test iron the unnecessary piece of fabric.
Topperr (“Topper”)
Topperr is a company that produces various products and chemicals for iron care.
The drug is diluted with water in a ratio of 2:1. Next you need to proceed step by step:
- Pour the solution into a water container.
- Heat the unit while holding it in an upright position.
- Unplug the device from the outlet and place it horizontally on an unnecessary piece of fabric, placing a piece of oilcloth on the ironing board.
- Leave the iron in this position for 2-3 hours.
- Drain the used fluid and fill the reservoir with clean water.
- Warm up the unit, set the steam supply mode and use it to clean the holes in the sole.
(Technology may change over time; follow package instructions.)
Other
Another well-known household chemical product for removing scale from irons is the German drug Optima Plus OP-020. It contains only organic components, so it can be used without fear of damaging the device. If you trust the reviews, the effect of use is noticeable the first time
Before cleaning, read the instructions and follow the precautions described therein.
There are a large number of anti-scale products on the market, such as Magic Power, Bon and others. To descale your ironing device, you can choose any of them or use proven folk remedies. We hope our recommendations will allow you to make the right choice.
Methods for cleaning soles
The base of the device also requires constant cleaning. There are steam holes on it, which tend to get clogged. There are several ways to mechanically clean them:
- Salt. This method is only suitable for metal surfaces. To clean it, simply sprinkle fine salt on a cotton cloth and rub the preheated soleplate of the iron.
- Citric acid solution. It is used to treat surfaces made of metal and ceramics. An acid solution is poured into a large frying pan, several coins are placed there, and an iron is placed horizontally on it. The coins should be placed in such a way that the holes in the sole remain open. The liquid in the frying pan is heated to a boil and cooled. The heating process is repeated several times.
Before treating the sole, the nozzle should be pierced into it using cotton swabs, a needle or a toothpick. This must be done with the utmost care so as not to leave scratches on the surface.
It is better not to clean devices with Teflon soles yourself. This material is quite fragile, so it can only be cleaned in a workshop using special compounds.
Irons with any type of sole must not be treated with acetic acid. Vinegar applied to a heated surface will enter the device through the nozzles, causing oxidation of electrical circuits and irreparable damage to plastic parts, regulators and pumps located under the housing.
Self-repair of a Tefal iron can only be carried out if you have certain knowledge and experience in repairing electrical appliances. In the absence of such experience, it is better not to take risks and seek help from qualified specialists.
Comparison Tefal vs Philips
Tefal and Philips are worthy brands that produce quality products. But of course there are differences in these brands
The first thing we pay attention to when choosing an iron is the sole. It comes in ceramic and metal-ceramic
Tefal's most popular ones are Durilium, Ultragliss and Autoclean Catalys. Philips has the most popular sole with Steam Glide technology - this is the company's own development, which combines all the best features of Tefal soles: ease of sliding, scratch resistance and high wear resistance.
The second important point when choosing an iron is its steam features.
When purchasing, be sure to pay attention to the number and location of steam holes. Both manufacturers, of course, equipped their products with a steam function, but Tefal can be considered more “advanced” in this regard
Thanks to special grooves for steam, where it collects, a so-called steam cushion is created, which will become simply indispensable when ironing delicate fabrics.
In principle, these are all the differences between these brands. Tefal and Philips irons use a “drop-stop” leak protection system, auto shut-off, have a fairly wide range of power from 350 to 2600 W, ergonomic handles and are light weight.
Advantages and disadvantages of PHILIPS
The advantages include:
- SteamGlide sole – we already mentioned it above
- Calc Clean anti-scale function
- large water tank (400 ml) – you will have to stop ironing less often
- adding water at any time, without disconnecting from the network.
We identified the following as disadvantages:
- lower power of the device itself (2400 W) and steam boost (170 g/min)
- manual adjustment of steam modes
- production in China
Advantages and disadvantages of Tefal
Advantages:
- iron power 2600 W and powerful steam boost (200 g/min)
- Autoclean Durilium AirGlide - although it is inferior in strength, it glides perfectly and easily
- automatic adjustment of steam supply - just set the required type of fabric
- convenient steam spout - it can easily iron out even wrinkles near buttons
- production in France
- Anti-scale system (scale protection)
Flaws:
- There is no way to add water without turning off the iron
- it is heavier (1.5 kg compared to 1.2 kg PHILIPS) - this will be noticeable during prolonged use.
In all other respects, the irons of the two competing brands turned out to be identical: there are energy saving modes, automatic shutdown, protection against leakage, even the cord length is the same - 2 meters. In addition to technical characteristics, when choosing an iron, remember that you will use it very often, so you should like the color, design, handle material, it should fit comfortably in your hand and not be heavy. Best of all, before purchasing, go to the store and take a closer look at the models pre-selected on the list of your favorites, “live.”
Tips for the hostess:
- Before ironing, you need to check the sole - there should be no dust or lint on it. Do not wipe hot soles.
- Linen and cotton items are best ironed on the reverse side, as the fabric may become shiny.
- To iron woolen items and dark fabrics, it is advisable to use a special cloth or gauze.
- You cannot wear only ironed items. They should hang on the hanger a little.
- Be sure to study the labels on clothes so as not to spoil the fabric.
- Steaming should not be used for suede, leather and faux fur.
How to properly disassemble the device
To work you will need screwdrivers: flat and asterisk.
Important! Before you begin, you should disconnect the device from the power supply. Some models (FV 9347, 5375, 9240, 4680, 3530 and 3830) have an anti-scale rod installed and must be removed.
Begin disassembly by unscrewing two bolts on the rear wall. Use a star screwdriver for this. The third bolt is located under the steam button; you need to carefully remove it: pry it off with a flat screwdriver, bend the plastic latches, and pull it towards you. You should act very carefully so as not to break anything. The button for spraying water is removed in the same way.
Unscrew the bolt located under the buttons of the steam supply system, after which the handle of the device can be removed. Carefully remove the sole heating temperature regulator. Remove the power cord block. 2 more screws are hidden under it and 4 contacts are visible.
Moving on to disassembling the case. The case consists of two securely sealed parts, which should not be attempted to be disassembled. The sealant is visible to the naked eye; it is a black mass, similar to rubber.
Important! The sole of Tefal irons is attached to the internal elements using special methods that differ from the methods used by other manufacturers. These can be hard-to-find screws (usually located under plugs) or special latches. Before you begin to separate the sole from the body, you should make sure that all fasteners have been removed.
In order not to completely break the device, before work you should watch a video about disassembling and repairing a Tefal iron.
Video
The video contains instructions on how to disassemble, clean and assemble a Tefal iron yourself:
Electronic engineer with many years of experience. For several years he was involved in organizing the repair of household appliances, including washing machines. Loves sport fishing, water tourism and travel.
Found a mistake? Select it and click the buttons:
There are a variety of balls that are used in the washing machine. Antistatic ones will prevent the fabric from sticking to the body after washing, balls with special loops will “comb” the lint and prevent the appearance of pills, and silicone ones with pimples will prevent fluff from matting when washing outerwear.
The first officially patented washing machine was made of wood and was a box with a frame, half filled with wooden balls. Laundry for washing and detergent were loaded inside and the frame was moved using a lever, which, in turn, made the balls move and grind the laundry.
There is a washing machine “for bachelors”. Linen washed in such a unit does not need to be ironed at all! The thing is that the device does not have a drum: some things can be placed inside the container directly on hangers (for example, jackets and shirts), and smaller things (for example, underwear and socks) can be placed on special shelves.
History knows the fact that a kitten fell into the drum of a washing machine and, after going through a full wash cycle on the “Wool” program, got out of the unit unharmed. The only trouble for the pet was an allergy to washing powder.
Conclusion
Repairing irons with a steam generator is fundamentally no different from conventional ones. A big word simply means a water container with a valve actuated automatically by a button. The location of the holes in the sole allows you to explore the built-in steam generator. Lined up on the edge: water simply drips from the container into the center. When the holes dot the surface, there is a flow-through heater or boiler inside. On the way to the bottom, the water becomes steam.
Some breakdowns of household appliances are quite easy to fix if you have minimal skills and tools; you don’t need to contact a service center for this. It is quite possible to repair a Tefal iron with your own hands; the main thing is to correctly disassemble the device and determine the cause of the malfunction.
Checking the simplest things
Often the iron does not work due to problems with the cord. During operation, it often bends, the insulation is damaged at the bend points, and sparks may even appear. Therefore, the first step when repairing an iron yourself is to inspect and test the cord. To test, you will need a multimeter (read how to use it here).
Disassembling the iron is the very beginning
Checking the power cord
Sometimes, to make sure that the problem is in the cord, you can plug in the iron. If everything is in order, the indicator lamp lights up. This is usually a green LED. Based on whether it is constantly on or goes off periodically, we will monitor the condition of the cord
We twist and bend it, paying attention to the state of the signal light. If it blinks, then the power cord is really at fault.
It is better to replace it, but, if desired, you can find the problem area (often it is visually easily identified) and correct the situation.
Typical problems with the iron cord
If these are problems with the insulation, and the conductor itself is intact, using insulating tape the fault is eliminated. If the wires are damaged, they are cut, connected in a new way using soldering, and the junction is insulated. This repair is a temporary measure, as problems will soon appear again - not far from the "restored" place. Therefore, it is still better to replace the cord.
Terminals and contacts
If there is no external damage to the cord and it does not work, you will have to disassemble the iron. At the first stage there are usually no difficulties - there is one bolt at the back. This is perhaps the only fastener that cannot be hidden. Unscrew it and remove the cover.
Removing the back cover is usually not difficult - just one bolt
Under the back cover there is a terminal block to which the wires from the thermostat and the heating element are connected, and our power cord is connected to the other. The terminal block may look different. Some manufacturers, like Bosch, have it hidden under a plastic cover. The cover must be removed. How to get to it depends on the model. Sometimes you just need to pry and pull, sometimes you have to remove some parts
It’s important to get to contacts
Overheating may cause the block or cord to melt.
Often the reason that the iron does not heat up is not hidden in the heating element, but because the contacts are clogged or oxidized. Sometimes water gets on the contacts (the container leaks), sometimes dust gets baked in there, sometimes the contact just weakens. If there is one of these problems, fix it. Perhaps repairing the iron yourself will end there.
Checking the cord for wire integrity
If the contacts are normal and clean, we test the cord to check the integrity of the wires. We take a tester/multimeter and put it in dialing mode. With one probe we touch the cord pin, with the second we “sort out” the wires on the terminal block. If the wire is intact, one of the pairs should “ring” - you should hear a beep.
Iron cord test
The iron cord is three-wire, two wires go to the pins of the cord, and the third is green or yellow-green - grounding. This is a metal plate on the fork of the iron. When you touch it and the green wire on the block, you should hear a “squeak” from the multimeter. If at least one wire does not ring, we change the cord.
Abstract reasoning
Manufacturers justify turning the iron into a kind of combination lock with safety, design and ergonomic requirements. But, sorry, from the visible fasteners on the irons there were only 1-2 screws at the back, and that remains so. Moreover, the body parts of old irons were made from fragile bakelite and polystyrene, while today’s plastics compete with metals in strength.
In fact, we, alas, live in an age of things that are not eternal. One of the fundamental principles of consumer society is inexorable: a product of mass demand must work flawlessly (manufacturer’s reputation, but what) for no more than 2-2.5 warranty periods, and then quickly and irreversibly become completely unusable. Leading manufacturers of consumer goods employ up to half or more of their design personnel to ensure that, God forbid, the product does not turn out to be too durable.
How does the work of the industry in the trash can affect the environment, and the involvement of truly high-quality specialists in actually harmful activities on the mass consciousness, is another question, but the iron almost does not give in to such attempts: it is too simple, and inside it is too hot and humid. Therefore, damage to the iron at the design stage comes down mainly to making it difficult to disassemble it outside the service center. However, it is still possible to repair an iron at home using improvised means if you know where and what secrets may be hidden in it and how to open them without the risk of completely ruining the iron.