Leaving your inkjet printer idle for a long period of time can cause a noticeable deterioration in print quality. Too much frequent use of the printer without preventive measures also leads to a poor print.
Below are different ways to clean the cartridge. Cleaning methods depend on the degree of contamination or drying of the ink inside the container. The laser printer cartridge can also be cleaned.
Regardless of the printer brand (HP, Canon, Epson and others), the cleaning principle is the same. The method is affected only by the cartridge manufacturing technology. So, there is a cartridge with a built-in print head or with a removable one. The first technology is used on HP and Canon printers, the second - Epson.
Causes of printer blockages
Before you clean the printer, you need to find the reason why it is clogged. Having installed it, you can choose the most effective cleaning method that gives the desired result in the shortest possible period of time.
After a long period of inactivity
If a printing device is left idle for a long time, the ink in its cartridges can dry out and form a kind of plug. This cause of blockage is considered the most common. Most of the devices installed in ordinary apartments suffer from it. This is because people rarely need to print any text or document at home.
To correct the situation, you need to clean the printer print head nozzles. You need to do this several times until the blockage disappears. If performing this operation multiple times does not help resolve the problem, you will have to flush the print head.
Due to mixing of incompatible paints
There are dozens of types of ink that are only suitable for one or another printer model. If you fill a cartridge with incompatible ink, a sediment will form that will quickly clog the nozzles. To avoid this problem, you must constantly refill the cartridges with the same ink.
As a result of printing with an empty cartridge
Any printing device warns the user about the lack of ink in the cartridges. If you ignore this warning, the nozzles will gradually begin to clog. Continuing to ignore the prompts will cause the nozzles to burn out. After this, it will be impossible to restore the print head.
Cleaning your Epson device
If you find a problem such as a faded image when printing with an Epson printer, as well as missing dots, you should clean the equipment nozzle. If you clean the print head in a timely manner, the printer will supply ink in the correct proportion. You can clean the nozzles on an Epson printer using a utility such as head cleaning (located in the printer kit), as well as using a special button on the printer control panel.
Syringe attachment for cleaning Epson printers
If you cannot clean the print head on an Epson l210 device using this method, you should mechanically clean the device. During mechanical cleaning, you must adhere to the following rules:
- Identify the problem initially;
- Disassemble the device;
- Unscrew the screws;
- Disconnect the cartridges on the Epson device;
- Disconnect the cable from the print head;
- Blow out the print head;
- Reassemble the printer in reverse order.
Epson head flush
Cleaning the nozzle of Epson and Canon devices should be taken seriously and if you are unsure of your abilities, contact a specialist.
Sources
- https://printeru.info/remont/promuvka-strujnyh-kartridzhej
- https://tehnofaq.ru/ochishhenie-pechatayushhej-golovki-printera-svoimi-rukami/
- https://tze1.ru/articles/detail/ochistka-kartridzha/
- https://superzapravka.ru/articles/poleznaja-informacija/kak-samostojatelno-prochistit-kartridzh-strujnogo
- https://printergid.ru/uhod/kak-prochistit-sopla-printera
Hardware cleaning
Hardware cleaning will help remove clogs in the printer nozzles. Its main advantage is that you will not need to disassemble the device to carry out the work. This method allows you to get rid of only recently occurring traffic jams. Severely dried nozzles will be difficult to clean using this method.
Algorithm of actions:
- Check the ink levels in the cartridges and refill them if necessary.
- Connect the device to the computer.
- Place a blank sheet of paper in the paper holder.
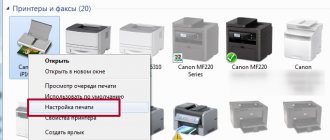
- On the computer, open the “Start” menu, in which you find “Control Panel”.
- It goes to the “Devices and Printers” section.
- On the page that opens, right-click on the name of the device to be cleaned.
- A new window will appear in which you select the “Properties” tab and the “Maintenance” section.
- Among the proposed options, choose a cleaning method.
- After clicking on the icon, the printer will begin to supply ink under high pressure. A spray of paint will break through the blockage and fix the problem.
- Once cleaning is complete, the device will prompt the user to print a test page.
Cleaning Tool Set
You need to remember that you cannot clean the camera with improvised tools, such as brushes, pieces of cloth, and the like. Buy special tools.
What should be included in a cleaning kit?
- blower is one of the most gentle dust removal tools because it won't damage the optics or smear dirt. A special pear costs an average of 600 rubles. But I bought one on Aliexpress for 100 rubles, here.
- Lens cleaning pencil After working with the pear, use a pencil brush, and then a second soft felt attachment. The most popular pencil from Lenspen costs 800 rubles and more. I didn’t bother and bought it for 400 rubles, in the same store as the pear. I bought my pencil here.
- Cleaning wipes or microfiber cloth. I advise you to use disposable wipes to avoid smearing dust on the dirty side of the cloth. I bought these rags here, for 120 rubles for 3 pieces.
- A special treatment liquid consisting of alcohol and distilled water will help remove more difficult stains. Instead of liquid, I bought mops already moistened with a special cleaning liquid. I also bought them on Aliexpress, and they cost me 550 rubles, for 8 pieces (4 dry and 4 wet).
Do not use monitor cleaners instead of a special liquid, as this may damage the camera.
A small note! Once the felt on the tip of the pencil wears out, you should stop using it, as the rubber underneath can damage the camera. Depending on the brand of pencil, the average number of uses can vary between 100-150 times.
I don't use wipes because they don't remove dirt well. A microfiber cloth with or without special liquid is the best replacement for napkins.
We have reviewed the most necessary set of every self-respecting photographer. All other devices, for example, special brushes and brushes are already additional accessories.
Cleaning a Canon printer manually
If the hardware method does not give positive results, then wash the nozzles manually. All actions performed are the same for most models of printing devices. In addition, the equipment body, tray and feed rollers are cleaned.
External surfaces
The easiest way is to clean the outside of the device. The user needs to remove accumulated dirt and dust.
Features of the work:
- Before cleaning, you must unplug the printer.
- To avoid damaging the plastic housing, do not use abrasive cleaners.
- Even with severe contamination, it is not recommended to use household chemicals.
- It is best to remove dust with a slightly damp cloth.
Scanner cover and feed rollers
Most Canon models combine a printer with a copier and scanner. These built-in devices should be wiped regularly with a soft, lint-free cloth. Do not use water or any cleaning agents.
It is more difficult to remove dirt from the feed rollers. To do this job, you need to do the following:
- Remove all sheets of paper from the tray.
- Connect the device to electricity.
- Press and hold the “Stop” button located on the control panel of the device.
- After this, the red indicator will start flashing.
- Count 7 such signals and release the “Stop” key.
- The feed rollers will begin to rotate.
- As soon as they stop moving, several blank sheets of paper are inserted into the tray.
- Press “Stop” again and count 7 blinks of the indicator.
- Release the button and wait for the paper to come out.
How to clean a tray
Sometimes dirt accumulates in the tray and leaves marks on the printed sheets. To fix this problem, you need to perform a cleaning procedure. This is done in the following way:
- Connect the device to the network.
- Remove all paper from the tray, leaving 1 sheet.
- It is folded in half and then leveled.
- The paper is placed in the rear tray and a test print is started.
- Press and hold the “Stop” button until the red indicator flashes 8 times.
- After this, the key is released and the paper is waited for to come out.
Prevention
Sooner or later, especially if refills are frequent, you will have to clean the inside of the cartridge. But during normal operation, when there are no large volumes of printing, it is necessary to adhere to some rules. Then the ink will not dry out completely and there will be no severe contamination.
- Be sure to test print a color sheet at least once a week to prevent the nozzles from drying out.
- Regularly do wet cleaning of the workplace and the entire room. It wouldn't hurt to clean the printer with a damp cloth and remove dust from accessible areas with a vacuum cleaner.
- Periodic software maintenance will be a good way of prevention.
- When refilling a laser printer, be sure to clean all elements of old toner. Empty the waste hopper, clean the dosing blade, magnetic shaft and others.
5 / 5 ( 3 voices)
Methods for cleaning cartridges
You can clean the cartridge using hot and cold methods. In the first case, heated water will be used to achieve the desired result, and in the second, cold water will be used.
Cold cleaning
To rinse Canon cartridges with a cold method, you will need clean water, napkins, a disposable syringe, a pipette, gloves, a piece of soft cloth and any glass cleaner.
Procedure:
- A cloth is spread on the table and the dried cartridge is placed on it.
- Apply a small amount of glass surface cleaner to the nozzles.
- After 10 minutes, the substance is removed with a napkin.
- To remove residual moisture, the nozzles are additionally wiped with a soft cloth.
- Return the cartridge to the device and check the print quality.
If this method does not help, then immerse the cartridge nozzles in a container with a cleaning agent poured at the bottom. After 3 hours, wipe off the remaining soaked ink with a rag.
Application of the hot method
Cleaning cartridges using hot water takes longer. At the same time, the probability of successful completion of the case increases several times.
Step-by-step instruction:
- Heated water is poured into a bowl or plastic container. The height of the liquid level should be about 3 cm.
- The cartridge is placed in the water (nozzles down).
- After 3-5 minutes, replace the cooled liquid with hot one.
- You can complete the first stage of cleaning only after the water is no longer colored by ink.
- After this, detergent is diluted in hot liquid. The proportions of the components should be 1:1.
- The cartridge nozzles are placed in the solution and left there for 2 hours.
- After the specified time, wipe dry all wet areas.
Soaking
If problems with printing remain, then the next way to “reanimate” the cartridge is to soak it.
To do this, you will need a glass cleaning liquid (be sure to make sure it contains ethylene glycol and isopropyl alcohol), a small container, and a lint-free cloth. A small jar with a wide neck or a lid is suitable as a container.
- Pour the product (3-5mm) into the bottom and place the cartridge in it with the nozzles down for 2-3 hours.
- remove the cartridge and dry it with a napkin;
- do a test print.
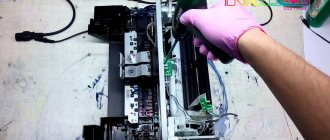
How to remove and clean the print head
The head can be washed only after removing this part of the device. This must be done as carefully as possible, since any careless action can easily damage it.
Sequence of operations:
- Raise the top cover of the device.
- Connect the device to the network and press the power button.
- Wait until the head moves to the central position.
- After this, carefully open the protective cover and remove the cartridges.
- Raise the locking lever and remove the head.
To clean the seal from contamination, you need to prepare some household chemicals. It should not contain aggressive components that could damage printer parts.
Washing steps:
- A piece of bandage, folded several times, is placed at the bottom of a wide bowl.
- Pour a little cleaning product on top. It is necessary that the bandage is well saturated with it.
- The print head is placed in the container.
- Tubes intended for installation of medical droppers are put on the fittings. Their length must be at least 4 cm.
- The selected cleaning agent is poured into the tubes.
- The part is left for 2 hours.
- Periodically check the level of the poured substance.
- After the specified time, a syringe is inserted into the tube.
- With its help, the product and ink residues are drawn out.
- Repeat similar steps several more times. Do this until the drained liquid becomes clear.
- The head is wiped with a dry cloth and returned to the printer.
- Install cartridges.
- Close the device cover and turn on test printing.
Removing severe head clog
If flushing the print head is unsuccessful, then you should use a more effective cleaning method. It will take a lot of time and effort to complete all the steps provided.
Step-by-step algorithm:
- The medical tube for droppers is cut into several parts. The length of each of them should be about 6 cm.
- Tubes are inserted into all holes.
- Pour in cleaning agent.
- If the blockage does not allow liquid to penetrate inside, then repeat similar steps several more times.
- As soon as the plug is partially broken, the head is left for 2 days.
- Check the cleaning agent level every 2 hours. If necessary, top it up.
- After 2 days, the liquid mixed with ink is drawn out with a syringe.
There is another way to get rid of severe blockage. To carry out the work, you will additionally need a plastic container and several napkins. Having prepared these items, perform the following steps:
- Place 2 napkins at the bottom of the plastic container.
- A small amount of the selected detergent is poured onto them.
- The part to be cleaned is placed on top.
- It is pressed to the bottom of the container.
- Use a syringe to draw out the liquid.
- Repeat the operation 5 times, constantly adding a little cleaning agent.
Installation and configuration process
After the print head has been washed, the parts are installed in the printer and configured. Setup and calibration work is carried out based on the results of printing a test page.
The complete process consists of the following steps:
- The print head, wiped with a dry cloth, is installed in the device.
- Lower the latch and insert the cartridges.
- Close the printer cover and start a test print.
- If extraneous lines or symbols appear on the sheet, then calibrate. The same operation is performed if the print quality is poor (blurry, pale colors, stripes).
- Place at least 10 blank sheets in the tray.
- The printer is connected to the computer.
- Both devices are connected to the network.
- On the PC, find the “Start” button.
- In the menu that appears, select “Control Panel”.
- Then click on “Devices and Printers”.
- In the window that opens, select “Properties”.
- In this section, go to the “Advanced” tab.
- Place a check mark next to the words “Align manually”.
- Save the changes made.
- At the next stage, find the “Maintenance” section.
- In it, select “Head Alignment”.
- Make the necessary changes and save the settings.
Do laser printers need to be cleaned?
To clean a laser printer, you must have special equipment and knowledge. Because of this, such work should be left to professionals. In some cases, a contaminated part cannot be restored and must be replaced with a new one.
Cleaning the laser printer cartridge is rarely done. This is due to the fact that any impact on this component of the design can lead to damage to various parts of the printer.
Used powder must be disposed of immediately. Some users reuse it, which leads to contamination.
If you know the correct sequence of actions and a few important secrets, then cleaning a Canon printer at home will be a simple task. You can perform all actions quickly and without much effort.
Checking the quality of “reanimation”
After completing all recovery procedures, you should check the result. Perhaps our efforts will not give it at all. To do this you can:
- Print a test sheet.
- Print a test page.
- Blot the cartridge with the nozzles on a napkin. In black there should be one black stripe, and in color there should be three different shades with a clear display.
Take the time to follow these simple steps to know the real state of your printing equipment.