- Blower (vacuum cleaner) or compressor for cleaning PC. A lot of dust can accumulate inside the system unit, and it can be quite difficult to simply brush it off with a brush. There are several hard-to-reach places, which can be reached with a stream of air. Although it's not necessary, vacuuming will save you a lot of time. This will remove dust particles faster.
- Screwdriver. You will have to disassemble some PC components. The best way to do this is to use a handy screwdriver. This will help you remove the cover from the case and remove any elements that may interfere with cleaning.
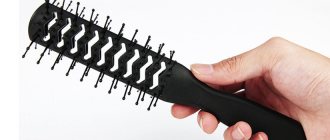
- Antistatic brush. This tool will help remove dust from the surface and prevent it from returning during the cleaning process. It is better if it is small.
- Cotton buds. They can be a real lifesaver if you don't plan to use a vacuum cleaner or compressor. Some areas are difficult to reach, and cotton swabs can help clean even those areas.
- Soft fabric. It will be needed at the final stage. Thanks to the use of fabric, the details of your PC will look neat and flawless.
- Screen cleaning cloths or microfiber cloths. Don't use a regular cloth to clean your screen if you want to keep it scratch-free and clean. It contains fibers that can potentially damage your monitor's surface, and in general, a regular cloth isn't very effective at removing dirt.
To better clean your computer from dust, you can use a special blower.
How to clean the system unit from dust
Step 1. Turn off everything and disconnect all cords connected to the system unit and the power supply. If the cover is screwed on, use a screwdriver and carefully remove it. Be careful not to pull too hard as this may damage the wires.
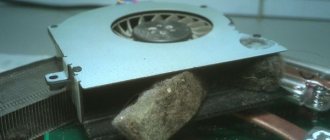
Step 2: Using an antistatic brush, remove dust from the cover. Then use a leaf blower to get rid of any dust that has accumulated in the fans. Hold the blades while you blow to avoid damaging them. Brush off any remaining dust.
Step 3. Using damp cotton swabs, wipe the areas between the fan blades to remove any dust or dirt that may have remained there during the cleaning process.
When disassembling your computer, be careful not to damage its components.
Why clean your PC?
Some people believe that cleaning a personal computer (PC) is not necessary, but this is not true. If you do not clean the system unit, dust will begin to accumulate in the heatsink of the central processor, motherboard chipset and video card. Dust coating on the surface of heat sinks reduces its ability to conduct heat, which leads to increased temperatures of PC components.
If there is a large amount of dust, even an installed fan will not be able to normalize the temperature, and the computer will begin to overheat. Therefore, to avoid overheating, they periodically clean the components of the system unit.
How to clean a video card
Step 1: Using a screwdriver, carefully remove the graphics card. All computers have a retainer that holds the GPU in place. Make sure it is not shorted before removing.
Step 2: If your graphics card has a fan, hold the fan blades while you blow off the dust. For a more thorough cleaning, wipe the area between the blades with a cotton swab.
Step 3: Do not return the video card to its original place until you have finished cleaning the entire PC. Instead, give it a good wipe with a dry cloth to complete the cleaning process. Do this carefully to avoid damaging the device.
Do not forcefully remove the video card if it does not give way: most likely, you will need to release the lock on the mount
Causes of pollution
There are several reasons for dust getting into the computer system unit, which you need to familiarize yourself with:
- Dustiness of the room. Most often, a PC becomes dirty due to the fact that it is kept in a dusty room. Therefore, it is necessary to periodically carry out wet cleaning and maintain cleanliness in the apartment.
- A magnetic field. It's no secret that all devices that operate using electricity have a magnetic field. It is thanks to this that digital devices attract dust particles.
- The operation of coolers. Some system units are equipped with special fans that blow cold air inside. If the room is rarely wet cleaned, dust is drawn in along with the air and settles on the motherboard.
How to clean your monitor from dust
It's time to use screen cleaning wipes or microfiber cloths. For a more effective cleaning, use rubbing alcohol to remove any dirt that has accumulated on your monitor.
To clean the monitor, use special wipes or microfiber cloth
Step 1: Without alcohol or water, wipe off any dirt from the monitor. Take a microfiber cloth and wipe the screen and back of the monitor several times.
Step 2: If that doesn't work, apply some rubbing alcohol to the cloth and repeat the process. Be careful not to press on the monitor to avoid damaging it. Just walk through the contaminated areas several times.
Step 3: Wipe the screen dry with a regular cloth. Do not leave the monitor wet as this may leave marks on it.
What not to use
Not all products can be used to clean a personal computer from accumulated dirt, and therefore you need to figure out in advance what should not be used.
Wet rags and sponges
Some people believe that the computer can be wiped with damp sponges or rags, but this is not true. Cloths soaked in water can only be used to wipe the outside of the case. It is contraindicated to wipe the inside with a damp cloth, as this can damage the motherboard.
Experts recommend using only dry sponges or cloths.
Hairdryer
It is no secret that compressors or vacuum cleaners are often used to blow out dust. However, some people do not have such devices and decide to use a household hair dryer instead. This cannot be done, since modern models of household hair dryers will only spread dust particles throughout the entire body, after which they will again settle on the surface of the processor, video card and other components.
Cotton swabs, napkins
When cleaning hard-to-reach places on the motherboard from dust, some people use napkins with cotton swabs. They should not be used, as such material begins to split upon contact with sharp objects. This leads to small particles of napkins and cotton swabs remaining on the surface.
Instead, it is better to use a flannel cloth, which does not splinter due to its density.
Ethanol
When wiping the monitor, mouse, keyboard and computer case, do not use ethyl alcohol. It contains components that promote the development of oxidation. If you wipe the monitor with a cloth soaked in alcohol, the anti-reflective coating will be damaged.
Products containing ammonia, acetone, toluene
Toluene, acetone and ammonia can damage the motherboard and therefore you should not use cleaning products that contain these substances. Before using a product against dirt and dust, you must carefully familiarize yourself with the components from which it is made.
How to clean a computer mouse from dust
Now we come to the easiest part of cleaning your computer. There is no need to even list the steps because all you need to do is wipe the mouse with a cloth soaked in alcohol.
Other devices, such as headsets and speakers, are cleaned in the same way.
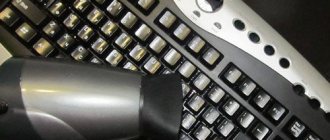
A large number of germs accumulate on a computer headset, so it is necessary to clean it as often as possible
Some final useful tips
- When carrying out a complete cleaning and disassembling of the PC, you need to carefully monitor the small details.
If you have at your disposal not just a Phillips-head, but a magnetic screwdriver, you will protect yourself from the possible loss of mounting bolts.
Having unhooked them, it is better not to put everything in one pile, so that later there is no confusion with the connectors.
Be sure to write down or photograph which contacts and in what order are connected to the motherboard from the power and reset buttons.
Most users think that they can remember the whole bunch of small wiring, and then they wonder why, after cleaning the dust, the computer does not turn on, the lights on the front panel do not light up, etc.
Now you know what and how to clean your computer from dust.
Don’t forget to try the above tips in practice and express your opinion in the comments below the post. Thank you for your attention!
Popular types of cleaning
Depending on the degree of contamination of the computer device, there are several types of cleansing: superficial and deep. Superficial cleaning involves preventive actions that are performed on an ongoing basis, such as wiping the monitor and keyboard, as well as blowing out the fan. For preventative cleaning, you will need wet wipes and a can of compressed air, which can be purchased at computer hardware stores. Timely superficial care will keep your equipment clean and extend its service life.
Additional Information! The accumulation of dust in the cooling system and germs on the keyboard can harm human health and cause allergies and a number of other diseases.
Checking for viruses and fixing system errors
Cleaning and optimizing Windows is creative work and requires perseverance.
Virus cleaning
The list of antivirus programs is large, use any of them, the standard one installed on your computer is quite suitable.
The steps to launch an antivirus program are extremely simple. You should run an anti-virus program with a full system scan and wait while the system is scanned and cleaned of viruses.
If any threats or malware are detected, you will receive a proposal on options to solve this problem. By default, the program contains the right decisions; you just need to agree. If you are offered the option of “treat” or “remove”, in most cases it is better to delete. You should only try programs that are well known to you.
It’s very good that when there are no viruses or malware, a corresponding message will appear. If the computer is well protected , you can rejoice, but even if viruses are found, there is no reason to panic. The antivirus knows what to do in such a situation.
After checking the system for viruses, it is recommended to reboot the computer, which is what we do.
Finding and fixing system errors
First, we determine whether the hard drive is divided into local partitions or not. If yes, which disk is the last one? You need to start checking there.
Let's say the hard drive of your computer has three local drives C, D and E. You need to start the scan from the last drive E, and we will end with the system drive; this is always drive C by default.
To start checking, click on the “Start” button, in the right column we see the “Computer” menu, click on it. By hovering the cursor over the last drive E, call up the context menu using the right mouse button. We find the last line of “Properties” and call it.
The information window for the corresponding drive will open. You need to find the “Service” tab and open it.
The window that opens offers:
- Checking the disk for errors.
- Defragmentation of files stored on this disk.
- Archiving files stored on this disk.
Now we are interested in checking the disk for errors; we launch the check by clicking the appropriate button.
A window will appear in which you need to check the boxes, check both of them and click on the “Run” button.
All stages of verification will take quite a long time. Enough time to eat and drink tea. The check ends by clicking “OK”. We do the same with all remaining disks.
Questions will arise when you run a scan of system drive C. A message will appear: “Windows cannot scan the drive that is currently in use. Do you want to check the disk for failures the next time you restart your computer? — click “Schedule disk check”. We reboot the system ourselves using the “Start” button.
The system scan will occur before Windows boots, and a scan notification will appear, displayed on a blue screen.
Checking the system disk is similar to the others, with the exception of the ending. When the scan is completed, the computer will reboot itself and open the “desktop”.
The second phase of cleaning your computer has ended. There is very little left.
Criteria for choosing a vacuum cleaner
Many manufacturers produce vacuum cleaners designed for computer care, but this does not mean that any one will be suitable for you personally.
When choosing a device, you need to pay attention to several details:
- Nozzle. Since dust must be removed from all corners without exception, this element must be narrow, then the most secluded places will become accessible to it.
- Availability of a flashlight. With its help, dusty areas will not be hidden from your eyes.
- Presence of USB. In this case, your dust “recycler” will be able to work not only from an outlet, but also from equipment directly. You can always clear the keyboard rows by connecting it to the appropriate connector. This is especially true for a laptop, because the conditions for its use are far from ideal.
- Compactness. Small dimensions are desirable, since cleaning with a large vacuum cleaner is inconvenient and dangerous.
- Network cable. For convenient cleaning of the device, the optimal length is 1.5 m minimum.
- Nozzles The kit should include at least three: a soft brush, a rubber brush, and a crevice brush.
- Additional functions. “Turbo” allows you to briefly increase the suction power, if necessary, and the power regulator to decrease it.
Many models can be stored in a desk drawer so that you can use the device at any time.
There are coolers (from 3 to 4) inside the computer. Each of them is the same vacuum cleaner and draws a large amount of dust that conducts current into the computer. If you do not clean it, the machine will overheat and fail.
Caring for a miniature computer vacuum cleaner is easy; you just need to empty the dust container, which takes little time.
And after removing dust inside the system unit, power supply and on the fan blades, the cooling system will work at full capacity, the coolers will stop making noise, and the operation of the electronic components of the gadget will stabilize.
Signs you need cleaning
Cleaning the laptop screen
When the computer is used intensively, the central and graphics processor heat up significantly and require additional cooling. For these purposes, every laptop has a system that removes excess heat from the processor to the fan and cooling radiator. For the cooling system to function properly, cleaning measures must be carried out periodically.
Signs that indicate a dirty laptop:
- Fast heating of equipment;
- The processor is too noisy;
- Programs freezing;
- System slowdown when playing video files;
- USB ports do not function;
- Keyboard sticking;
- Long loading of files;
- Long-term inclusion;
- Involuntary shutdown of the laptop.
Temperatures above 70 °C indicate overheating and possible contamination. Often, the device already has software installed to track temperature; if the program is missing, it can be downloaded from the Internet.