Any equipment fails sooner or later. Washing machines in the budget category, for example, Indesit brand models such as WISL 82, WISL 83, WISL 102, WISL 103, WISL 105, IWSC 5105 (especially those that have been in use for a long time), often require repairs. Failures can be very different, and in order to correctly determine the cause of the malfunction and eliminate it, as a rule, the machine needs to be disassembled.
To determine the cause of the malfunction and eliminate it, it is usually necessary to disassemble the washing machine
Sometimes it is enough to simply remove one of the housing covers, but there are times when you need to get to a bearing located in the drum or to another hard-to-reach part. Then the owners of the equipment are faced with a serious task, the solution of which must be approached with full responsibility.
If you want to save money, try performing repairs without contacting a service center. In our article we will tell you how to disassemble an Indesit washing machine with your own hands so that you can easily reassemble it later.
Preparation
Before you begin any repairs, you need to make sure you have the necessary tools. You may need:
- a set of flat and Phillips screwdrivers;
- socket and open-end wrenches;
- set of heads and knobs;
- hammer;
- multimeter;
- bit;
- hacksaw for metal;
- pliers;
- WD-40 product;
- awl.
To disassemble a washing machine, you may need a variety of tools.
Please note that the presented list of tools and tools is as wide as possible and allows you to perform any repair. In some cases, you can get by with a much smaller set.
You must understand that troubleshooting can take more than one day, and the removed parts will take up a lot of space. Therefore, if possible, move the unit to a garage, shed or any other utility room, where it will not be in the way, and spare parts can be neatly laid out.
Before disassembling the automatic machine, find the warranty card and make sure that the warranty period has expired. Remember that the manufacturer is not responsible for equipment that was repaired at home, so if the warranty is still in force, contact a specialized service center.
If there is no free space, organize the work on site: prepare a section of the floor at least 2 x 2 m in size, removing carpets, furniture and covering it with film or old newspapers. Disconnect the washing machine from all communications and carefully disconnect the hoses.
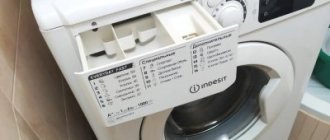
It is imperative to drain the remaining water from the tank so that during disassembly it does not get on other parts. To do this, place a dry cloth under the machine, unscrew the drain filter and wait until all the water drains from the hole. Also remove the detergent tray (usually to do this you need to press the latch located in the middle and at the same time pull the part towards you) and set it and the filter aside.
In order to disassemble a washing machine, certain skills are required. If you are not confident in your own abilities, it is better to entrust the work to professionals.
So, the Indesit washing machine is ready for disassembly, what should you do first?
Nuances when working with washing machines
Removing the top cover is usually not difficult, but certain points should still be taken into account. Indesit WISL 105 and other models are easy to handle because they have the same disassembly principle. Rarely can you come across models that are understood a little differently. Let’s say the manufacturer Ardo produces cars that have untypically removed top covers. You need to remember this, as you may encounter an unusual model.
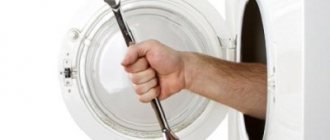
As always, you will have to first disconnect the device from the network. Just in case, it is better to wear rubber gloves to avoid electric shock. After this, the unit will need to be moved away from the wall. You need a place to work, otherwise it will be difficult and even impossible to unscrew the screws.
The lid will have to be moved forward rather than backward. That is, if a person is standing behind the unit, then you need to move the element away from you. The cover can only be moved at an angle. Otherwise, nothing will work. You will have to determine the angle yourself, as it may differ. It is worth trying different slopes until you achieve the result.
On older washing machines, there are sometimes bolts attached to the front panel. This is even more convenient, because there is no need to move the unit. All screws are covered with plugs, which must first be removed. After this, you will need to unscrew the bolts, remove the fasteners and lift the cover, pushing it forward.
As a rule, Indesit machine models are disassembled according to the standard scheme. People have no problems interacting with the device. You should act carefully so as not to damage the plastic element. In addition, you should try not to leave scratches. It will be difficult to remove them from the front panels later. If you follow the instructions, you will be able to remove the lid from the Indesit washing machine yourself. The main thing is to correctly return it to its place, so that later there are no problems with the functioning of the device.
How to remove main parts
The washing machine consists of many parts, most of which are hidden inside the body.
Here is a schematic representation of the main parts of the washing machine
We begin to disassemble the case from the top panel , which is secured with two bolts located on the back side of the machine; they need to be unscrewed first. Then, standing at the front of the unit, pull the panel towards you and lift it slightly.
Next we move on to the rear panel , which is held on by six self-tapping screws. You can unscrew them using a screwdriver. Directly behind the cover you will see the drive belt; it is better to immediately remove it too, carefully turning the pulley wheel clockwise.
The diagram shows in which direction you need to rotate the pulley to remove the belt from it
To dismantle the dashboard , unscrew several screws located in the niche of the detergent tray. Then we disconnect the wires and the pipe, remove the panel from the latches and put it aside.
During the disassembly process, the location of the parts and the connection diagram of the contacts can be photographed so that after the repair you can quickly and correctly reassemble in the reverse order.
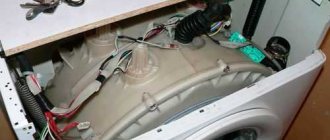
At the top of the washing machine there are: a counterweight (stone), a pipe connecting the powder compartment to the tank, a water intake valve and its contacts, as well as a pressure switch, its tube and contacts. We remove all these details.
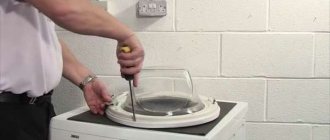
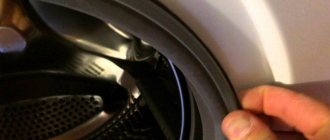
Before removing the front panel , remove the hatch door and rubber seal. We begin dismantling with the cuff - bend it with a screwdriver and carefully remove it. We dismantle the door by unscrewing several bolts that hold the hinge. Then we remove the screws that hold the front panel in place and move it to the side.
Remove the rubber cuff by carefully bending it using a screwdriver
In the lower part of the unit, it is necessary to dismantle the electric motor, tubular electric heater (TEH), lower counterweight, drain pipe and shock absorbers on which the tank is supported.
The heating element is easy to find by the end, which is visible under the tank. Remove all wiring from the heater contacts. Unscrew the nut located in the center between the contacts. Having loosened the element, remove it from the groove. We remove the power supply and ground wire from the engine, and then unscrew the bolts securing it.
The heating element is located under the tank, to remove it you need to disconnect the contacts and unscrew the nut located in the center
To remove the shock absorbers and drain pipe, you need to place the washing machine on its side. Using pliers, remove the clamp and disconnect the drain pipe from the pump. Then unscrew the shock absorbers.
To dismantle the drain pipe, you need to loosen and remove the clamps holding it
After dismantling all the parts, remove the tank. But what if this is not enough? How to disassemble the drum of an Indesit washing machine located inside a non-separable tank?
How to open an LG washing machine if the handle is broken?
There are times when the pen
stuck, and the problem can be solved using a regular rope.
Take a thin, but at the same time strong cord and insert it into the gap between the body of the washing
machine and the hatch. After this, take both ends of the lace and pull it towards you, thus opening the lock.
Interesting materials:
How to connect a router to the Internet without a computer? How to connect a router to a computer via TP link? How to connect a router to Mgts? How to connect a router to a laptop for setup? How to connect a router to a router via LAN? How to connect the router to the Internet? How to connect a Netis router to the Internet? How to connect a router to a phone? How to connect Tenda ac11 router? How to connect Xiaomi router to the application?
How to disassemble the tank and drum
Washing machines of the Indesit brand usually have non-separable tanks, that is, if any element located inside fails, the manufacturer recommends replacing the entire part. Such repairs can be expensive, so if it is necessary to replace, for example, a bearing, it is still better to disassemble the tank.
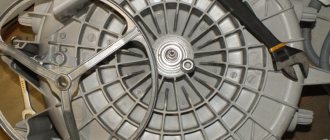
In the photo you see a non-separable washing machine tank in which the drum is located
Dismantling begins by removing the pulley (the wheel through which the belt passed). The bolt that secures this part is subject to significant stress, and it is important that it holds tightly. Therefore, when assembling a machine, it is often not just screwed on, but also additionally secured with glue. It is better to use a T40 hexagonal star wrench and loosen the bolt, gradually loosening it. If the part does not give in, spray it with WD-40 or carefully knock it off the glue with a hammer.
In order to unscrew the bolt securing the pulley, you need to use a T40 hexagonal star wrench.
Next, we lay the tank on its side and carefully cut it with a hacksaw along the seam (where the two halves of the part are soldered). First, use a drill to drill holes around the entire perimeter of the seam (during assembly, the halves can be easily fastened with bolts).
When the tank is open, unscrew the bolts securing the drum, unfasten the fastenings and remove the tank wall. Now you can disassemble the drum, that is, remove the oil seal and bearings from it.
We start with the bearing located closer to the outside of the drum. We lay the part with the hatch hole down, place the chisel on the outer rim of the metal ring and hit it with a hammer.
You will need a hammer and chisel to remove the bearing from the drum.
We carefully monitor the position of the chisel when knocking out the bearing - if the tool slips and the inner ring is struck, it may fly out, and it will be quite difficult to remove the remaining bearing from the seat. We dismantle the inner bearing in the same way, and then remove the oil seal.
Features of disassembling units with vertical loading
How to disassemble an Indesit top-loading washing machine? The procedure will not differ much from that described above, because the device contains the same elements as a front-loading washing machine (pressure switch, water intake valve, drum, tank, control board, pump, etc.). The main differences are that the axis of the “vertical” drum is structurally made on two bearings, and sometimes a self-positioning sensor is located on the tank (fixing the drum with the flaps up).
In the photo you can see the structure of a top-loading washing machine
We begin to disassemble the unit from the control panel by unscrewing the screws holding it on the sides or simply prying the part with a screwdriver and sliding it towards you, not forgetting to disconnect the contacts. Under the panel there is a control board, which we also dismantle.
Then remove the top cover (its fastenings are usually located under the control board) and side panels, carefully disconnect the clamp from the drum.
Further actions will consist of sequential removal of all parts. The bearings in a top-loading washing machine are located on both sides of the drum, so removing them will take a little longer.
We will be glad if our article helps you repair your washing machine yourself. Follow the instruction manual, take your time, be careful, and you will succeed!