If any breakdowns occur in the washing machine, it is often necessary to remove the drum. The procedure is most often carried out by specialists, but if you wish, you can do everything yourself. Especially if there is no desire to spend the family budget on the services of a third-party specialist. By following the basic rules for working with equipment, you can easily remove the drum and repair the required unit.
Required Tools
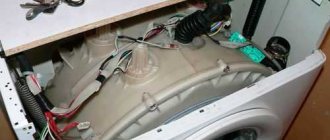
The drum can be removed from the washing machine only after complete or partial disassembly of the equipment.
In this case, the user will need the following tools:
- a set of screwdrivers of different sizes depending on the fasteners used;
- hammer;
- a hacksaw for metal (if a non-separated tank is installed);
- mites;
- screwdriver;
- a set of wrenches for the required fasteners or a universal adjustable tool.
You can also order new parts for repairs in advance. However, it will be very difficult for an inexperienced user to accurately formulate the cause of the breakdown before removing the tank.
Symptoms of a problem
The main signs of drum failure:
- the drum creaks, knocks and rubs;
- the drum does not rotate or does so with difficulty;
- the drum dangles;
- increased vibration during operation of the washing machine;
- increased noise;
- leakage;
- a foreign odor appears.
Features of replacement in washing machines
Damage to the drum of washing machines most often occurs due to prolonged use or manufacturing errors. Unrepairable damage includes holes in the walls and destruction of the grooves of the bushings. The solution would be to install a new element to replace the failed one.
Replacing a washing machine drum is a fairly serious task that requires complete disassembly of the equipment. A lot of time and effort is spent on this, so the services of specialists are usually expensive.
Most manufacturers do not supply drums separately, preferring to sell them together with tanks. But if you wish, you can find the original component at disassembly sites or in specialized service centers.
Models with different methods of loading things have some specific repair features. The first step is to remove things, then you need to drain the water, disconnect the car from electricity and all communications.
Horizontal loading
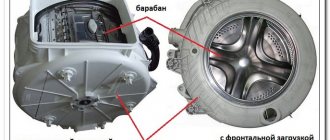
In horizontal loading washing machines, the drum is attached to the rear panel of the machine. Therefore, for disassembly and extraction it is necessary to gain access to this particular unit.
Procedure:
- Remove all screws that hold the back panel in place.
- Remove the top panel, powder container and control module.
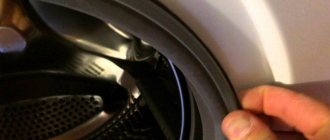
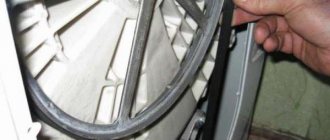
- Pull the cuffs out.
- Disconnect all wiring and unscrew the retaining bolt.
It is advisable to not unwind the module completely, but only to be able to move it. In this way, the position of the parts can be secured and serious damage can be prevented.
During disassembly, it is advisable to photograph each stage. This will allow you to remember the procedure during the assembly process and return all the elements to their places.
Top loading
Machines with vertical loading ensure that the drum is fixed on both sides at once. Such a solution strengthens the structure, makes it more reliable, but significantly complicates the removal of the drum.
Instructions:
- Unscrew all fasteners on the front panel and rear wall.
- The side panel is removed from its place, providing access to the necessary components.
- All that remains is to remove all the wires, carefully disconnecting them from the drum.
You need to do the same with the second side. Then the mounting screw is removed from both sides, which holds the element in place. Only after this can the drum be pulled out freely. It is also advisable to record the sequence of actions in this case with photographs or even film it on video.
Is it possible to solve the problem
If something gets into the drum assembly, it can cause the washing machine to stop and break down. To remove debris, you must disassemble the unit. However, it is worth considering that there are some nuances. The drum should be removed very carefully so as not to touch other parts of the device. As a rule, such repairs are carried out by professional craftsmen. If it is not possible to turn to specialists for help, then you can try to solve the problem yourself. The main thing is to adhere to the recommendations described below.
See also -
Problems with water temperature in the washing machine: checking the sensor
How to remove and replace the drum
The most popular washing machines include models from LG, Samsung, Indesit and Ariston. They are distinguished by reliability, functionality and ease of repair. Each brand has its own characteristics, which are important to consider during the disassembly process.
LG
The main difference between LG washing machines and other similar units is the presence of direct drive. This causes some peculiarities when disassembling and replacing the drum.
How to remove the drum from an LG washing machine:
- The top cover is removed.
- Use screwdrivers to unscrew the rear wall fasteners
- The dispenser tray and control panel are pulled out.
- All elements of the hatch are disconnected from the front, including the O-ring. The cuff and the lid itself.
- The screws holding the front wall are unscrewed, then it is removed.
- On the front of the washing machine you can see two counterweights, which are attached to the tub with screws. You need to unscrew them and then remove the weights.
- The wiring of all upper parts is disconnected.
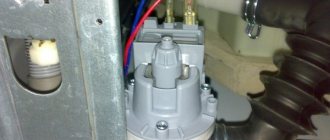
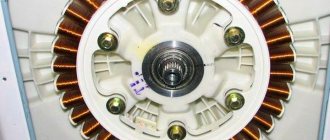
- At the rear, unscrew the central bolt of the motor cover, then you need to unscrew all the bolts holding the engine to the structure.
- After disconnecting all the associated equipment, the tank will simply remain hanging on special hooks. It needs to be lifted slightly and removed from the machine body.
- To remove the drum, you usually just need to knock on the corresponding tank sleeve.
After replacing faulty elements, assembly is carried out according to the same rules in the reverse order.
Samsung
When working with Samsung washing machines, you need to follow approximately the same instructions as for any other device. In this case, the top cover, front panel, back panel and all related elements are removed sequentially. It is important to disconnect all wires as carefully as possible, while recording their location in the photo.
There are counterweights located at the top and bottom of the tank, which can be removed using the appropriate key.
It can be difficult to remove the drum from a Samsung washing machine alone, so it is better to immediately ensure that you have an assistant. The design has many latches and hooks that prevent you from changing position. Before pulling out, you will need to disconnect the drive belt and remove the motor.
To replace the bearings, you will need to disassemble the washing machine drum. If it is soldered, then a hacksaw comes to the rescue. However, in this case, you will need to think additionally about the method of connecting the halves of the structure after repair.
Indesit
In their design, Indesit machines are very similar to Samsung models. It also uses a belt drive, and a set of two counterweights at the top and bottom of the tank.
The tank can be pulled out only after all elements have been disconnected from it, and it itself remains hanging on two springs. Indesit models use non-separable tanks, so to gain access to the drum and bearings you will have to use a hacksaw.
Ariston
The process of removing and replacing the drum on Ariston equipment is practically no different from the procedure on other models. First of all, you need to remove the top cover, back wall and front panel of the device. At the same time, the powder tray and control unit are pulled out.
To gain access to the tank, you need to remove all equipment from the device, including the pressure switch, drain hose, inlet valve filler pipe and wiring. The tank can be pulled out along with the counterweight, but it is better to get rid of it in advance.
It is advisable to perform the procedure together , since you need to simultaneously lift the element and press special springs.
New drums are supplied as a single unit with the tank, so there is no point in splitting the structure in half if it is necessary to replace the entire unit.
Causes of breakdowns
The situation when, after starting the washing machine, after some time it stopped rotating and the drum jammed, is familiar to many owners of household appliances. The reasons for the failure of a household unit may be related to mechanical damage, wear of parts, structural components, malfunctions of electronics, and problems with wiring. To eliminate the malfunction, it is very important to establish the root cause of what exactly caused the malfunction of the household device, and for this the device will have to be disassembled.
Reasons that led to drum failure:
- ingress of foreign objects into components, structural parts, drums - buttons, coins, underwires from women's bras. The drum is jammed, does not spin, and turns with difficulty. To establish the causes of malfunctions, it is necessary to dismantle the heating element, after which third-party objects can be removed;
- jamming, wear of bearings, flanges, seals. The problem arises with the frequent use of household cleaning products. The cuff wears out over time and water leaks into the bearings. The bearings fall apart, the drum shaft jams, and the drum does not spin. It is best to entrust replacement to washing machine service specialists;
- broken drive belt, which is equipped with machines with commutator motors. The problem occurs when automatic washing machines are idle for a long time. The belt material loses its properties, cracks appear on its surface, which lead to rupture during operation of the machine. In this case, the most vulnerable spot is the electric motor pulley. Before replacing the belt, remove the back cover of the unit and examine the markings on its outer surface;
- The drum drive motor is not functioning. During operation, the operation of the motor wears off the material of the brushes, and an unpleasant specific smell appears when the washing machine operates. If the brush life is exhausted, the drum stops rotating. Before installing new brushes of the appropriate size, the commutator is cleaned;
- malfunction of the electronic programmer module, which, depending on the model modification, is responsible for the water supply valve, operation of the drain pump, collector motor, thermistor, timer. In fact, the electronic module is responsible for the performance of the main parts and engine components of washing machines.
The drum may jam and not spin if the tachometer fails, the electrical wiring is damaged, or the capacitor burns out. In this case, it is necessary to carry out serious diagnostics. The reason why the drum does not spin may be overload with laundry or clogged filter. All of the above reasons require troubleshooting, so you cannot do without disassembling the washing machine and removing the drum.
Inoperative state of the electronic module
Foreign object in drum
Belt break
Bearing wear
Drum motor malfunction
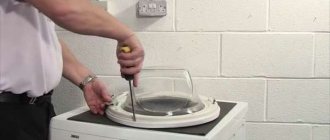
How to halve a drum
Previously, almost all washing machines had a tank consisting of two halves. To disassemble it, you just had to unscrew the bolts connecting the halves. However, production approaches have changed significantly and now manufacturers install non-separable drums in their models, the parts of which are soldered together. But even such a component can be disassembled if some specific manipulations are performed.
How to halve a solid tank:
- The pulley is removed from the tank. If the retaining bolt cannot be unscrewed immediately, it is likely that the manufacturer additionally used reinforcing glue.
- Use a hacksaw to cut the tank into two parts along the weld seam.
- As an additional step, you can drill small holes around the perimeter of the seam. Then, with their help, the halves of the structure will be connected to each other.
- It is easy to remove the drum from the sawn tank. Moreover, convenient access to the oil seal and bearings will open.
- The units consist of metal elements, as well as an oil seal. It is best to disassemble the drum from the unit that is located closer to the front.
- The drum is placed with the hole down, and the outer metal ring is knocked out with a hammer. The procedure must be carried out as carefully as possible, since hitting the inner ring can lead to its falling out and subsequent problems with removing residues.
- The second bearing is pulled out in the same way.
Repair involves replacing failed elements and subsequent assembly of the structure in accordance with the instructions. It is during the assembly of the machine that the photographs that were taken during disassembly may be needed.
Not every washing machine repair can be done on your own. But disassembling and replacing parts of the drum can definitely be done even by an inexperienced user. It is enough just to follow the instructions and not neglect the rules of working with tools.
Complex non-separable parts
The two elements that make up the Ariston washing machine cause the most problems:
- Counterweights.
- Tank complete with drum.
The tank and drum are nominally not at all possible for disassembly. This was originally intended by the manufacturer himself. But, if you have the right skill, you can still first disassemble the models and then put them back together.
As for the counterweight on top, it is screwed to the surface with special spring-loaded screws. Such parts are not like ordinary screws; rather, they are special types of fasteners. Users are recommended to use a special wrench to unscrew it. Otherwise, the operation will become impossible altogether. And it will be impossible to disassemble the drum.
Tools can be asked to be rented for a while, or purchased separately. Pliers and other similar devices must not be used to remove counterweights. This will only lead to additional problems due to the fact that the counterweights break.
Care Tips
The best repair is the one that never happened, so it’s easier to save the thing than to try to restore it later. To avoid having to do this, you must follow all the instructions in the operating instructions.
- Do not overload the machine with laundry . Due to overload, not only will things not be washed properly, but the bearings and support shaft will also wear out greatly.
- You should not start the machine with a half empty drum. This will cause everything to bunch up on one side during the spin cycle and create an imbalance in the drum, causing the machine to vibrate a lot. This runout on the shaft severely damages the bearings and seal, after which repairs become necessary.
- Hard water leaves scale on the heating elements, which leads to a decrease in their service life. This problem can be solved by installing special filters in the water supply that reduce the carbonate hardness of the water. Thanks to this, there will be significantly less scale, which means the service life of the heating element will be longer. It happens that scale accumulates on the drum - from here it must be removed with special means.
- Clean the machine's dirt filter regularly . It is located in its lower part, most often on the right side. Its clogging will lead to the fact that water will stop draining from the machine, and it will be impossible to do without completely disassembling the drain system and cleaning it.
- Do not put too much powder in the tray . The remaining wet powder, when dried, turns into a very hard substance that can clog the water supply pipes to the tank. Use exactly the amount of powder needed for a given wash cycle.
- Never send items for washing that may contain small items in their pockets, such as paper clips, buttons, and other similar items. During the cycle, they will fly out of the pockets and can cause serious damage to the drum. Keep an eye on this when preparing your items for the scheduled wash.
For information on how to cut and glue a non-separable washing machine tank, see below.