Replacing the drum in a washing machine with your own hands: simply dismantling the old one and installing a new drum.
Tips for use. Reading time: 16 min Category: Cleanliness
- Eliminating problems
- How to disassemble the tank and drum
- Choice of funds
- Removing and sawing the tank
- How to seal the washing machine tank?
- Reassembly and inspection
- Common codes for Zanussi washing machines
- Assembly Tips
- How to disassemble an automatic washing machine
- Let's halve the glued tank
- Washing machines with collapsible tank
Eliminating problems
Disassembling the drum
The tank in the washing machine consists of 2 halves. Some tanks are fastened together, while others are soldered.
To disconnect the tank, you just need to unscrew the mounting bolts.
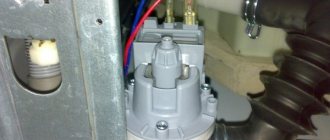
At this stage, the oil seal becomes accessible and if it needs to be replaced, you can remove it using a screwdriver or pliers.
It's more difficult with a bearing. It will have to be knocked out using a metal tube and a hammer. I think there is no point in talking about accuracy, and that’s understandable.
You can also replace the crosspiece, again, if necessary.
Important! Before replacing a new part with an old one, the installation site is treated with lubricant. If the tank is not dismountable, it is more difficult to carry out repairs on your own; you may need the help of a professional
If the tank is not dismountable, it is more difficult to carry out repairs on your own; you may need the help of a professional.
Changing the bearing
In what cases is it necessary to replace a part and how to remove a bearing from a washing machine drum?
For example, if a puddle has formed under the machine and there is a strong hum and vibration during operation. Why did this happen? There is a high probability that water got into the bearing and caused it to fail. In general, the service life of this part is not short, from 7 to 11 years, but sometimes trouble happens and you have to replace it ahead of time.
Troubleshooting shock absorbers
Shock absorbers are responsible for the smooth operation of the drum during washing and spinning. There should be no knocking.
How to check their serviceability?
Just. Open the car hatch and pull the drum towards you. Now let go. What happened?
If the drum, like a swing, swings from side to side and does not fall into place, this is a sure sign of the need to replace the part. Moreover, the shock absorber must be replaced in pairs.
To do this, you don’t have to disassemble the car, as is the case with bearings, but this is true only in LG, Veko, Ardo models. It is enough from the bottom, unscrew the fasteners and change the parts. But with the rest of the models you will have to tinker.
- – The top cover is removed and the dispenser is removed.
- – The control unit is disconnected.
- – Remove the rubber seal with the clamp.
- – The front part of the machine body is removed.
- - Details change.
Removing the foreign object
What does foreign object mean? It can be:
- coins, even rhinestones,
- buttons and other clothing items.
If you do not reach and free the drum from these things, the consequences can be tragic, including jamming and breakage.
What other problems can you solve on your own?
Changing the cuff
There are many reasons for cuff failure. This could be: wear due to long-term use, due to mold, due to cracks and tears, due to limescale, etc.
If there is water left under the machine after washing, check the cuff. After all, this is a dangerous business. The power supply may short out or the machine may fail completely.
What is needed to replace the cuff and how to remove the rubber from the drum of the washing machine?
Firstly, you need a new cuff, which must match the old one 100 percent, otherwise an incomplete fit may occur.
To replace an old rubber band with a new one, you need:
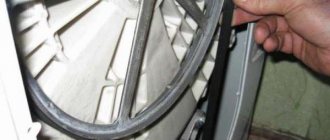
- Remove the front panel of the machine, remove the powder compartment, remove the front of the machine.
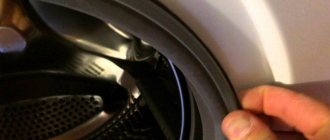
- Remove the cuff. In the usual version, the cuff is screwed to the tank with two metal clamps. You just need to pry the spring of the clamp and pull.
- After the first clamp is removed, you can remove the top of the rubber band, which ensures its correct location in the tank. The cuff will be released without any problems and can be removed after removing the second clamp.
- When installing a new rubber band, use the marks on the rim of the hatch as a guide.
- Before installation, it is necessary to carry out cleaning work on the rim of the hatch, at least with just a soap solution.
- The cuff is pulled over the hatch. If the top is pulled, the bottom is held in place; if it's down, then vice versa.
- Next, all the parts are assembled in reverse order.
All that remains is to check the work done by running the wash without laundry. If there are no leaks, everything went well and you did it!
Replacement features
As a result of prolonged use or due to a manufacturing defect, the drum of the washing machine may become damaged. Usually the following damages cannot be repaired: damage to the walls with the formation of a hole or destruction of the bushing seat. In such cases, there is only one solution - to install a new element. Replacing a washing machine drum is a very labor-intensive procedure, as it involves disassembling the entire main device.
Manufacturers usually do not supply drums separately. They are sold complete with a tank.
The process of disassembling the washing unit will differ slightly depending on the type of product: top-loading or front-loading. But before starting work, you should perform the same steps for both models: unload the laundry, unplug it, remove the inlet hose.
In a horizontal (front) loading machine
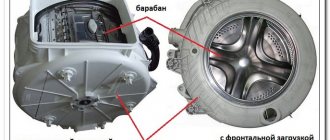
In such models, the drum is mounted in one place - to the rear wall. This feature requires the following actions:
- Unscrew the screws that hold the back wall;
- remove the entire cover (including the powder container, control panel);
- pull out the hatch cuffs;
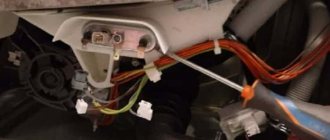
- remove the wiring and disconnect the bolt that holds the drum at the back.
It is better not to completely unscrew the control panel, but simply move it to the side to avoid damage. If removed, it is recommended to photograph the wires to make it easier to return everything to its original place.
In a top loading machine
In such models, the drum is attached to the walls on both sides, which naturally complicates its removal. The operating procedure is as follows:
- unscrew the screws on the front and rear walls;
- remove the side panel;
- remove all wires and unscrew the remaining screws.
The second side panel is removed in a similar way. Then you need to remove the screw for attaching to the shaft and pull out the drum.
Specialists strongly recommend taking photographs of all the main stages of work, so as not to confuse the sequence of actions later.
Collapsible drum
Most models of modern washing machines, this is true for models from famous manufacturers: LG, Samsung, Ariston and others, have a collapsible drum, which significantly simplifies any repair work associated with it. Structurally, it consists of two halves, which are bolted together. Along the joint line there is a gasket or a layer of sealant, which ensures ease of disassembly and tightness of the drum.
Most often, disassembly is not particularly difficult, you just need to perform a number of actions in the following sequence:
- place the drum on a flat surface with the hatch down;
- jam the pulley using a small wooden block;
- Use a socket wrench or a socket with a ratchet to unscrew the bolt securing the pulley;
- after the pulley is removed, use a wrench of a suitable size to unscrew the connecting bolts;
- The halves are easy to separate; you may need to apply several light blows to the shaft with a mallet or a regular hammer through a wooden block.
When planning to unscrew a pulley, you must be prepared for the fact that the bolt will resist. If this is the case, you should not try to unscrew it “forcibly”; it is easy to tear off the edges, or even break the rod, as a result of which the repair will take a long time. Before unscrewing any bolts inside the washing machine, you should use WD-40, this will make the work easier and ensure the safety of the original fasteners.
After the drum is disassembled, you can proceed directly to replacing the bearings or removing foreign objects that have jammed the machine. If the task is to remove old bearings, it is better to use a screw-type puller. You can preheat the bearing, but you must use a torch or blowtorch with extreme caution so as not to damage the drum itself.
When changing bearings, it is important to pay attention to the condition of the sealing seals. If they have lost elasticity, there is a lot of wear or mechanical damage, the seals are replaced along with the bearings. Afterwards all that remains is to assemble the car; this is done in the reverse order. Of course, before assembling the drum, a layer of sealant must be applied to the parts being connected.
Non-separable drum
Some manufacturers make the drum non-separable “disposable”. The goal is clear. On the one hand, it’s easier to manufacture, there are no bolted connections, on the other hand, you can make money on repairs, because the owner of such a machine, if a cheap bearing fails, will have to buy the entire drum.
Certified service centers are unlikely to agree to disassemble a non-separable drum, however, this can be done in a home workshop. As a result of such repairs, you will be able to save a lot of money, because you will only have to pay for the failed bearings.
In essence, disassembling this drum differs from working with its collapsible counterpart only in that it will have to be sawed. This is not very difficult, it is more difficult to choose the best tool for this. There are several options.
- A hacksaw for metal gives a thin, even cut, but when heated, it often gets stuck, plus the blades break easily.
- A hacksaw for wood does not heat up, does not get stuck, or breaks, but it produces too wide a cut, and even with torn edges. In other words, it is easy to cut with such a hacksaw, but difficult to assemble the drum afterwards.
- A jigsaw allows you to get a thin, even cut, but in some areas it is extremely inconvenient to use.
Such a popular tool as a grinder is not considered at all for this operation. The disk rotates at a very high speed; one wrong movement is enough to ruin everything.
There is no ideal tool for sawing a drum, you will have to improvise. Some experts recommend using a regular hacksaw and a piece of cloth with a homemade handle for working in hard-to-reach places.
Before you take up the cutting tool, you need to worry about subsequent assembly and ensure the reliability of the connection. To do this, at the gluing site, where the cut will be, you need to make small diameter holes for the bolts. The number of holes may vary, but 15 - 20 pcs are sufficient.
The drum is placed on its side. Now you can take up the instrument. Where to cut from is a matter of taste. There is no single correct algorithm. We can only advise you to start in a place where it is easier to get to, this will give you the opportunity to do most of the work before your enthusiasm dries up. That's right, it will take a very long time to cut. It may take several hours to disassemble the drum, but there is no need to rush. It is better to spend time on monotonous boring work than to buy a new drum later.
Next, exactly as in the previous case, change the bearings and seals. Hot glue is applied along the cut line, and the halves are pressed against each other. To give greater rigidity to the structure, bolts of a suitable diameter are screwed into pre-made holes. The glue is allowed to harden. Before assembly, the adhesive seam should be carefully inspected again; if there is a suspicion of the presence of cracks, the questionable areas should be glued again.
The assembled drum is installed in the machine in the reverse order. Screw on the pulley, install the engine and drive belt. The drum is suspended on springs, counterweights are installed, the inlet and outlet pipes are connected, and the device is completely assembled.
Breakdowns of an automatic washing machine, for which it is necessary to disassemble the drum, are considered the most difficult, however, if you have a small list of tools and desire, you can fix them yourself. Do-it-yourself car repairs are beneficial in all respects: there is no need to go to a workshop, money and time are saved. Among other things, self-repaired equipment is an opportunity to do something with your own hands, which is always nice.
How to disassemble the tank and drum
Washing machines of the Indesit brand usually have non-separable tanks, that is, if any element located inside fails, the manufacturer recommends replacing the entire part. Such repairs can be expensive, so if it is necessary to replace, for example, a bearing, it is still better to disassemble the tank.
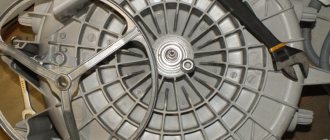
In the photo you see a non-separable washing machine tank in which the drum is located
Dismantling begins by removing the pulley (the wheel through which the belt passed)
The bolt that secures this part is subject to significant stress, and it is important that it holds tightly. Therefore, when assembling a machine, it is often not just screwed on, but also additionally secured with glue.
It is better to use a T40 hexagonal star wrench and loosen the bolt, gradually loosening it. If the part does not give in, spray it with WD-40 or carefully knock it off the glue with a hammer.
In order to unscrew the bolt securing the pulley, you need to use a T40 hexagonal star wrench.
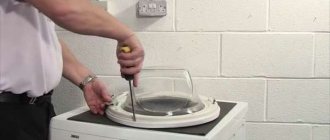
Next, we lay the tank on its side and carefully cut it with a hacksaw along the seam (where the two halves of the part are soldered). First, use a drill to drill holes around the entire perimeter of the seam (during assembly, the halves can be easily fastened with bolts).
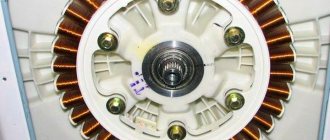
When the tank is open, unscrew the bolts securing the drum, unfasten the fastenings and remove the tank wall. Now you can disassemble the drum, that is, remove the oil seal and bearings from it.
We start with the bearing located closer to the outside of the drum. We lay the part with the hatch hole down, place the chisel on the outer rim of the metal ring and hit it with a hammer.
You will need a hammer and chisel to remove the bearing from the drum.
We carefully monitor the position of the chisel when knocking out the bearing - if the tool slips and the inner ring is struck, it may fly out, and it will be quite difficult to remove the remaining bearing from the seat. We dismantle the inner bearing in the same way, and then remove the oil seal.
When should you start disassembling yourself?
With all of the above malfunctions, extraneous noise appears during washing: grinding, creaking, whistling and other sounds. Hard objects, buttons, cufflinks, small change, paper clips, pins, and nails torn from clothing can seriously damage the drum, bearings or its seal. Although all the malfunctions described above can be eliminated on your own, to do this you will first have to almost completely disassemble the entire machine, and then put it back together.
You should only disassemble the drum yourself if the service center refuses to carry out repairs.
This refusal is most often due to the fact that some washing machines Indesit, Ariston, Samsung and others may have welded, that is, non-separable tanks that can only be replaced entirely. You may also be forced to carry out repairs on your own due to a tight financial situation or an expired warranty. Otherwise, it is better to trust a qualified specialist.
Choice of funds
You can clean the washing machine drum from dirt and deposits not only with commercial chemicals. In some situations, home remedies will come to the rescue.
Household chemicals
On store shelves you can see a lot of products designed to clean and subsequently protect automatic machines from scale and other contaminants. The following solutions may be useful in a housewife's arsenal.
- Bleach Whiteness is an inexpensive chlorine-based liquid. The advantages of “Belizna” are not limited to the low price - the product will eliminate small lime deposits in the drum, remove rust and unpleasant odors.
- Cleaners for washing machines of the Frisch-aktiv, Tiret, Dr. brands. Beckmann and many others. The cost of a bottle can vary from 150 to 500 rubles, however, the spectrum of action of these chemicals is wide. The products can remove lime and soap deposits from the drum and internal parts of the machine, oily contaminants, and even dissolve the remains of threads, hair or wool in the filter.
The fundamental difference between specialized products and chlorine bleach is the presence of anti-corrosion components in the composition. This means that all metal parts are covered with a film and wear out less during operation.
Important! Both chlorine bleach and other cleaners should not be used more than once or twice a year. Due to the aggressive effects of chemicals, the rubber band of the drum may lose its elasticity and even crack.
Home Remedies
Among the folk remedies that are effective are:
- acetic acid;
- lemon acid;
- baking soda.
With their help, you can eliminate unpleasant odors, clean soap deposits in the drum or in the detergent compartment. Vinegar or soda are unlikely to cope with old lime deposits, but this is their only drawback. The advantages of home remedies include absolute safety for the washing machine and humans, accessibility and ease of use.
Tools
To dismantle the drum of an Indesit, LG, Ariston, Samsung or Bosh washing machine, we may need the following tools:
- Crosshead screwdriver.
- Slotted screwdriver.
- Pliers.
- Hammer.
- Hacksaw.
- A set of open-end or hex keys.
- Puller for dismantling bearings.
- A small adjustable wrench.
- Drill with drills.
- Hot melt adhesive.
- WD-40 lubricant.
This list of necessary tools and materials was compiled with a large “reserve”, since we do not know in advance the design features of some of the parts that we will have to deal with. Many of the listed tools may simply be redundant.
Removing and sawing the tank
Now you need to put the washing machine on its feet. Carefully return the machine to the vertical position
This must be done carefully, as the tank is now held in the housing only by a pair of springs
Take a close look at your washer. The control module may interfere with removing the drum. If this is the case, you will have to disconnect the board. Unhook the wiring from the block, unscrew the bolts securing it, and, having mastered the latches, pull out the part.
The tank-drum assembly is heavy, so it is better to pull it out with two people. Together with an assistant, remove the mechanism through the top of the housing, removing the reservoir from the shock-absorbing springs.
After removing the assembly, it may seem that the work has come to an end. This is wrong. The tank of Candy washing machines is non-separable, so to get to the drum, you will have to saw the container. Such a misfortune as a “monolithic” tank greatly complicates equipment repair.
It is very simple to understand why the supplier equips washing machines with a non-separable unit. At a minimum, this allows us to reduce production costs, and therefore the cost of production, as well as the assembly time of units. As a maximum, the manufacturer hopes that if the components “hidden” in the tank break down, the consumer will most likely buy an automatic machine in a store rather than repair the equipment, since the cost of repair is usually equivalent to a new purchase.
However, the masters found a way out of this situation. They discovered a way to split the tank in half and remove the drum from it. The body of the container is carefully sawed with a hacksaw, and after repair work is completed, it is connected back together using silicone waterproof sealant.
To cut a non-separable tank of a Kandy washing machine and carry out repairs, you must:
- carefully inspect the container;
- understand where the factory weld goes;
- using a marker or pencil, mark the line along which the cut will be made;
- make small holes in the tank with a drill with a thin drill bit along the entire length of the cut line, at a distance of 3-5 cm;
- cut the plastic container along the intended line using a hacksaw;
- separate the upper part from the half with the drum;
- remove the drum. To do this, turn over half of the tank, find the wheel connecting the parts and remove it;
- to solve a problem. If the bearing assembly breaks down, remove the worn-out components, replace them, and install a new oil seal. If the process started due to “interference” stuck between the tank and the drum, remove the object and make sure that the plastic walls are not damaged.
When all the planned manipulations are completed, all that remains is to assemble the container. Moisture-resistant silicone sealant is used to connect the tank halves. First, the area of the new seam should be degreased, then apply the product around the entire circumference and connect the parts.
This is where the main difficulties end; all that remains is to assemble the Candy washing machine. The parts are attached to the housing in the reverse order. Refer to the photographs you took. Securely fix the elements inside, connect the wiring and sensors, and carefully check the connection diagram.
The process of removing the drum is very labor-intensive. This is why the cost of repairs carried out by specialists is so high. By doing the work yourself, without resorting to service, you can save a large amount of money.
Share your opinion - leave a comment
The main reasons for drum failure
The drum of an automatic washing machine is one of its most important components; it is the basis, at least, of its mechanical component. Like any other component and assembly, it can fail, which will entail the need for repairs. In addition to the most common malfunction - bearing failure, repairs may be required in a number of other cases.
Drum jamming caused by foreign objects getting inside. Unfortunately, this happens quite often. A torn button, a fastener, a metal object forgotten in a pocket - all this can end up in the space between the body and the drum, get caught on the heating element, fall into the hole, blocking rotation and destroying the tank.
The use of certain types of detergents can cause rapid wear of the seals, they lose elasticity and crack. The seal does not cope with its task, water seeps through it, which negatively affects the operation of the machine as a whole and can cause an accident.
You cannot do without dismantling the drum even if the shaft is damaged. A broken drive belt, a skewed pulley - all this may lead to the need for serious repairs involving complete disassembly of the device.
A common reason for a machine to suddenly stop working is the failure of the electric motor or the need to replace the commutator brushes. To repair the engine, it is not necessary to disassemble the drum, but you definitely cannot do without removing it.
How to seal the washing machine tank?
After repairing and replacing faulty parts, you need to reassemble the tank in the reverse order:
- First of all, carefully treat the joint surface of the tank halves. They should be smooth and free of rough scratches that may remain from sawing. To clean the surface, use a stationery knife:
- position the blade at 90 degrees to the surface being processed;
- Grind down all the irregularities, bringing it to perfect smoothness.
- Degrease the interface between the two halves of the tank.
- Lubricate the oil seal and shaft with oil seal grease.
- Insert the drum axle into the bearings.
- Secure with a pulley.
- Apply silicone glue (aquarium silicone washing machine sealant is ideal) to both halves of the tank.
- Spread the sealant layer so that it is even.
- Place both halves of the tank on top of each other.
- Tighten the halves around the circumference with bolts until the silicone dries.
- Let the glue dry.
- Reassemble the washing machine in the reverse order: screw the front weight, install the heating element, hang the tank, connect the pipes, motor, etc.
Repairing a washing machine tank is a rather complicated and lengthy task, because you not only need to properly disassemble the device, remove the tank, also disassemble it without errors (after all, not all washing machines have collapsible tanks) and only then begin the repair. And it’s not a fact that this repair can be done at home - it all depends on the malfunction. We hope that the information presented in the article will at least a little help you achieve your plans, and the washing machine will be grateful to you and will repay you with high-quality and long-lasting work.
Step-by-step instruction
Let's say you have already pulled out the tank and partially disassembled it, if it turned out to be collapsible, or sawed it with a hacksaw along the welding seam, if not. What's next?
First you need to remove the rear forecastle from it, to which it is still connected by a shaft to the drive belt pulley. For different models of washing machines, the design of the tanks may differ slightly, but the sequence of actions when disassembling them is approximately the same for all.
Holding the pulley from turning with a stick, unscrew the pulley bolt with an open-end or hex wrench, depending on which one is suitable. We remove the pulley, then screw the bolt securing it back until it stops.
Removing bearings will most likely require a special automotive puller and a gas torch to heat them, although sometimes they will come off the shaft without much trouble. It's also a good idea to have WD-40 lubricant on hand, which will help you quickly deal with various stuck parts.
Unscrewing the pulley bolt (nut) can be a difficult task, since its threaded hole is filled with a special compound that prevents it from spontaneously unscrewing during vibration.
Next, knock out the shaft with light blows of a hammer. You should hit through a wooden block so as not to damage the bolt head. Removing the back of the tank will also require a couple of hits with a hammer. The main thing is not to break anything.
After we have taken out the drum, we can begin to directly repair or replace it. The drums of collapsible and soldered tanks are constructed in the same way . Reassembly should be done in reverse order. The sawn-off part of the tank can be installed back by fastening its halves with hot glue and bolts, having previously drilled small holes for them.
Reassembly and inspection
The reverse assembly process follows the following algorithm:
- we mount the tank in its original place (suspended on springs);
- install shock absorbers (for this work it is convenient to place the machine on its side);
- connect the drain hose;
- we connect the wiring to the heating element and the engine (it is convenient to carry out the work when the machine is positioned vertically);
- install the drum cuff and secure it with a clamp;
- connect the water intake, control panel;
- install a counterweight;
- fix the lid of the washing machine;
- We connect the washing machine to the sewer.
You can check the operation of a repaired washing machine only during the washing process. The machine is plugged in, select the required program on the control panel, and press the “start” button.
Common codes for Zanussi washing machines
Typically, a Zanussi washing machine produces the following error codes: E11, E12, E21, E22. Let's look at the most common combinations.
| Code | Problem |
| E11 | Washing water is not supplied. Most often, the code lights up if the valve supplying water from the water supply to the machine is closed. The pressure in the pipe may also be weak. It is possible that the filter mesh on the inlet valve is clogged. The integrity of the hose is checked and the filter is cleaned. It is advisable to check the resistance of the valve coil - a working element will give a reading of 3.8 kOhm. |
| E12 | Problem with water filling during drying. If the cause is the water inlet valve, the code will appear on the display 10 minutes after the start of the wash cycle. |
| E21 | Water does not leave the system - the drain filter needs to be cleaned and the pipes checked for blockages. It is also necessary to check the functionality of the pump impeller - it should rotate freely in both directions. If movement is difficult, the pump needs to be replaced. |
| E22 | Indicates a low level of water drainage during drying. The condenser may need to be cleaned. |
Why do you have to glue it?
Sealing and gluing the washing machine tank is a forced process that owners of some SMA models have to deal with. Washing machines with a non-removable tank are offered, for example, by brands such as Ariston and Indesit. Manufacturers, making this element monolithic, do not intend to disassemble it. If the bearing breaks, the unit must be completely replaced. But such a replacement costs a lot of money and our people simply cannot agree with this order of things. As it turned out, you can halve the drum, remove the bearing, replace it with a new one, and then connect the halves. It is important to know how and with what to seal the tank.
[custom_ads_shortcode3]
Assembly Tips
The assembly of washing equipment from different manufacturers may differ, but general recommendations from professionals will help to carry out this work efficiently.
After sawing, the two parts of the body can be glued together with silicone glue - this is the best sealant for this purpose, connecting both metal and plastic well. They need to carefully go around the edge of the cut, but try not to use it in large quantities. Before installing the new bearing, the seating area must be cleared of dirt and small debris. You can tap it not only with a hammer, but also through an insulating washer made of getinax
It is very important to hammer the part all the way. After removing the bearings, the drum shaft is thoroughly polished, and there is no need to remove the spider. Before checking the machine, it is also important to clean all parts of the equipment, including washing the drum and descaling the heater. It is better to place the tank on the springs with two people, but it is also possible to fix the spring at the top and then tension it.
If you are repairing the unit yourself, remember that assembly must be carried out strictly in the same sequence as disassembly.
Tricks for repairing a washing machine tank in the video below.
Conclusion
Finally, it is worth warning that this repair will take a lot of time. And if the tank of your Ariston, Indesit or Samsung washing machine turns out to be non-separable, then it will take many times more time: it will take three to four hours just to saw it and then install it back!
Therefore, be mentally prepared for difficulties with the drum, be patient, carefully weigh the pros and cons before you start disassembling and repairing the washing machine yourself. And don’t be afraid to stop in time if you reach a dead end.
To make it as clear as possible, we recommend watching thematic videos before starting repairs.
How to disassemble an automatic washing machine
It is important to remember that work is performed only if the machine is completely disconnected from the network. Before disassembling, you must make sure that there are no foreign objects in the machine.
The water drain hose must be disconnected and the water supply must be shut off. Washing machines are divided into two types: horizontal loading and vertical loading machines. Each type has its own parsing features.
Disassembly of a horizontal loading type machine:
- Using a screwdriver, remove the screws that are responsible for securely fastening the back panel of the washing machine to the body;
- The front panel and top surface of the washing machine are dismantled in a similar way;
- A slotted screwdriver can be useful for removing the container into which the powder is poured and removing the control panel;
- The rubber cuff for the hatch is removed, then the bottom panel is removed;
- Before removing the tank, unscrew the screws on the bottom panel;
- It is necessary to remove all electronics from the drum and turn off the motor.
When disassembling a washing machine, you need to take into account the design features of the model
In any case, you need to watch the training videos a couple of times to fully understand the entire analysis scheme. Each machine may have its own peculiarities of connecting electronics and mounting, which will create difficulties in disassembly. This manual is suitable for Indesit, Bosch, Samsung machines.
Disassembly of a vertical loading type machine:
- It is necessary to unscrew the screws that secure all the walls and parts to each other;
- Pull out the side panel;
- For a vertical machine, the automatic wiring is located around the casing; it is dismantled by unscrewing and removing the screws.
The design features of a top-loading washing machine are its compactness. It takes up little space, and the disassembly of such machines differs from standard machines of various brands, such as Indesit or Ariston. The laundry tank itself is secured with screws, so it can be removed according to the instructions given above.
Let's halve the glued tank
Disassembling a glued tank will be different from working on a “new” tank. First of all, this will affect fixation, since after repair it will be attached not only with self-tapping screws, but also with sealant. The first ones are easy to unscrew, but the second one will have to be tinkered with - the dried glue holds well and is not removed quickly.
Some “craftsmen” suggest removing the sealant with a sharp knife, picking and cutting. However, experienced craftsmen do not recommend doing this for two reasons. Firstly, it is too long and ineffective. Secondly, the blade can jump off its intended path and puncture the tank, creating a new problem. It is much safer and more effective to go the other way: cut the tank with a hacksaw with small scars, going in a circle along the seam. Repeated cutting will be easier, since only the layer of dried glue will provide resistance.
The main thing is to act extremely carefully, focusing on the old “path”. Even the slightest bevel will ruin the tank - gluing it will be extremely difficult
It is not enough to simply halve the tank - it is important to remove any remaining sealant. A layer of dried glue will prevent the tank from sticking together, so you need to clean it off the seam
We proceed like this: take fine-grained sandpaper and sand the cut without going into the plastic. Then we shake off the crumbs with a rag and proceed to repair the bearing assembly.
Permatex 81730
This is a flowable adhesive-sealant designed for hermetically sealing headlights and glass in a car. The composition is characterized by transparency. Frozen seams do not allow water to pass through and are not afraid of extreme temperatures.
The operating range of the composition is from minus 62 to plus 232 °C. Great for the task. Costs on average - 175 rubles.
[custom_ads_shortcode3]
Washing machines with collapsible tank
50% of SMAs are collapsible. It is this solution that allows craftsmen to change bearings without problems. In the collapsible version, the halves are connected by bolts. The joint of the parts is lubricated with sealant or sealed with rubber - all this is done to prevent leaks. Disassembling a glued drum:
- A wooden beam is placed in the drum pulley and jammed. In this case, the tank is located with a hatch in the floor.
- Take a socket of the required size with a ratchet to unscrew the bolt securing the pulley to the shaft.
- Remove the pulley. Next, unscrew the bolts connecting the halves of the tank.
- Having unscrewed the bolts, they hit the shaft lightly. Remove the rear part of the element being dismantled.
- Use a blowtorch to heat the bearings and then pull them off with a puller.
Requirements for glued joints
When new bearings are installed, the question arises - how to repair a plastic tank that has been sawed in half. How to seal the drum to prevent leaks? What to choose - glue or sealant? It is better to use glue, since no sealant can provide the necessary strength characteristics of a glued structure.
Reliable connection of parts requires two operations:
- The halves are connected using bolts and nuts. To do this, holes are made in the plastic - evenly along the entire seam.
- The gap between the parts to be joined is filled with glue or sealant.
Not every composition will work. It is important to know what sealant to glue the halves together with. In this case, the operating features of the unit are taken into account:
- Strong vibrations - the connection must withstand severe mechanical loads.
- Extreme temperature conditions - the unit either heats up or cools down.
- Contact with aquatic environment. Including water supplied under pressure.
If the purchased composition fails you, leaks are possible. Then you will again disassemble the machine and fix the problem.
[custom_ads_shortcode1]