In modern automatic washing designs, checking the pump is not a difficult task, but not everyone does it correctly.
There have been cases when owners changed working drain pumps, spending a lot of time and money, and still the problem did not go away, which hinted at the breakdown of a completely different element of the washing machine. We will tell you how to properly check the pump in a washing machine, which will help you protect yourself and your assistant from a huge number of different breakdowns, and learn how to find and fix breakdowns of this nature yourself.
What is needed for verification
Usually people think about how to check the pump on a washing machine when the following problems arise:
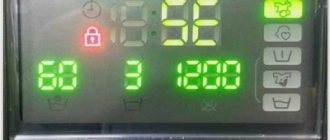
- Fault code. Appears on the electronic display thanks to the self-diagnosis system of your SMA. In machines without a display, you can diagnose pump failure by deciphering the combination of flashing lights on the control panel. If a combination of LEDs or an error code indicates a malfunction of the pump, then it must be checked.
- Before draining the waste water, the SM stops washing and “freezes” without draining the contents of the tank.
- The water drain pump does not make itself known - there are no sounds or other signs of its activity.
If you are sure that it is worth checking the pump, do not delay your decision, but start preparing the necessary tools:
- Multimeter (tester).
- Two screwdrivers: slotted and positive.
- Pliers.
- Awl.
Important! The tester must be working properly. If you don’t have it (and you need it in any case), buy it for yourself - it’s inexpensive, and will come in handy around the house.
When the pump on the washing machine does not turn off or does not pump water, a check is needed. Next, we will provide all possible assistance with advice, recommendations, photo and video instructions.
How to find a pump
Before checking whether the pump is working or not, you need to find its location. Often the design of the machine allows you to see the part without even opening the case. Proceed as follows:
- Disconnect the machine from the water supply, sewer pipe and unplug the power cord.
- Remove the powder dispenser.
- Cover the floor with a cloth.
- Lay the machine on its side.
- If your model does not have a bottom, then everything is simple - the pump will be in the public domain right in front of you. It is located opposite the drain filter (this is what you check and clean every 3 months). In general, this detail is difficult not to see or confuse.
- If there is a bottom, then it must be removed by unscrewing the fastenings with a Phillips screwdriver. Use a second screwdriver to pry up the bottom.
Related article: Indesit does not drain water
If your washing machine is 100% protected from leaks by the manufacturer, then before checking the pump in the washing machine, you need to remove a special tray and sensor. To get to the pump in this case, you need to act like this:
- Disconnect the SMA from the outlet, from the sewer and water pipes.
- Drain the water using the emergency drain tube (located near the filter) or drain filter.
- Move the equipment to the center of the room and lay down a cloth.
- Take out the detergent dispenser.
- Drain the water through a hose or filter at the bottom of the housing.
- Place the machine on its side.
- Pry and pull off all the latches on the pallet (usually there are four).
- Move the pan aside to remove the wiring going to the sensor. The sensor itself is attached to the pallet.
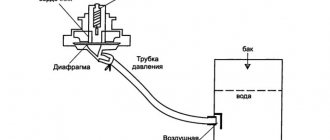
Important! The sensor you will see on the pallet is a leakage sensor. It is triggered when water enters the pan. It is he who, having detected a leak, blocks the operation of the machine, stops the flow of water, and prevents a “universal flood” in the apartment.
Removing the pan, you will see what you were looking for - the drain pump.
Verification Process
Both the electrical and mechanical parts of the pump can fail. Many home craftsmen, forgetting about mechanics, rush to check the electrics, armed with a tester. But often the pump stops working due to debris.
Unfortunately, not all the debris goes into the drain filter - some of it can collect in the impeller area. Most often, hair and threads get wrapped around it, blocking the work over time. If you are thinking about how to check the pump without removing it from the engine, then we recommend removing it, especially since it is very easy to do:
- Take a photo or video of the wiring location. This will help you connect everything back correctly later.
- Remove the wiring.
- Unclench the clamps of the pipe and hose using pliers. Don't break them - they will be useful again.
- Turn the pump half a turn to the left and remove the part without any effort.
Related article: Pump for draining water from a washing machine
Before disassembling the pump, carefully inspect the impeller. If you notice debris blocking its operation, start cleaning it. Be sure to thoroughly clean the entire pump to remove any accumulated dirt. Mechanics also include gaskets - they can wear out.
Important! Service centers do not advise repairing the pump, suggesting that it be replaced immediately. But the “traditional craftsmen” came up with a more economical way. They know how to lubricate the washing machine pump and use lithol or graphite lubricant.
If the mechanics are in perfect order, you can check the electrics. Proceed this way:
- Turn on the tester by selecting voltage test mode.
- Place the probes on the contacts.
- Does “0” or “1” appear on the display? The pump motor may have burned out - replace it.
- If a three-digit number lights up on the screen, then the problem may not be in the motor itself, but in the electronic control unit. More accurate diagnosis is required.
Now you know how to check the drain pump on a washing machine: disassembly is not essential, and checking will not take a lot of time. To make it easier, watch the video:
We will tell you how to properly check the pump in a washing machine, which will help you protect yourself and your assistant from a huge number of different breakdowns, and learn how to find and fix breakdowns of this nature yourself.
When is a complete pump replacement necessary?
If the drain channel is simply clogged with small objects or dirt, cleaning will help. When the multimeter shows a short circuit or open circuit, the pump will need to be completely replaced. Without a tester, this will be indicated by a lack of rotation when the pump is connected directly.
Strong radial play of the shaft is another sign for replacing the pump, because the impeller will warp and possibly jam. If you find one of the four blades missing, it’s up to you to decide whether to change the pump or not. Without one blade, pumping out liquid occurs more slowly, but the machine remains working. Without two blades, the process is delayed even more, so the unit will need to be replaced.
To do this, rewrite the model of the washing machine and manufacturer. The information is on a sticker or nameplate on the case. You need to look for a pump of this particular brand, since others may not be suitable in diameter or mounting holes.
Replacing the pump of an automatic machine is quite simple - you need to unscrew a few screws or disconnect a couple of latches, which depends on the model, and remove the assembly out. Install a new one in its place and connect the contact chip.
You should start replacing the pump yourself if the warranty on the machine has already expired. Burnout of the pump's electric motor winding is a warranty case in which the pump will be replaced by a service center technician - free of charge.
What do we need to test the pump?
Let's talk in more detail about the signs:
- The first sign is an error code - it appears due to the results of the self-diagnosis system - almost all modern automatic models are equipped with such a system. If the error code you deciphered leads you to pump failure, then it is better to first check the drain pump.
- Before starting the process of draining water from the drum, the washing machine stands still and is in the same position with all the water.
- In the washing design, the drain pump does not produce absolutely any sounds or even signs of life.
If you have already found out for sure or simply suspect that there is a possible problem with the pump, then you should not put off repairs until later, but it is better to immediately look for the tools necessary for this repair.
We don’t really need much equipment, like a plumber, we only need a couple of tools , which in principle are not difficult to find:
- Screwdrivers (flat and Phillips);
- Multimeter;
- Pliers;
- An awl (or a needle in extreme cases).
If you don’t have a multimeter, we recommend purchasing one, because it will be useful in the future not only for this problem, but in general. This is quite a necessary device in the household for each of us. So, take a working multimeter and go fix the problem.
Forced drain
If the water from the Kandy washing machine has not been drained, it still remains in the tank. This is not a desirable circumstance that requires elimination.
It is necessary to remove water for several reasons:
- keeping water in the tank for a long time is not desirable for the washing machine itself;
- things in the drum deteriorate from prolonged exposure to water.
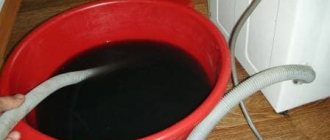
If draining the water in the standard way does not work, it must be drained forcibly. There are several ways to do this.
Alternative way to drain water:
- Pull out the drain hose from the connection to the apartment's sewer system.
- Place the end of the hose in a low container placed directly on the floor. This could be, for example, the pelvis.
- Place the drain hose completely on the floor, avoiding raising it above the level of the tank when installing the washing machine. As a result, the water should drain itself.
We are getting closer to the element
In an automatic washing design, it is possible to examine the drain pump without disassembling the housing.
This feature is available in many models. To get to the drain pump, you must:
- disconnect the machine from power and various types of communications,
- first drain the water through the drain filter we need,
- remove the tray for washing products (powder or conditioners, etc.),
- put a floor rag (so to speak, to be on the safe side in case there is water left in the machine)
- turn the structure over to the right side of the body.
In principle, this is wonderful. It’s good because it’s possible to get to the pump and even the motor from below without disassembling the machine, but it’s bad because the parts may be damaged during transportation or moving the washing machine, or the elements may become clogged and eventually break due to dust .
In this case, you need to look through the bottom of the structure into the body, where you will have a view of the pump. The pump is located opposite the drain pump, or more precisely, opposite its body. You probably already know what we’re talking about, because you clean the pump in a timely manner by first unscrewing it. The pump is also very hard to miss.
There is a possibility that your model of washing machine covers the bottom with a special lid. But there shouldn’t be any difficulties with this either; in the same order, you place the washing unit on its right side, take a screwdriver (Phillips) and get rid of the screws that are holding the lid in place. Once you have unscrewed everything, simply pry up the cover (you can use a flat-head screwdriver) and remove it, and you will have access to the “inner world” of your washing machine.
Everything will be somewhat more complicated if your washing structure is equipped with protection against leaks: in this case, there will be a tray at the bottom with a special sensor, which also needs to be removed. To achieve the goal and finally consider the washing machine drain pump in such a situation, we need to act in accordance with all eight stages of this algorithm:
- It is necessary to disconnect the washing machine from the power supply, disconnect it from the sewerage system and water supply;
- Drain all remaining water through the drain filter, or through an emergency drain hose;
- Pull the washing machine out into the middle of the free space, after laying dry rags on the floor (for insurance);
- Take out the laundry detergent tray;
- We turn the structure over onto the right side of the body;
- We pry up and pull off the pallet (you need to pull off 4 latches, a screwdriver (flat) is perfect for this);
- We move the pallet a little - this is done in order to disconnect the wire that goes to the sensor mounted on the pallet body;
- We adjust the tray further away, and we can now freely delve into the elements of the washing machine through the bottom.
The sensor, which is installed on the pallet, is responsible for leaks. For example, water somehow gets into the tray during the washing process, the sensor notices this and shuts off the water, simultaneously stopping the washing process. This is done to eliminate the problem of “flooding”.
We check the mechanical and electrical parts
Once you find the drain pump through the bottom of the washing structure, it must be checked immediately.
Basically, when repairing a unit with their own hands, owners make one of the most basic mistakes of beginners - they immediately try to check the drain pump with a multimeter, imagining that the problem is in the electrical part.
As we know, the drainage system of a washing machine is designed in such a way that almost all the garbage that accidentally ends up in the laundry tank ends up in the garbage filter. However, even the smallest piece of debris that comes into contact with the impeller of the drain pump can cause you a huge number of problems. For example, the same hair: it wraps around this same impeller and thereby can stop the pump from working. In this case, it is necessary to immediately make decisions and fix the problem.
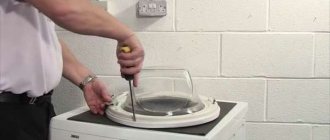
Repairing a pump, as well as checking it, begins with removing this element. The pump is quite easy to remove, here is the order of the correct actions :
- It is best to photograph the location of the wiring;
- Then you can disconnect the wiring from the element;
- Release the clamps (use pliers) that hold the hose and pipe to the pump;
- Remove the pipe and hose;
- Grasp the pump body and turn it half a turn counterclockwise - this way you will remove the pump.
Next, you need to pry off the special latches that hold the pump body, but before this action it is possible to check the impeller. You will immediately notice if there is something wrong with the impeller, for example, the same wound hair. When you check the mechanical part of the pump, you need to check the mechanism itself, as well as the rubber gaskets, in addition, you need to clean all the elements of the pump and check for the presence of other remaining dirt. If there is one, clean everything again.
If you did everything correctly, checked the mechanical part of the pump, the pump, and still found nothing, then you can start checking the electrical part.
First, set up a multimeter to check the voltage, then connect the device to the contacts of the drain pump. If your multimeter screen displays a result of zero or one, then your motor is completely and irrevocably burned out, and it must be replaced. If the result is in three digits, then it is better for you to continue looking for a breakdown, since the motor is completely working, and it is already becoming clear that the problem is not with the pump. There is a chance that this is a control board triac, but we cannot say for sure.
[warningIn general, there is nothing difficult in checking the drain pump and pump in an automatic washing machine, especially if you have received help in advance in the form of instructions from the specialists.[/warning
To find, remove and check the pump and drain pump, the machine should not be disassembled down to the screw, and checking all the elements will also take a lot of your time. We wish you good luck with the renovation!
Common causes of breakdowns
If the machine pump fails, it can completely stop pumping out liquid. Such a breakdown can occur due to various malfunctions. The simplest solution is to completely replace the pump in the washing machine.
You can repair your electric pump, but there is no guarantee (and no specialist will give it) that you can use the machine for a long time. How long it will last after repairing the pump is unknown. It is better to purchase a new drain pump for your washing machine.
And by purchasing a new pump for a Samsung washing machine (Zanusi, Askol, Indesif, Ariston, etc.), you get an additional 15 years of device service. Such a device will stop making noise and retain factory characteristics. And if you install a drain pump filter, the service life will increase by another couple of years.
When purchasing an original pump for a Zanussi, Indesit, Ariston, etc. washing machine, you should rest assured that these devices are made of the highest quality, taking into account all modern requirements and technologies.
Here are the most common breakdowns of washing machine pumps (each of them requires pump replacement):
- Wear of motor bushings.
- Winding break/short circuit.
- Impeller failure.
Those who buy a new pump for a washing machine are often those who use it incorrectly. Yes, a washing machine drain pump is inexpensive, but it is better to prevent it from breaking.
What is needed for this:
- make sure that solid elements are not “erased” in the drum - coins, keys, etc., which can jam the pump. It is best to install a special washing machine pump filter (inexpensive);
- choose the right modes when washing. Do not set the timer for too long - this will lead to breakdowns.
The first signal of a breakdown is uncharacteristic sounds. So, the machine may hum (sometimes it makes a lot of noise), rattle, etc. A particularly loud sound may occur when draining water.
Additional pump failure signals: service codes
Modern washing machines usually produce error codes. They will signal that the device is faulty. Of course, they are different for each manufacturer.
To find out them, you should read the instructions for the device, or go to the manufacturer’s official website. There you can find not only error codes, but also useful recommendations for servicing devices.
How is the pump replaced? (briefly)
It all depends on the specific brand and model of the device. But, usually, you first need to unscrew and remove the cover, unscrew the pump’s mounting bolts (cleaning is also carried out at this stage), replace the pump, and send the unscrewed one to the trash heap or sell it to a mechanic for spare parts.
Checking the washing machine drain pump
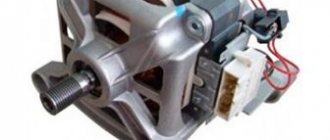
The drain pump occupies the same important place in a washing machine as the human heart. Its main job is to distribute water throughout the system and pump it out after the wash is completed. Experiencing constant loads, this part requires especially careful care. Like the engine, the drain pump experiences the most wear and tear. That is why you should periodically check it for malfunctions and replace it at the first sign of failure. But how to check the pump on an automatic washing machine? Anyone can do this at home.
Instructions for checking functionality
Signs of abnormal operation can be seen by listening to the sound the pump makes. It should be smooth, without noticeable sound deviations. Before you clean the pump in the washing machine and test it for functionality at home, you need to remove it.
First of all, you need to remove the drain filter located at the bottom of the front panel under a small hatch. It opens after pressing the latches. The filter is unscrewed by thread. Do everything carefully so as not to break the parts. Do not forget that you will have to drain the remaining water from the drainage system.
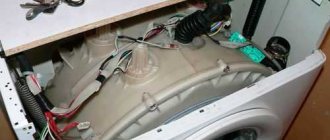
After disassembling the elements of the machine body that limited access to the pump, the drain pump itself is removed.
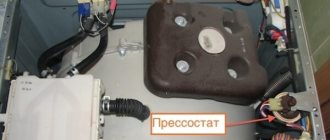
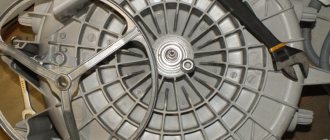
Location of the drain pump (photo source - Yandex.Pictures)
After a detailed inspection, the drain pump (by unscrewing the mounting screws) is disconnected from the volute. Then the following steps are performed:
- external control is carried out for the presence of mechanical damage;
- check for traces of washed clothes, such as hair or lint, on the impeller;
- by manually rotating the rotor, the engagement of the impeller with the rotor shaft is determined;
- The play of the rotor shaft in the mounting slots and the amount of wear are checked.
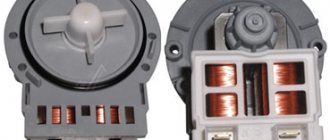
The electrical part of the pump is diagnosed using a multimeter or tester, so the problem can be determined. The device is set to the dialing mode, and the control wires are connected to the metal contacts of the pump. Any three-digit number on the instrument scale means normal. Values “0” or “1” indicate an open circuit.
The serviceability of the electrical part can be checked by connecting special contacts from the network to the pump. In this way, tests are carried out to identify the problem and find out whether the pump operates when power is applied to the motor. Analysis of faults allows us to draw a conclusion about the possibility of repairing or replacing the drain pump.
Pump diagnostics (photo source - Yandex.Images)
Where is the pump located
To check the pump, you first need to get to it, and to do this you need to know where it is located. To do this, it is not at all necessary to dismantle all components of the washing machine. In different models, everything is different, but most often it is enough to remove one of the outer panels.
- The easiest way to get to the drain pump is in models from Samsung, Kandy, Ariston, Ardo, Beko, Virpul, Lzh, Indesit. Simply turn the machine on its side and remove the bottom cover. After this, the pump will be within easy reach.
- It will be much more difficult with devices from Electrolux and Zanussi. It is possible to remove their pumps only after dismantling the rear wall.
- And the most difficult path you have to go through is with AEG, Bosch, Siemens machines. Their pump is hidden directly behind the front panel. To dismantle it, you will first need to remove the dashboard, then the loading hatch cover. Checking the pump in these models is the most troublesome thing, but with some experience, you can handle this too.
Video
Cleaning the pump, like other components of the machine, is included in mandatory preventive maintenance when using the machine at home.
Your gratitude in the form
of subscriptions to the Zen channel , to our Website , VK group and on Facebook , Telegram channel , on Youtube , on Instagram . Thank you in advance!