Solenoid valves for connecting various devices to water supply systems are used quite often. Such devices have an electromechanical principle of operation and are a type of locking equipment. Experts call them solenoid (solenoid - magnet).
Solenoid shut-off elements are often found in various industries, in water and gas supply systems. In accordance with its functions, in washing machines this device is called a filler or inlet valve.
Valve design and principle of operation
The water supply valve for a washing machine can be in two states:
- open;
- closed
The washing machine does not drain water: causes and solution to the problem Automatic washing machines have long moved from the category of wonders to the list of essential items...
Most of the time the machine is operating, it is closed. If you take it apart, you will see a small coil inside. The electronic program that controls the “washer” regulates the supply of electricity to the coil. An electrical impulse opens the valve so that it can allow liquid to enter the tank. When the entire chain is functioning normally, the machine fills up quickly.
On a note!
Based on the principle of operation, such devices are called electromagnetic.
After filling the “washer” to the required level, the control program transmits another signal to the coil. The valve mechanism closes. Now his task is to prevent liquid from entering the hoses: it remains in a confined space during the entire wash cycle.
The valve installed on a horizontal-loading washing machine is located in its upper compartment. On top-loading models it is located at the bottom or on the rear wall. In the first case, you need to dismantle the back panel, in the second - the side panel.
Important! High probability of leakage
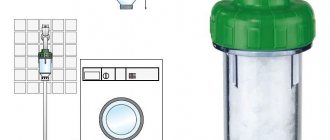
After repairs are completed, it is necessary to monitor the serviceability of the machine for some time, since leaks are possible. Changes in water pressure, temperature changes, vibration when performing the spin function at high speeds can cause leaks at the joints. Only after checking the tightness of the system using different washing modes can you be confident in the quality of the repair performed. For your own peace of mind, you can install a leakage protection system on the floor.
Theory and principle of operation
The shut-off valve on a washing machine performs the same functions as a regular faucet. Only it opens not manually, but with an electric coil at the command of the control unit. When power is applied, water under pressure rushes into the tank or into the powder compartment, depending on the program.
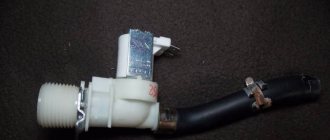
What does the inlet hydraulic valve consist of:
- plastic case;
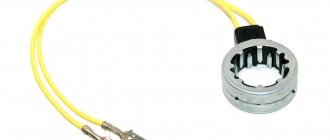
- solenoid (electromagnetic coil);
- stock;
- spring;
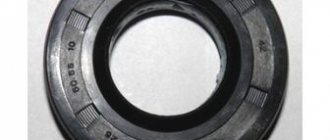
- rubber or polyurethane membrane;
- filter mesh;
- inserts in fittings that reduce pressure;
- seals and fasteners.
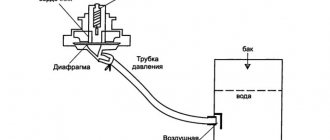
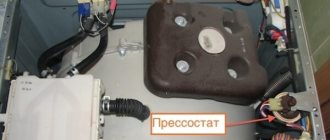
When the wash starts, current is applied to the coil and the rod (a metal rod with an elastic band attached) is attracted. The membrane opens, liquid under pressure from the water supply enters the washing machine. When the required quantity is reached, the level sensor (pressostat) signals the control unit and the current is turned off. The spring returns the rod to its original position, closing the water.
New washing machines from SMEG
SMEG washing machines are modern equipment, made in a stylish design solution and characterized by wide functionality. The combination of high reliability and relatively inexpensive prices explains the popularity of washing machines from this Italian brand. The catalog of models is represented by built-in and free-standing models of various capacities. The ability to choose a washing machine with vertical or front loading allows you to choose the model that is optimal for a room of any size and interior.
Depending on the model, SMEG washing machines are equipped with programs for washing various types of fabric, quick washing, rinsing and spinning, drying, hand washing, ensuring gentle care for household items. Control of temperature and spin intensity, the presence of a delayed start option, and the Aquastop leakage control system guarantee comfortable and safe use of the device. Various classes of energy consumption, the presence of the “Night” function ensures the efficiency of SMEG washing machines.
Types of valves and signs of their malfunction
There are several types of water fill valves in a washing machine. Any of them is divided into sections. Each individual section has an electromagnetic element. All departments are connected to a common system and respond to signals sent by the control program. Depending on the number of coils, the devices are:
- single-reel;
- two-coil;
- three-reel.
A malfunction is indicated by one of the external manifestations:
- the display displays an error code consisting of two or three digits;
- after filling the tank, water continues to flood the interior;
- liquid does not enter the tank.
Where does the water come from under the machine? What to do when an emergency is detected?
The washing machine is leaking from below reasons
The washing machine is one of the main household appliances, designed to create comfort in your household. However, as a result of active use, as well as as a result of poor-quality assembly, damage occurs. One of the most unpleasant breakdowns is a leak from your car. And this problem can not only slow down the washing in your home, but also cause problems in the event of a flood on the lower floors of your neighbors, and what is even more dangerous is electric shock. However, if you see a puddle on the floor, do not immediately despair; perhaps you can solve some of the problems yourself.
Determining the cause of leaks and eliminating them
If a leak is detected from below, you need to turn off the power supply, turn off the water supply and turn the machine over. By continuing the inspection, we will be able to discover the cause of the leak. We look at the presence of smudges on the parts and the condition of the clamps, at the connection of hoses and pipes.
Troubleshooting
A simple test will help you check the operation of the system. The device is removed from the machine and a hose is connected to it. After connecting the water hose, it should open and let in liquid. As soon as the voltage stops acting on the coil, the mechanism will close. If it doesn't work, it should be replaced. This is an easy test, but you must work carefully to prevent the wiring from coming into contact with a damp environment.
Step
- Remove the machine body
Disconnect the electrical connectors from the top panel. Release the clips that secure the sides of the machine to the back panel. Using a slotted screwdriver, lift the clips forward to release them from the slots on the top panel. Lift the rear of the machine and slide it forward.
Move the body to the side - we won't need it for now. Disconnect the wires. Release the housing clamps. Remove the housing.
This is interesting: Decoding error F4 on the Atlant washing machine: causes of malfunction, solutions
Basic faults
Housing, filter mesh, membrane, spring, winding, pipes - all these parts of the intake mechanism fail over time. Let's look at the main types of faults.
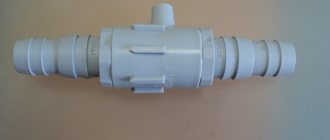
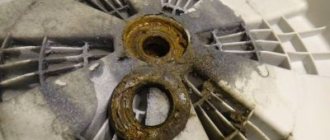
The inlet grid is clogged
There is a metal or plastic mesh at the entrance to the valve. It traps large mechanical debris from the pipes without allowing particles to enter the drum. The dirtier the water in the tap, the faster it becomes clogged. Dirt on the filter is visible from the outside; just remove the supply hose. There is no point in disassembling the entire assembly each time for cleaning.
The mesh is removed using pliers, translational and rotational movements. The inlet filter must be cleaned: rinse under running water and blow through with air.
The membrane is clogged
An elastic and elastic rubber membrane moves with each movement of the rod, opening and closing the tube. When clogged, the rubber does not adhere tightly to the walls of the housing and allows water to enter the tank, even in the closed position.
The membrane should be removed from the housing, inspected for integrity, and elasticity checked. If there are cracks or abrasions, the part must be replaced.
The return spring breaks or becomes clogged
Over time, the return spring compresses and may break. If the part is visually in good condition, it should be slightly stretched and put in place during assembly. If there are defects, breaks, or rust, the spring must be replaced with a similar one.
When disassembling, the return spring itself falls out of the housing - just remove the rod. Be careful not to lose the part.
Damaged hull
The plastic shell contains an electromagnetic coil, inside which the rod and membrane move. If there are cracks, water will constantly leak inside the machine and can get onto electrical components. As a result, the “washer” produces an electric shock the moment it touches the body. This is fraught with a short circuit and fire.
The element is dismantled and inspected, checked for leaks. There should be no dents or traces of impacts. If there are visible defects, there is no need to repair the part; it is easier to buy a new unit.
Cracking due to frost
A washing machine installed in a place of seasonal residence, for example, in a country house, freezes in an unheated room in winter.
Communities › DIY › Blog › INDESIT WITL 86 - water supply valve repair
INDESIT WITL 86 "vertical" age about 7 years. The washing machine suddenly began to fill with water uncontrollably. And with washed things and empty! And since we supply water according to time(, we need to find out who is to blame: the valve or the electronics. While there is no water, turn off the tap on the supply pipe. They gave water, opened the tap - thin streams ran from the holes for flushing the powder (the washing machine was unplugged from the outlet ). Result: “the valve does not hold.” Internet monitoring did not please: “INDESIT WITL 86 WATER SUPPLY VALVE 33390017” price from 800 to 2400 rubles! Plus delivery time. ((((Knowing the quality of our water) I hope there may be dirt (although filter - the coarse cleaning flask is worth everything) or the frog might get stuck).Just in case, I reached into the pumping pump - I earned 1 iron ruble))
Disassembling the machine. It's enough to shoot the left side and that's it, but then it's a bit cramped, you need to have the hands of a surgeon)).
Disconnect and remove the panel with switches (so as not to interfere) Lift the top part up. I didn’t remove it completely - there was too much extra, factory installation, etc...
Disconnect, otherwise you cannot pull out the valve:
1. thick corrugated hose in the center. 2. plugs (2 pcs.) on the valves. 3. spring clamps (2 pcs) on the hoses (all motorists love them)) but it will not be easy to compress them. I used duckbill pliers. 4. remove 2 rubber water supply tubes.
Removing the double valve.
1 - press (with a thick screwdriver one at a time) 2 - turn until the latches disengage. Pull out the water supply valve
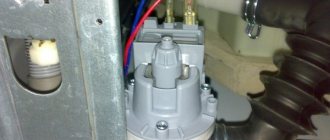
Checking valves. Measure the resistance of the electromagnet coils. I got a coil resistance of 3.72-3.77 kOhm. The windings are intact. (from 3 to 5 kOhm) If you blow into the holes, you can hear the characteristic gurgling sounds of passing air. Result: the valve does not hold. Replacement. Nope.
Disassembling valves 1. pry off the coil with a screwdriver.
2. pull out the valve. Unscrew the middle part. Unscrew by pushing with a screwdriver or “platypus”.
Wipe everything away from plaque. Clean the 3 pressure equalization holes.
3. I greased everything lightly with silicone. I don't think it will get any worse.
4. collected. I checked it and it holds perfectly. You can blow and gently press with a blunt object (screwdriver) through the fitting to check the operation of the valve.
5. At the same time I disassembled, cleaned and lubricated the second working valve.
Assembly. Everything is in reverse order. I lubricated the fittings with silicone - it’s easier to put on the hoses.
1. valve 2. plugs 3. film - splash protection 4. thick hose 5. two water supply hoses 6. clamps 7. cover, control panel The valve - the gearbox at the inlet was also coated with silicone.
If you remove it, the machine works better with low pressure (they say), but there should not be a strong water pressure. Left him. I washed it and cleaned the mesh at the inlet.
I sprayed all the rubber bands with silicone - it won't get any worse. Put on the side cover. All. Connection. 1. does not allow water to pass through. Ok 2. erases. OK
All the best to everyone! Happy upcoming MAY 9!
PS: I'm not an expert, so I'll take all the advice)
Valve replacement procedure
The valve in the washing machine cannot be repaired. If it is broken inside or its coil is burned out, it is replaced with a new one. They do it like this:
- de-energize the machine by disconnecting it from the network;
- shut off the water;
- remove the back or side panel;
- carefully unscrew the water hoses. When disconnecting, you must remember the location of their installation;
- remove the fasteners holding the device;
- remove the valve;
- install a new one;
- assemble the structure in reverse order;
- check the performance of the system.
If everything was done correctly, the machine will work as before. After turning it on, check how the liquid enters the tank and whether the mechanism stops in a timely manner.
How to completely drain the water from a washing machine if it is broken
The role of the washing machine in the life of a modern family cannot be overestimated. These tireless units...
You can fix simple washing machine problems yourself. Typical models are not very different from one another. The main thing is to follow safety precautions when working with electricity.
Where to start
First you need to make sure that it is the supply valve of the washing machine that has failed. Signs of a breakdown are the entry of water into the tank when the equipment is turned off, or, conversely, its absence when the washing is started.
Before disassembling the washing machine, you must:
- disconnect the unit from the power supply - remove the plug from the socket;
- turn off the water at the inlet tap;
- prepare a basin and a rag to clean up spilled water;
- move the machine away from the wall and place it in a free place with access from all sides;
- Put on dry shoes with waterproof soles.
If there is water left in the washing machine, it should be removed through the drain hose next to the filter, or by unscrewing the plug (the compartment is located in front, at the bottom). To do this, use a low basin or other container. Remaining moisture spilled on the floor is wiped off with a rag or rag.
Avoid contact between electricity and water
The water distribution valve is driven by an electromagnet (solenoid) designed to operate from a 220-volt network. Electric shock at 220 V is deadly to humans. A burn appears at the point of contact and death is possible.
Tools
Disassembly and diagnostics of the valve is carried out:
- Phillips and flat-head screwdrivers (we recommend using a screwdriver);
- pliers;
- pliers with sharp jaws;
- multimeter.
All parts can be easily removed without the use of force, especially if there are plastic latches.
How to check functionality
An electromagnetic coil drives the rod. The performance of the node depends on its condition. You can check it in different ways.
Connect 220 volts
When connecting a 220 V household current to the electrovalve terminals, a magnetic field is formed in the coil, which attracts the metal rod along with the membrane - characteristic single clicks will be heard. When disconnected, everything returns to its place and the water pipe is closed.
Check resistance
The coil is usually soldered to the body, therefore, it is easier to test the contacts with a multimeter. Depending on the design of the bypass valve, the device will show a resistance of 2-4 kOhm on the working coil.
Intake valves are single, double, triple. The coils in each ring separately.
Sources
- https://hozsekretiki.ru/tehnika/klapan-podachi-vody-dlya-stiralnoj-mashiny.html
- https://ExpertLand.ru/tehnika/stiralki/pochinit-klapan-v-sm
- https://cosmo-frost.ru/stiralnye-mashiny/remont-i-zamena/kak-proverit-i-zamenit-vpusknoj-klapan-v-stiralnoj-mashine/
Where is?
Most often, the inlet valve is located at the top of the machine, closer to the back wall, so to check and remove it you need to disconnect the back cover of the machine. Usually the cover is held in place by two self-tapping screws, after unscrewing which it is pushed from the front side and easily removed.
In models in which laundry is loaded vertically, the fill valve is also located at the rear of the machine, but at the bottom. To gain access to the valve, part of the side wall of the machine is disconnected.
Step
- Reinstall the machine body
Place the previously removed machine body in front of its rear wall. Place your elbows on the front edge of the machine and tilt it slightly forward towards you. Now press a little and push the body of the machine forward with your feet to move it as close as possible to the base (base) of the washing machine itself. Now lower the back of the case so that the holes in the back of the case line up with the corresponding tabs in the base of the machine. Reinstall the spring clips on the top of the housing. Plug the wires back into the connector on the top of the machine. Reinstall the chassis. Reinstall the clamps. Insert the wire switch into the connector.
Step
- Remove the water inlet valve
Take photos of the wire connections or mark them so that you can connect them correctly later. Pull the electrical wire connectors toward you to disconnect them from the solenoid valves. Remove and disconnect the water valve mounting screws from the back of the machine. Using pliers, release the hose clamp. Disconnect the water supply hose from the inlet valve. Remove the valve. Disconnect the plastic clamp securing the hose and remove the old valve. Remove the mounting screws. Remove the hose. Remove the valve.
Can it be repaired?
By their structure, filler valves are classified as non-separable parts, so their repair is often impossible. You can try replacing a burnt-out coil by removing a working coil from a similar valve. However, in most cases such actions do not bring results. The best solution would be to buy a new valve and replace it completely.