The automatic washing machine is controlled by an electronic unit that responds to signals from control devices, the main one of which is a pressure switch. This is a multifunctional sensor responsible for filling the washing tank with water to a certain level, turning on the heating in a timely manner, and pumping out the liquid. Understanding the operating principle of the device and the ability to carry out diagnostics yourself will help save the family budget from unnecessary expenses.
- Purpose of the pressure switch
- Principle of operation and varieties
- Signs of level switch failure
- Self-diagnosis of the pressure indicator
- Is it possible to configure it yourself?
- Do-it-yourself replacement
- Catalog of washing machines with reviews
Options of pressure switches, principle of operation, consequences of malfunction
If the pressure switch of a Samsung, Ariston, Indesit, Bosch or LG washing machine does not work correctly, this will provoke one or more malfunction options:
- overflowing water in the tank of the machine with constant addition and drainage of liquid;
- the liquid level in the tank is too low, the quality of the wash deteriorates;
- incomplete drainage of liquid after washing, insufficient spinning of laundry;
- start of the program (turning on the heating element) without water, overheating of the element and its failure.
The last point threatens serious damage to the washing machine and may even cause a fire.
Washing machine water level sensor
Failure of this part will result in incorrect operation of the unit.
You can determine that the liquid level relay has broken down based on the following indicators:
- the machine tries to wash in the absence of liquid;
- insufficient or excessive amount of water to implement the current action;
- burning smell, heating element reaction;
- when the rinse starts, the water is either drained or collected;
- The laundry is not spun at the end of the wash cycle.
The occurrence of these symptoms requires checking the functioning of the pressure switch. Since the fasteners on some machines have a specific shape (this is done to protect against burglary), it is recommended to purchase a special device for opening with a set of several attachments.
The washing machine water level sensor can be adjusted using two adjusting screws. The peripheral screw determines the contact disconnection time, the central screw determines the connection time. The device can be equipped with not one, but two or three groups of contacts - this is determined by the characteristics of the operating modes of a particular model.
An example of a machine with one sensor with a large number of groups is machines of modern models. Three contact groups are built into their pressure switches - one is responsible for the normal mode, the other for the economical mode, and the third shows the tank overflow status.
It also happens that the body of one washing machine is equipped with several such devices. Different wash programs fill the washing machine with water differently. In particular, the gentle wash uses a half-fill tank.
The screws that regulate the process are secured with varnish or paint. You should not move or rearrange the screws - in this case, malfunctions will occur in the well-thought-out program implemented by the unit.
Setting up a pressure switch at home is a procedure that is very demanding on the competence of the master. It is recommended to carry it out independently only if you know the volume of liquid required by a specific model at all stages of the washing programs implemented by this technique and the ability to adjust the operation of the contact groups in accordance with these data.
When purchasing a new pressure switch for a washing machine to replace a non-working one, you must make sure that the purchased model is identical to the one previously installed in the machine and is suitable for use in a specific brand and model with its inherent drum capacity parameter.
The procedure for replacing a pressure switch in a washing machine is similar to removing a broken sensor, but the steps are carried out in reverse order:
- The device is secured with special screws.
- The hose is connected to the fitting and the whip is tightened.
- Connect the wiring.
- Place the cover and tighten it with screws.
When the work is completed, you must turn on the equipment and run a test wash to check that the sensor copes with its functions correctly.
One of the water level sensor models Install a new pressure sensor in the following order:
- the tube that was removed from the old sensor is put on the same place on the new sensor;
- electrical wires are connected to the sensor;
- The pressure switch of the washing machine is bolted to the old place;
- The top cover of the washing machine is installed in its place and secured with bolts;
- the machine is connected to the electrical network;
- laundry is loaded into the machine;
- The required washing mode is set, after which the machine starts working. During the first wash after the repair, it is recommended to monitor the operation of the pressure switch. If there are no comments on its operation, then the repair is considered successful.
We suggest you read: How to get rid of smell in a washing machine? The automatic machine smells moldy, what should you do if the drum smells rotten?
Do-it-yourself replacement
In order not to make a mistake in choosing a sensor suitable for the brand of your existing washing machine, it is recommended to take the old pressure switch with you, as well as the SMA technical passport. This will allow the store manager to provide comprehensive information about the purchased model of level sensor, and to verify for himself that the markings on the housings of the old and new pressure switches exactly match.
The sensor is replaced in the reverse order of its removal:
- the tube, disconnected from the previous device, is docked to the fitting of a working pressure switch and tightened with a clamp;
- electrical wires are connected to the sensor in accordance with the pre-applied markings;
- the new pressure switch is attached to its original place, the top cover of the SMA is installed and secured with screws;
- The washing machine cord plug is plugged into the socket.
After completion of the repair, a control wash is performed, during which the result of the new pressure switch is observed. The absence of failures in the specified program means that the replacement was successful.
Without a water level sensor, the washing machine is not able to perform its functions. This important device is individual for each manufacturer. Installing a pressure switch on an SMA from another manufacturer can cause serious problems in the operation of the washing machine.
Video
Checking the pressure switch
If you have the slightest doubt about the correct operation of the pressure switch, you must immediately replace it with a new one. But before that, you need to gain confidence that the problem is with the sensor. Checking the pressure switch of a washing machine is quite simple:
- The top panel must be removed. You can remove it by unscrewing the special bolts and sliding it in the opposite direction from you. On most models, the sensor is located at the top of the side wall.
- Experts recommend simply unscrewing the pressure switch. It is usually secured with several screws, which are quite easy to unscrew.
- After this, disconnect the tube and contacts from the sensor. The hose is secured with special clamps; they will either have to be carefully disassembled or cut off and then replaced with new ones.
Carefully examine the dismantled pressure switch: there should be no damage or formations on the housing. Check the tube and the condition of the insulating material of the wiring no less carefully. If necessary, clear blockages and repair minor damage. Clean the sensor contacts.
Now let's check the device itself. Typically, a ten-centimeter hose is used for this, identical in diameter to the one already removed earlier. Having connected the tube to the inlet fitting of the pressure switch, blow strongly into it. At this moment, clicks should be heard from the sensor. Their number depends on the blowing force.
To finally make sure that the pressure switch is not working, measure its resistance with a multimeter. If during injection the resistance remains at the same level, feel free to throw away the sensor.
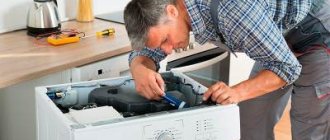
This small device is necessary for the entire system. When it fails, it deprives you of the ability to wash, and can lead to various breakdowns. Replacing the pressure switch in an automatic washing machine is a troublesome, but not complicated process.
Pay attention to the behavior of your machine, and you will be able to notice a malfunction in time
Replacing the pressure switch
First, buy a new device. You can take your sensor and go to the store with it, but usually, to purchase the appropriate part, you just need to tell the seller the car model. If you did not completely remove the relay when checking, do this:
- Disconnect all wires (take photos or label connections).
- Remove the bolts that secure the device to the housing.
How to connect a pressure switch? Repeat all steps in reverse order:
- Screw it into place using bolts.
- Then connect the hose, securing the clamp.
- Connect the wiring according to the markings.
Great! The work is completed successfully - you can launch your SM and check its operation. A video on the topic will help you:
Principle of operation
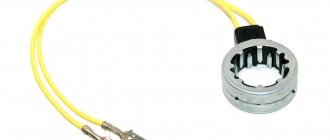
A pressure switch, also known as a pressure or water level switch, is a small round element made of plastic. Several insulated wires and a tube or hose clamped with clamps are connected to it. There are several types of devices:
- mechanical;
- electronic;
- single-chamber;
- two-chamber.
A rubber membrane is built into the sealed housing, which moves under the influence of air pressure, closing or opening electrical contacts. The device has a return spring that returns the diaphragm to its original position. From the outside it looks like a click inside the washing machine body.
A rubber hose runs from the bottom fitting of the tank to the sensor. When you turn on the washing machine, water begins to fill the tank, which puts pressure on the air in the hose. When the pressure reaches a certain value, the membrane will compress the spring, the contacts will open, and the water supply will stop.
The pressure and volume of water are adjusted by a screw that acts on a spring (but not all models are adjustable). A mechanical pressure switch is designed and operates on this principle. An electronic relay has an inductor (choke) instead of contacts, which controls the operation of the device.
Replacement with a new one
If you are convinced that the level sensor is indeed faulty, it will have to be replaced with a new part. You can purchase a new pressure switch both in a regular store and on the Internet. To do this, you just need to know the make and model of the washing machine or look at its number on your non-working pressure switch.
Installing a new sensor is quite simple. First, a tube is put on it, then the contacts are connected, after which the pressure switch is installed in its place in the washing machine. Next, all that remains is to start the device and check whether the new sensor works.
You can learn more about the operation of the pressure switch in this video:
A device that controls the presence and volume of water in the tank of a washing machine, regardless of its brand (LG, Samsung, Ariston or Indesit), is called a pressure switch, or water level sensor. The main washing algorithms are turned on or not on according to its indications. The answer to the question of where the pressure switch is in a washing machine varies depending on the model and manufacturer, but the general criterion is its location near the housing wall, under the top panel of the unit.
Verification methods
There are two main methods that allow you to quickly check the performance of a heating element at home. But for this you will need to acquire special tools - a multimeter or tester.
How to remove and call
To make sure the device is working properly, test the electrical circuit.
Procedure:
- Turn off the power to the machine by unplugging the plug from the socket.
- Having gained access to the element, do not disassemble or dismantle it - the check is performed on site, without removing the heating element.
- Disconnect the wires from the live contacts (before doing this, take a photo of them so as not to forget the correct location).
- Place the multimeter probes on the contacts of the mechanism, which is set to the resistance scale.
In normal condition, the indicator does not exceed fifty OM. If the reading is more than 100 ohms, then the boiler is definitely faulty.
Connecting a multimeter to a heating element
Testing and setting up the sensor
Before you start repairing your “home assistant”, find the receipts and see if the washing machine is under warranty. If the deadline has not passed and you are entitled to free diagnostics, it is better to contact the service center specialists. It should be remembered that if you open the machine body yourself, you can’t hope for warranty service in the future.
If the warranty card is no longer valid, you can proceed with diagnostics. First you need to remove the sensor from the housing. The algorithm of actions will be as follows:
- de-energize the SMA by unplugging the power cord from the outlet;
- turn off the tap responsible for the water supply;
- Unscrew the two bolts securing the top panel of the machine;
- remove the “cover” of the unit;
- find the pressure switch - it has the shape of a washer;
- Unscrew the bolt securing the relay in the housing, remove the connector;
- loosen the clamp and remove the sensor from the machine.
Before adjusting the device, you need to check whether it is working properly. For diagnostics, you will need a rubber tube of the same diameter as on the pressure switch. Having taken out the level sensor, put the prepared tube on its inlet fitting. Then blow into it - the working pressure switch will make 1-3 characteristic clicks. If the device is silent, it means that the contacts do not work and the relay is faulty.
Then inspect the level sensor. You need to make sure that it is not deformed and that there are no traces of burning on the surface. Also check the hose for blockages; sometimes the cavity becomes clogged with dust. If the tube is clogged, clear it or rinse it with warm water.
Hardware diagnostics of the pressure switch is more accurate. To test the device, set the device to resistance measurement mode and attach the multimeter probes to the pressure switch terminals. To activate the contacts, it is necessary to create pressure in the tube.
If the values on the multimeter display remain unchanged when the relay contacts are activated, you will have to replace the pressure switch. If the numbers on the screen change, we can talk about the serviceability of the sensor. Then, perhaps, it will be enough to simply adjust the existing device.
The level sensor is configured manually. Adjustment will be advisable in cases where too little or, on the contrary, too much water is poured into the tank during washing. The amount of liquid collected by the washing machine can be reduced or increased - to do this, you need to set the response force of the pressure switch.
First you need to turn off the power to the machine. Next, remove the top panel of the case, find the pressure switch and disconnect the connector. The relay has three adjusting screws, one of which needs to be tightened. The bolt with which adjustment is made is usually located in the central part.
To tighten the screw, you will need a Phillips screwdriver or a special wrench. The process is carried out in stages - it is necessary to evaluate the intermediate results of adjusting the pressure switch. So, you should turn the bolt half a turn, then assemble the machine body and start a test “idle” wash. If the desired effect is not achieved, you still need to turn the screw.
To set up a pressure switch, you need to have minimal basic knowledge of the internal structure of a washing machine. If you do not have even the slightest idea how a level sensor functions, it is better to invite a specialist to do the work. Otherwise, you can harm the “home assistant” even more.
Interesting:
- How does the pressure switch of a washing machine work?
- Miele dishwasher errors
- Washing machine connection - review
- Checking the pressure switch of the Indesit washing machine
- Error codes for AEG washing machines
- How to adjust the pressure switch of a washing machine
Reader comments
Share your opinion - leave a comment
Checking legs, hoses, bolts
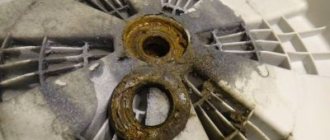
It is best to start with the bolts that secure the drum during transportation. They are located on the back panel, installed in the right places and fixed. With their help, the tank is not subject to vibration and accidental damage. Any tilt of the bolts hints that the car was handled carelessly during transportation and the tank has moved out of its place. And if it is made of plastic, then, most likely, cracks have appeared on it. It is best to abandon such a car in time.
Let's move on to the legs of the SMA. There are four of them in total, and each one will have to be screwed in to make sure there are no defects. The installation process should go smoothly without any obstacles. Serviceable legs will ensure the evenness of the working body, which will affect its service life.
The hoses must be intact, and they will have to be inspected at least visually
In this case, pay attention to the fastenings so that the diameter of the hoses corresponds to their size. The drain hose, through which water is directed into the sewer pipe, is attached to the back wall of the washing machine and is already connected to the pump
Its structure is corrugated, the material used for manufacturing is distinguished by its thinness. The hose feels fragile to the touch and is highly likely to suffer damage from mechanical impacts. So this element of the machine will have to be checked thoroughly, because it is through it that most leaks occur.
The inlet hose has a denser structure. At its ends there are plastic nuts, with the help of which the hose is mounted to the water pipe and to the machine itself. All elements must be intact and free of chips and cracks. The nuts must be tightened without fail to check the condition of the threads and the tightness of the fit.
The washing powder tray must be completely dry and clean. You can even smell the item to make sure it hasn't been washed with chemicals.
What factors may indicate a breakdown?
Blockages in the pressure tube, damage to the surface of hoses and valves, overheating and burning of sensor contacts are the main types of failure of the pressure switch. The source of these problems is the dirt accumulating inside the machine.
Also, to avoid machine breakdown, you should pay attention to the following points:
- Do not allow the washing machine to idle. Before starting the wash, the machine must fill the tank with water.
- The optimal temperature for washing is no higher than 45 degrees. This is enough for high-quality washing of clothes.
A pressure switch is necessary for the entire SMA system. When it fails, it deprives you of the ability to wash, and can lead to various breakdowns. Replacing the pressure switch in an automatic washing machine is a troublesome, but not complicated process.
Pay attention to the behavior of your machine, and you will be able to notice a malfunction in time
The following symptoms indicate that a washing machine malfunction may be caused by a problem with the pressure switch:
- Water did not fill the tank, but the machine started washing. The consequence of such a situation is usually the heating element burns out, since the heater must operate in water.
- There is not enough water in the tank.
- The machine overflowed with water.
- The wash is over, but the water still remains in the tank, so after spinning, you take the wet clothes out of the machine.
- The rinse cycle does not start.
- You smell a burning smell coming from the tank.
How to check the serviceability of the pressure switch of a washing machine
It's not that difficult to do. In the system, the part acts as a liquid level switch. Different stages of the washing process require a certain amount of water. The pressure switch controls this indicator, taking into account the volume of things loaded into the device drum.
@itisfixed.com
To check the operation of the relay, you need to turn off the power supply. It is unacceptable to do this with the device connected to the network.
Finding a water level sensor
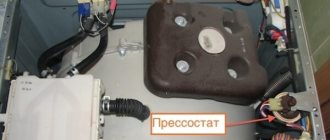
In 90% of models, a small round device is located in the upper part under the cover closer to the front panel. On some older top-loading washing machines, the pressure switch is located at the back wall at the bottom of the machine.
Adjusting the device
Procedure:
- Unscrew the two cover screws.
- Pull it back slightly and remove.
Pull out the relay with the tube, removing the hose secured with a clamp, and replace it with another identical one, prepared in advance. A regular tube will do. It is needed to determine how the membrane in the pressure switch reacts to air pressure. To do this, attach it to the fitting and blow quite strongly into the hole.
@how-to-repair.comAs a result, if the model is not damaged, a click or several will sound (depending on how many water levels are provided in the machine’s operation). If there are no clicks, the sensor is faulty. You can do a more accurate test using a multimeter.
Design features
The more washing programs a device has, the more complex the structure of the device. Although, in fact, all types of relays perform the same job: when the tank is filled to a certain point for a specific cycle, as a result of pressure, the sensor is triggered and sends a signal to the controller. After this, the flow of liquid into the tank stops. And vice versa - at the stage of water displacement, the part is triggered when the drum is completely empty.
Sensor design
The design of the pressure switch is round, with adjusting screws and flat-shaped contacts located on the outside. Moreover, the function of the screws is to set and regulate the switching on and off of the pumping device at a given water level. There is a separate pair for the water level mode, namely:
- To fully load the drum.
- If the unit is only half loaded.
- Delicate wash mode.
4.Eco mode.
One screw is supposed to turn on when the set level is reached, and the second works to turn off.
The range of offered machines differs in the number of modes, that is, the sensor is adjusted for a specific model. To purchase a replacement element, you must tell the seller the name of the model, since an analogue from other equipment will not work.
The heads of the screws themselves are painted, this allows them to be unscrewed and installed unmistakably, and the color itself acts as a seal for the assembly. If the coating is damaged, then we can say that the warranty will not automatically apply.
The cylinder is structurally provided with a chamber for air, connected together with a tube, which in turn is lowered into the tank. When water is collected, the pressure indicator increases and a notification is transmitted from the built-in membrane to the signal contacts.
The terminals are in one row and located along the entire plane of the sensor, after which a terminal block with wiring is installed on them, directed to the immediate program. From the end, a tube of different sizes is lowered into the tank.
Checking the contents and documents
Take the instructions, which will indicate all the components for the machine. These include hoses, plugs, warranty document and operating instructions
It is very important that the availability fully matches the records
Documentation must be verified. Instructions for use must be detailed, in Russian. The warranty card checks the date of completion and year. The serial number of the washing device and model are also indicated here. Any violation in the execution of this document will be a prerequisite for refusal to service the machine.
If there are no problems with the documents, you can carry out further inspection.
Operating principle and location of the pressure switch
In washing machines, a pressure switch is used to determine the water level and control its quantity. The device operates under pressure and is usually located on top of the tank to avoid direct contact with the liquid. Much less often, the manufacturer installs the sensor below, under the tank.
A pressure switch is a small plastic part with a round shape. It communicates with the tank through a tube, and is connected to the control board by connecting wiring. When water is drawn into the completely sealed tank of the washing machine, air enters through the tube into the pressure switch chamber. A pressure is created corresponding to the amount of liquid poured in, due to which the contacts close and transmit to the central board that the required amount of liquid has entered the tank. Thus, if the pressure switch is faulty, no voltage is supplied to the control module, which means the washing machine will not be able to determine the water level and will complete the program or will not perform it correctly.
Self-adjustment of the pressure switch
Sometimes, instead of replacing a part, you can make adjustments or adjust the pressure switch in your washing machine. How to proceed:
It is important to know how much water a given washing machine model requires to complete each program. Based on their number, there are from one to three screws on the sensor.
In accordance with the required amount of water during the mode, you need to tighten the screws. Knowing how to set up and adjust the pressure switch, you don’t have to buy a new part
But calculating the correct tuning coordinates is quite difficult, since such work is carried out by specialists at the factory. If you decide to replace the relay, read the next paragraph
Knowing how to set up and adjust the pressure switch, you don’t have to buy a new part. But calculating the correct tuning coordinates is quite difficult, since such work is carried out by specialists at the factory. If you decide to replace the relay, read the next paragraph.
How a washing machine controls the water level
Knowing what a pressure switch (controller) is in a washing machine, the principle of operation of the pressure switch, it is easy to understand how washing units determine the level of water poured into the tank. Devices manufactured in the 90s have old-style mechanical sensors. Modern models have an electronic pressure switch. For example, Samsung and Electrolux machines have long switched to a more efficient relay. The level sensor must also be correctly configured.
Electronic pressure switch, what is it and how does the water level sensor work in a new type of washing machine? The principle of operation of such an element remains the same. The only thing is that it has become smaller in size and is characterized by increased reliability and accuracy. Samsung machines have dn s14 installed.
Washing machine pressure switch, what is it and how to check? Adviсe
To make sure the sensor is working, you need to check it. There are several useful recommendations that will help you check the serviceability of the part.
Where is
Before proceeding with dismantling, you should understand the location of the product. Many washing machine owners mistakenly believe that the part is located inside the drum, but this is not the case. Most manufacturers install a level switch on top of the drain body, which is mounted near the side wall. This arrangement is considered very convenient, as it simplifies the removal of the product from the structure.
However, on some models the sensor may be installed in other locations. For example, in modern models of Samsung or Ariston washing machines, the part is installed on the right near the front wall. For cars, the relay is located in the central part of the left side wall.
How to dismantle
It is quite easy to dismantle the pressure switch yourself. However, despite this, you need to familiarize yourself with how to do it correctly. The dismantling process is carried out in several successive stages:
Removing the top cover. To get rid of it, you will have to unscrew two bolts that are located on the back wall. The top cover is then carefully slid back and removed. Detaching a part. The relay is connected to wires leading to the control unit and a hose
Before removing the product, you must carefully disconnect the wiring and hose. Removing the pressure switch. It is connected to the wall with mounting bolts that must be unscrewed.
There are different methods for checking the functionality of a device, but most often they use a multimeter for this.
Before you begin testing, you must carefully study the electrical circuit of the device and carry out preliminary setup of the tester.
It is set in advance to resistance mode, after which the probes are connected to the contacts of the removed part. After connecting the probes, the values on the tester display should change. If the numbers have not changed, then the relay is faulty and will have to be completely replaced with a new one.
If the breakdown turns out to be minor, you don’t have to buy a new part, but simply manually adjust the old one. When setting up, adhere to the following recommendations:
- It is necessary to determine the optimal amount of water for the washing machine. For each model there is an optimal volume of liquid that is needed to complete the programs. Therefore, it is necessary to find out in advance how much water should be poured into the tank for washing and rinsing things.
- Configure. On the surface of the product there are adjustable screws that are adjusted depending on the required amount of liquid.
This is a sensor that monitors the level of water poured into the drum and informs the electronic module of the equipment about its quantity at each stage of washing.
Modern machines are equipped with sensors that are responsible not only for the water level, but also monitor the amount of laundry loaded.
Principle of operation and varieties
Deflection of the membrane causes the closure or disconnection of the contacts through which the impulse passes to the control module. The type of pressure switch depends on the method of signal transmission and the design of the block. There are 2 types of pressure sensors:
- Analogue or mechanical. A pneumatic membrane drive is found in most SMA devices.
- Electronic. The impact on the membrane is an electromagnetic oscillatory circuit. The relays operate at low voltage, 3 wires come from the block.
Expert opinion
I work in the household appliance repair industry. Extensive experience in restoring washing machines and dishwashers.
Ask a Question
In what follows, only mechanical models of sensors will be considered. Pressostats come in single- and double-chamber types. The latter are designed for small and large load machines, when 2 water levels are maintained depending on the amount of laundry being washed.
The membrane is made of rubber or polymer and is located inside the block - the sensor body. Scheme of operation of the device: change in water level - increase/decrease of air pressure in the tube - deflection of the membrane - activation of contacts - electric pulse through the wires to the SMA control unit.
Variety of temperature sensors
An automatic washing machine can be equipped with only one of the following three temperature sensors:
- Bimetallic;
- Thermistor;
- Gas-filled.
Each of these three temperature sensors has its own different capabilities and may differ in design and operation, so each of them is replaced and tested differently.
The bimetallic temperature sensor looks like a tablet, approximately 20-30 millimeters in diameter and 10 millimeters in height. Inside this small tablet is a bimetallic strip. During the process of heating water, when it reaches a certain temperature, the plate bends and creates a closure of the contacts. Under this condition, the heating process is completed.
The thermistor has become a fairly popular element among modern washing designs, which has replaced the temperature sensor.
The thermistor looks like a small elongated cylinder. Its diameter is about 10 millimeters, and its length reaches about 30 millimeters. This cylinder is attached directly to the heating element. The principle of operation of such an element does not involve any mechanical work of the part, but simply changes the resistance during the process of heating the water to the temperature you need.
A gas-filled temperature sensor has only two parts: the first is a tablet made of metal with a diameter of approximately 20-30 millimeters and a height of about 30 millimeters.
The first element is mainly located inside the tank itself, and is always touching the water to change the temperature. The second part of the temperature sensor is made in the form of a copper tube, which is connected to the temperature controller (external), which is located on the control panel of the washing machine. Inside these elements there is a gas, the name of which is freon. Under the temperature of the water, this gas can compress or expand, thereby forming contacts that lead to the heating element.
Where is the level sensor located?
Relay, sensor or pressure switch are possible names for a small element that controls the water level in the tank. A tube leads from the relay body to the tank. When water enters the machine, the pressure increases, which detects the sensor by switching contacts. The control module receives signals from the pressure switch and stops water intake.
This is what a level sensor is needed for. Replacement may be required if the electrical part breaks down (if the contacts are damaged) or the membrane itself, which acts on the switch, fails. Incorrect operation of the element is possible if the tube is clogged with small debris.
In such cases, you will need to find and dismantle the part. In modern washing machines, the water level sensor is usually located under the top cover of the housing. To detect it, do this:
- Disconnect the machine from the power supply.
- Close the inlet valve.
- Remove the two screws from the back and slide the cover off.
- Remove it from the body.
Now look at the top. The placement trajectory is slightly different in these models:
- In SMA “Indesit”, “Samsung”, “Kandy”, LG, the sensor is located on the side, closer to the right wall. Typically, the pressure switch is not mounted exactly in the center, but closer to the corner of the front panel.
- Machines of the Ardo and Whirlpool brands are also equipped with a relay, which is visible from above on the side wall closer to the rear cover of the unit. The reference point is the rear corner of the body.
- Bosch washing machines are distinguished by a rather large element. You can find it in the center near the right side wall. In some models, the device is slightly lowered, which makes searching difficult. However, the sensor is located under the crossbar and is often hidden by wires.
If an external inspection does not help locate the device, try to find the thin tube that comes from the tank. Follow its direction and find the device.
In older models of washing machines (usually vertical loading), the relay may be located below, in the tray. This will make the search somewhat difficult, so check the instructions if possible. Bottom placement complicates the design of the equipment, so it is not used today.
What does a pressure switch look like?
The network will answer this question with thousands of pictures with different images. We have already found out where the relay is located, it remains to determine the appearance of the device.
Most often, the pressure switch is a round part, similar to a tablet. Sometimes this may be a rectangular device. The fact remains unchanged that a pressure tube leads to the sensor, and wiring is also connected. The part is attached to the body using one or two screws.
The video will help you find the part:
Thanks to the electrical part, the pressure switch is connected to the control module and can send signals. Typical signs of sensor failure are:
- Overfilling or underfilling of water in the tank.
- Lack of drainage of waste fluid.
- Constant supply and drainage of water.
It is clear that if the relay does not send a signal about the need to drain the liquid from the tank, the module will not start the pump. Therefore, in case of such problems, the level sensor must be checked. Sometimes the washing machine’s self-diagnosis system indicates that the device is not operating correctly. Then the display shows an error code. The decryption is indicated in the instructions.
Removing the level switch
Have you decided to remove and inspect the sensor? Then, after removing the top cover, find the device and do this:
Disconnect the wiring from the relay contacts.
- Disconnect the handset.
- Unscrew the fixing screw.
The part is in your hands. Inspect the pressure switch and its tube for blockages. By the way, the relay cannot be repaired, so with the old device you can go to the store and choose a replacement.
As you can see, getting to the pressure switch is as simple as possible, and dismantling is not difficult. Follow safety precautions when disassembling and be sure to disconnect the machine from electricity.
Symptoms of a problem
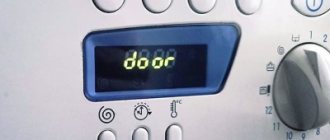
If the pressure sensor fails, an error code will be displayed on the display of modern washing machines (each manufacturer has its own error, look in the operating instructions). But damage can also be determined by other signs.
Water does not fill
After selecting a washing program and turning on the machine, water does not fill, but the wash starts. This happens when the contacts of the device stick in the “full” position, and the programmer automatically starts the “dry” washing process.
Repeating cycles multiple times (endless wash)
Due to a breakdown, the sensor stops functioning or does not work correctly, transmitting incorrect commands to the control panel. It is necessary to disconnect the machine from the network and replace the pressure switch.
Poor wash quality
If the sensor is adjusted to low pressure (or the membrane has become stuck due to age), then the water in the tank will not be enough to thoroughly wash dirty clothes. In this case, tighten the spring with the adjusting screw.
Water remains in the machine
There are several reasons why water remains in the drum, including a malfunction of the pressure switch or related elements. Sometimes after finishing the wash, not all the water is drained and new water immediately begins to accumulate. If all the hoses are clean and the drain pump is working correctly, the problem is in the pressure switch.
The smell of burning
The lack of water in the washing machine and the appearance of a burning smell indicates a malfunction of the sensor or problems with the pump. The programmer starts the washing process, the heating element begins to heat up, but since there is no water, the fuse of the heating device trips, which is why the smell appears.
Typical faults
Without disassembling the washing machine, how can the user guess that the level relay is broken? Main features:
- When a vehicle with a self-diagnosis system detects a problem, it immediately displays an error code on the display. The user reads and decrypts the code, which makes it possible to understand which part has failed.
- The washing process starts, but you see that there is no water in the drum. In this case, the machine turns on the heating element, which can lead to fire and malfunction of the heater.
- The amount of collected water exceeds the permissible level. Continuous supply of water is possible. There are situations when the level does not reach the minimum value.
- Poorly wrung laundry. If the pressure switch malfunctions, it is possible that the water does not completely leave the tank, so the spin cycle is poor.
Such problems may also indicate a breakdown of other components, such as the control module or inlet valve. It is even possible that the system is connected incorrectly to the sewer system. Therefore, to be sure, it is important to know how to check the relay (pressure switch) in a washing machine.
What it is?
All washing machines are equipped with a special sensor when assembled at the factory. It is called a pressure switch and is needed to fill the required volume of water in the drum. The program unit receives a signal from it about the presence of water, due to which the washing stages change in the correct order.
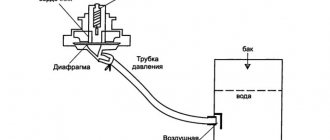
The pressure switch body looks like a round bowl, with an air chamber installed inside it. A tube is attached to it, which at the other end is connected to the tank from below.
When water is added, pressure increases in the tube and air chamber. The membrane lifts the rod and it touches the contact spring plate. When the water in the tank reaches a certain amount, the plate springs back and switches to the upper point with a characteristic click, and the electrical circuit of the sensor is closed.
When water is drained from the tank, the chamber pressure decreases, the rod lowers, and the springy contact plate moves to the bottom. The electrical circuit is broken. Based on the pressure switch signals, the machine controls the water pump, motor, and heater.
How to find a part in a washing machine?
You need to unscrew the two bolts that secure the top cover of the machine and remove it.
If you stand facing the loading hatch, you can easily notice the pressure switch. It is installed on the right wall of the washer, close to the front corner.
Before opening the back panel, be sure to unplug the electrical cord from the outlet so that the machine is de-energized. You also need to turn off the water supply using a tap.
What is a pressure switch?
The main task of this unit is to determine the amount of water collected in the tank by the pressure of its column. Liquid is supplied to the sensor through a tube connected to the bottom point of the washing container. Contact groups are used to transmit information signals to the electronic control unit of the machine.
The more washing modes or other functions the machine offers, the more complex its pressure switch will look. Each group of contacts is activated when a certain amount of liquid is poured into the tank. But in the general case, the assembly looks like a flat, round, tablet-shaped structure, to which a wiring harness fits on one side and a fluid supply tube on the other.
How to diagnose an electronic temperature sensor (NTC)
The electronic sensor (NTC) changes its resistance as the temperature rises or rises. This is the basis for how to check the temperature sensor of a washing machine of this type. It is this particular feature of the operating principle that gives a 100% analysis result and makes the procedure simple.
You will need a multimeter; it is switched to resistance measurement mode; you can also use an ohmmeter. Next, the detector values are analyzed when exposed to different temperatures.
It is advisable to clarify the test results: compare the resistance of the temperature sensor, the temperature sensor of the washing machine with the table from the specification for a specific sensor model (data can be found on the manufacturers’ websites).
For example, we learn the relationship between the resistance of a thermal sensor and the temperature on an LG washing machine from the specification table for a specific detector with a certain marking:
Algorithm:
- We disconnect the chip and remove the sensor from the socket.
- We switch the multimeter to resistor testing mode, that is, to measure resistance - select 200 kOhm.
- We attach probes to the sensor contacts and look at the result. The normal value at room temperature (+25° C) is about 6 kOhm. The indicated figure is the standard for most products. It is possible that there may be other parameters, so we recommend checking the technical documentation for the washing machine and the specifications of the detector.
- They lower the thermistor into warm water, take repeated measurements, add boiling water and watch how the indicators change. At approximately +50°C the tester should show about 1.5 kOhm. If the value does not change (and it should do this as the liquid cools), then the sensor is broken.
You don’t have to remove the sensor and pour water into the same tank of the washing machine. The principle of such a check is similar to the same procedure for refrigerator sensors, as well as for most household appliances.
Diagnostics and setup
- unplugging the power cord from the outlet;
- dismantling the top panel by removing two small screws located on the back wall and moving the panel back and forth;
- detection of a pressure switch, which is located on one of the body walls;
- removing the connector, freeing the screw, pulling the hanging sensor out of the car;
- unscrewing the clamp and removing the device with pliers.
After the device is removed from the washing machine, it is connected to a small pipe. After this, you need to blow into it to see if there is a clicking sound inside the sensor when the pressure changes. If there are no clicks, then the pressure switch is considered to be working. To check the serviceability of the water level sensor using a hardware method, namely a multimeter, you will need to perform the following measures:
- preparing a device for determining resistance;
- placing the probe on the contacts that correspond to the electrical circuit of the pressure switch;
- the formation of pressure in the air tube until a certain relay contact is activated.
If there is no change in the resistance value when the contact is activated, then the water level sensor should be changed. If all of the above checks have shown that the mechanism is in good condition, then it would not be superfluous to carry out an additional check. The procedure is carried out by attaching a tube to the sensor and assessing it for leaks.
It is possible to set up and adjust the mechanism at home if the liquid level in the drum is not suitable for the user. The volume of liquid can be made larger or smaller by adjusting the trigger force of the sensor. Before starting the adjustment procedure, you will need to disconnect the unit from the power supply. To do this, remove the top cover and also disconnect the connector from the relay.
The required screw that controls the primary force is usually located in the central part of the relay housing. This part is usually made for a Phillips screwdriver, as well as an asterisk. It is worth adjusting the sensor when the tank is empty. The process is carried out in stages with intermediate, visual checks of the water level:
- turn the key - assembly;
- connection - testing, etc.
It is recommended to turn the screw only half a turn at a time and no more. It is worth checking, changing, and adjusting the pressure switch only if you have at least basic basic knowledge of the theory. If you have no experience in this process, then it is better to entrust the procedure to a professional.
Principle of operation
The operating principle of the pressure switch is based on reading oscillations that are converted into electronic signals. When water is pumped inside the washing tub of a machine, it creates powerful air vibrations that can be measured. These same vibrations reach the pressure switch core through the hose, pushing away the diaphragm and causing it to hit the central magnet of the device. As a result of the impacts, a pulse is generated that pushes the core into the adjusting screw and thereby sends data to the connected controller through the contacts. The electronic pressure switch thus receives up-to-date information about the extent to which the tank is filled with water.
The controller can determine the volume of filling the central container with water by the type of vibrations emitted. The higher they are, the fewer obstacles inside the washing machine for the propagation of sound waves and the lower the water level. Otherwise, when there is a lot of liquid, it begins to absorb any vibrations, which makes it clear to the computer circuit that there is not enough water and it is not recommended to start washing. When the oscillation frequency drops to the minimum specified by the setting, a corresponding signal is sent to the board through the adjusting screw and the machine stops drawing water through the hose.
At the same time, the factory settings for sensors vary from brand to brand, since they are set by manufacturers at the assembly stage and after that do not attract attention until a breakdown or technical diagnosis occurs. However, over time, due to numerous vibrations along the membrane and core, its height is lost, and the transmission of data on the degree of filling with water becomes less accurate, until the operation stops completely. To return it to operation, you need to disassemble the washing machine, which you can do yourself or entrust to a specialist.
Setting up the operation of the pressure switch
You can try to “reprogram” a non-working pressure switch. To do this, we adjust two adjusting screws to a certain water level so that the one located in the center fixes the moment of closing the contacts, and the third one – their breaking. In this case, there are several contact pairs, since different models of the machine require washing programs with different fullness of the tank. For example, with a standard or delicate cycle, a full drum is taken, and when choosing an economical mode, only half is taken.
Adjusting the position of the screws yourself is extremely problematic. Full setup is carried out by professionals at the factory, and the appropriate marks are applied to the tube. It is strongly not recommended to change the given position, since intervention threatens a serious imbalance. The situation is complicated by the fact that the average user of the machine does not know how many liters of water the unit takes at each stage when any of the available programs is turned on. The more options a washing machine offers for selecting modes, the more difficult it is to reprogram the pressure switch.
Sensor setup
All water level control units in washing machines are carefully tested and adjusted at the manufacturer. The user does not need to perform any actions. However, if the owner of the washing machine knows where the water level sensor is located in the washing machine and wants to make repairs by installing a unit from another model, a mechanism for setting parameters is provided.
Each pressure switch has at least two adjusting bolts. The central one is responsible for the filling level at which the contact group is activated. The side one regulates the response sensitivity and fine-tunes the water parameters. In complex pressure switches with several contact groups, each group has two bolts for changing the response parameters. The pressure switch can be adjusted to level out supply deficiencies. For example, in some homes, the water supply system cannot create enough pressure to fill the car tank. In this case, by adjusting the pressure switch, you can achieve normal operation of the washing machine, even with low inlet pressure of the supply system.
It is worth especially noting: independent adjustment of the pressure switch without special need can be dangerous. When the amount of water drawn in changes in certain operating modes, mechanical forces arise that were not taken into account when designing the design of the washing machine. As a result:
- the drum may begin to vibrate;
- at high speeds the engine will overheat;
- couplings and bearings will wear out faster;
- When the load parameters are exceeded, the drive pulleys become thinner faster.
One of the most unpleasant consequences, especially in inexpensive models, is water leakage due to the fact that the adjustment of the pressure switch has led to the operating pressure on the tank wall being exceeded during rotation.
How to adjust?
You can adjust the pressure switch yourself, the main thing is to act slowly, strictly following a certain sequence of actions:
- We press out the fixing bolts and release the wiring connected to the sensor.
- We find screws next to the terminals (they are the ones that attract or loosen the contacts of the pressure switch).
- We clean the sealant from the screws.
Next begins the most important stage - adjustment. The goal is to record the water level in the tank at a certain moment when the sensor is triggered, and adjust the device to optimal operating parameters.
Since only professional craftsmen have special devices for setting the pressure switch, self-adjustment at home will be carried out using the tracking method:
- carefully turn the first screw half a turn, start the fastest wash program;
- we evaluate the result - if the amount of water in the tank has increased in comparison with previous measurements, then the adjustment is being made in the right direction;
- repeat the steps with the second screw;
- We finish the adjustment process - if necessary, tighten the screw another half turn, cover it with sealant, and return the sensor to its original place.
If, as a result of the first scrolling, the water in the tank has become even less than it was at the very beginning, the screw is turned one turn in the opposite direction.
Each scrolling is accompanied by starting the machine for a quick wash and analyzing the filling of the tank with water. Considering that the relay contact travel is very small, it is recommended to turn the screw no more than half a turn at a time.
How to check if the sensor is working properly
This type of sensor is considered quite reliable, since its operation is based on the mechanical movement of the membrane under the influence of air pressure. However, the possibility of its failure cannot be ruled out. If this happens, the consequences can be very serious, including burnout of the heating element. And this will already entail significant financial expenses.
Are there ways to check the pressure switch in a washing machine? An ordinary person can do this, even without going to a repair shop.
To do this you need to do the following:
1. Turn off the power to the washing machine by unplugging it from the socket. Carry out further actions only after completing this step.
2. You need to get to the level sensor itself. Since the relay is located in the upper part of the machine body, you need to completely remove its top cover. To do this, unscrew the bolts holding the cover to the body. The cover slides and is removed.
3. Having found the sensor, you should unscrew the bolts holding it, and then remove the sensor itself.
4. The tube and all wires are disconnected from the sensor body. The tube is secured with a clamp that can be unscrewed. If the electrical wires are held on a chip, then to disconnect them it is enough to simply pull this chip out of the socket.
5. The tube is checked for blockages. If there is a blockage, the tube is washed until it is removed.
6. A visual inspection of the sensor is carried out. If any broken elements are found, the sensor must be replaced. The cleanliness of the contacts is also checked.
7. The pressure switch of the washing machine is checked. To do this, you need to take a piece of tube whose diameter corresponds to the diameter of the removed hose. You can also use the removed hose if it is not dirty inside. One end of the tube needs to be connected to the sensor, and blow into the other end. Moreover, you should not blow hard to avoid damaging the membrane. After creating pressure in the tube, clicks will be heard inside the sensor, indicating that the relay has activated. If you cannot hear them, then it is better to replace the sensor.
The cost of the pressure sensor is low, so if you suspect it is faulty, it is recommended to purchase a replacement and install it on the machine.
Hardware sensor test
To check the pressure switch of an Ariston, Samsung, LG or Bosch washing machine using a multimeter, you need to:
- prepare a device for testing resistance;
- place the multimeter probes on the contacts corresponding to the electrical circuit of the sensor;
- create pressure in the air tube until a certain relay contact is activated.
If the resistance value does not change when the contact is activated, it means that the sensor must be replaced.
If all stages of the test have shown that the pressure switch of the washing machine is working, you need to additionally check how the tube is attached to it and evaluate its tightness.
Design and principle of operation of the device
Before checking the part, it is recommended that you familiarize yourself with its design features and operating principle. A pressure switch is a part that is responsible for controlling the volume of water in the washing system. Different operating modes of washing equipment require different amounts of water. Therefore, when switching, a level switch is used to check the amount of liquid in the tank.
The part is made of high-quality plastic and has a round shape. It connects to electrical wiring and a hose to determine pressure. Inside there is a switch with a thin membrane. When the system is filled with water, pressurized air will flow through the hose, causing the switch to close. After this, the system will stop taking in new fluid.
https://youtube.com/watch?v=XOBXWWR5RPQ
How to replace it yourself
In case of more serious damage, you will have to replace the broken product. However, before replacing, you must purchase a new pressure switch. To do this, you will have to take the broken product with you to the store and buy exactly the same one.
Replacing a part is carried out in several successive steps:
- Removing the old relay. To remove the broken part, all wiring and hoses are disconnected. This must be done very carefully so as not to accidentally damage anything. Then the mounting bolts that secure the housing are unscrewed.
- Installing a new relay. The structure is bolted in place of the old one. Then a hose is attached to it using a clamp and the electrical wiring is connected.