Most women at least once in their lives have a question: how to shorten a dress? There can be many reasons for this. Here are some of them.
- On a thinner figure, the item fits looser, making it longer.
- An outdated model can be revived by making it shorter.
- Boring length of the product.
- Change of style.
If you have chosen a dress to shorten and made a firm decision to modify it, you need to know the main points, using which you will get an excellent result. This is especially true when you need to shorten quickly. We'll tell you how to turn a long dress into a short one.
Various fabrics
As mentioned above, the technique of work and the choice of tools depend on the fabric. So, for linen, synthetics and cotton, you need to carefully consider the choice of scissors due to the high cutting resistance of the fabric, while for wool it is several times lower.
For thick fabrics, thicker threads and needles are used, and for thinner ones, vice versa.
The color of the fabric and thread should be as similar as possible so that the seam is not so noticeable.
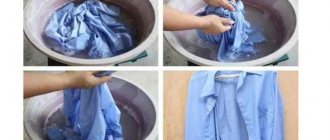
There are fabrics that shrink after washing, so the product or only the area where it will be cut must first be subjected to a wet-heat treatment.
For silk and other fabrics that tend to fray, you need to leave a larger allowance, which will require an overlocker to process. Many professionals say that the edges of such fabrics should be finished at the basting stage.
LiveInternetLiveInternet
*Overlock is a special type of sewing machine. Serves for processing (overcasting) the edges of products made from various types of fabric. With its help, sections of textile products stop “crumbling” and “creeping” and acquire a neat and professional appearance.
Most overlockers trim away excess fabric.
Sewing knitwear without an overlocker is a difficult task. However, not every seamstress (especially beginners) has a wonderful machine for processing cuts (seams) at hand.
So far, I also sew without overlocking, and there is one simple and very banal reason for this: among similar machines I have not found “the one”.
The fact is that many amateur and even semi-professional models (that I have met) are a little less than useless at sewing. But first things first.
Why do I think modern overlockers are useless or how to do without an overlocker, having a sewing machine and ingenuity
I come across current models of overlockers in real life and watch reviews on YouTube. But I strongly doubt the veracity of the words of most video bloggers, because they are fed and watered by advertising.
Yes, the machines put a beautiful stitch and cut the edges of the products perfectly evenly. But... after a couple of washes you will notice how the professionally overlocked edges will begin to unravel. You will have to correct the annoying mistake the old fashioned way, armed with a thread, a needle and a thimble. And you will have to do this regularly.
After watching, reading and practicing a lot with different models of overcasting machines, I became disappointed and seriously thought about whether it is possible to sew without an overlocker?
As it turned out, this is quite possible. Therefore, now processing edges without an overlock, but with the help of intricate (and not so intricate) machine stitches, seems to me the only possible.
How to process fabric edges (seams) without an overlocker:
Method No. 1 Large zigzag
It is a universal analogue of the overlock stitch.
This is what the seam looks like before and after trimming, respectively, photo: personal archive
Advantages of the standard “large zigzag” machine stitch:
- without exception, all electric (electromechanical) sewing machines “can” sew with a zigzag, so every needlewoman can overstitch without an overlocker;
- The zigzag seam prevents fabrics from “shedding” and “crumbling”.
Minuses:
- Thin knitwear, chiffon and some other fabrics cannot be overcast without an overlocker, but only using a zigzag will not work.
- on a small piece of fabric it looks nice, but on a large piece it forms an ugly “skirt” (especially if you zigzag both layers of fabric);
- After processing with a zigzag, excess fabric will have to be cut off manually with scissors. The activity requires extreme care, because the damaged seam will have to be redone;
- a large zigzag can pull the fabric and an unsightly furrow will appear in the middle of the stitch:
One of the disadvantages of a large zigzag is the middle furrow - when thin knitwear is pulled together by a machine on both sides, photo: personal archive
Solution
And yet, one should not discount the major zigzag. You can overcast edges without an overlocker. It will turn out very neatly if you put silicone tape under the seam. It will give the seam stability and will not allow any furrows or “skirts” to form, even on thin knitwear.
Method number 2 Small zigzag
When sewing without an overlocker, do not forget about one more line - a fine zigzag.
Pros:
- like a large zigzag, this line is provided in most sewing machines (except, perhaps, manual ones);
- due to the small pitch, it does not form “grooves” in the center of the stitching.
Minuses:
- in its “pure form” the seam is not suitable for finishing the edges of knitwear. By pulling the fabric together, it forms a “wave”, which is clearly visible in the photo:
A “wave” formed on knitwear due to a small zigzag, photo: personal archive
- the machine can “chew” thin fabric;
- if the fabric being processed is too “loose”, there is a possibility that the seam will “slip” along with the peeled threads.
Conclusion:
If you sew thin fabrics without an overlocker, then you should not resort to a small zigzag: it is good for processing sections of dense fabrics and is ideal for sewing on appliqués.
Method number 3 Double stitch
Having considered a couple of ways to process cuts without an overlocker, we come to the double stitch - a non-obvious and original option for dealing with loose fabrics and capricious edges.
If large and small zigzag are not very suitable for the needs of needlewomen, then double stitching (without using a special machine needle) will appeal to many.
Double stitching looks neat and in some cases can replace overlock stitching, photo: personal archive
Pros:
- this line is found even in the simplest manual sewing machines;
- with its help you can safely sew knitwear without an overlocker: with the correct thread tension setting, the seam will look amazing;
- after washing, the seam does not lose its elegance and performs its functions 100%: it prevents the fabric from fraying, crumbling and unraveling.
Minuses:
- You will also have to trim the excess fabric “behind the seam” manually. But this will be much easier to do than in the case of a zigzag;
- Without using a double needle for a sewing machine, you will have to sew the stitch twice.
Method No. 4 Cellular seam
The original seam, which looks like cells or honeycombs, is found in many electromechanical machines, not to mention computer-controlled models.
It is intended not so much for handicraft overlaying, but for creating simple embroidery - decorating clothes for the sake of beauty.
Using ingenuity and resourcefulness, it is quite possible to process the edge of the fabric without an overlock machine:
Cellular seam as an overlock stitch, photo: personal archive
Advantages of a cellular seam:
- found in many modern sewing machines;
- the pattern of one segment consists of approximately 6 small stitches. Due to this, the stitching is elastic - just what is needed when processing edges;
- has an original, “elegant”, pleasing appearance to the eye;
- copes well with securing threads on fraying and “creeping” fabrics.
Minuses:
- Excess fabric will have to be trimmed by hand with scissors.
Subtleties:
Before processing the seam with a honeycomb stitch, you need to lay a regular one 0.7 mm - 1 cm apart (see photo above).
Using a honeycomb stitch, I was able to sew a T-shirt without an overlocker. Read more about this here.
Method No. 5 Buy an overlock foot for a sewing machine
The universal overlock foot fits almost any sewing machine:
- Janome / Janome;
- Brother / Brother;
- Singer / Singer;
- Aurora STYLE / Aurora Style;
- Toyota / Toyota;
- and to many others. Here's what it looks like:
The universal overlock foot is made of silver metal. Smooth to the touch, without burrs. Adequately imitates an overlocker, photo: Chinese online store
In specialized sewing stores, the price of an overlock foot can reach up to 300 rubles, and in a Chinese online store you can buy it for less than 50 rubles. I found a detailed review about this overlock foot:
Screenshot of a review about the overlock foot, source: Chinese online store
A photo was attached to this review, which clearly shows a beautiful, neat seam on thin knitwear. And this type of fabric is difficult to process with a standard zigzag:
Photo from a review of the universal overlock foot, source: Chinese online store
This is how, with the help of an inexpensive Chinese overlock foot, you can “teach” your sewing machine to overcast the edges of finicky fabrics.
photo: personal archive I wish you easy stitches and beautiful, hand-sewn things!
https://zen.yandex.ru/media/id/60bae483647a823e604...usami-60bb095c3adb654fa514ab49
Hemming on a sewing machine
Hemming a T-shirt, sweatshirt, top or anything else using a sewing machine is very easy. Need to:
- Measure the required length, mark and cut.
- Fold the T-shirt at the bottom, determining the distance at which the seam will be.
- Place the folded product under the machine foot with the wrong side up.
- Straighten and align so that the edge of the T-shirt is under the left needle.
- Install the stopper and start stitching so that the fabric does not tighten.
- Tie an end knot and hide it.
Manual hemming method
The fastest and cheapest option is to hem the T-shirt yourself at home.
If your product is made of dense fabric that does not fray, then you can safely trim it. And if there is a risk that the fabric may “move” or fall apart, then it is better to pre-process the edge with an overlocker.
After cutting, the bottom of the T-shirt must be finished with a hidden cross-shaped seam, which is usually called a “goat”.
Goat seam
This type of seam is quite simple to make; even a novice seamstress can handle it. One or two threads (at your discretion) are grabbed with a needle from below and above the cut allowance. In this case, you need to carefully ensure that the seam is not visible from the outside.
The item you are going to trim and hem must be clean and ironed.
Using adhesive tape
This method is one of the easiest; it can be used even when you have absolutely no knowledge of any sewing technique. The adhesive tape itself comes in different widths, so you can find it in the same size as you want the width of the hem to be.
Glue it on the wrong side, iron it on the side of the paper tape, moving about a centimeter away from the edge of the folded fabric. After this, you need to remove the protective film from the paper, bend the hem to the desired length and iron again.
The excess fabric must then be carefully cut off. The seam will not be visible.
If the dress material is heavy textile, you will need two inserts.
We offer you a two-minute video on how to properly glue the tape:
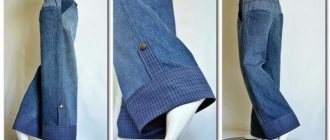
There are options for finishing the hem of the dress with and without hems.
How to hem a neckline
Sometimes, due to prolonged wear and frequent washing, the neck of a T-shirt can stretch and look different than when purchased. On the Internet you can find a lot of tips on how to hem a neckline. We will talk about several below.
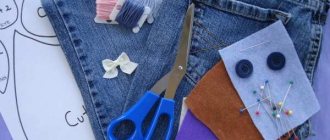
What you will need:
- pins;
- hand needle for knitwear with a blunt tip;
- or a sewing machine.
Collar hemming method No. 1
Progress:
- Turn the T-shirt inside out.
- Fold the edge of the collar and pin it with pins.
- Sew by hand or on a sewing machine.
It is important that in the end your seam is elastic!
Collar hemming method No. 2
There is another option for hemming a T-shirt collar, which involves cutting it off and then re-sewing it back on.
- Pull the collar away from the T-shirt.
- Spread the shoulder collar about two centimeters.
- Carefully smooth out the entire fabric.
- Cut the seam from the trim strip.
- Stretch the bar by ironing it.
- Finish any of the long edges with an overlocker.
- Place the T-shirt and placket with right sides facing each other.
- Baste so that the neckline and raw edge match.
- Cut off the rest of the strip.
- Sew the placket to the fabric.
- Unscrew the bar and baste.
- Sew the strip and topstitch it at a distance of half a centimeter.
- Sew and finish the shoulder seam area.
Selection of makeup, accessories and jewelry
Properly selected cosmetics are aimed at completing a woman’s image. In this case, taking into account the fact that shortened models reveal more areas of the female body.
It is important not to use tones that can provoke conclusions about vulgar taste. When adding shadows, blush and powder, it is important not to overdo it: just use skillful movements to identify the desired areas of the skin of the face and neck.
There are no restrictions regarding hairstyles for such clothing models. Styled hair, loose or short hairstyles will look equally good.
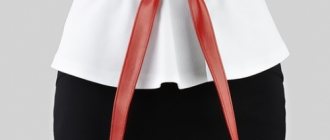
Accessories that are used to complement the look should not hurt the eyes. If it is a belt, it should not be too wide and contrasting in color. Handbags should not be too bulky; purses with snaps made of various materials are best suited.
Several pieces of jewelry can be used simultaneously as jewelry, but they should not be very large. Suitable, for example, are earrings, rings and a brooch from the same collection or a separate piece of gold jewelry with added stones.
When choosing lingerie, every woman must decide for herself what color scheme and model she will choose; the main thing is to remember that excess or minimization is not always welcome.
When shortening a dress, you must take into account not only your tastes and preferences, but also those factors that nature has endowed: height and body composition. If you picked up an item in a store, but decided to shorten it at home, then think about how profitable this decision is. The most important thing is to know moderation in everything and try to make your outfit more beautiful in every way.
How to hem a T-shirt on the sides
Without using a sewing machine, a topstitcher and an overlocker, it is very difficult to hem a T-shirt on the sides. The last two tools can be replaced with a sewing machine that has an overlock stitch.
Instructions:
- Mark on the sides the places where the seams will later be.
- Trim the overlock seam at the sides and armhole, but do not cut the fabric.
- Mark the place where the seam will be (it is better to use a template).
- Fold the product in half, align the cutting lines and pin everything together.
- Mark the future armhole line.
- Pin together the back, hem and armhole.
- Fold the T-shirt along the seams at the shoulders and pin it in place.
- Cut off the excess fabric, leaving an allowance of about 0.7-0.8 centimeters.
- Fold the sleeves together, pinching them at the bottom.
- Mark the highest point on the rim line with chalk or soap.
- Make marks on the front and transfer them to the second sleeve.
- Remove the pins.
- Align the cuffs and armholes, as well as the cuff point and shoulder seams.
- Sew all seams.
It is better to sew the seams on the sides and sleeves in one go.
The sequence of hemming with an invisible seam
Sew the side seams of the skirt and lining. Iron the seam allowances as shown in the photo. There is no need to overcast the seam allowances as they will all be inside.
Place the lining and skirt right sides together, matching the bottom edges of the lining and the dress. It is important that the lining is not narrower than the width of the dress, otherwise you will not be able to sew it on without “seating” the hem fabric of the dress.
If you can't cut out the lining exactly, let it be slightly wider. The excess can be placed in small folds, for example near the side seams of the dress. Align the edges of the bottom of the dress and the bottom of the lining and stitch them.
Turn the product right side out. The lining in this form should be 2 cm higher than the bottom line of the product.
Baste the edges of the skirt and lining along the waistline. The lining should not “pull”. Lightly press the hem of the skirt.
How to hem a T-shirt at the shoulders
Sewing a T-shirt at the shoulders is easy, since you don’t even have to rip the fabric.
Hemming steps:
- Mark the length you need from shoulder to collar;
- Draw a line with chalk or soap to the end of the armpit line.
- Fold the T-shirt in half.
- Trim off excess fabric.
- Pin the sleeve, front and back that you cut off.
- Sew these parts and press thoroughly.
Secrets of the correct hem
Once you have trimmed off the excess fabric evenly, you can begin to hem the hem. Suppose you have a very thin fabric - chiffon, calico, silk. You can use the Moscow seam. Stepping back from the hem mark, use an overlocker to sew a stitch. Then cut off the excess material close to this line. Fold it in carefully and machine stitch it.
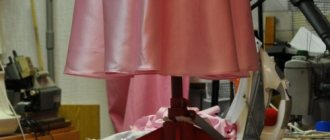
A silk dress looks good if there is a border instead of a hem.
Buy ready-made binding and hem the hem. If appropriate, you can buy a contrasting color. Fold the binding in half, insert the hem material inside, run a basting stitch, then machine stitch it.
To decorate the sleeve and hem beautifully, simply sew on lace. This season it is very fashionable!