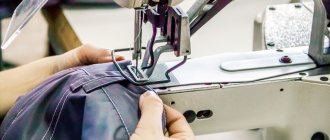
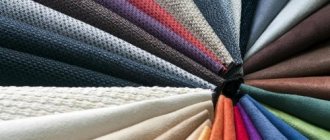
Nylon and polyester
Items made only from artificial material will not stretch or shrink.
This is only possible if the composition contains natural fibers. Before starting the shrinking procedures, read the instructions. Study what the item is made of so that you don’t waste time and effort reducing it at home in vain.
How to make clothes fit?
If a synthetic item contains natural substances, it is possible to reduce its size. This is done in an automatic washing machine or manually.
How to wash the product:
- Load the item into the machine. Add the powder (it will wash at the same time), set the temperature higher than what is indicated on the tag. Set the spin mode to medium.
- The maximum shrinkage effect can be obtained by soaking synthetic clothing in cold liquid for a quarter of an hour. After this, you need to wash the product.
That is, the faster the product dries, the better the fabric will fit.
Drying using modern technology can cause even greater shrinkage. If the usual one does not help, wet the product and place it in the unit.
Synthetic fabric quickly takes the correct shape. It’s enough to simply wash things in hotter water.
If the clothes are made of spandex and lycra, then such manipulations to shrink them will be in vain.
Fiber tension
woodiesclothing.com
Another factor that can contribute to shrinkage is the degree of tension in the yarn fibers when the fabric is woven or knitted. Fiber that is highly stretched during fabric making will shrink in size when wet unless a special finish is applied during the manufacturing process to prevent this effect. In addition, how tightly the fabric is stretched during processing will later be reflected in shrinkage. As with yarn, fabric that is under tension during production will relax when wet. This process is called relaxation shrinkage, Gagliardi says.
During production, a finish can be applied to the fabric to reduce the effects of tension. In general, if a garment has any relaxation shrinkage, you will see most of it the first time you wash it. In other words, if clothes shrink a lot after washing, this means that the fabric used to sew them was not subjected to special anti-shrink treatment during production.
see also
How to keep clothes looking presentable after washing
How to tailor a jacket to fit your figure
So, you have decided to sew your jacket yourself. Now you need to determine exactly where it needs to be sutured. Usually women lose weight in the chest or waist and this is what we will talk about in our article.
How to sew a jacket at the shoulders
Follow the presented algorithm.
First we take care of the chest girth - do not forget that you need to measure at the points of the chest that protrude the most, otherwise the jacket may be sewn in so much that it becomes narrow for you, and you will constantly experience discomfort. On the back, the centimeter should be located just above the shoulder blades.
Now we tear off the shoulder pads.
IMPORTANT!
If there is a lining, be sure to rip it open - the side seam is torn out by 15 cm.
Now we place the shoulder pad so that its dense half is a centimeter from the shoulder. This way you can determine what size the cutout will be. The resulting okata should be raised and attached on one side and the other to the seam on the shoulder. Then make sure it is pinned correctly to the shoulder seam and the resulting sleeve fits exactly how you want it.
After this we begin marking.
Be careful and attentive - something will go wrong, and you will have to start the work all over again and waste time and effort on something that could have been done once.
Inside the lining, use chalk to mark a new shoulder line. On the fabric you need to mark the places where the sleeves will be sewn. Also determine the locations for new grooves.
After these steps, you can already rip off the sleeve, but before that, do not forget to mark the top and bottom points. There may be excess fabric on the front and back, which will need to be cut off, but you must leave a seam allowance.
Ask an experienced seamstress for help if these tasks seem difficult.
IMPORTANT!
At this stage you can change the sleeve width.
Most likely you will need to make the sleeve narrower
Pay special attention to this, because by sewing the jacket but leaving the sleeves too wide, you risk getting an awkward outfit that will look untidy and ugly
When all the necessary manipulations with the sleeves are completed, you can sew it back. To do this, return the sleeve back to the armhole and make sure that the collar is slightly larger in size. Don't forget to put the shoulder pad back in place; its thick part should protrude beyond the sleeve sewing line. Then hand stitch it to the raised part of the sleeve cap seam. Regular stitches will do, so no special knowledge is required from you.
And the final stage of work is to sew the darts along the previously marked lines.
IMPORTANT!
Don't forget to iron fresh seams.
Now is the most exciting moment - try on the jacket and check if you are happy with the way it fits and if you did everything right! If the result is satisfactory, then you can sew up the ripped seam with a clear conscience. Job finished!
Sewing the jacket at the waist
For this procedure, the algorithm of actions is as follows.
If you need to sew the jacket in at the waist, then the first step is still taking measurements. We have already mentioned the chest circumference and the narrowest part of the waist.
IMPORTANT!
Watch how hard you squeeze the tape when measuring your waist. It shouldn’t dangle, but you shouldn’t tighten it too much either - you’ll end up sewing the jacket in so tightly that you’ll experience discomfort during further use. The best option would be a tight but not tight girth (like a corset).
Product fit.
Turn the jacket inside out and mark the new side lines with pins. Be careful when trying it on later so as not to prick yourself. After marking, turn the item back right side out and try it on. If everything fits perfectly, then you can start working. If you are not satisfied with something, repeat the procedure and place the pins a little differently. Surely next time you will do better.
We sew the jacket on the sides.
So, you are happy with the way the jacket fits - now you can sew in the sides. You can move away from regular darts by about 1-2 cm and sew them again, but triangle-shaped darts can be transferred: pinch the fabric to the distance from the previous seam that is required and secure. Sew a new dart along the old mark at a distance of about 1 cm.
The main defects associated with the armhole
In self-sewn or ready-made clothing, there may be design defects and imperfections that appear during movement. When modeling a product, it is very important to calculate the size of the increases and distribute them, based on the physique and configuration of the model.
If you set incorrect values on key structural chords, the shape of the product will be distorted. Therefore, when creating an armhole, you need to carefully measure the circumference of your chest and determine the increase based on it. The quantities are related and change in inverse proportion. As the increases on the chest increase along the armhole, they are reduced in width. The required armpit depth is also taken into account. The larger it is, the smaller the increase in width should be.
When putting on a thing, you can immediately detect a problem, but a number of shortcomings “appear” only in motion.
The main static defects of the armhole
- The shelves are too short, “turned up” or overlapping each other. To eliminate it, you need to correct the axillary line.
- Deviation of the sleeve forward or towards the back, caused by incorrect definition of notches along the armhole. It is worth suturing and redoing the neckline to correct longitudinal, oblique or transverse creases.
- Oblique folds under the axillary notch (towards the shoulder blade), resulting from too little inclination of the cuts along the shoulder. You will have to deepen the armhole while simultaneously adjusting the shoulder line.
- Creases along the armhole, running obliquely along the front to the neckline (they appear if the flange on the side is too long). To fix it, you need to deepen the neckline, change the chest dart and shorten the seam on the side.
Neat armhole on a sleeveless sheath dress
Other disadvantages may appear when moving:
- inconvenience when moving your arms forward - they are caused by excessive narrowing of the armhole - therefore, before suturing it, a careful fitting is performed;
- unaesthetic shape of the armhole due to an incorrectly narrowed edging on the sleeve - the neckline is redesigned;
- difficulty raising the arm - the depth of the cutout decreases, while the reserve is used (it is left along the bottom line).
An incorrectly sewn sleeve can also wrinkle on a finished item - they correct the situation by adjusting it and the armhole. To correct this and other shortcomings, it is necessary to re-design the cutout line.
How to shorten your sleeves
Before starting work, an analysis of the condition of the finished product is carried out. The simplest alteration option is to shorten the sleeves of a men's or women's shirt. Some classic shirt options are sewn with extra sleeve length. Therefore, the case when, with other suitable size parameters, the product is large in sleeve length, occurs quite often.
To determine the optimal shirt sleeve length, you need to measure the condition of the sleeve in a static position with your arms down. In this case, it is necessary to leave a gap of several millimeters in the elbow area, which is necessary for comfortable bending of the arm and natural tension of the tissue.
Sleeve shortening is carried out in stages:
- carefully tear off the cuff;
- measure the length to be cut;
- cut off excess fabric;
- sew on the cuff.
This method is only suitable when the sleeve needs to be shortened by no more than 1-2 centimeters. If the sleeves are too long, then the shirt is altered along with alteration of the vents on the sleeve.
With lightning
This option is good for straight-cut dresses, without a cut-off waist or yoke. So:
- Cut the dress in half along the back. Fold the edges 1-2 cm on each side, no more, otherwise the dress will fit unnaturally.
- Unzip the zipper and baste it on one side first.
- We fix the zipper at the waist level and at the edge of the neckline.
- Now do the same operation on the other side, try it on, if everything turned out well, then sew it on with a sewing machine.
- You can sew a hidden zipper, or you can sew a decorative one on top. For both options, the procedure is the same, the only difference is in the direction of attaching the zipper.
How to tape your trousers at home
There is nothing difficult in creating such beauty. Open the bottom edge (hem). Iron the product. Try on the pants from the wrong side. Spin around the mirror. Mentally estimate how much it needs to be narrowed.
Adjustment on one side is made subject to slight narrowing. Then it looks more practical (internal or external). Is there any decor?
Mark excess material on the material with pins. You have to be careful here. This may affect stretch fabric. The fabric will stretch a little and the stitching will be crooked. If the fabric is non-stretchy, your legs should fit comfortably into the pant leg. The main thing is not to overdo it.
- Remove carefully and spread on the table.
- Align. Draw a line with chalk along the marked areas. Draw a 2nd line for the seam.
- Baste with threads along 1 line.
- Try it on again and check the comfort.
- Adjust as necessary.
- Trim off excess fabric.
- Seal the edges.
- Machine sew trousers.
Adjustments on both sides are made under the condition of large narrowing. The same actions are performed, only on both sides at an equal distance. Otherwise it will be crooked. Finish hem and iron.
Rework options
There are several different options for making your blouse smaller. The specific choice depends on the detail that turned out to be large.
To correct the cut you can:
- take the item to a professional tailor (atelier, private seamstress);
- start working on your own.
But you can do without this if you get down to business yourself. First you need to determine what exactly needs to be done to solve the problem.
To reduce the size of a blouse, use the following options.
- Deepen the front and back darts (on the chest, on the waist).
- The side seams are sutured.
- Reduce in the side seams, in the seam of the back flange.
- The shoulder seams are sutured.
- Reduce according to the sleeve if it is too big.
- They tighten and drape excess material.
- They rearrange and re-stitch buttons.
- Wash at a certain temperature, taking into account the quality of the fabric.
- Dried using a special method.
Before starting work, you need to select and prepare the necessary tools and materials.
- set of needles of different formats
- threads (different numbers and colors. Suitable ones are selected from them, depending on the structure and color of the fabric);
- scissors (large, small and medium);
- pins;
- thimbles (to protect fingertips);
- various accessories (buttons, decorative brooches, buckles);
- crayons;
- sewing machine;
- iron and ironing board.
- patterns;
- cardboard (thick paper);
- measuring tape;
- a box of wax (for waxing the thread);
- threader;
- cutter (special copy roller for making marks on the material);
- carbon paper (for transferring the drawing);
- transparent template ruler;
- overlock
Once wet, the fabric will shrink and the blouse will become smaller. This is what you do with a product that needs to be reduced by 1 size.
Important: It is necessary to pay attention to the quality and structure of the fabric. For example, to prevent knitwear from stretching, it should not be hung out to dry.
Darts are made so that the product fits the figure. Begin laying from the side seam, slightly below the level of the armpit. The top point should be where the figure is most convex. They are sharpened on the parts from the inside out, after cutting. The line should end at the top point.
- Measure the product, volume.
- Calculate how much fabric is extra.
- Subtract 2-3 cm for a loose fit.
- Divide the rest in half.
- Set aside a few cm for the inside and side seams.
- Draw lines from the armhole to the bottom of the product.
- Baste.
- Do a fitting.
- Repeat the procedure if the blouse doesn’t fit well and not enough excess has been removed.
- Sew along the basting, retreating 1-2 mm.
- Remove the basting and secure at the end of the seams.
- Iron them.
Attention: If you always use a pattern, this will help you avoid big troubles when altering clothes. They work the same way as in Method 2, but they also reduce the volume of the backrest:
They work the same way as in Method 2, but they also reduce the volume of the backrest:
- The excess is calculated.
- Leave centimeters for allowance so that the fabric fits easily.
- Remove excess fabric.
- They make notes.
- They sew by first pulling out the extra thread.
To reduce shoulder seams, you need:
- rip them apart;
- take measurements;
- build a drawing;
- cut a pattern;
- cut the material according to the pattern, leaving a few cm for seams and shrinkage;
- outline by hand;
- stitch up.
Reduce along the sleeve as follows:
- Plan how much to cut, starting from the sleeve and going down to the bottom.
- Draw a cutting line with chalk.
- If necessary, prepare a pattern.
- Remove excess material.
- Sew taking into account the seam allowance.
The fabric is draped.
- The excess is not cut off, but placed inside.
- The put aside material is pulled together (with a button, decorative pin, buckle, brooch. You can pin it with several buttons in a row. Loops are added).
Sometimes it is enough to rearrange the buttons a little further, and the item will look good and fit your figure.
Have you already figured out which method is the most suitable for you? Start altering and wear your blouse with pleasure!
Happy remodeling!
1 point
Silk
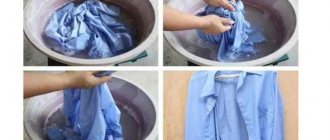
Silk items should not be machine washed, just as you should not try to reduce clothing sizes in this way.
Silk is the most delicate, thin fiber, so clothing can only be reduced in size by hand.
Natural material is afraid of high temperatures, so this method will not work.
To shrink clothes, wash them in hot water. The temperature of the liquid should be 10 degrees higher than indicated on the label.
You will also have to forget about drying in an automatic machine. Dry silk items in a well-ventilated area on a clothesline in the sun or in a horizontal position.
Arranging things yourself is not difficult. The main thing is to know how to do it correctly. Therefore, it is worth familiarizing yourself with the materials on shrinkage, obtaining all the necessary information, and only then proceeding with the procedure.
If you are afraid to tempt the fate of your favorite item, it is better to take it to a seamstress. And the last option is to give it to relatives and friends. You can also take your clothes to a homeless shelter.
How to shrink cotton
WERAYUTH TESSRIMUANG/GETTY IMAGES
Cotton items shrink best . Cotton is a machine washable fiber that is more likely to shrink under the standard process of washing on a hot cycle followed by a high heat cycle in the dryer. However, finishes applied during production can limit shrinkage, Gagliardi says. The best you can do is try to take advantage of the relaxation shrinkage effect - cotton fibers and yarns have some difficulty getting wet. But even this process has its limits.
Relaxation shrinkage is usually reversed. Remember: when you put on your pants immediately after washing, the belt fits snugly around your waist. But when some time passes, it stretches again - the tension is restored. This effect is clearly visible in the example of jeans, which after washing fit tightly, and then become loose during wear. Tension is the stretching of the waist to the desired size. The pattern pieces for the waistband and legs are cut in the warp (length of the fabric) direction, which tends to weaken more than the weft (width) direction.
So while some items become shorter when machine washed and dried, they do not become narrower. This means that the item can only be shrunk along the length, but in the width it will most likely remain wide or narrow minimally.
How to make a woman's jacket smaller?
Today I will tell you how to reduce the size of a women's jacket.
Many of you probably have a couple of jackets hanging in your wardrobe, slightly out of fashion, but still very decent. I understand that you may be sorry to part with them, so I will tell you about one way to adjust the jacket to your figure and fashion :).
So, if the jacket is too big, how to alter it?
First, we rip off the shoulder pads. If the jacket is lined, you can get under it by opening the side seam of the sleeve of the lining by 20 centimeters. Then we will carefully sew this seam and nothing will be noticeable.
It is advisable to do the following operation together. Ask your mother, sister or friend to help you. It is necessary to install the shoulder pad on the shoulder so that its thick part protrudes approximately 1 cm beyond the shoulder bone. Now your assistant should raise the sleeve cap (that is, the very seam where the sleeve is sewn to the armhole) so that it matches your shoulders. You need to pin the sleeve cap to the shoulder seam and make sure it sits in place. If not, try again and install the shoulder pad again.
Once the new high point of the sleeve cap is found, pin the cap to the front and back of the jacket in several more places, creating a new armhole line. This applies only to the top of the cover; there is no need to pin the sleeve under the arm.
When a new sleeve sewing line has been found, check whether the new shoulder fits you. At the same time, check whether the sleeve is too wide and whether there is excess fabric that can be tucked into the side seam. If desired, you can mark the undercuts along the front and back. On plain fabrics, try to mark the darts with maximum symmetry and accuracy. On colorful or variegated fabrics, small inaccuracies will not be noticeable, but on plain fabrics they will be.
At the same time, decide on the length of the jacket.
Now take off the jacket and mark with chalk on the front side the “sewing” line for the sleeve where it is marked with pins. Take out the pins. Reach inside the jacket and mark with chalk where the sides and sleeves will be sewn under the arms and in the darts.
Open the sleeve from the jacket, noting the highest point of the cap that was sewn to the shoulder seam and the lowest point that was sewn to the side seam. If the sleeve consists of two parts, mark out the guidelines by which you will install it in place.
Trim off excess fabric on the front and back of the jacket along the marked line, leaving a seam allowance. Line up the armhole line, all the way to the armpit. Measure the lengths of the shoulder seams and make sure they are the same. If you were planning to remove the width of the jacket from the side seams, now is the time to do it. Next, the sleeve is sutured, if planned.
Now we insert the sleeve back into the armhole, pin it and make sure that the sleeve cap is slightly larger than the armhole (the excess is placed at the top of the collar). If not, then you need to sew the jacket along the side seam or take it a little into the shoulder seam. We sew in the sleeve. We install the shoulder pad in a new place so that its thick part protrudes slightly beyond the line of sewing the sleeve. If necessary, the shoulder pad should be reduced. This can be done on both the thick and thin sides. We fasten the shoulder pad by hand, basting it to the protruding part of the seam of the sleeve cap.
Now it’s time to stitch the grooves along the marked lines, and also reduce the length.
To be honest, I hate shortening jackets, but I have to :).
Cut the bottom of the jacket along the marked line (leaving a hem allowance of 5-6 cm), pulling the lining up. Turn the jacket inside out through the open sleeve of the lining. Glue the bottom of the jacket with non-woven fabric. Check with the cut piece. Try to completely repeat what was done there. Sew the lining and main fabric with one seam. Secure the seams of the collar and the bottom of the jacket together so that the collar does not straighten out or come out from under the main fabric.
Turn the jacket onto your face, make sure you did everything correctly. Steam the new seams with an iron.
Try on your jacket. If everything is in order, you can sew up the torn sleeve of the lining. We sew either an overlay on a machine, or a blind seam by hand.
- How to decorate a white jacket Today in the article: the idea of decorating a simple white jacket. A white jacket (or any other color too) is of a simple cut or rather boring.
- How to make a blouse smaller? It happens that you have a favorite shirt or blouse in your wardrobe, which, unfortunately, has already gone out of fashion, or has lost its relevance due to more.
Blouse and shirt
If you need to reduce the size of a blouse or shirt, a lot depends on the style - the number of decorative details, the shape of the sleeves and the neckline. But practice shows that in most cases this task can be overcome. There are two main situations:
- the back consists of two parts;
- The back is one-piece.
If the back part consists of two parts, it is more convenient to stitch along the line of their stitching. In this case, it is quite possible to do without a pattern, but it is better to do this work with an assistant:
- We try on the blouse (it is not necessary to turn it inside out).
- We cut off the middle so that the blouse fits well.
- Remove and mark a stitching line along the wrong side.
- Align the line with the ruler.
- Sew, trim and overcast the edges.
Theoretically, in this case, you can make a seam in the middle of the back. You can even make a fold - this is exactly what you should do if you have to sew a men's shirt on the yoke. But you can change the position of the side seams - it will be much easier, especially if the darts are in their places. The process is no different from sewing a skirt - you need to try on, pin and stitch in exactly the same way. But if you have a pattern, it will be even better, because you can draw all the lines along it.
If the darts are not in place
It also happens that you can’t simply sew a blouse or dress. This task is somewhat more difficult than the previous one, because part of the product will still have to be ripped apart. You definitely need:
- flog the sleeves;
- open the shoulder seams.
As for the side seams, then, as they say, options are possible. Maybe they won't need to be touched at all. Most often, their position also has to be changed, but this is done in the same way as when simply changing the width of the blouse. Once you have flogged the sleeves and separated the shoulder seams, the process continues as follows:
- Using the pattern or figure, mark the position of the shoulder seams.
- If you made this from a pattern, baste the seams.
- Try it on - if everything suits you, stitch it together.
- Cut the allowances to normal size, that is, no more than 1 cm.
Sleeve fit
Perhaps the most difficult stage. Having a basic pattern can make your life a lot easier. If there is a pattern, trace the edging along it, leave an allowance and trim the part.
Important! Don’t forget about the alignment points - they should be on both the armhole and the sleeve
Then, as with any other garment, sew the casing with a basting stitch, using small, even stitches, and pull lightly. After this, baste the part, aligning the necessary points, try it on and sew it in.
It's a different matter if you don't have a pattern. Then everything has to be done by eye. Don’t rush to cut the sleeve right away:
- Sweep it along the edge at a distance of 1-1.5 cm from the previous line, parallel to it.
- Then pull the gathers slightly and try to sweep them in.
Don’t be discouraged if it doesn’t work out right away - without a pattern the process is much slower, and the exact position of the sleeve can be determined exclusively empirically.
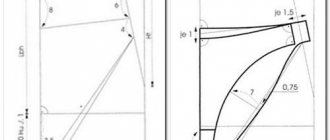
Layouts for armholes
When sewing in sleeves, you may encounter various difficulties - folds along the edges, tightening of the fabric in the armhole. Without control notches, part of the part moves up or down. Therefore, having found your “ideal” basis for the bodice and sleeves (it is usually single-seam), it is worth creating a layout for the armhole according to your measurements. It will allow you to make all the adjustments in advance, and there will be much fewer mistakes during fitting.
The drawing does not take much time and fits on a standard A4 sheet. Having made a basic pattern, you can use it to create various clothes - jackets, dresses with long sleeves, coats. You will simply need to attach the layout in the “working” pattern and determine whether it needs to be expanded, deepened or reduced. It will help solve many problems even at the drawing design stage.
Possible shortcomings
- Inconsistency between armholes and sleeve lines (for example, if the gathering allowance is not made or is too large, or the magazine pattern does not suit you personally). You need to move the top point along the edge to suit the features of your figure.
- The difference between a layout and a ready-made “alien” scheme, which does not take into account individual sizes and body features. If you use a standardized drawing rather than an individual one for cutting, you will have to change its armholes (adjust the depth, the slope of the seam along the shoulder).
- Violation of the length of the side seam. When changing the size of the armhole, place the parts of the drawing side by side and make sure that the designations for the back and front waist are on a single line.
Armhole on a sleeveless blouse
What do you need to get stitched?
If you want, you can reduce the size of all things:
The most difficult thing is to adjust the jacket and coat; for such work you need some skills in working with different materials and good command of a sewing machine. Therefore, you need to start with something simpler - for example, with a skirt. But in any case, it makes sense to take care of some accessories that will certainly be useful to you. You need:
- sewing machine (preferably with an overlocker);
- threads matching the color;
- good tailor's scissors;
- pins;
- ruler;
- chalk, soap or water marker;
- basic patterns;
- tape measure.
They are not always needed. For example, a skirt or shirt can be adjusted without patterns, directly on the figure (or, even better, on a mannequin). But if we are talking about a dress, coat or jacket, then, as they say, options are possible. It is possible that you will be able to do without a pattern, but it depends on which parts of the clothing you want to sew.
The question always arises, where to get patterns. There are several answers:
- In the magazine;
- in the Internet;
- in the studio;
- in your own closet - there will probably be something there that is ideal in size, but no longer suitable for wearing;
- build it yourself.
The last option is wonderful, but complicated. It is tempting to order patterns from the studio; you will need them more than once. But, unfortunately, not everyone has this opportunity. As for cutting from ripped items, this method is good if you need to sew something new, but is not very suitable for remaking existing wardrobe items. Therefore, the easiest way is to take a pattern from a magazine.
In the studio
The need to take a sundress or dress to a studio arises if you can’t do it yourself or don’t have a machine. It is also better to trust a specialist if the dress has a complex cut or needs to be changed by 3-4-5 sizes (then only a professional can recut it).
You might be interested in this: Patterns and sewing of Slavic shirts and Russian dresses for women
It is also important to remember that there are certain specifics when working with elastic fabrics. They can become pulled together or deformed when sewing, and in order not to spoil the product, it is better to trust the seamstress.
If the dress has a complex pattern and many elements, then it will be difficult to reduce its size on your own. In this case, it is better to hand over the dress for a girl or woman to an atelier; experienced seamstresses will do it efficiently. Evaluate the rationality of your choice; this option is not always economically justified. It should be remembered that different fabrics used for sewing dresses have different quality characteristics, for example, linen and knitwear. They stretch and lay differently, this should be taken into account when remaking finished products.
How to sew the sleeves of men's and women's shirts
To reduce the width of a sleeve without a cuff by 3-5 mm, you should initially turn the product inside out and lay it out so that the fabric is not deformed. The required distance is measured with a measuring tape, and a line is drawn along the entire sleeve along which the seam will run.
Please note that if you need to remove only 3 mm from a shirt sleeve, then only 1.5 mm should be removed from the existing seam. This is explained simply - you will cut off 1.5 mm on both sides of the sleeve, which in total will give the required 3 mm
After drawing a line and securing the fabric with pins, a seam is formed using a sewing machine or manually with a needle and thread.
How to sew in a shirt by more than 5 mm? To do this, you need to open the side seam near the armhole under the sleeve, cut off the excess fabric, and then carefully sew it up.
Shrinkage after washing
This method is only suitable for natural woolen items. When exposed to high temperatures, they tend to shrink, that is, shrink. If the dress has lost its shape or stretched, it is recommended to soak it in water at +50–80 degrees. The hotter it is, the more it will shrink.
Wool after washing
It is worth remembering that the thing will not stretch back, so it is important to be careful. It is better to wash by hand in order to control it in a timely manner.
Thus, the process of changing the size of your favorite dress after reading this article will not be so difficult for any girl or woman.
Source
What to do if a new dress is not enough
If the dress is still new, or almost never worn, you can try simply opening the darts and slightly reducing the seam allowances. Believe me, with such simple manipulations you can significantly increase the size of the dress.
To increase the length of the dress, you can sew an original frill to the bottom or cut it along the waistline and insert a strip of fabric into this place. Moreover, it can be made from a completely different fabric. The same material can be used to trim the sleeves or bodice of the product.
Remember that before sewing on new fabric, it must be washed or ironed, making sure to steam it.
This is done so that after finishing work, your idea does not shrink and spoil the entire appearance of the dress.
Before starting work, be sure to carefully calculate all the patterns, taking into account seam allowances and freedom of movement.
If the dress has become too small in a certain place, try to work it out. For example, for the chest, you can simply deepen the neckline or insert ribbons into the seam, intertwining them beautifully. If it’s tight in the hips, you can try inserting wedges (triangular pieces of fabric). But problems may already arise with the waist. The entire dress will have to be adjusted.
But it’s better, of course, if you see that all your efforts are not bearing any fruit, not to suffer and buy a new dress, no matter how much you love the old one. Another option is to take your dress to a skilled craftsman at the atelier; you will surely be satisfied with the result!
A wedding is every girl's dream. We are looking forward to this day, preparing for it carefully, thinking through everything down to the smallest detail. We choose our wedding outfit to show off in front of the guests, and especially in front of the groom. This is where the hardest part begins - choosing that one dress that will fit and fit perfectly on your figure. Some girls have a non-standard figure and you just can’t find it. We spend hours, or maybe even months, choosing an image for ourselves.
Wedding products are sewn according to certain patterns, and the bride’s figure is individual. Therefore, additional adjustments are required for the suit so that it fits well on the figure. Sewing a wedding dress.
You may just need to hem it along the length, if you are short this is not too difficult. True, it all depends on the style of the outfit, if you have a full skirt, there are usually many petticoats, it is much more difficult to hem it than a simple straight one. It is better to take a dress with a full skirt to the atelier. If you have decoration at the bottom, for example, an appliqué of flowers, the atelier will save this decoration for you at the bottom of the hem. It happens that it seems to fit, but the waist is wide, then they will sew your wedding dress in a corset. We will tell you how to sew a dress to size.
The easiest way is to wash it, take it to the dry cleaner, perhaps it will shrink to size if the fabric is made of wool. If not, then you need to take the correct measurements first. The bride should stand straight, wear lingerie, shoes with or without heels, i.e. the shoes you will wear on your wedding day. It is necessary to measure the chest circumference along the protruding points, the waist circumference, and the hip circumference along the buttocks. Don't forget to add a centimeter everywhere so that your outfit doesn't fit together. Then the parameters of the product itself are measured, and the difference in measurements is calculated.
The easiest way is to sew along the side seams, so as not to spoil the pattern, if there is one. Extra centimeters along the chest, waist and hips are immediately removed.
Are you one of those millions of women who struggle with excess weight?
Have all your attempts to lose weight been unsuccessful?
Have you already thought about radical measures? This is understandable, because a slim figure is an indicator of health and a reason for pride. In addition, this is at least human longevity. And the fact that a person who loses “extra pounds” looks younger is an axiom that does not require proof.
If your favorite dress suddenly becomes too big for you or you made a mistake in choosing the size, do not rush to get rid of it, since you can reduce its size yourself. There are many methods for this; for example, depending on the composition of the material, you can adjust the size of the product by washing.
To reduce the size of a cotton dress, you need to wash it in the washing machine, setting the temperature to 60°; after completing the washing process, you need to set the normal spin and dry mode. Iron the dress thoroughly with an iron set to steam, after which you can safely put on your favorite item, which will definitely fit you.
A dress that contains wool may shrink if not washed correctly. To do this, soak it in hot water and then rinse the product in cool water. In this case, it is better not to use machine washing, since the result may be unexpected. It is not recommended to dry a woolen product on a hanger or rope - this can cause it to become deformed and stretched; it is necessary to lay it on an absorbent material in a warm place until it dries completely. As a result, a woolen dress is bound to shrink.
To resize a denim dress, wash it in warm water using the auto dryer. If you need to adjust the size of a silk dress, you should wash the product exclusively by hand and only in warm water. To shrink a nylon or polyester dress, wash it in a washing machine in cold water and tumble dry at the end of the wash.
If your dress is made of a different fabric or for some reason you were unable to achieve the desired result with washing, you can try another option.
First, decide where you want to reduce the dress. The easiest way to shorten the hem is to roll it up to the desired length and pin it. You can also trim off excess fabric and hem the hem.
To sew in the sleeves, try on the product and mark how much you want to narrow them. The seams on the sleeve must be opened and stitched along the marked line. If you want to make the dress smaller at the shoulders, you will have to rip the sleeve off the garment, then remove the extra centimeters in the shoulder area and sew the sleeves back on.
If the dress is wide at the waist or chest, the sewing method will suit you - using undercuts. During fitting, the darts are pinned, sew them along the corresponding line.
Excess width along the hips is removed along the side seams. Try it on, make marks and sew the sides along the new line. Then you need to remove the old seams and sew new ones along the basted seams. It is better to trim off the excess fabric, after which you can process the edges. Carefully iron the new seams and the dress is ready.
You ordered a dress through an online store, but it turned out to be too big for you. You can adjust the dress to size yourself, even without knowing the intricacies of sewing.
Sewing a straight dress
If you bought a straight wedding dress and suddenly lost weight, you will need to reduce it by a whole size. It is much easier to sew a straight dress than a fluffy one. We start by taking certain measurements: the circumference of the waist, hips and chest. The easiest way to sew in is a skirt with a set-in belt. First, rip the belt, and then rip the product on the sides. Mark the new measurements on the skirt where needed, and when you draw a new line, make sure it runs parallel to the old seam.
Try on the dress and make sure it fits you well. Only then sew the seams and cut off the excess with scissors. Then we sew the belt back, shortening it to the desired length.
Sew the sides of the dress. To sew the item on the sides to size, you will need to adjust the armhole line. If your product has sleeves, then you can reduce the size using the side seam, opening the armhole line and the sides. Mark the new seam and sew it up. We cut off the unnecessary fabric on the sides with scissors.
Putting all the parts together
Now all you have to do is put the sleeves back on. After turning the shirt inside out, turn the sleeves right sides out. Arrange the shirt and one sleeve as shown in the photo below, making sure the buttons on the cuff are facing down toward the table (if they are up, you'll need to switch sleeves).
Place the sleeve inside the armhole as shown in the photo below.
Align the raw edges of the sleeve and the armhole, then pin everything together well and you can sew it neatly.
Repeat the same manipulations for the other sleeve, smooth out all the seams and admire your new smaller shirt!
Found a violation? Report content
How to sew a jacket at the waist
To do this, you again need to take measurements. First, measure your chest circumference - to do this, the tape should pass along the most protruding points. Make sure that on your back it extends slightly above your shoulder blades. Then measure the narrowest part of the waist, and you need to wrap it tightly, but without too much tension.
When marking, the jacket is put on inside out and the new side lines are marked with pins. After this, the product is turned inside out and tried on - if everything is fine, the sides are sewn up according to the marks.
From ordinary darts, it is enough to retreat 1 or 2 cm and stitch them again; triangular darts are transferred. To do this, the fabric is selected to the required distance from the former seam and fastened. A new dart is sewn along the old line at a distance of about 1 cm.
In these simple ways you can give the jacket the desired shape and continue to wear it, this is a great reason to improve your sewing skills.
Instructions for doing suturing in different ways with your own hands
You should immediately determine the area of sewing that most dissatisfies the owner. There are several ways to reduce your dress size.
Along the side lines
The simplest method that even inexperienced seamstresses can use is transferring the side seams. In order to use it, you must first try it on. This is done in conjunction with underwear. This procedure allows you to accurately determine the fit of the dress. Excess fabric is pinned along the side seam. You should start from the armpit and move down. At the same time, use a pencil or colored chalk to mark the location of the new seam. Do not forget about the allowances, which leave about 1 cm of fabric.
Before sewing a new seam on a machine, you need to baste it by hand and try on the product again in order to eliminate possible errors.
If the size is adjusted correctly, then the excess material is carefully trimmed, the allowances are folded and sewn. To prevent the fabric from fraying, the edges are finished with a zigzag stitch. Temporary sutures are carefully removed.
At the waist
You can alter a dress at the waist without much effort or skill using darts. They are available on almost every ready-made dress. To adjust your waist, you should try it on. The excess fabric is cut off with a bobby pin or a pin, the new position of the dart is marked with chalk or a pencil, and manually stitched with a temporary seam. Next, you should try on the dress again and make sure that the preliminary measurements were taken correctly. After this, the excess fabric is trimmed, the seam is sewn on a machine using the minimum pitch width, and the edges are processed.
Breast reduction
The most practical way to reduce the size of a dress in the chest area is to use darts. You should try it on and mark the area where the new seam will be located. Next, baste it by hand and measure the product again. If there are no mistakes and the dress fits well, then carefully cut off the excess fabric and sew the seam on a machine. The edges are processed and ironed.
Hemming the shoulders
Hemming the shoulders is a more complex procedure and requires certain skills and abilities. Additionally, you will need to change the armhole. You need to try on the dress and mark the new width of the armhole with chalk. After this, the product must be removed and folded strictly in half, placing one armhole behind the other. Sections, armholes and necklines are cut off using bobby pins or pins. After this, a new armhole line is drawn and the dress is tried on again.
If you are satisfied with the result, you can trim off the excess fabric and add permanent seams.
If the dress has sleeves, then the armhole line is placed a couple of centimeters below the ruler.
How to sew a dress at the waist
If the dress fits well in the shoulders and chest, but hangs a little at the waist, then you can sew it up 1 size yourself. There are several ways to do this. Firstly, you can make a slit in front and sew in buttons or a zipper, secondly, make darts, and thirdly, sew in the side seams. The choice of method will depend on the style of the product, the desired size, fabric and skill of the craftsman.
Attention! If you need to reduce a dress by 3 or more sizes, then the described methods will not work, you will only have to reshape it
Dress with buttons
To reduce the size of a product with buttons or a zipper, you need to know how to sew in the sides of a dress at home. If the buttons are on the side, it is enough to alter them further by 1-2 cm, due to which the product will become narrower.
Button up
With zipper
A zipper is another cool option for sewing a dress. In addition, it will allow you to update the model, change it and diversify it. So, the algorithm of actions:
first you need to try on the dress to understand how many centimeters you need to sew it up; then it is cut in half along the back or ripped along the seam, if there is one; the fabric is folded on each side as much as the volume of the dress needs to be reduced (if it is necessary to remove 5 cm in total, then the fold is made at 2.5 cm intervals); it is important to select the zipper according to the length of the cut and baste it on one side and then on the other; The next step is to measure the dress to see if the size is right or if adjustments are still needed. if everything is fine, then the zipper is attached by machine and smoothed with an iron.
You can use small hidden zippers, which are built into the seam and are almost invisible, or massive decorative ones, which will become a new decoration for the dress.
With lightning
Breast reduction
In order to make a dress smaller in the chest, the method with buttons or a zipper is not very suitable. It is better to use the dart method. They can be vertical and horizontal.
Horizontal darts help reduce the size of the product in the chest area, and vertical darts can narrow the dress along the entire length of the bodice.
First, you need to put the product on yourself and use chalk to measure approximately the area where you need to adjust the item. After this, a tuck is made using a basting stitch. Before stitching tightly, you need to try on the product.
Darts
What you might need for work
To alter the finished product, you need to find free time and prepare special sewing supplies:
- Centimeter and ruler. These items are necessary in order to take measurements. In some areas of the finished product you need to retreat a few millimeters or centimeters, strictly observing a straight line. This applies to marking side seams, as well as drawing a line to finish the edge of a shirt or blouse.
- Pins or needles. Using pins or small needles, parts of the shirt are held together when sections need to be joined before further basting.
- Chalk. The area is marked with chalk, which is later fastened with pins and basted with thread.
- Scissors with sharp edges. Scissors are necessary for making cuts and cutting parts of the shirt. The sharper the scissors are, the less likely it is to damage the product.
- Threads. Colored threads are used for basting: they are better visible on the fabric. Only threads that match the shade of the fabric on the shirt are suitable for sewing.
- Needles. Basting is done using a needle. After parts of the shirt are sewn on the machine, the basted seam, made by hand with a needle, is removed.
- Sewing machine. When reducing a product by a size, it is wiser to use an automatic sewing machine. The automatic process will produce smooth seams that will be indistinguishable from factory-quality seams.
Reference! In addition to chalk, you can use a small dry piece of soap.
Ways to do the job
When the sewing area has been selected and all the materials have been prepared, we begin to work.
Along the side lines
You can change the size of the dress and precisely fit it to your figure using the side seams. This method is one of the easiest to implement.
In most cases, it is possible to achieve the appropriate size and perfect fit after changing the lateral lines. With their help, the product can be altered in accordance with personal parameters.
To make the size smaller, you should try on the dress. It is recommended to carry out fitting complete with underwear . This will help determine the exact fit of the product.
Along the side stitch, starting from the armpit, we pin off the excess fabric . We mark the new location with a pencil. Don't forget about the allowances (about a centimeter).
Tip : for more comfortable work, it is recommended to try on the wrong side.
Before sewing, it is recommended to baste the dress along the intended seams and try it on again. This will help eliminate possible errors.
If the size is optimal, cut off the excess fabric, carefully fold in the seam allowances and sew. The edges can additionally be finished with a zigzag stitch to prevent the fabric from fraying.
After laying the main lines, carefully remove the approximate seams. Finally, we iron the new seams.
At the waist
You can adjust the waist area, as well as eliminate excess material, using darts. Almost every dress has this feature.
It is a rare product on the market that does not require additional stitching. In order to change the waist area using darts, you should try on the dress. We chop off the excess with pins. On the wrong side we mark the new position of the dart and stitch it with a temporary seam, manually .
If after trying on the result is positive, cut off the excess material. Using a sewing machine, we sew a line with a minimum step width. Finally, we iron the fresh seams.
Important: adjust only the dart area, without transforming the side or back stitches.
Breast reduction
You can also correct the chest area using darts . The process is similar to the method described above.
How to properly sew a dress with a lining and a full skirt.
Dear beginning dressmakers, sometimes we have to solve the following problem: how to sew a wedding dress, or how to sew a complex children's dress with a lining and a full skirt. So you sit down and think about where to start? How and what? From this article you will learn how to solve this issue without wasting time. The whole job took me 4 hours.
Such dresses are made using rigilene in the seams and at first glance it seems that it is difficult to alter this dress. Let's look step by step, schematically, where to start, what will have to be unraveled, what knots in a specific example, in order to properly sew in a dress.
True, the dress will be for a child, but the principle of its tailoring is also used in some wedding and evening dresses.
The client asked this dress to be sewn in 6 cm in width in total volume. What did we decide with her? Sew in the side seams, as this is the easiest way and solves the problem of excess width along the lines of the chest, waist, and hips. Where do we start? Of course, from ripping.
how to sew a dress properly
Turn the dress inside out. You see in the photo the lining of the underskirt. Lift it up and you will see the stitching seam of the underskirt lining and the two mesh layers of the overskirt.
Peel the skirt lining and overskirts away from the corset part of the dress, but not the entire skirt, but sections of about 10 cm in the area of the side seams.
how to sew a dress properly
And open the dress at the top, under the arms. Also 10 cm.
how to sew a dress properly
Open the reinforcement from the stock of the side seams. In this dress, it is sewn to the seam reserves, without drawstrings, so it will be easier for us to sew it in later.
how to sew a dress properly
Turn the bodice of the dress through the open seams of the skirt so that the entire side seam becomes accessible. Draw a new side seam line with a simple pencil at a distance of 1.5 cm from the previous one and sew it on the machine. Do the same with the lining.
how to sew a dress properly
Trim off the excess from the side seam.
how to sew a dress properly
The neckline goes smoothly down from the chest to the back. Because of this, there was a slight discrepancy in the upper cut in the side seam. What should I do? From the chest to the back along the neckline, cut off the excess seam, folding the two side seams together for symmetry.
how to sew a dress properly
Now sew the rigilen in the same way as it was sewn before. Press the side seam.
how to sew a dress properly
The dress has decorative pleats on the chest. Pin them together to prevent them from becoming deformed.
how to sew a dress properly
Sew up the ripped areas along the neckline, continuing the untouched lines.
Restitch the seam reserves towards the lining with a seam width of 1 mm (you must also take into account
technology for processing a specific item. In some products the stitching
there may not be any re-stitching, but there will be finishing stitching, for example.)
how to sew a dress properly
Baste and press the completed seam.
how to sew a dress properly
Gather the folds of the upper skirt and pin them together, adjusting them to the required volume. Sew the overskirt to the corset part of the dress. Simply sew on the petticoats one at a time, immediately forming folds with your hands. Lastly, sew on the lining of the dress. There is no need to iron the seams of the skirt. Well, that's probably all. This is how you can simply sew a dress.
how to sew a dress properly
What else to read on this topic:
How to sew a children's dress pattern.
all blog articles
To main
How to properly sew the sleeves of men's and women's shirts
Sometimes when trying on, it turns out that the sleeves of a shirt are too big in the armhole area. The overall appearance suffers from this. The armhole is reduced by suturing the area between the top and bottom of the center of the shirt. To reduce the armhole, you cannot do without ripping the sleeves. After tearing off the sleeve, use a pin to fasten the armhole, measure the distance required for suturing, and try it on. Then the sleeves are sewn in along the new line and the fabric is smoothed out on the inside.
When reducing the armhole, there is a possibility that you will also have to reduce the width of the sleeve along the entire length of this part of the product. There are 2 ways to reduce the sleeve width along a redesigned armhole:
- when basting a sleeve to a narrowed armhole, a vertical fold is placed on the sleeve, which, after sewing to the armhole, must be carefully ironed;
- if the method of touching the fold is not suitable, then the sleeve is sutured along the seam, redoing the vent and sewing in the cuffs.
Advice! When completely altering the sleeve width, the cuff does not need to be reduced. To make it narrower, just alter the button a few millimeters to the left.
Adjusting undercuts
Sometimes it turns out that the dress fits true to size, but in some places it bulges or does not fit as well as we would like. This problem can be dealt with by adjusting existing grooves or by making them, like this:
- Put on the dress and pin in those places where you need to reduce the volume.
- Turn the dress inside out and mark the darts in a new way, sew them with thread and try on the dress again.
- If you are satisfied with the result, then sew it on a typewriter.
- Iron the grooves with a steam iron.