Sooner or later, all owners of laminate flooring have to look for a convenient way or means to fix cracks in the laminate. No matter how accurately the lamellas are laid and pressed tightly, still after a year or two thin and narrow holes appear at the joints. It’s good if signs of a future gap are identified when laying the laminate, in this case it can be corrected without the use of special means, but more often you still have to deal with the problem after the lamellas have settled on the substrate.
The cracks must be removed urgently, otherwise the laminate will become unusable
Why do cracks appear in laminate flooring?
There are not many reasons why joints between lamellas increase or holes form, and most of them are related to the process of laying the coating. In order for cracks to appear in the laminate, the panels must move relative to each other. This happens due to three reasons:
- The lock is not completely closed; as a result of under-pressure or failure to tamp the lamellas when laying the laminate, gaps remain between the slats. The easiest way to correct the situation is at the stage of assembling the laminate, but you can try and simply seal the gap after the fact;
- The lock is broken due to the joint hanging above the substrate. Most often this happens when the line coincides with the seam between the pine needle backing sheets;
- Improper subfloor preparation. If all depressions and “humps” are not corrected before installation, then over time the substrate will settle and the laminate will shift, forming cracks.
In addition, holes in the laminate flooring may appear due to improper installation technology. For example, craftsmen may leave or forget to seal the gap between the laminate and the wall. With a floor width of 3-4 m, due to thermal expansion, the material can easily diverge by 8-10 mm.
Some of the slats may need to be removed
In any case, regardless of the reasons why cracks appeared in the laminate, the situation must be urgently corrected before moisture reaches the substrate and the end surface of the planks. It is clear that you will need to inspect the entire coating in order to identify places where the lamellas are subsiding, determine the number of holes, select a material and a method to correct the damage.
Causes of the unpleasant phenomenon
If the owners eliminate the cracks, but do not identify the culprits of their formation, then soon the defects that appear will “delight” them again. Therefore, the first necessary step is to discover the causes of the cracks. Several factors can be suspected of “complicity.”
- Drying due to natural causes. Any type of wood loses weight over time, but the intensity of this process depends only on the species. The exception is boards that are processed in vacuum chambers; changes in geometry are almost not typical for them. Conventional building material, on the contrary, can lose from 5 to 10%, or even more: the numbers depend on the type and initial moisture content.
- The air in the house is too dry. In this case, the tree will very quickly give up moisture, which means it will decrease in size. Normal “life” conditions for such coatings are temperature from +18 to +25°, humidity from 40 to 65°.
- Laying wet material. The optimal relative humidity for raw materials that are being prepared to become floor coverings is in the range of 8-10%. If the wood is damp, then it will have to dry during use, and such conditions lead to the appearance of cracks.
- Violation of technology. Incorrect installation - poor fastening of the flooring, failure to maintain horizontal joists - are the most common causes of loosening, “walking” of boards, their subsidence, and, naturally, deformation.
- "Living animals" living underground. Rodents - rats and mice - are required to constantly grind down their incisors, so they have to “train” on everything that comes their way. The second reason is hunger, which draws them to heroic deeds. These cracks and holes are the most severe “injuries.”
- Wrong choice of material. The optimal boards are made from oak and coniferous trees. A floor made of beech, cherry, pear, maple or ash will definitely require repairs, since these types are most susceptible to deformation.
- Extremely high operating load.
The scope of work depends only on the size and number of cracks, so repairs can be either simple or incredibly complex. The most serious damage already requires radical measures - a complete replacement of the floor.
How to remove cracks in laminate flooring
In this situation, the determining factor is not the size of the hole between the slats, but the number of slots. The width of the hole can vary depending on the temperature and load on the laminate, but if in one room there are more than five points of divergence of joints with a total width of more than 20-25 mm, then it is urgent to dismantle the covering.
Preparing how to fix the situation at the lowest cost
Usually the situation is partially saved by furniture. Wardrobes and heavy wardrobes, furniture walls are fixed on one side so that the seams do not open. All small pieces of furniture, sofas, armchairs, chairs, tables are taken out of the room. Next, you need to determine the direction of dismantling the laminate.
Important! If the laminate panels simply come apart, then only part of it will need to be disassembled, from the wall to the point where the first joint is opened. In a situation where broken locks are discovered, in order to fix the damage, you will have to disassemble all the slats down to the broken board.
It is not necessary to remove the coating one strip at a time. You can fasten them with tape and dismantle them in entire sections. You just need to mark the panels and try to do the work with maximum accuracy.
Before trying to correct the divergence of joints, you need to perform a small revision:
- Check the condition of the substrate and try to find out the cause. It is important not only to fix the gap, but also to eliminate the source of its appearance. These could be trimmings of the lining, pieces of the slab, or simply garbage forgotten on the lining. All this needs to be removed with a vacuum cleaner;
- The second stage is to inspect the locks; they also need to be cleared of debris. After which, with your hands, without a hammer, you check how deep the connection is closed;
- If there is a chipped tenon on the lamella, it will need to be replaced; any gluing or attempts to cover up a hole in the laminate or fix the damaged area with even the strongest glue do not yield results.
The laminate lock must remain movable and allow the lamella to expand. You can try to fix the spike with a PVC film insert. Otherwise, at the first serious load or temperature change, a hole will appear again in the restored area.
Part of the rotten lamella is cut out and a patch is glued in
Repair, how to fix a gap with a hammer and a pry bar
After the inspection, the slats need to be laid in the reverse order. Usually the tongue and groove of the lock are lubricated with sealant on the back side. You can fix the coating without gluing, given the fact that the laminate is not designed for repeated assembly and disassembly, it is still better to play it safe and use silicone. This will make the locks tighter.
Individual planks are hammered through a wooden block, onto the end of which a strip of soft and thick leather is glued. To eliminate the gap, apply a series of gentle blows, moving the block along the bar.
Sealing cracks by interrupting
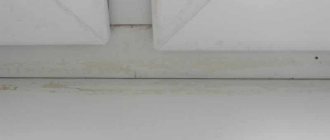
There is another way to fix the joints; you don’t even have to disassemble the coating. In order to tighten the separated joints, use a mounting tool and a long wooden or aluminum beam or rail, the edge of which is pressed against the opposite wall. Using it as a stop, the lamellas are carefully pressed down with a mounting tool and the connection is completely seated.
This method is convenient for correcting joints at the short ends of the planks, especially if the place is located close to the wall.
The ends are supported by a stop
Laminate design and features of its operation
It is, in principle, possible to renew laminate flooring, but some nuances of the work must be observed.
Before you paint laminate flooring, you should take a closer look at what it is and how it differs structurally from parquet flooring.
Laminate floorboards, despite their similarity to parquet, have little in common with them. Their main difference is the material from which they are made.
If natural wood is used in the production of parquet boards and bars, then various composite materials are widely used in the production of laminated slats.
A classic laminated board consists of 4 layers, bonded together using polymer-based adhesives.
Features of operation
Due to this design of the laminate, if its top layer is damaged, all underlying layers are inevitably at risk, so damage to the protective surface should be considered not only as a decorative defect that worsens the appearance of laminate flooring.
Violation of the protective layer can cause “failure” of the entire floorboard - moisture and chemical components of cleaning agents penetrating into the base of the lamella will lead to its deformation, delamination or fungal damage.
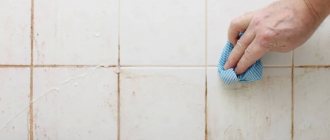
To avoid deformation of the floorboards, you should limit yourself to dry cleaning with a vacuum cleaner or broom.
But it is quite clear that dry cleaning will not be able to rid the floor surface of stubborn dirt.
Moreover, a floorboard devoid of a polymer film tends to absorb dirt, and this makes cleaning it using a dry method almost impossible.
In this regard, painting the laminate is necessary not only to restore its decorative qualities, but also to protect it from adverse external influences.
As a preventive measure against premature failure of the laminated coating, it is recommended to choose it in accordance with its resistance class.
For example, in rooms with increased load on the floors (hallway, kitchen, living room) you should use a higher class laminate. The table shows the classes of laminate flooring, their recommended area of application and approximate service life.
How to seal cracks in laminate flooring
It doesn't always make sense to dismantle the flooring to fix one or two defects. Sometimes a small section of a tenon is simply broken in place, and it is simply not physically possible to replace the entire lamella.
The cracks must be treated, otherwise the hole will appear again
Therefore, you can fix or seal the gap with plastic compounds:
- Sealant to match the color of the laminate;
- Grouting compound based on wax and sawdust;
- Seal with cork;
- Fix the joint using a proprietary repair compound.
Important! The worst way is to try to fix the joint using regular glue and settling of the strip. If the cause of the gap has not been eliminated, then before the adhesive mass sets, the lamellas will return to their original state.
The damage will remain, but it will be permanently sealed. In general, experts do not recommend using any brand of glue; the laminate only loses its mobility and breaks at the seams. An exception may be a gap between the laminate and the door frame or wall; in this case, the ends of the lamellas must be firmly secured.
Sealing the gap with acrylic
Repair with sealant
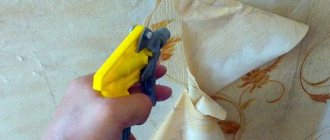
The most reliable way to correct the situation is to close the gap between the edges of the laminate using a ready-made acrylic wood repair compound. There are a dime a dozen such mixtures on sale; it is only important that the repair material is intended specifically for wood. As a rule, this is a plastic tube for a syringe gun; this tool is convenient to use if you need to fix a gap between a hard and soft surface.
To seal the gap, first of all you need to stick transparent wide tape onto the joint line. This will help not to stain the laminate and avoid a long and unpleasant procedure for cleaning it from sealant residues.
After sticking the tape, carefully cut it with the tip of a sharp knife. You need to cut with your hand without pressure, almost by weight, so as not to damage the lock or, even worse, not to cut the lining, then it will be much more difficult to fix the seam.
Moving along the cut line, fill the gap with sealant
Next we apply sealant. To prevent the film from interfering with the movement of the tip, we wrap a regular wallpaper nail onto the nozzle. When moving, the edges of the tape rise, rather than wrapping inside the joint.
Advice! Craftsmen recommend that before pressing in the sealant, slightly spread and wedge the gap. After filling with repair mixture, the wedges are removed and excess material is squeezed out of the joint.
After the mixture has dried, cut off the top of the seam and remove the tape. One way to remove cracks in laminate flooring is shown in the video:
Cork repair
For laminates laid loosely on a substrate, it is important to maintain movement and expansion. For such coatings, it is recommended to correct cracks with “liquid plug”. This is a mixture of sealant and cork chips. You can buy it or make it yourself. The cured material is very soft and elastic, so it can be used to easily fix any cracks and joints.
Gap problems at the walls or at the front door can be corrected with cork tape. “Liquid plug” is not used for these purposes. The tape is cut to length and thickness, glue is applied and pressed into the gap.
Preparing flooring for repairs
If the laminate was installed before the new owners moved into the apartment or house, it is possible that they have already tried to hide the cracks. Often home craftsmen make the mistake of using putty for these purposes. This is strictly forbidden. Temperature and seasonal changes will cause the putty to crack. Yes, and normal movement on the laminate leads to its movement. Therefore, if a gap in the floor covering has been puttied, the putty should be completely removed with a knife. If it is not there, then you will have to clean out all the accumulated dust and dirt from the crack, and then remove small particles with a vacuum cleaner. Any debris left inside will prevent the boards from sitting flush together.
PHOTO: YouTube.com All putty, if any, must be completely removed
The same should be done with other problem areas. There is no need to repair each of them separately. It is better to immediately outline the entire scope of work, and only after that begin to complete the task.
PHOTO: YouTube.com It is necessary to immediately prepare all problem areas for repair
How to avoid recurrence of cracks
If a gap has already appeared, the lock is most likely broken. This means that after the problem is fixed, the gap will appear again. To prevent the problem from reoccurring, you should use regular or PVA wood glue. You shouldn’t pour too much glue into the gap; it will still squeeze out when joining the boards. Although its excess can be easily removed with a damp cloth.
Under no circumstances should liquid nails or other inelastic compounds be used for these purposes. They can ruin the flooring so that you end up having to replace some of the boards. And to do this, the floor will have to be disassembled, which will lead to additional problems with longitudinal locks.
PHOTO: YouTube.com PVA glue can be called the ideal solution to the problem of broken laminate locks
How to fix a hole in laminate flooring
Nightmarish situations happen when you not only need to seal a thin and narrow gap, but also fix more serious damage, for example, repairing a hole in the laminate flooring.
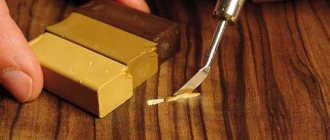
The easiest way is to use a branded repair compound, for example, “Quilosa” or something similar. It is easy to use and does not require special training. All you need to do is choose the right color, seal the edges of the hole with tape and rub the hole with repair paste.
Grouting with acrylic putty
Sometimes it is simply not possible to use special means due to their lack. In this case, you can donate a piece of laminate and rub sawdust from it. In order to fix a hole, you will need twice as much sawdust as the amount of damage itself. Mix the material with wood glue heated in a water bath and use a spatula to press the mixture into the hole.
To completely correct the damage, the hardened patch is carefully ground and polished with a felt attachment on a screwdriver. All that remains is to remove the tape and traces of glue.
Replacing the board
Often, when the floor is damaged or blistered, the question arises as to how to replace one damaged laminate board. There are two ways: disassembling and sawing.
Disassembly is a fairly simple and effective method that only requires time. This method should be used if the damaged panel is located close to the wall, since disassembling the entire floor to the middle is not very practical.
In this case, sawing is used. It takes place in several stages:
- On the damaged board, the boundaries of the cut are marked - 3-5 cm indentations along the contour of the laminate itself.
- A parquet saw makes a cut along the new marks and removes the cut piece.
- Use pliers to carefully remove the remaining pieces from the grooves so as not to damage other boards.
- The lower part of the lock breaks off on the new replacement panel.
- After inserting the covering, all joints are glued, and excess glue and sealant are cleaned off.
- The new board is left under load for a day.
Sawing laminate
Preventing cracks in laminate flooring
The formation of damage at joints can only be prevented by periodic inspection of the joints. Moreover, it is best to start prevention at the stage of assembling the laminate. If the master is a professional, then it is better not to get on his nerves and let him do his job calmly.
In other cases, you need to regularly inspect the coating and try to fix the seams before the locks break. Cracks most often form as a result of water spilled but not removed in time, so it is better to prevent the edges from being squeezed out than to try to correct the defect later.
Mastic treatment reduces the risk of damage
Laminate flooring creaks due to uneven base
According to the instructions of laminate manufacturers, the difference in the base should be no more than 2-3 mm per linear meter. Some unevenness is compensated by the spread of the substrate. Over time, the laminate floor takes the form of a screed, but gradually a divergence occurs at the ends of the key joint and a fracture is formed. The panels no longer stick together and friction appears. We can hear clicks, creaks, crunches, depending on which parts and “how” they cling and rub.
In such cases, nothing can be done about this problem. Correcting the defect is only possible by leveling the base and laying a new laminate.
But this is not a matter of one day, years can pass, and you won’t even think about paying attention to a couple of squeaks. I had a case where they laid laminate flooring in a Khrushchev-era house.
The customers did not need to level anything, because they planned to live in this apartment for 2-3 years and then sell.
The ground was very uneven. Therefore, I recommended buying Art Floor laminate with a UniClic lock. During assembly, there were practically no gaps and the person was satisfied. I wrote to him on VKontakte a few months later, he said that everything was wonderful.
How to mask cracks in laminate flooring
There are only two ways to hide the repair site. Firstly, use special wax compounds, which are usually used to fix scratches and abrasions. If you regularly treat the area, then over time the stain will merge in texture with the main background of the floor.
Secondly, you can seal the hole with film cut from the remains of the laminate. This process is complex and requires skill in working with a grinder, but in terms of texture quality it is the best. You can fix it with vinyl self-adhesive, but the masking effect is much worse.