- home
- Articles
- Washing machine creaks
A squeaking sound in your washing machine is always a sign of a problem.
If newly purchased and installed equipment is noisy, it must be returned, replaced or repaired under warranty. There should be no extraneous sounds when the new unit is operating. But if the machine begins to creak after several years of proper washing, this is a reason to contact washing machine repair. Creaking is heard due to the friction of parts or other things against each other. There are two main reasons why a washing machine squeaks:
- the fastenings that hold certain elements of the device are worn out and weakened;
- foreign objects have gotten inside the equipment and interfere with the work process.
To diagnose and eliminate the causes of the squeak, in most cases you have to call a specialist. He removes the cover or wall of the device and examines the inside to find the source of the noise. Usually it is possible to quickly find the cause, tighten loose fasteners or replace a worn part. Such repairs of washing machines allow you to extend the service life for several years and avoid having to buy new equipment.
Equipment may make sounds - this is normal.
It is worth understanding that a washing machine, like any unit, still creates some sounds during operation. In particular, you may hear:
- the sound of water pouring as it is drawn;
- the noise of a running drain pump (pump) when draining water;
- the sound of the engine when the drum rotates;
- drum noise at high speeds during spinning;
- clicks if the machine switches modes, for example, moves from the washing phase to rinsing mode, etc.;
- the noise of water heating, like in a kettle, during the washing process.
Don't worry, these sounds are not a malfunction.
Foreign object entry
During washing, a knocking sound is sometimes heard due to the presence of some foreign object in the tank. These could be keys, coins, buttons, rhinestones, or a bra wire. They can even pierce the tank at high speeds, so the device will jam and water will leak onto the floor. After removing foreign objects, it is necessary to check the parts for integrity and serviceability.
If you act incorrectly and connect the device to the system incorrectly, important parts of the washing machine will fail. Therefore, it is better not to carry out independent repairs, but to entrust the matter to a specialist.
Washing machine noise level in decibels
It is indicated in the characteristics of the machine and may differ slightly depending on the brand and model of the equipment. In most modern washing machines, the permissible noise level does not exceed 55 dB (decibels) during washing and 70 dB during spinning.
What is 50-55 dB? This is loud human speech or background music. The noise level is 80 dB - the noise of a large highway. Thus, there is no need to talk about the machines being completely silent. But if you close the door to the room where such a machine is working, the sounds really won’t bother you.
The procedure for carrying out work when replacing brushes by a RemBytTech technician
What we do when performing a service at a client’s home:
1. Disassemble the washing machine
The engine, most often, is located at the bottom, slightly to the right, when looking at the car from the rear wall. To get to the engine, the master removes the back panel. In some washing machines, you need to remove the top cover before doing this.
Disassembly order:
We completely turn off the power to the machine by unplugging the plug from the socket.
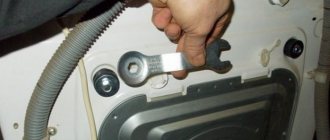
Remove the back wall. We unscrew the fastening screws with a screwdriver (if the wall is additionally pressed by the top cover, first remove it).
We remove the drive belt, which is put on the drum and engine pulleys. To do this, turn the drum pulley and slightly pull the belt towards you.
2. Remove the engine and check the brushes
In most models, the motor is “put on” special holders and secured with screws or bolts. The sequence of our actions is as follows.
- Disconnect the engine power supply. To do this, remove the connector from the socket.
- Unscrew the fasteners and remove the engine.
After removal, the technician checks that the brushes are worn out and it’s really time to change them. As a rule, this is not difficult to determine by visually looking at them. RemBytTech employs experienced craftsmen who, by their appearance, understand how critical the wear of brushes is.
In some older washing machine models, the brushes may be hidden behind the motor housing. In this case, the technician checks them with a multimeter.
3. Change brushes
The brushes are inserted into special holders. The contact part is in contact with the rotor commutator, the wire part is connected to the stator. In very old electric motors of “aged” cars, access to the graphite brushes is blocked by part of the motor. Therefore, it has to be partially disassembled. But this is rare and usually the replacement order is as follows:
- We disconnect the wires and dismantle the worn brushes. To do this, depending on the design, we either snap off the pressure plate and pull out the brush, or unscrew the holder with the brush with a screwdriver, disassemble it, bite off the wire of the brush ember from the holder, and then remove the ember itself. During dismantling, be sure to remember where the bevel of the contact part of the brush was directed. This is necessary for proper installation of the new part.
- We inspect the collector. If it is very dirty, wipe it from dust.
- We install the new part in the reverse order of dismantling. If the design is such that during dismantling the brush carbon wire was cut off from the holder, then new brushes will need to be soldered to the brush holders. After installation, the technician visually assesses how the electric brushes are installed: the end should protrude from the holder by approximately 10mm. The technician also checks the correctness and tight fit of the brush bevels to the commutator.
- We connect the wires.
4. Install the engine
Now we return the motor to the washing machine.
- We put the electric motor on the mounting lugs and tighten the bolts or screws. We check the stability of the motor so that there is no movement or swaying.
- We put the drive belt on, first on the motor, then on the tank pulley. We check the tension, otherwise the belt will fly off when starting the engine.
- Connect the power, insert the cable into the socket.
5. Assembling the car
We put the back panel in place and screw it on. The top cover is put on last if it was also removed. After assembly, we run the washing machine in test mode to check the operation of the motor under different loads.
The washing machine is noisy due to improper use
Overloading, underloading or uneven distribution of things in the SMA can lead to loud noise during the spin cycle. Be careful to read the washing machine instructions and follow the rules regarding the weight and size of the laundry you load. This will not only save you from increased noise, but will also extend the life of the equipment.
Note! Underloading the washing machine or washing one large and one small item is no less dangerous than overloading it. Since in these cases the washer cannot distribute the load evenly throughout the drum, it “dangles” during the spin cycle more than necessary and creates loud sounds.
Machine motor malfunction
It often happens that the washing machine motor, which is responsible for the movement of the drum, sparks. Most often, brushed motors are used, which eventually fail and begin to show their “intrigues”.
But even in such a situation, there is no need to panic, because repairs may involve the usual replacement of brushes, which is a standard procedure and such repairs are quite inexpensive. You can replace the brushes yourself.
Brush motors transfer energy to the windings using graphite brushes. These brushes rub against a rotating commutator, and the high speed causes the brushes to simply wear out over time.
Most often this leads to sparks and an unpleasant burning smell. The more worn the brushes are, the more sparks may appear when they touch the rotating rotor.
If the electric motor of the washing machine sparks and the problem lies precisely in the worn brushes, then to repair you just need to replace them, after which the machine should work stably again.
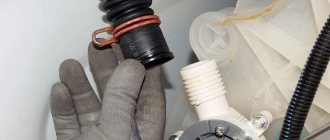
To replace the brushes, you need to remove the belts that are on the motor shaft, disconnect all the terminals, unscrew the motor and very carefully remove it from the washing machine. When removing the motor, the tank may become an obstacle, but do not think that in this case the motor will not be able to be removed. You just have to apply a little force and the engine will be removed.
There are two ways to replace brushes:
- Disassembling the engine, which is most often needed in older models of washing machines;
- Without disassembling the engine, which, of course, is most often observed on modern versions of cars.
After this, you can find that the problem of “brushes sparking on the washing machine” is completely eliminated.
Why is there an unpleasant sound when spinning?
If the washing machine squeaks during the spin cycle, the reasons may include factors such as:
- Drum imbalance. It is a consequence of the weakening of the drum shaft, which causes free movement during spinning. In this case, the drum begins to wobble in different directions at high speeds, friction occurs with various parts (cuff, oil seals, etc.) and, as a result, creaking occurs. To fix the problem, you need to adjust the drum shaft mount.
- A foreign object has gotten between the tank and the body. This problem often occurs in top-loading machines. Small laundry or foreign objects may jump out of the drum and create friction at high speeds. The foreign object must be removed, otherwise it may cause the drum to jam and cause more serious damage.
- Failure to secure parts. In machines of poor quality, the mounting bolts may weaken over time and cause squeaking during spinning. In such a situation, a thorough diagnosis should be carried out and all fasteners in the household appliance should be adjusted.
Another reason for the squeaking of any top-loading washing machine can be the failure of the shaft bearings. Parts need to be replaced urgently. Otherwise, this may lead to additional violations of the integrity of other parts.
Top loading washing machine
If a squeak occurs at any stage of washing, it is important to carry out diagnostics as soon as possible, establish the cause and eliminate it. Otherwise, the breakdown may worsen and completely damage the washing machine. It is best to contact a service center or call a qualified technician for repairs.
Where does this sound come from?
Finding out the cause of a metal grinding sound is not always easy - this sound accompanies several breakdowns at once. To localize the problem, extensive diagnostics must be carried out. You should spin the drum slowly to the right and left, gradually accelerating. Then we pay attention to the following points:
- what is the nature of the crackling noise (creaks constantly or periodically);
- Is the drum jammed?
- whether a clanging or crunching sound is heard at the same time;
- how difficult it is to spin the drum;
- Is there any displacement of the cylinder down or to the side?
You cannot operate a clanging machine - it is unsafe!
It is important to comprehensively assess the situation by constantly rotating the drum. The stronger the clank and the more difficult it is for the cylinder to turn, the more serious the problem. Based on the results of the inspection, we correlate the “symptoms” with possible breakdowns. So, the machine rattles in the following situations:
- a foreign object is stuck in the tank, jamming the drum;
- the drive belt has fallen off or broken;
- the bearing unit has failed;
- the crosspiece was deformed.
You cannot delay repairs - any of the listed breakdowns are very serious. It is better not to delay diagnosis, but to look for the source of the clanging sound.
Main reasons
There are several reasons why the drum in a washing machine knocks during the spin cycle. This may indicate that:
- laundry in the centrifuge is distributed unevenly;
- a foreign object got inside;
- the machine is installed incorrectly;
- the spring mechanism has failed;
- the counterweight is broken;
- bearings are worn out;
- The power filter has come off.
You need to take certain actions depending on the cause of the knocking.
This problem is typical for older machines. In them, when washing and spinning, things do not straighten out, but clump together. In order for the centrifuge to stop knocking, when loading laundry, you need to lay it out evenly, without overloading the drum. It is also advisable to wash bedding and clothing separately.
Sometimes, when operating the machine, small objects fall out through the holes in the centrifuge into the space between it and the outer tank, for example, a bra wire, a button, or a small item that might have fallen out of your pockets. In this case, in order to remove a foreign object, if it cannot be reached through the door cuff, the device will have to be disassembled.
If errors were made during the installation of equipment, then in accelerated operation this is especially noticeable. In this case, it is necessary to check the correct location of the unit and make the necessary adjustments. In order to determine whether the car is level, you can use a level. If distortions are detected, it can be moved to a more even surface. In some models, the position can also be adjusted using screw-in and screw-out legs.
Shaft weakening
After a long period of use or due to poor assembly of the washing machine, the shaft mounting bolts may become loose, which upsets the balance of the drum; it begins to rattle and squeak. This problem can be easily resolved: you just need to tighten the bolts. However, the design of the machine does not always make it easy to reach them. If you cannot do this yourself, it is better to turn to professionals so as not to accidentally damage other structural elements.
Drive belt stretched
The belt that spins the drum can stretch over time and slip, making whistling sounds. If the reason is the belt, the creaking will be especially audible when the machine is heavily loaded and during a high-speed spin. At the first sign of belt stretching, it should be replaced or simply tightened. Otherwise, it may tear during operation, which in turn can lead to other, more serious damage.
Creaking at body joints
The fastenings of the machine body can also become loose and creak over time or due to poor quality assembly. It will not be superfluous to tighten all the bolts connecting the parts of the body and inspect all connections and fastenings that could become loose.
If all these simple manipulations do not help you solve the problem of your washing machine grinding, contact qualified technicians for diagnostics and repairs.
The fastenings of the structural elements of the washing machine are loose
If the noise level in the washing machine increases at high speeds and is accompanied by rumble, creaking and increased vibration, this may indicate a breakdown of the fastening elements.
Causes:
- The counterweight mount is loose or cracked.
- The shock absorber is worn out and damaged, or the mountings are loose.
- The suspension tank spring burst.
- The pulley is damaged or the drum pulley fastenings are loose.
Hanging tank spring.
If previously the car did not make any extraneous sounds, then when they appear, you should seriously think about it.
Failure of one of the components of the washing machine
One of the causes of noise in the washing machine is the activator clamp. In order to eliminate this problem, it is enough to remove the laundry and disassemble the activator. You need to make sure that there is no deflection. It's worth trying to correct the gap between the disk and the tank. Check the suitability of the activator axis.
Washing machine activator.
If the electric motor hums but does not rotate, then most likely the activator assembly is skewed, and the disk itself clings to the divider, grille or bottom of the washing tub.
An unscrewed surge protector can also create extraneous sounds during operation. It protects the car from current surges. To eliminate extraneous noise, you will need to fix the filter; in some cases, it is worth replacing the fasteners.
Breakage and replacement of bearings
If the washing machine rattles during the spin cycle, and you can also hear grinding noises and vibrations, the shaft bearing has most likely failed. If the unit has been operating for more than one year, then this is normal and after completely replacing the bearings and seals it will work as usual.
If you have no experience in disassembling and assembling washing machines, then it is better to seek help from a specialist. This breakdown is accompanied by almost complete disassembly of the equipment. If mistakes are made, irreparable damage is possible, after which the unit will be useless and cannot be repaired.
If the bearings were not replaced on time, and the washing machine creaks, hums and rumbles as before takeoff, then the crosspieces (the parts on which the drum is supported) will also have to be changed. And this significantly increases the cost of repairs.
Damage to shock absorbers
The shock absorber is located at the bottom of the household appliance and is designed to reduce vibration during operation. To check the functionality of the part you need to:
- Remove the top cover by unscrewing the screws.
- Press on the top of the tank so that it sinks 6 - 7 centimeters.
- Let go quickly.
- If the tank returns to its original position, then everything is fine. If it remains bent or rises more on one side and less on the other, repairs are needed.
The main signs of failure before “opening”:
- In the “washing” mode, the unit creaks and knocks.
- The drum rotates slowly (perhaps there is no lubrication in the shock absorber).
Repairing parts in such cases is not always justified. A repaired part, as practice shows, does not last long. It is recommended to completely replace damaged elements or the entire part.
Important! If only one shock absorber is broken, it is worth replacing both. Otherwise, the load will be distributed unevenly and the second shock absorber will soon need to be replaced.
Do-it-yourself repairs will require skill, care and caution. To get to the shock absorber, you need to get to the very bottom of the car. All parts must be removed carefully so as not to damage adjacent elements and wiring.
Damage to shock absorbers
Shock absorbers fix the tank in the washing machine from below, dampening vibrations during washing and spinning. The more often you use the equipment, the more you overload it, the faster the shock absorbers will fail. Even under ideal operating conditions, shock absorbers wear out: the lubricant dries out, the piston becomes loose and moves freely. Therefore, during the spin cycle, the tank will begin to dangle, the machine will jump around the bathtub, the intensity of vibrations will increase, and the drum will begin to knock.
It is necessary to change both shock absorbers, then the load will be distributed evenly. If you change only one, the new spare part will quickly break and the problem will recur.
In some washing machines, dampers (shock absorbers) are accessible from below, and in others from above. The specialist unscrews the bolts securing the shock absorbers to the body, disconnects them and replaces them with new ones.
- Remove the top cover of the machine by unscrewing the fixing fasteners on the back of the case and sliding the top panel.
- Remove the powder container and the lower plastic panel that covers the drain filter.
- Dismantles the control panel by unscrewing the fixing fasteners and disconnecting the cables.
- Remove the rubber cuff.
- Unscrew the bolts securing the front wall and remove it.
Once access to the shock absorbers is opened, the old spare parts are dismantled, new ones are installed, and the unit is assembled in the reverse order.
If you are not afraid to disassemble and repair equipment yourself, you can do it all yourself.
This is interesting: Do-it-yourself air conditioner repair: main faults and their elimination
Retaining springs squeak
The springs that fix the position of the tank may well be the source of the whistle. The rods can rub against the mounting sockets and make a very unpleasant whistle. Finding out whether this is actually the reason is quite simple: you need to remove the upper part of the washing machine body. Start the washing program and during operation (when a squeak appears) press firmly on the seat.
If the squeak disappears, then the problem is in the rods and springs. To eliminate the malfunction, it is necessary to lubricate the contact points with ordinary machine oil.
Incorrect operation of the drain pump
One of the common factors of poor water drainage can be kinking or squeezing of the drain hose due to improper installation of the washing machine. Make sure that there are no irregularities or kinks along its entire length; at the same time, it should be checked for clogging. If everything is in order and the water is drained into the sewer system, the filter may be clogged. Remove the end of the hose from the drain hole and direct it into the sink. If the water begins to drain, it means that the sewer system needs to be cleaned by plumbers.
How to understand the cause of a strange sound in a washing machine
If the washing machine squeaks when the drum rotates, the most common cause may be a clogged cuff. Small pieces of laundry or other large debris could get here. In this case, you need to carefully bend the rubber seal and clean it around the perimeter. If after cleaning the unpleasant sound remains, the reason lies much deeper, and you need to call a qualified specialist.
Place of cuff blockage
What to do if the spin does not work
Choosing the right program. It is possible that the machine has selected a program that does not include spinning, for example, for washing woolen or silk items, “Gentle Care”, etc. You can check this using the instructions, which describe each mode in detail. If the spin program you have set does not include a spin, start another one or turn on this function separately after the wash is completed.
There are situations when the program includes a spin function, but the unit still completes the cycle, leaving the laundry wet. You may have pressed the function deactivation button before starting the washing process, after which the machine stopped spinning. In this case, simply change the settings. These problems do not indicate a breakdown of the unit and are most often caused by user inattention.
The spin function may not work due to an incorrectly selected program.
We restore balance and get rid of overload. If the LG washing machine does not spin, and the tank is full of laundry, it will report an overload with an error code displayed on the display. Many modern units, for example those produced by Indesit, Samsung or Bosch, have an imbalance detection function.
If things are unevenly distributed throughout the drum, tangled in one lump, or there are too many of them, the machine often refuses to spin. The unit will make several attempts to spin the drum, and if they are unsuccessful, it will complete the washing cycle without spinning the laundry. To solve the problem, just distribute the wet clothes manually or remove excess items, and then start the wash again.
Overloading a washing machine with laundry often causes spinning problems.
Setting up the drain. Before spinning, the unit must completely drain the water from the tank through the drain system. Therefore, when the system does not drain the water, the machine cannot spin out the laundry. First, take out the drain filter and clean it of dirt. Also check the drain hose and the pipe that connects the tank to the pump for blockages. It happens that the pump fails, then it needs to be repaired or replaced. Having eliminated all dirt and malfunctions, start the spin function again. If the drain does not work and the laundry remains wet, then the cause of the problem must be looked for elsewhere.
We are repairing the tachogenerator. Breakdown of the tachometer occurs in washing machines (for example, brands Ardo, Whirlpool, Candy, Atlant, LG or Zanussi) due to frequent overloads of the drum. If you consistently exceed the loading rate specified by the manufacturer, this element can quickly fail. The tachogenerator is installed on the motor shaft and is designed to control the number of revolutions during washing. If the sensor breaks, the washing machine will not be able to calculate the drum speed and set the correct spin speed.
A breakdown of the tachometer can lead to problems with spinning.
Another reason for the incorrect operation of the tachometer is loosening of the contacts and wires that lead to this part. To diagnose the problem, check the fasteners and, if necessary, tighten them tighter. If the wiring or adjacent contacts fail, you need to clean them and seal them with electrical tape. If the tachogenerator itself malfunctions, the part is repaired or replaced.
We repair the engine. If the washing machine is installed not with an inverter, but with a regular motor with a belt drive, the brushes in it gradually wear out, which causes problems with spinning. If the engine operates poorly, the drum cannot reach the number of revolutions required for the final stage of washing.
If you have mechanical knowledge, you can try to fix the problem yourself. You should dismantle the rear wall of the housing, then remove the belt from the motor and disconnect the wires, and then unscrew the motor itself from the tank. During diagnostics, you will be able to identify faulty engine parts and replace them with new ones.
Checking the control module. This element is responsible for the operation of all programs, including spinning. If you have already ruled out all of the above problem options, most likely, starting the spin cycle is impossible due to a module failure. Unfortunately, it is unlikely that you will be able to check the control unit at home; you will have to contact specialists. Replacing the part will be quite expensive, so it is better to find a professional technician whom you can trust to repair the device.
It is better to entrust repair of the control unit to a professional
If the washing machine does not spin, this is not a reason to write it off. We hope that in this article you will find answers to your questions and be able to quickly fix the problem.
What can cause grinding noise in a washing machine?
For an accurate diagnosis, it is necessary to disassemble the unit, remove the cover and side parts, and carry out a detailed diagnosis. Each washing machine manufacturer has certain weaknesses that can cause an unpleasant grinding noise. For example, in Indesit technology, springs and shock absorbers often fail. This is the reason why the drum in the washing machine squeaks.
Depending on at what stage of washing the machine makes a grinding noise, you can judge the nature of the breakdown.
Laundry loading stage
Checking the drain filter
In popular brands of washing machines, such as LG or Ariston, this part is located in the lower right corner behind a small panel held in place by latches. You can remove it with your hands or help yourself with a screwdriver to press the latches. Now follow the instructions:
- Use a rag or low container to catch the water that comes out of the filter.
- Turn the filter cap counterclockwise.
- Take out the filter and inspect it.
- Remove visible blockages with your hands, then rinse the part under the tap.
- Place the element in place, screwing it tightly.
- Run a test wash and see if the hum and noise are gone.
Take note! If the filter cannot be unscrewed due to severe blockage, then the only way to get it out is from the inside, not the outside. In this case, the filter is taken out along with the pump.
If the filter is clean and no significant debris is found in it, then check the drain hose and pump further. Inspecting them inevitably requires disassembling the washing machine body. The pump is removed differently in different brands of cars.
- So, “Whirlpool”, “Samsung”, “Elgie”, “Ardo”, “Indesit” and “Ariston” do not have a bottom cover, so it is enough to put the SMA on its side to get to the pump.
- If you are the owner of a Bosch, Siemens or AEG machine, then you can only reach the pump from the front.
- In the Zanussi and Electrolux SMs, the pump is removed through the rear wall of the housing.
Manufacturers usually provide entire instructions in the user manual. But if the manual is lost without a trace, our photo instructions in the article “How to clean the pump in a washing machine” will come to your aid.
After you clean the pump, replace it or replace it with a new one if cleaning does not help. If the pump is still noisy after this, check other parts.
Checking the pipe and hose
If the filter and pump are in perfect order, and noise and hum still accompanies every wash, then the drain hose and pipe are likely to be clogged or broken. Having disassembled the SM body, you need to remove the clamp holding the pump and hose (disconnect the other end of the hose from the sewer).
Remove the hose from the washer and rinse under the tap using a cable with a brush at the end. After cleaning the hose, install it in place and check the operation of the machine.
If this does not help, carefully pull off the drain pipe - it may be clogged, which is where the noise comes from. Even though the rubber pipes are wide in diameter, debris can still accumulate in them, so pay attention to cleaning the pipe. At the same time, inspect it for damage and leaks so you can quickly replace the part.
If you have done everything we suggested and the car still makes noise, you should contact a specialist.
When the knocking is not associated with a breakdown
Sometimes the sound does not come from inside the washer. The cause of noise is in the environment or external elements of the SMA.
- The machine is close to furniture or a wall. According to the installation rules, there must be a gap between the case and adjacent objects if the equipment is not built-in. When everything is standing end to end, due to vibration, the SMA can knock on the surface nearby. Move the equipment aside or place a shock absorber between the body and the wall. For example, a rubber or foam seal with an adhesive backing.
- The washing machine hose is knocking . Another source of sound is the drain hose. If it is poorly secured and loose, it can knock on the body of the washer. Check the hose and secure it tightly to the body.
Sometimes it rattles inside the machine, but the reason is not in it, but in the laundry.
- Clothes fittings are knocking. There are metal or plastic parts on clothes: zippers, buttons, trim. Such items need to be turned inside out or placed in a washing bag in the machine so that the hard parts do not touch the drum and rattle. In addition to the fact that the fittings are noisy, they can damage the drum, the repair of which is expensive.
Have you checked how the machine is installed, secured the hose, did not wash items with hard fittings, but the knocking does not stop? This means it’s time to call a repairman; the cause of the suspicious sounds, unfortunately, is related to a breakdown.
Preventing blockages so that the pump does not make noise
To prevent unnecessary noise from occurring due to foreign objects, prevention is needed. You don’t have to do anything supernatural, just follow the basic rules for using the machine:
- soften water with special means;
- clean SMA parts from scale;
- Clean the filter after every 5th wash (or at least once a month);
- sort clothes, check pockets.
We hope you now know what to do to stop your washing machine from making noise anymore. If you still have questions, you will find comprehensive answers to them in the video:
How to avoid noise
To prevent extraneous noise and premature wear of the washing machine, you must follow these rules:
- take care of it regularly;
- soften water with certified products;
- descale;
- Clean the drain filter more often;
- check clothes before washing - small items can get into the filter or even into the pump.
So, you can figure out why the washing machine hums when draining water on your own. Some operations to replace or clean parts can be done quite successfully at home.
As soon as you hear extraneous sounds, stop the mechanism, determine the location and inspect it visually. Operating the machine without inspection can be fraught with serious breakdowns that threaten complete failure of the equipment. But I want the automatic machine to continue to serve. Follow the instructions for use, and the machine will delight you with trouble-free operation for a long time.
Is it worth undertaking expensive repairs?
Replacing bearings belongs to the highest category of complexity, because to perform this operation you have to almost completely disassemble the washing machine. A set of bearings and seals does not cost much, but the services of a professional will be expensive, and only an experienced mechanic can do the replacement yourself. The cost of repairing a tank costs half the price of a new washing machine, so sometimes even the service center employees themselves advise owners to sell the old equipment for spare parts and buy a new one.
Buying a new washing machine will cost more than repairing an old one in many cases. If the equipment has worked for more than half of its designed service life and has long been removed from warranty, one breakdown will be followed by another. In addition, the likelihood of finding original spare parts decreases every year - manufacturers may discontinue the model. If you use cheap analogues from unknown companies, the result is unpredictable. It makes sense to repair equipment in cases where the damage is minor and the washing machine is still completely new.
Wiring damage
Manufacturers of washing machines are quite economical in their use of components. This often leads to the following situations:
- The wires are stretched tight. Sometimes at an angle of 90°. The result is a break.
- The thickness is very small, and overloads or power surges cause damage.
- The weak point is the terminal chips.
These breakdowns lead to the fact that electricity is not supplied to the contacts, and therefore water does not flow into the drum.
Important! The MCA valves are in a permanently closed state.
Causes of noise when spinning a washing machine
If noise appears in the machine when the drum rotates, it is necessary to determine the cause of its occurrence. The machine is designed quite simply, but here are a number of reasons why noise occurs:
- Presence of small objects inside the machine.
- Bearing wear.
- Presence of unscrewed transport bolts. When moving and transporting a machine, many often forget to unscrew the bolts, thereby preventing the normal operation of the equipment.
- Breakage or loosening of the centrifuge rotation axis.
- Poorly secured counterweights.
- Drain pump failure.
- Incorrect installation of the machine. The washing machine is installed on an unsteady surface or is not level. These are some of the most common causes of noise.
Let's look at each of the reasons in more detail.
Incorrect installation of the washing machine
If during installation the machine was not placed level and it wobbles when pressed, you need to level it. At high speeds, the machine may begin to creak, and centrifugal force may create an imbalance; all this will sooner or later lead to breakdown of the washing machine. This may not be easy to do, but doing so will help avoid many problems in the future.
The problem is solved by installing the machine on a flat floor and leveling it exactly level. To do this, you will have to unscrew the legs of the machine so that it does not swing.
Breakage or loosening of the centrifuge rotation axis
The consequence of this malfunction may be clicking and vibration of the washing machine during spinning. This occurs due to the loosening of the pulley nut that secures it to the drum. When spinning, the pulley begins to dangle and hits the back wall of the machine, for this reason clicks may be heard.
To fix this problem, you need to tighten the pulley nut.
Transport bolts
If extraneous noise appears in the machine during the spin cycle, this may indicate that the transport bolts were not unscrewed when installing the washing machine. For the safe transportation of washing machines, manufacturers offer the use of special fasteners that secure the drum damping springs. If you do not unscrew them immediately, the machine may crack and rattle during the washing process.
To solve this problem, you need to remove the mounting bolts that are located on the back wall of the machine.
Foreign objects inside the machine
If the machine makes a loud noise during the spin cycle and begins to vibrate or a whistle is heard, it can be assumed that some small objects from clothing pockets have gotten into the drum. According to surveys of machine repair services, this reason is very common.
When putting things into the machine, you need to check the pockets every time, as there may be objects left there that can cause damage.
At low speeds, the washer creates virtually no vibration, so everything that gets into the drum settles at the bottom. But when the washing machine goes into spin mode, it begins to vibrate strongly and foreign objects begin to get stuck between the drum and the walls of the tank. A grinding noise appears, and machine parts can rattle and whistle, which ultimately leads to the washer breaking down.
To get out all the small things that are in the tank, you need to unscrew the heating element and, sticking your hand into the tank, pull out everything that is there.
Problems with counterweight
A knocking noise may be heard during the spin cycle. This indicates that the counterweights (usually a concrete block) are poorly attached. These parts are necessary to balance the tank and are bolted to its body. When the fastenings are loosened, the counterweights hit the tank. The machine hums loudly and sometimes jumps.
Such damage can be eliminated by tightening the counterweights. This is done by unscrewing the back wall or top cover of the machine and tightening the screws holding the balancers together. They must be tightened carefully. To access the screws, unscrew the cover of the machine. If the counterweight is cracked, it must be completely replaced.
Bearing wear
Bearings are one of the most important parts. After all, with their help the drum rotates. Noise when the drum rotates during washing and spinning indicates that it is in an unstable state.
When the wear of the bearings has just begun, the washing machine hums, rattles, and makes noise. Subsequently, the noise intensifies. If the bearings are not replaced, the device may break. The source of the problem can only be discovered when disassembling the machine.
You can diagnose the bearing yourself. To do this, open the door and press on the top edge of the drum. If you feel any movement up and down, you may suspect a malfunction. Then you need to spin the drum - extraneous sounds also indicate a malfunction.
The service life of the bearings is approximately 10 years. Their wear occurs either from corrosion or from wear of the oil seal. Also, the bearings wear out if an excessive amount of laundry is loaded into the machine.
The breakdown can be repaired in a workshop. Sometimes you can try to change the bearing yourself. Replacing a bearing is not as simple as it might seem. Sometimes you have to change the seal. In some cases, a plastic tank cannot be disassembled. If you do not have experience in replacing parts of an automatic machine yourself, it is best to take it to a service workshop.
Foreign objects and improper installation
If the washing machine starts knocking during washing for the first time, do not panic. You need to listen to the sound being made. The reasons for such “musical accompaniment” can be quite banal. Items of clothing that are currently being washed can knock and ring. You need to remember what things are in the washing machine:
- Large buttons or metal elements on clothing may knock on the hatch glass or drum;
- coins or keys spilled out of pockets that they forgot to take out before starting the wash.
To avoid this, you should always carefully check your pockets, and turn your clothes inside out or wash them in special bags.
Entry of foreign objects.
If during the first wash you hear an extraneous noise in the new washing machine, it is possible that the transport bolts have not been unscrewed. When purchasing, the seller always focuses on this, but when they get home, many completely forget about everything. If this is the cause of the grinding noise, then the sound can be quite loud, and the machine can even move due to strong vibration.
This problem can be easily fixed. To do this, you just need to unscrew the bolts and the machine will work as expected.
Another reason could be improper installation of the unit. In such cases, noise cannot be avoided.
If the washing machine is knocking and you cannot solve it yourself, it is better to call a specialist and not use it for now.
Small trash
Often, forgotten items fall out of clothing pockets, and small parts can fly off the surface of clothing, which through a hole in the rubber cuff can get into the space between the drum and the tank. When rotating, they begin to rub against the metal part of the drum and make a squeaking noise. You can remove small debris by disassembling the machine and removing the heating element. This sound may also appear if some hard objects are stuck in the fold of the cuff. Therefore, before completely disassembling the washing machine, check the rubber lining on the door for items forgotten in the pockets.
Sometimes the reason that the machine squeaks can be not only hard objects, but also an accumulation of fabric lint and wool stuck to the cuff. If it is pressed tightly against the drum, characteristic sounds will occur when it rotates. You can get rid of unnecessary deposits on the rubber part of the washing machine by thoroughly wiping it.
The seal does not fit the hatch size
Sometimes noise in a working washing machine appears when the filled drum rotates. Creaks and whistles, as well as the sound of rubber rubbing, appear immediately when you first start up new equipment. The breakdown is not a manufacturing defect and is not caused by the user. The rubber seal just doesn't fit the hatch door. It's worth changing. To save money, you can use sandpaper to sharpen the edges of the seal.
Important! A problem of this nature occurs only in budget models.
Damage to the cross shaft
The problems are characterized by play in the drum, which can be swayed by hand without tension. During the spin cycle, intense tapping is observed; water flows through the bearings and oil seal, which also flows from the tank to the bottom of the machine. The laundry shows oil stains, rust and chewing marks.
Probably, the bearings have not been changed for a long time (more than 7 years), so they are worn out. The lubricant is washed out, dry friction of the shaft occurs, impact on the bearings and oil seal. The bushing of the crosspiece has worn out, and the seating areas where the bearings are located are deformed.
Malfunction of bearings and seal
At first, a quiet extraneous sound will appear during washing, spinning, even when manually turning the drum. Over time, the sound will intensify, and a strong buzzing sound can be heard during the spin cycle. Rust streaks are visible under the CM on the tank. The laundry does not wring well, it is covered in stains from oil and rust.
Why is this happening? Over time, the seal becomes less airtight, water appears in the bearings, the lubricant is washed off and the balls in the bearings become rusty and destroyed. As the deformation progresses, the grinding noise of the rotating drum will intensify. Water will also start to drip through the bearings at the back of the drum. If water gets on a running motor, it will cause a short circuit and knock out the machine, causing the motor to smoke.
If you do not change the bearing and oil seal when these symptoms occur, the crosspiece, caliper and tank will become damaged over time and it will be much more expensive to repair the washing machine. In LG models with direct drive, drum play will damage the Hall sensor, so you need to urgently call a specialist.
Stages of the technician’s work when replacing a bearing:
- Unscrew and remove all bolts on the rear panel.
- Removing the dispenser.
- Removing the control unit.
- Removing blocking.
- Removing the remaining fixing parts, removing the front panel.
- Loosening the clamp.
- Dismantling the counterweight and tubular electric heater.
- Disconnecting all cables, pipes, and belts from the tank.
- Dismantling the motor, after which the tank and drum are removed.
- The cuff (rubber seal) is removed.
- The tank is installed so that the pulley is accessible, the bolts securing the pulley are unscrewed, which is also dismantled.
- The shaft is knocked out, after which the bolts connecting the two parts of the tank are unscrewed, which are also separated.
- Old grease and dirt adhering to the bearing are removed.
- The bearing is knocked out, the seals are removed.
- The space is wiped and lubricated with lubricant.
- New seals with bearings are installed.
When the work is completed, the specialist will assemble the structure in the reverse order. Carrying out this procedure on your own without special tools and proper skills is very problematic.
Prevention
In order for the machine to serve as long as possible, you should take small precautions:
- Items with small parts that can come off during washing are best washed in a special bag;
- Before placing things in the tank, you should check their pockets for debris, small items and other items that could damage the drum;
- do not exceed the load of the washing tank, observe the restrictions;
- add special substances that soften water - they will help preserve the heating element and remove scale;
- the machine must stand level and secure;
- It is advisable to ventilate the internal elements of the device, for which you need to open the hatch for loading laundry and the tray for detergents.
All these simple tips will help prolong the operation of your washing machine and protect you from contacting a technician or a repair and maintenance center, and, consequently, from unnecessary expenses.
How to avoid such problems?
Knowing what it can be, it is easier to take care of the machine in advance and prevent the occurrence of hum and vibration. You just need to remember a few simple rules for operating the machine. These are the simplest recommendations.
- Do not exceed the maximum permitted weight of laundry.
- Do not run the cycle several times in a row, giving the machine a break.
- Alternate cycles with high and low temperatures.
- Clean the machine in a timely manner, especially the garbage filter.
- Carefully check items loaded into the drum for items forgotten in pockets.
- Wash woolen clothes, as well as items with metal inserts and locks, in special protective bags.
- If very hard water flows in the water supply, then it must be softened with special means.
- At the end of the wash, run an “empty” cycle to wash the machine and remove soap deposits from the surfaces.
If your LG washing machine is making a loud noise, then this “symptom” cannot be ignored. It is necessary to urgently begin diagnostics, otherwise the problem will only worsen and lead to irreparable consequences.
Solutions to the problem
After identifying faults, some of them can be fixed with your own hands, but for more complex ones you will need to disassemble the machine. How to fix the most common breakdowns?
If foreign objects get inside the machine, you will most likely have to disassemble it. To do this, you need to open the lid, remove the electric heating element and remove these things from the tank. In the event that it is impossible to reach foreign objects, you will have to completely remove the tank.
Replacing bearings is an inexpensive but rather complex repair. If they are not replaced, they may break the spider. To replace the bearings, the machine is completely disassembled and the tank is removed. The bearings are removed from their mounting points and replaced with new ones.
When repairing, it would be correct to replace all elastic parts. Before starting repairs, do not forget to buy a repair kit.
The transportation bolts must be removed before installing the machine in place - this will eliminate one of the causes of noise during operation.
Shock absorbers are not repaired, but replaced. To replace the dampers, you need to remove the rear cover of the car, unscrew the fasteners located below the shock absorber tank, remove them and install new ones. Then carry out all the steps in reverse order.
If the balance of the axle is disturbed, then it is necessary to tighten the nut on the pulley. In case of problems with the counterweight, it is necessary to remove the back or front panel (depending on the design of the device) and tighten all loose fasteners. If one of the weights breaks, and such cases are very rare, you need to replace it with a new one.
Leveling the machine is very easy. To do this, it must be installed on a flat floor, and by rotating the legs with a special key, we make sure that it does not swing.
Before you begin repairs, check whether you have the necessary set of tools, repair kits and spare parts. And do not forget to disconnect the repair facility from the power grid and water communications.
DIY machine repair
To repair a machine yourself, you need to know its structure and operating principle. As a rule, repairs involve replacing old parts with new ones. When troubleshooting, you must first disconnect the machine from the power supply.
To replace parts yourself, you need to have a standard set of tools, and to repair the control board or electronics, you may also need a soldering iron.
Cleaning the drain filter
The first thing a washing machine owner can do is clean the filter. It often happens that small items of clothing or threads get there, which subsequently prevent the water from draining from the washing machine. To do this, you need to open the small cover located at the bottom of the machine and unscrew the small plastic plug using pliers.
After this, you need to clean the filter and rinse it under running water.
Cleaning the fill filter
This filter is located in the water intake hole. It can become clogged with small particles of dust or sand. To do this, you need to unscrew the inlet hose and use pliers to pull out the filter - a small plastic mesh that needs to be rinsed under water.
Replacing the heating element
If the repair involves replacing the heating element, you must first remove the back cover of the machine. Then disconnect the terminals and use a multimeter to check the element for functionality. The faulty heating element must be unscrewed using a wrench. After the old heating element is removed, you need to replace it with a new one. Be sure to install all parts in the correct order.
These are the most common types of repairs that you can easily carry out yourself. For more serious damage, it is better to contact a specialist.
Tips for avoiding malfunctions
- Observe the permissible load during washing - leave the drum one third empty.
- Perform preventative cleaning between work cycles.
- Try to use programs with high water heating as little as possible.
- Open the door after each wash to allow the machine to dry.
- If you wash several times a day, take breaks of 30 minutes.
- Leaving the washing machine idle for a long time causes the lubricant to evaporate and dry out.
- For budget models, components quickly wear out or wear out.
- Follow the rules for transportation, installation and connection to communications.
Why does the washing machine spark?
The source of this could be the following details:
- Commutator brushes;
- The heating element, which is responsible for heating the water in the washing machine;
- Electronic module.
Most often, these three sources are the main culprits of possible sparking. If you are not confident in your knowledge, then it is better to call a specialist to your home who can carry out quick and high-quality repairs.
Let's figure out why you hear a squeaking sound in the washing machine during the spin cycle:
- This can happen when random objects hit and rub against the tank and other parts. For example, a coin or sock can get through the hatch cuff. This item will not only prevent the tank from rotating freely, but will also jam it during further use.
- Creaking in the drum, especially often in Indesit or Candy brand washing machines, is due to its imbalance. This happens after prolonged use, when the fasteners wear out, the shaft touches any part of the machine, and this creates a creaking sound. This problem can be solved by replacing the drum shaft mounts.
- It happens that during the spin cycle, loose parts of the washing machine body creak. A specialist will check and tighten all housing fasteners.
- Often a narrow machine makes a creaking noise when the drum rotates due to the close proximity of the main parts and loose tank fasteners. The solution to this problem is also diagnostics and adjustment of fasteners.
If a metallic sound occurs along with the squeaking noise, you will most likely have to replace all the shaft bearings.
If your washing machine makes any extraneous squeaking noises during the spin cycle, during washing, or when the drum rotates, contact a specialist by phone on the website as soon as possible, or leave a request to the technician, he will call you back!
Call the master
A technician will come out for diagnostics and repairs upon prior request. You can make a call by phone or through the feedback form on the website. Provide the service manager with the following information:
- Make and model of the washing machine (see the instructions on the body).
- What happened, when, after what, the main symptoms of the breakdown (needed to select tools and components before leaving).
- Optimal time for repairs.
- Contact details.
The technician will tell you why the malfunction occurred and what to do only after visiting and inspecting the washing machine. Most breakdowns are fixed within 1-2 hours; removal of equipment to our service is not required. Immediately after the repair is completed, the washing machine will be ready for use. In rare cases, repairs may require more time and a return visit from the technician. We are ready to order any components and perform complex software repairs, but this often increases the work time.
How to check and replace the pump?
In order to check the serviceability of the drain pump, we will remove the filter, as you have already done this before. After that, set the program to spin. And highlight the filter hole. The easiest way to do this is to use a regular pocket flashlight. If the pump impeller does not move, then the pump (drain pump) is broken. After all, we have already checked it for the presence of foreign objects. And this is the only explanation for the fact that the impeller does not rotate. And once we have identified the fault, we move on to the next stage - replacing the broken part.
But before that, we need to purchase this very detail. Most washing machines use standard parts to assemble them. Therefore, we will be able to select the new pump we need without any problems. If you don’t know where you can buy it, the easiest way is to use the Internet to find a seller. Namely, search engines Yandex, Google, Mail.ru or others. Type into the search bar: “buy a pump for a washing machine in Moscow”, “in Moscow” you need to change it to your city if you are not a Muscovite. Then find sellers in the search results, call them and buy a new pump.
And so, we have already bought a pump. Now let's remove the broken one and replace it with a working one. To do this, we need to remove the drain assembly of the washing machine. And detach the drain pump from this unit. Then he carefully removes the wires from it. Then we take out the working drain pump and install it in place of the old one. We attach wires and stuff to it. And we put the machine back to its original condition.
To make the whole process easier, we have compiled a video that shows the entire process of removing and replacing the drain pump. See: