Winter, cold wind, as a result, drafts and blows from the window, neither the owners of new plastic nor the owners of old wooden windows are immune from this. Insulation of windows in an apartment or private house should extend to the spaces above and below the window sill, because there may be cracks into which it will blow.
What to do if it's blowing from under the windowsill? How to identify the cause and eliminate the gap?
If the window was recently installed, you should contact the company that performed the installation. If the warranty period has expired or you did the installation yourself, you need to consider ways to solve the problem yourself.
Blowing from under the window sill is possible if it is installed incorrectly, or if the mounting foam that foams the space between the window sill and the wall sag.
Methods for insulating a window sill depend on which unit is the source of the blowing.
How to seal the gap between the window sill and a plastic window
When the causes of blowing are clarified, they are eliminated depending on the nature of the defect. If a technician is called, then while waiting you can temporarily block the flow of cold air by placing any barrier (book, blanket, piece of furniture).
If you decide to seal the gap between the window sill and the plastic structure yourself, then ways to solve the problem:
- Closing with profile.
- Using sealant.
- Reinstallation, insulation of window sill.
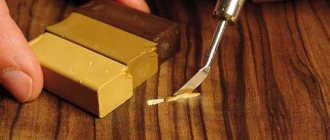
Silicone sealant
It blows between the window and the frame, a gap appears with a cold bridge penetrating into the room through it due to the destruction of the mounting seam and poor sealing of the joints. Frost-resistant silicone sealant, which should be used to go through the cracks, will help solve the problem. To work you will need:
- construction knife;
- masking tape;
- gun for applying sealant;
- the profile section is 2 cm longer than the window frame.
Stages:
- Clean the joint between the frame and the window sill from dirt, dust, and old foam. It is advisable to first remove the low tide from the street side.
- Slightly widen the gap with a construction knife.
- Cut off the perforated part of the corner. Use a knife to sharpen the cut area.
- Make small holes in the slopes where the profiles will be mounted.
- Apply tape to the frame to save silicone.
- Apply an even layer of sealant from a gun along the entire length of the joint. Fill the inside of the gap to the maximum. Also process the pointed wedge of the profile.
- Insert a corner into the hole in the slope and tuck it into the gap. Press down to help the sealant set faster.
- Remove the tape. Remove any remaining silicone from the window frame with a cloth soaked in alcohol in case of accidental contact.
Plastic profile insert
Labor-intensive but reliable method. To install a profile yourself:
- Mark the length of the window sill. Take a profile that is 2 cm longer.
- Using a sharp knife, remove the perforated part, leaving 1 cm to the corner and a 2 mm bend.
- Sharpen the edge of the profile so that it fits tightly and easily into the gap between the wall and the window sill.
- Make holes in the corners of the walls (width - 1.5 cm). Clean, degrease and dry them.
- Fill with a thick layer of sealant. Apply the same glue to the profile.
- Insert one end into the hole in the wall. The other sharpened edge is in the gap.
- Align the profile along the entire length of the structure. Fix, press with your hands for a few minutes for better fixation of the glue.
- Remove any remaining sealant before it dries.
Replacing the seal
The elastic band located on all sides of the glass unit stretches and dries out over time. To prevent it from blowing, you simply need to replace it with a new seal. Then treat with silicone.
Reinstalling the window sill
A last resort when there is really a lot of blowing out the window. Dismantling on your own is carried out carefully so as not to disrupt the integrity of the structure as a whole:
Cut off the old polyurethane foam on the slopes without touching the plastic. Remove the window sill. Walk over the work surface with a wet cloth or vacuum cleaner. Identify defective areas. Fill with foam or sealant. Apply a layer of sealant to the rib part of the structure. Fix, press to the previous place. Wait for the foam to dry completely
Attention! To strengthen the window sill in the correct position, you can place a heavy object. This way the structure will not warp over time. Plaster the slopes.
The cracks are sealed with transparent sealant with a special nozzle quickly and easily. Although, the method is only suitable when the joints diverge a short distance. In order for the putty to last more than 2 years, you need to pour the maximum amount of it into the gaps. Then it is advisable to go along the seam with the edge of a large coin (10 rubles). This way the sealant will become smooth and beautiful.
Causes of drafts
You won’t have to figure out why it’s blowing if the warranty period has not yet expired after installing the double-glazed window. You just need to contact a company whose specialists will fix everything for free.
If the warranty has expired, you will have to solve the problem yourself. It is possible to follow the path of least resistance: block the flow of cold air with some kind of barrier (blanket, books).
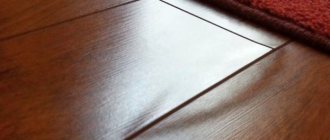
Even a small gap can be the cause of blowing
However, this is a temporary measure. It is not the consequences that need to be eliminated, but the causes. They are different:
- Defect due to violation of plastic window production technology.
- Low-quality materials, as well as materials that do not suit our climate. Thus, the profile loses its strength under the influence of low temperatures. In this case, even a small crack leads to blowing.
- Seal wear.
- Incorrect installation of the window structure.
- Subsidence of the polyurethane foam or the use of low-quality adhesive-sealant.
- Warping of the glass unit due to shrinkage of the house.
Having discovered one or more causes of blowing, you need to begin to act depending on the nature of the defect. You can eliminate it in several ways:
- Remove the gap using sealant;
- Close the cracks with a profile;
- Insulate the window sill.
What to put
If it blows between the window and the windowsill, you can cover this area with a blanket. This is a temporary measure, it will only slightly reduce the flow of cold air. This method cannot be called a complete solution to the problem.
A reliable way is to install a plastic profile with your own hands. How to proceed:
- Prepare a plastic profile in the internal corner configuration, glue-sealant, scissors and a stationery knife, as well as a measuring tape.
- Find out the length of the window sill.
- Measure the profile and trim it with a margin of a couple of centimeters.
- The perforated part must be removed so that 1 cm remains to the corner. The bending height is 2 mm.
- Using a sharp knife, the edge of the profile should be sharpened so that it easily fits into the gap between the window sill and the wall.
- Now - work with the window. On the walls in the corners you need to make holes about 1-1.5 cm wide.
- Before inserting the profile, it is necessary to clean the window from dust, degrease and dry the surface.
- First you need to apply a small layer of sealant into the gap and holes on the wall.
- Next, apply glue to the profile.
- Insert one end into the hole in the wall, and place the sharpened edge into the slot.
- Align the profile along the entire length of the window sill.
- You need to hold the structure for a few minutes so that it is better fixed.
Miss Clean magazine recommends removing any remaining sealant immediately after installation before it dries.
Let's start with insulation
Insulating the window sill of plastic windows will provide additional thermal insulation and eliminate blowing. The materials used are polyurethane foam and acrylic sealant . If you find a gap between the window sill and the wall, you cannot do without dismantling it.
Dismantling
Arm yourself with a hammer, hammer drill, chisel, hacksaw, knife. Dismantling can be done in two ways.
(function(w, d, n, s, t) { w[n] = w[n] || []; w[n].push(function() { Ya.Context.AdvManager.render({ blockId: "RA-510923-1", renderTo: "yandex_rtb_R-A-510923-1", async: true }); }); t = d.getElementsByTagName("script")[0]; s = d.createElement(" script"); s.type = "text/javascript"; s.src = "//an.yandex.ru/system/context.js"; s.async = true; t.parentNode.insertBefore(s, t) ; })(this, this.document, "yandexContextAsyncCallbacks");
Method No. 1
First of all, remove the wallpaper. Then, using a chisel and hammer, beat off the plaster under the window and in places where there is a junction between the side parts of the window sill and the slopes.
Cut off the mounting foam and carefully pull the canvas towards you, tilting it down a little.
To insulate the window sill you will need to dismantle it
Method No. 2
Using this method, you will not need to beat off the plaster. Run a long-bladed knife under the window sill and cut away the foam and sealant near the slopes. The blade should not come into contact with the plastic. After getting rid of the fastening elements, pull out the canvas.
After dismantling, clean the work surface of debris with a broom or vacuum cleaner. This will allow you to see all the cracks through which cold air entered.
Polyurethane foam is used to fill cracks
Fill all cracks with foam. And if there are significant deformations, use silicone sealant.
Installation
After completing all the necessary procedures, you can install the window sill. To do this, apply polyurethane foam along the perimeter of the front side, as well as along the diagonals of the product. Lay the canvas on the work surface.
To ensure that the canvas adheres to the base, lightly press it and hold for a few minutes. Use a spirit level to make sure everything is level.
The correct installation of the window sill is checked using a level
For better fixation, place something heavy (for example, books) on the windowsill, as it may warp as a result of foam expansion.
More reliable insulation is achieved through the use of sealant. It is applied to each area where there is a joint .
The final stage in the installation is plastering the slopes. It is made from both cement mortar and ordinary dry mixture.
By insulating a plastic window in this way, you will forever forget about the cold window sill and drafts in the house.
The adjustment didn't help. How to seal it so it doesn't blow
If none of the adjustment methods turned out to be effective, you can try using additional insulation materials. Good fit:
- Styrofoam;
- mineral wool;
- fiberglass;
- expanded polystyrene.
Gluing is carried out with a special adhesive composition. In this case, the material is selected depending on the size of the cracks in the house. After installation, it is necessary to putty and paint to mask the panel.
Problems with plastic double-glazed windows occur quite rarely. However, even a reliable and modern type of window includes a number of parts that can lead to wind and dust. This is especially true for the upper floors. Fixing the problem for PVC windows can be complicated by many factors. The cold can be drawn from the middle, from the handle, from above and below where the sash joins. And it is not always possible to fix the problem. In this case, the structure may need to be replaced.
Voted over 386 times, average rating 4.6
Polyurethane foam protection
To hide the mounting foam, any of the existing types of putty is convenient. However, the preparation process and the proportions of dilution of the mixture depend on the choice of manufacturer and specific model.
Puttying foam
After mixing is completed, the mixture has acquired a thick, uniform consistency; it is applied to the polyurethane foam.
They make a small, protruding excess, which is then eliminated with a spatula, but you should not go too deep, otherwise you will get a notch, a depression, which will have to be eliminated again.
The excess, when it dries, is simply wiped off using sandpaper or a special construction mesh, which is used for finishing work with plaster.
Blowing from the handle of a plastic window
A cold breath from under the handle of a plastic window indicates that it has ceased to fully perform its functions.
That is, the window sash is not completely pressed against the base, resulting in a small gap through which cool air passes.
Solution: it needs to be tightened, tightly clamping all fasteners, or replaced. For this:
- The decorative strip covering the place where the handle is attached to the window block is removed. To do this, simply turn it in any direction 90 degrees, after which the fixing screws located under it are unscrewed.
- Having removed the old handle, install a new one in its place and fasten it with the same screws. Cover the fasteners again with a decorative plate.
After this, you need to check how tightly the new handle presses the sash. If necessary, the lock of the plastic window is additionally adjusted.
Adjusting winter and summer modes
The main task of adjusting plastic windows for the winter is to increase the service life of the sealing gum and regulate the microclimate in the house. Changing the degree of fit of the sash to the frames allows you to compensate for seasonal changes in the size of the seal.
Thus, thanks to the adjustment of plastic windows for the winter, when the material contracts, complete tightness and minimal heat loss are ensured. In summer, the seal expands, and it is recommended to loosen the clamp. Seasonal operating mode settings should be made in the following cases: • the plastic window does not close tightly, ineffectively protecting the premises from cold in winter and from dust in summer; • a plastic window does not close well, jammed during ventilation - the solution to the problem can be found by knowing how to adjust the sashes for winter or summer; • the handle of the plastic window does not close completely because the clamp is incorrectly adjusted; • worn hinges have led to sagging of the sashes - the problem can be solved by knowing how to adjust plastic windows for the winter, but sometimes you have to replace worn parts. Adjustment work begins with a search for all trunnions (eccentrics) on the sashes, the number of which depends on the size of the window.
The larger the double-glazed window, the more difficult it will be to set up the mode. Trunnions can be located on the doors at the top or bottom. If you have a wide window sill, it may be difficult to access the lower eccentrics.
On the left, the trunnions are adjusted using a hex key. On the right they rotate with pliers. 1. Summer mode 2. Middle position 3. Winter mode
In the next step, before adjusting the plastic window so that it closes tightly, use pliers (for old windows) or a hex wrench. Each trunnion rotates to adjust the level of pressure.
Sometimes you can adjust the pressure eccentric (trunnion) only by pulling it towards you. When rotating, focus on the trunnion marks or the position of the eccentric.
The last stage is checking the correct adjustment of the pressure of plastic windows and other settings
To do this, close the window sash, paying attention to how tightly the handle turns. For winter mode, the level of pressure on the sash is stronger, and it is more difficult to turn the handle
Another way to check the adjustment of plastic windows yourself for winter or summer requires the use of a paper sheet. They press the paper with the flap and try to pull it back out. In winter mode, the sheet should come out more difficult, when setting the summer settings it should be easier.
Pressing eccentrics are available not only on the handle side, but also on the hinge side. Accordingly, all trunnions located on the sash must be in the same position.
When is a simple repair not enough?
In some situations, simply repairing the window sill board and sealing the seam may not help , since more serious intervention in the building structures is required:
- If there is insufficient insulation in the outer wall, it is necessary to install additional insulating material on the facade of the building. In old apartment buildings, such work is carried out as part of a major overhaul by local authorities.
- In case of insufficient power of heating devices, they must be replaced, since the heat input must ensure heating of the entire volume of the room.
- If there are cold bridges or cracks in the wall structure, it is necessary to carry out finishing or restoration work after a detailed examination of the structure.
Note! If the owner of a residential or public premises decides to carry out a complete renovation of his property, experts advise using all of the listed methods simultaneously.
With a combined approach, maximum energy efficiency of the space being used is achieved, and external structures almost completely eliminate heat loss.
Diagnostic methods
To establish the exact location of the penetration of cold air, it is necessary to carry out diagnostics. The method is very simple: take an ordinary candle, light it and carry it around the frame, at the joints with the slopes and the window sill.
Fluctuation of the flame may be due to trembling of the owner’s hands, so you need to hold the candle carefully and move it slowly. If the flame deviates strongly from the vertical position, the blowing point will be established. If it burns almost evenly, then the reason for the penetration of cold air should not be sought in the windows. You can use a lighter instead of a candle.
There are other diagnostic methods:
- When blowing near the cracks, dirt will certainly settle. You need to open the sash and inspect the frame. Where the layer of dirt is larger is where air passes through.
- You can check the tightness of the connection of the sash using a sheet of paper. It needs to be closed along with the window. If the paper can be easily removed, the fit is loose. The cold from the street will pass through this gap.
Combining these diagnostic methods will make it possible to identify all the real places where cold frosty flows appear.
Dismantling
If there is a strong blow in the window, it is better to immediately begin global measures, namely, reinstalling the window sill.
How to do it right:
- First you need to dismantle the canvas: carefully run a sharp knife under the window sill, cutting off the mounting foam, and cut off the sealant on the slopes. Do not touch the plastic.
- Carefully pull out the window sill.
- Use a vacuum cleaner to clean the entire work surface. This will reveal all the cracks.
- Fill the cracks with sealant or foam. The method with sealant is more reliable, the substance fills defects better.
- Apply polyurethane foam to the canvas. Return it to its place and press down for better fixation. It is most convenient to control an even angle using a mounting level.
- While the foam dries, it is recommended to strengthen the position of the window sill with heavy objects so that it does not warp.
All that remains is to plaster the slopes. If everything is done correctly, improvements will be noticeable immediately.
The windows are sweating, what should I do?
Unlike drafts, the accumulation of condensation on windows is not at all evidence of errors in their installation. Moreover, windows with good sealing often sweat more than ventilated ones. The reasons are mostly natural:
Practice shows that when the outside temperature drops, windows sweat more often; in particularly difficult cases, they become covered with ice, which is unacceptable for obvious reasons. It is impossible to leave the situation “as is”; if there is frequent condensation on the windows, you need to look for and eliminate the reason for the decrease in the temperature of the inner surface of the window to the dew point and take measures to normalize the level of constant humidity.
First, it’s worth remembering what not to do. To solve ventilation problems, it is strictly not recommended to switch windows to micro-ventilation mode in winter. Condensate accumulates in such cracks and freezes first.
Safer and more effective ways to protect windows from condensation include:
Why does water accumulate on the windowsill of plastic windows?
Often, after the blowing has been eliminated, users are faced with the fact that complete tightness leads to water accumulating on the windows and sills of plastic windows. This is condensation that forms for various reasons, in particular:
due to lack of ventilation,
due to the significant width of the window sill. It protrudes beyond the heating radiator and the warm air does not have time to warm up the glass and prevent the appearance of moisture;
high indoor humidity. The appearance of condensation is typical for the kitchen or for rooms in which renovation work is being carried out;
low temperature in the rooms;
defects in window installation and slope insulation.
How to get rid of condensation on a windowsill:
install a convection valve;
remove all unnecessary things from the windowsill, in particular potted indoor plants;
replace the heating radiator or replace the window sill with a narrower one;
Ventilate the room periodically.
How to eliminate condensation on PVC windows is shown in the video
Why windows can let cold in
There are several factors that can lead to the appearance of blowouts. These include:
- Defect in the manufacturing process. Most often this is typical for budget windows. The use of low-quality raw materials for production, which significantly decreases in characteristics with a sharp decrease in temperature and can crack or change shape. Also, the reason may be incorrect storage of window structures. If parts of metal or plastic profiles were stored outdoors, or in rooms with low temperature and humidity, the shape also changes. This leads to problems during the installation process and accelerates the appearance of drafts.
- The material or fittings are of insufficient quality. Problems especially often arise with fittings. For this reason, it is not advisable to purchase windows from little-known manufacturers. Also, the cause of a draft may be an incorrect adjustment, which causes defects in contact with the surface.
- The main reasons include problems with seals. If they are made of rubber with a large number of impurities, or are clogged with dirt, then cracking of the gaskets is observed, and as a result, the tightness of the structure is significantly reduced. To get rid of drafts, you will have to replace the seal yourself or with the help of specialists. The cause of problems with the seal may be its obsolescence, manufacturing defects or improper installation.
- The installation was performed incorrectly or with a number of errors. During the installation process, even minor deviations from the norm, which are extremely difficult to notice, can subsequently become a factor leading to the appearance of a draft. Therefore, it is necessary to attract professionals who would check the work at every step.
- A draft from windows can appear due to poor-quality installation of interior finishing, insulation of slopes and other cladding work, as a result of which a misalignment occurs between the sash and the frame, then a gap appears, and cold atmospheric air penetrates through it.
- Incorrect adjustments or adjustments made at the wrong time can also cause problems. This occurs due to the loss of quality of the fittings during operation. The mechanisms begin to sour or rust, which leads to a change in plane. As a result, the room becomes cold. To prevent this, you need to correctly switch the shutters to the appropriate mode.
- Depressurization. The problem arises due to the obsolescence of the double-glazed window. All window components lose their properties over time. Therefore, the tightness of the structure is broken and, as a result, cold air, dust, and other particles penetrate into the room.
Possible reason
How to identify the problem?
To identify where it is blowing, it is enough to use simple techniques or available means:
- Inspect the joints with the wall and PVC profile with the palms of your hands. If the outside air temperature differs significantly from the indoor microclimate, the skin will feel cold or draft.
- You can also determine the blowing using a sheet of thin paper. As the material approaches the gap or joint, the paper will begin to sway due to the draft.
- The most reliable household way to detect a draft from a windowsill is to use a candle flame or lighter. In a calm position, the fire burns evenly, without hesitation, but at the slightest movement of air masses, the flame begins to deviate.
Why do plastic windows make noise: it blows between the frame and the window sill
In fact, if a suitable design is chosen, just right for the climate, then it should be extremely reliable. That is, there should not be any drafts, and in general there should not even be a breath of cold from the system, even ideally. In fact, there may be only a few rather banal reasons why there is blowing between the window sill and the plastic window; only having dealt with them can we move on to the question of how to fix the problem.
The most common problem for small companies and firms producing new-style window structures is the use of materials that are completely unsuitable for our climatic conditions, that is, a profile that, when frozen, becomes brittle, deforms and even simply bursts in the most unexpected places. It is clear that this leads to complete depressurization of the entire unit, and as a result, to drafts and blowing. In addition, the profile, for example, long before the start of window production, needs to be provided with appropriate storage conditions, otherwise it may simply become unusable, and then these same “sides” will come out during operation of the finished window. The cause of the breakdown can also be a manufacturing defect. That is, both in the production of double-glazed windows and profiles, and during its manufacture, a defect may simply arise that was not noticed in time, which will then be reflected in the quality of the entire structure. The quality of materials plays a huge role in the performance of windows. That is, when choosing profiles, double-glazed windows, seals, it is better not to save much, since the price determines the quality, no matter what anyone says
Particular attention should be paid to these rubber bands. There is already an article on our website on how to replace the seals yourself; anyone can read it.
But that’s not all, since the human factor has always been and remains the main cause of equipment breakdowns. If it is blowing from a plastic window from below, then it also makes sense to think that gross errors were made during installation and installation, because they too can cause such misfortunes. Even the most minimal deviations in the vertical or horizontal plane can become fatal, and therefore it is better to entrust such a responsible task to real professionals from a company proven over the years, with a high reputation and many positive reviews.
How to insulate plastic windows at home?
If you have tried all the suggested options to eliminate the blowing, but the cold still penetrates into the room, it may be due to a cheap profile. It is not always possible to install more expensive models, but everyone wants warmth and comfort on winter evenings. In such a situation, you can do the insulation yourself.
- First of all, wash the glass. Dusty glass does not transmit enough heat rays, and dust and dirt trapped under the seal lead to a violation of the seal.
- Use transparent silicone sealant around the entire perimeter in places where a draft may form;
- Seal the cracks with a special sealing cord;
- Glass can be sealed with insulating film. Manufactured using a special technology, such a film is practically invisible, easy to install and performs the function of “additional glass”.
How to determine?
The problem of blowing through the slopes at the junction of the frame and the wall is identified using simple techniques and available means:
- Visual inspection of the structure at the junction of the slopes with the wall and window, identification of places where the palm can be blown, in those places where the skin feels cool or the movement of air masses. This method is most effective in the winter, when the temperature difference between the indoor and outdoor spaces exceeds 20C or more.
- Using a lit paraffin candle, the flame of which, in a calm state, is always directed upward, and, subject to blowing, deviates in the direction of the movement of air masses.
To more accurately identify the place of blowing, when a ready-made plastic, wooden or metal patch is installed, it is better to dismantle the element. In such cases, the owner of the premises or the master can determine where exactly the cold bridge occurs.
It's blowing from under the windowsill - what to do?
This section contains articles that will help you cope with minor household problems related to the repair of windows and glass. We hope this material will help you deal with minor problems without resorting to the services of specialists.
In order to get rid of the wind from under the windowsill, you first need to establish the causes of this phenomenon. Most often this is due to the fact that the installation of the window frame is not airtight. For example, if you lightly press on the window sill (the part located near the frame) and it is noticeable that it moves slightly at the joints, then minor repairs will be required, which can easily be done on your own. If the window sill is installed normally, then the reason for the draft from under it lies somewhere else, and then without the involvement of experienced craftsmen there will be no problem.
What can you do if there is a draft coming from under the windowsill?
If the glass unit is still under warranty, you must immediately call the technicians who installed it. If the warranty card is no longer valid or the installation company has disappeared somewhere, you can contact the service department or try to do the repair yourself. But in order to do this quickly and efficiently, you need to acquire tools and acquire basic work skills.
Eliminating blowing - stages of do-it-yourself window sill repair
- First you need to open the window and unscrew the external drain. Sometimes it may be necessary to remove the glass unit located on the blind part. Then you need to carefully inspect the installation seam located on the outside, which should be perfectly smooth and without any breaks. If you notice defects in the seam, then air can penetrate into the room through them.
- Then you should press firmly on the window sill and insert any small object into the gap that will serve as a retainer. The joint is thoroughly cleaned of dust and construction debris, and then wiped dry and filled with sealant. Then you can pull out the lining and remove excess product with any convenient tool or rag.
- If there is a small distance between the stand profile and the wall base, you can independently remove the layer of polyurethane foam using any sharp object, such as a screwdriver or knife. In addition, thanks to this you can check if there is a void there.
- If the window profile is located closely, then using a drill, carefully drill small holes, the diameter of which should be no more than 8 mm.
- The joint (window frame and profile) should be thoroughly cleaned and then wiped. After this, it must be lubricated with a small amount of sealant, and then the excess product must be removed with a knife. The holes made, as well as the void under the window sill, should be filled with polyurethane foam (this can be done through small cavities located under the profile).
- The place outside the room where the drainage system will be fixed must also be treated with polyurethane foam, which is needed for high-quality sound and heat insulation.
- Before installing the drainage system, it must be cleaned.
Once the seams are thoroughly sealed and the gap is completely filled with construction foam, air will no longer penetrate through the joint.
In case of a more serious problem, you will first need to remove the window sill, as well as the side slopes. Then it will be necessary to fill the seam with foam, after which the components of the window are installed back. It is worth knowing that to fill the voids under the window sill and in the slopes you need to use only high-quality construction foam from well-known manufacturers - the fact is that household foam is not suitable for these purposes.
What tools and materials will be needed?
When performing repair work and sealing the interface between the window sill and the window structure, the technician will need the following set of tools, as well as consumables:
Polyurethane foam for filling the joint between the window and the opening after dismantling the window sill.- Silicone, acrylic or rubber sealant for additional protection of the joint.
- “Liquid plastic” glue, if necessary, to seal the junction line of the window sill and PVC frame.
- Sealing tape with foil coating, preventing the penetration of moisture and vapors into the installation gap.
- Scissors for cutting tape.
- Tape measure, if necessary, to measure the lengths of joints.
- A mounting gun that is convenient for applying sealant.
- Construction knife for removing old sealing materials and foam.
- Bubble level, which is used to position the horizontal window sill board after re-installation.
- Chisel and abrasive materials for grinding, removing dust and cleaning the surface after dismantling.
- Fixing elements - a heavy clamp or masking tape, necessary to ensure the constant position of the window sill after it is installed on the foam.
- In case of fastening the window sill after dismantling with mechanical anchors or self-tapping screws, the craftsman will need a set of hardware, a screwdriver or screwdriver, as well as auxiliary materials for installation using this technology.
Advice. To achieve the best result, it is recommended to purchase all high-quality consumables from well-known manufacturers, whose products have many positive reviews on online forums from satisfied consumers.
Cover with sealant
This method is suitable if the gap between the window sill and the window frame is not very large. In addition, compared to other methods of combating drafts, this is the cheapest.
Defects are eliminated using a transparent sealant. Before using it, the gap should be cleaned of dust and dirt, degreased, and dried.
The gap between the frame and the window sill must be cleaned of dirt
Then, using the tube nozzle, apply the maximum possible amount of the substance until it is completely filled.
For the easiest way to eliminate a defect, use a sealant
To get a beautiful seam, run the edge of a 10-ruble coin along it. Do this in a continuous motion to avoid crooked seams.
The advantage of this method is that all the work takes a matter of minutes. Disadvantage: fragility. After two years, the sealant begins to peel off and darken.
How to cover it up
The fastest way is to seal the gap with sealant. It only works if the joint is separated by a small distance.
- Wash the window from dust and dirt, degrease and dry.
- Take a transparent composition with a special nozzle and place it exactly at the junction of the frame and the window sill.
- Pour in as much sealant as possible.
This putty will last for 1-2 years. It's not much, but the method is cheap and fast.
Advice! To make the sealant seam look beautiful, immediately after pouring, go over it with the edge of a large coin, for example 10 rubles.
What to do if a defect is discovered is up to you. If you are not satisfied with the short-term result, arm yourself with knowledge and begin dismantling. If in doubt, this process should be entrusted to specialists.
Installation of a plastic window sill
When the surface of the window frame is prepared, you can install a PVC window sill. You need to place the object at the bottom of the window on wooden supports. The thickness of the wood should correspond to the distance from the double-glazed window to the very bottom of the window sill. Proportions can be easily measured with a standard tape measure. Wooden supports will create the required design rigidity. It will maintain the strength of the system during its operation.
After attaching the object to the base, the cavity below is filled with insulation (foam or acrylic sealant). To avoid leaving voids and small cracks (places for cold air to pass through), you need to seal the joint between the inside of the plastic window sill and the mounting profile. Next, to securely fasten the wooden supports, foam is applied again. It foams the embedded plastic object and the wall joint from the outside.