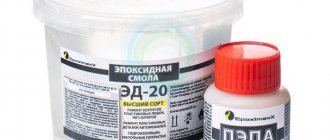
Two-component epoxy resin for gluing materials or epoxy two-component adhesive has long and firmly conquered the market. So in the home toolbox or cabinet of any handy owner, and housewife, let’s pay tribute to our women, there will always be these two different-colored and different-sized bubbles. In one of them, the base composition, thick as honey, will lazily flow when tilted from wall to wall, and in the other, smaller, the tea-colored hardener splashes more freely. After all, this is how you can get epoxy resin for filling or epoxy glue for gluing by mixing two components.
You can read about the main principles of diluting glue for household needs, the conditions necessary for this, devices and components in our material. After studying it, you will learn how to dilute epoxy glue in order to perform high-quality work, in what proportions you should mix components A and B, and what you should be wary of when working with similar adhesive compositions.
Features of diluting epoxy resin
Epoxy resin, being an integral part of epoxy glue, has a viscous consistency; this characteristic sometimes interferes with its comfortable use. You can dilute the epoxy by heating it or adding a solvent to it.
Adding solvent is an easy and quick method to reduce the viscosity of the resin, but at the same time the strength and water resistance are reduced. Almost all solvents are used to dilute this material, but preference is given to volatile ones, since they quickly turn into a gaseous state without remaining in the mass.
When diluting the composition, it is important to consider the following features:
- Even a small volume of solvent helps to significantly reduce the viscosity of the resin;
- The addition of a solvent helps to reduce the hardness of the resulting polymer, which prevents its use for the manufacture of structural products;
- The solvent increases the tack and hardening time;
- The introduction of a solvent into the material subsequently causes it to shrink;
- That part of the solvent that has not evaporated can cause microcracks;
- Substances used for dilution may change the color of the polymer;
- The presence of substances introduced into the epoxy can harm the surface;
- The increased fluidity of the resin interferes with working with it on verticals.
Adding solvent is an easy and quick method to reduce the viscosity of the resin, but at the same time the strength and water resistance are reduced.
Thermal dilution method is the most preferred. With this method, there is no reduction in the strength of the polymer, and it will also make working with the unhardened mass easier. The resin is heated without adding a hardener; it is added at the end. This avoids excessive overheating of the mass.
But this method also has its disadvantages. Heating accelerates the polymerization of the adhesive mass, so all manipulations must be performed quickly. Boiling of epoxy leads to unwanted polymerization, which makes it unsuitable for further work.
Thermal dilution method is the most preferred.
Transportation and storage
Studies have shown that epoxy resin from any manufacturer tolerates transportation well, even in cold weather. Transportation even over long distances does not affect its quality in any way. The only requirement is that the container must be tightly sealed.
EDP should be stored separately from food products at 20°C and humidity 45-80%. Under such conditions, the shelf life is 6 months, but at lower temperatures (3-8°C) it increases to a year.
Can be used after the manufacturer's recommended expiration date has expired. But before use, it is necessary to check the components for compliance with specifications.
What are hardeners used for?
A hardener is a liquid chemical that can accelerate chemical reactions. When a hardener is added to the epoxy resin, the polymerization phase begins, as a result of which the composition acquires the necessary characteristics. These include uniformity, strength and durability.
These properties are determined by the correct selection of proportions when combining the resin and catalyst. When mixing substances yourself, it is important to maintain the correct proportions.
Substances that have the necessary parameters can be used as hardeners:
- High adhesive ability;
- Good protection against water;
- Good dielectric properties;
- Small percentage of shrinkage;
- Protective properties against mechanical damage.
Polymerization after adding a hardener usually occurs in several stages:
- Liquid consistency. It is observed immediately after adding the hardener. At this stage, the resin quickly fills all cavities.
- Thickening to the state of honey. The resin flows worse and cannot be used on complex terrain.
- Increase in density. The fluidity of this resin is less pronounced, but it is still suitable for gluing large parts.
- Rubber stage. The mass stops sticking to your hands and surfaces and resembles rubber in its ductility.
- Polymerization. At this stage, the epoxy becomes similar in properties to glass.
When a hardener is added to the epoxy resin, the polymerization phase begins, as a result of which the composition acquires the necessary characteristics.
Adviсe
When preparing the composition, as well as when applying it to the surface or filling molds with this glue, there are universal tips that help achieve better gluing.
When preparing the composition, it is better to use utensils and auxiliary tools that are unnecessary for further use. It is almost impossible to clean them from such a composition, so all used containers and mixing tools will be thrown away.
Pouring into the mold must be done in stages, especially if you plan to make the layer thickness more than 2 mm. After the first coating has polymerized, the next portion is poured only after the layer has cured, but with a sticky surface.
For large volumes, it is better to buy special compounds that are not subject to overheating. When mixing a large amount of regular glue, there is a risk of the composition catching fire. Therefore, for your own safety, you need to calculate in advance the required volume of the mixture and buy glue designed specifically for this volume.
How to choose a hardener
When choosing a hardener, it is important to consider the parameters of the resin itself and operating conditions. This has a significant impact on the final result. So how to dilute epoxy resin?
There are two types of hardeners: acid or amine. Acidic substances include acidic substances and their anhydrides. They are hot-setting compounds. This ensures that the resins harden at fairly high temperatures - from 100 to 200 degrees. This means that the final characteristics of the product will be slightly better than those of resins cured at standard room temperature.
Such chemicals are characterized by increased resistance to humidity and temperature changes. They conduct electricity poorly, so they can be used as insulators. They act as a connecting element when working with reinforced plastic.
The group of amine hardeners includes various amines. They allow the resin to become solid at room temperature. No additional equipment is required when using them. But some hardeners in this group are colored, which affects the final result.
Amines increase the elasticity and durability of the resin, and also improve its adhesion to the material. These characteristics have made this group of chemicals the most popular.
When choosing a hardener, it is important to consider the parameters of the resin itself and operating conditions.
Scope of application
Due to its technical characteristics and safety, the material has a wide range of applications in both industrial and domestic environments. Due to the demand in various areas, quality is constantly being improved to improve it.
Depending on the area in which the epoxy is used, it can be rigid or flexible, soft or hard.
The main areas of application of EAF include:
- Design. Used for making various souvenirs, jewelry, accessories and much more.
- Furniture production - for decoration.
- The electrical, aviation, shipbuilding and mechanical engineering industries are like an adhesive.
- Construction - for impregnation of materials in order to increase their wear resistance, waterproofing (swimming pools, basements, etc.), for pre-treatment of building facades before painting them.
- Production of fiberglass products.
The areas of application are growing steadily. This is due to its safety and durability. For example, quite recently it began to be used in the production of plastic window systems.
How to dilute epoxy
Diluting the glue must be done carefully, so it is important to prepare protective equipment and working tools in advance. Rubber gloves and a protective mask are necessary to prevent damage to the skin and respiratory system, because both ingredients are quite toxic. It is also important to prepare mixing containers and sticks. It is important to ensure ventilation of the work area.
Diluting the glue must be done carefully, so it is important to prepare protective equipment and working tools in advance.
Ratio norms
In order to properly dilute epoxy glue, the proportions must be strictly observed. Typically, purchased chemicals come with instructions. It specifies mixing rules and proportions. To mix the composition, it is usually necessary to maintain a ratio of 10 to 1. That is, for 10 parts of the resin volume, take 1 part of the hardener.
Today, the industry produces various compositions, so this ratio is not suitable for all substances. Dilution proportions will vary depending on the manufacturer. In one case it can be 10 to 4, in another 10 to 6. This ratio depends not only on the manufacturer, but also on the release date of both products, as well as environmental parameters.
Previously, for convenience, manufacturers produced formulations in containers with divisions. Today, you can use various available means for this.
In order to properly dilute epoxy glue, the proportions must be strictly observed.
Adding color
The color is added to the epoxy resin before it hardens. It is important to know the physical and chemical properties of the dye and the mass itself to obtain the desired result. It is important to choose non-aqueous based materials when painting epoxy.
For successful coloring of the mass, it is important to follow the following recommendations:
- When using oil paint, it is important that the mass of the dye does not exceed a tenth of the total volume;
- Do not allow moisture to get into the mixture;
- Ventilate the room well;
- It is necessary to work with resin at a temperature not lower than 22 degrees.
The color is added to the epoxy resin before it hardens.
It is better to use special pigments for coloring epoxy. They are presented in a wide range in construction stores. There are several types:
- Plain. Can be from white to black, as well as bright shades;
- Fluorescent. The composition includes a phosphor. This ensures the product glows in the dark;
- Matte. The presence of a special substance in the composition ensures a matte surface.
The intensity of coloring depends on the amount of pigment added. Therefore, it is important to strictly measure the amount of dye added.
You can also use improvised means for coloring. But it is important to consider that they can interact with each other. Also, this is not always advisable due to the low cost of piments. The following options can be used:
- Ink from ballpoint pens;
- Nitro dyes;
- Pencil leads;
- Printer toners;
- Dry pigments;
- Artistic oil paints;
- Alkyd dyes.
It is better to use special pigments for coloring epoxy.
How to mix at home
Before diluting epoxy resin, you need to read the instructions and study all the nuances. At home, you can only mix small volumes of resin. This can be done in a cool room. When working with large volumes at home, the composition immediately begins to harden due to the heat generated.
First, mix small volumes, and only then move on to larger ones. This is necessary in order to ensure that the proportions are selected correctly.
Substances are dosed using different syringes. Their size is selected taking into account the working volumes. Both components are poured into the prepared container and mixed thoroughly. There should be no air bubbles in the resulting mass. The finished mass should be transparent and uniform. After receiving the composition, you can add dyes and perform all the necessary work.
At home, you can only mix small volumes of resin.
Security measures
Epoxy resin becomes completely harmless to humans only after the polymerization stage is completed. Being in a liquid state, the substance emits harmful fumes.
Therefore, working with such a composition requires certain safety rules. Namely:
- The room where you work with epoxy is well ventilated;
- Do not allow animals and children to be present when working with resin;
- When mixing the composition and gluing, use personal protective equipment: respirator mask, goggles and gloves;
- After finishing work, ventilate the room well and rinse protective items with running water;
- Also cover the work surface with plastic film (polyethylene is one of the few materials that cannot be glued with epoxy).
Be careful not to get the resinous substance on your skin. In such a situation, immediately remove any remaining resin with acetone, and then wash the contact area with soap and water.
How long does it take for epoxy resin to dry?
When calculating the drying time of epoxy, it is important to consider many factors. The following factors influence the hardening time:
- Freshness of glue;
- Composition and type of the selected hardener;
- Mixing proportions of chemicals and substances;
- Surface area to be treated;
- Thickness of the applied layer;
- The temperature at which polymerization occurs.
In most cases, epoxy hardens in 1-1.5 days. If the volume of applied mass is too large, the hardening time can be up to 7 days. The polymerization time may vary if the proportions are incorrect. The complete curing time is usually indicated in the attached instructions.
In most cases, epoxy hardens in 1-1.5 days.
Thinning the epoxy resin and adding a hardener are the key stages of working with the mass. Their correct implementation guarantees obtaining the desired result and giving the product the necessary properties.
Properties and technical specifications
As with any other compound, EAF has standards that it must meet. It may contain the following ingredients:
- mass fraction of epoxy groups - 20-22.5%
- hydroxyl - 1.7%;
- pollinated chlorine - 0.3-0.8%;
- volatile substances - 0.2-0.8%;
- chlorine ion - 0.001-0.005%.
According to its chemical formula, it is an artificial oligomer. Despite its resistance to alkalis and acids, it is able to dissolve without a trace in essential liquids with a complex chemical formula and in acetone.
Composition of the substance
The main components of epoxy adhesive consist of resin, special hardeners and additional components. The adhesive composition is represented by hardeners, solvents and other substances.
Hardeners (up to 15% of the total composition):
- polyamine;
- carboxylic acids;
- anhydrite;
- polyethylene polyamine;
- organophosphorus modifiers;
- laproxy;
- aminoamide
Proportions of adhesives Source gidpokraske.ru
Solvents (up to 3%):
- acetone;
- alcohol;
- xylene
Other substances:
- metal oxides;
- chalk;
- fiberglass;
- formaldehyde;
- metal powder;
- clay;
- synthetic rubber.
Additional components improve the characteristics of the adhesive composition, making the seams of the joined surfaces harder and more durable. Experienced craftsmen add industrial additives to the composition:
- Aluminum (powder). Positively affects strength and thermal conductivity.
- Silica. Gives viscosity and strength.
- Asbestos. Produces hardness and resistance to temperature changes.
- Iron powder. Gives seams a reddish tint, increases fire resistance and thermal conductivity.
- Titanium dioxide. Capable of turning transparent color into white.
- Soot. Used for painting seams in a dark shade (asphalt, black).
- A combination of glass fibers and wood chips. Adds volume to the mixture to fill large voids.
A large role in the composition is given to plasticizers - phosphoric and phthalic acids. Polymers and oligomers regulate the technical properties of the adhesive, ensuring reliable installation.
Reasons for incomplete cure
It happens that the resin does not acquire the required hardness after all the work is completed. The surface remains sticky and the strength is low. If incomplete curing is temporary, it can be easily eliminated by increasing the temperature to +100...+130 degrees. Constant incomplete hardening cannot be removed; the mass will be spoiled. How to avoid such problems? Here are the main recommendations:
- do not cure at temperatures less than +23 degrees, humidity more than 65%;
- do not change the manufacturer’s recommended proportions of components for a specific polyester resin;
- exclude the penetration of pollutants and impurities, use only clean dishes.
The last point is especially important to observe, since even a small amount of fat, water and other substances disrupts the polymerization process. Polluted air, especially with phenol vapor, also has a bad effect on the quality of the mixture.
Upon completion of the work, the surface of the resin is covered with a film. This will prevent the mass from coming into contact with air.
Physics and Chemistry of Curing
By themselves, polyesters would cure very slowly, so they are combined with a monomer capable of copolymerizing with polyester. The rate of copolymerization of polyester double bonds with monomer double bonds is much higher than the rate of interaction of polyester double bonds with each other. The curing process is initiated by radicals formed during the breakdown of peroxide initiators and looks like this: after the introduction of the initiator and accelerator, nothing externally happens for some time. Despite the absence of visible changes, a reaction of the hardeners with the inhibitor is already taking place inside the resin. Once the inhibitor is used up, the viscosity of the polyester resin increases sharply, it loses its ability to flow and turns into a jelly-like state (gel). Next, this mass turns into a rubber-like and finally into a solid state. The curing process occurs with the release of heat. Warming up can be quite significant.
It should be taken into account that the gelatinized polyester resin is no longer suitable for molding, so it is necessary to have time to fill the molds before the moment of gelatinization occurs.
Yellowing
Effect – Uneven coloring of white or pastel colors after exposure to sunlight.
| Possible reason | Corrective Action |
| Polystyrene/wax coating from the matrix is transferred to the product from the matrix | Clean the matrix regularly. Do not clean the matrix with styrene solvents. |
| 2. Incorrect curing of gelcoat: 2.1. Catalyst problems | Check the catalyst (defective or old batch) and its percentage. Use only recommended catalysts in appropriate quantities. |
| 2.2. Contaminants (solvent, moisture, oils) | Contaminants affect the curing process. |
| 2.3. Inappropriate additives in gelcoat | Do not add any materials (except MEKR catalyst) to the gelcoat without approval from the manufacturer. |
| 2.4. Low temperature | Do not apply gelcoat at temperatures below 16C as this may cause the gelcoat to undercure. |
| 2.5. Old material | Upgrade your warehouse |
| 2.6. Film curing is inhibited by styrene fumes. | ensure the necessary air circulation in stagnant areas where styrene fumes collect. |
| 3. Preliminary separation | Most conditions that cause gelcoat to separate also cause yellowing. Check the same specifications as for pre-release gelcoat. |
| 4. Areas of laminate dominance | Control lamination technology. Especially in recesses where gelcoat cures atypically. This often causes the gelcoat to yellow. |
| 5. Resin separation | Overspray, excessive film thickness, separation of dissimilar pigments or contamination can cause binder/pigment separation. The concentration of the gelcoat binder on the surface of the product leads to a faster yellowing of the finished product |
| 6. Thickened gelcoat film | Avoid applying too thick a layer of coating |
| 7. Cleaning the finished product with alkaline cleaners | Do not use strong alkaline cleaners (such as ammonia or other pH >9 cleaners) to clean the gelcoat surface. |
| 8. Spray gun too close to the matrix | Maintain the required distance |
| 9. Spraying in one pass | Spray several times |
| 10. Insufficient variance | The gelcoat should be well dispersed. |
Room temperature
Professionals advise working with this material at a room temperature of at least 23 degrees above zero. There are resins on the market, this usually applies to paints and varnishes, work with which can also take place in microclimates of +15 degrees. This information can be found on the product packaging.
In theory, curing of these types will take a long time, about a month. Therefore, in order to improve sales, the manufacturer prepares elements for polyesters of this type for acceleration and polymerization so that diluting them, even at such temperatures, starts the self-heating process, and the process is carried out within an acceptable time frame. They can vary by changing the accelerator ratio
It is important to follow the instructions here
How to dilute polyester resin with a hardener, the procedure for introducing all necessary additives includes:
It is necessary to accurately measure the amount of resin and accelerator (if it was not added earlier before sale), you can find out by studying the packaging, these details must be written on it. You should not mix them together or move vigorously, so as not to cause the formation of excess air bubbles; mixing time should be spent 3-5 minutes. Add a curing initiator, mixing should last three minutes, if the climatic conditions of the room are hotter than standard, then it will take less time. They proceed to pouring the composition into molds or pouring it over the surface; it is important to do this 10-12 minutes before moving on to the gelatinization stage. To speed up the transition to the next stage, the temperature in the room must be increased, and, conversely, to slow it down, it must be decreased. Primary hardening will occur after 14 hours - a day.
Primary hardening will occur after 14 hours - a day.
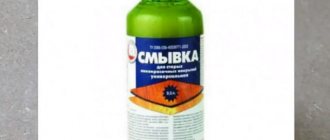
What solvent can I use?
Any weak solvent will be suitable for use in epoxy mortar. Adding too much solvent can have a disastrous effect on the final adhesive solution, so don't waste your money on these types of solvents. A regular varnish solvent is best; it will have the least effect on the quality of the glue and will not change its color at all. If this type of solvent is unavailable, it is not necessary to go to the store to buy it; it can be replaced with ordinary acetone. In this case, you need to understand that the quality of the resulting adhesive solution will be somewhat worse, and the color of the glue may change quite a lot.
If both types of solvent are not available, a solvent with a percentage of no more than 5% can be used. The use of stronger solvents is permitted solely at your own risk.
Don't overpay
In some stores you can find a special solution for softening epoxy mortar. The decision to purchase it lies solely with the buyers. Such solutions can cost significantly more, but they are not always very different from the cheapest solvent. When purchasing such solutions, you need to carefully review the label; in cases where all the information on the label indicates that the bottle contains the simplest solvent, you should not overpay much and it is better to buy a regular solvent, which is cheaper and practically no different from the expensive one. dummies."