Most women at least once in their lives have a question: how to shorten a dress? There can be many reasons for this. Here are some of them.
- On a thinner figure, the item fits looser, making it longer.
- An outdated model can be revived by making it shorter.
- Boring length of the product.
- Change of style.
If you have chosen a dress to shorten and made a firm decision to modify it, you need to know the main points, using which you will get an excellent result. This is especially true when you need to shorten quickly. We'll tell you how to turn a long dress into a short one.
Steps
Hem
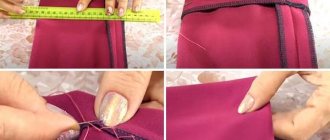
- Measure and pin the new hem.
Whoever wears the dress must wear it. The second person should fold the hem of the dress to the desired length so that there is excess fabric on the back of the garment. Pin the hem along the entire circumference of the product and check the length.
- One thing to keep in mind is that the wearer of this dress will also wear the shoes to prom. Due to the height of the heels, the length of the product will also change.
- Another person must pin the hem together. If you try to do this yourself while you are wearing a dress, it may skew the length of the garment, resulting in a hem that is either too short or too long.
- Trim the original hem.
Take sharp scissors and cut off the excess fabric from the bottom of the dress. You need to trim enough fabric so that you have about 6mm extra left after the hem is finished.
- The hem seam itself will be about 3mm.
If you can't trim the old hem when the fabric is pinned, mark the new hem with a pencil and remove the pins before trimming the excess fabric.
Use a seam ripper and remove approximately 2.5cm of stitching from the hem side seams.
- These side seams are too bulky and almost impossible to thread through the presser foot of a sewing machine. For this reason, it is highly recommended to remove them before making a new hem.
Place it in the sewing machine and carefully lower the sewing needle, holding the hem there.
- The hem seam should be about 3mm. Fold the fabric under so that the seam is hidden on the inside of the hem and the selvage (edge of the fabric) is hidden under the folded hem.
Hold the needle down and snap the presser foot closed.
- Something to keep in mind is that if you don't have a presser foot that snaps into place and you need to screw it on, you'll need to do this before you insert the needle into your hem.
Slowly sew about five stitches on the machine. All you have to do is start stitching the seam and press it down.
Using your fingers, guide the unhemmed edge of the piece into the curved insert on the front of the presser foot.
- Make sure the needle is in the down position at this time.
This insert will guide the unhemmed edge of the product during sewing, folding it and bringing it to the stitching site. As a result, you don't have to manually roll up the rest of the edge; the machine will do it for you.
Continue stitching the hem along the entire length of the product. The presser foot will do most of the work, but you must manually pull the fabric slowly, carefully and correctly into the curved insert on the front of the presser foot.
- The edge of the fabric should be parallel to the edge of the presser foot, and the edge of the hem should be parallel to the right side of the presser foot.
If you work in parts, you need to start the process all over again with each new section.
Once the hem is done, the side seams should be pinned and sewn together with a straight stitch.
The owner of the product should try it on to see how the new hem looks. After this the process is over.
- Please note that this is the recommended method for hemming. Since the bottom of many prom dresses is not straight, but flared, the length of the product is uneven around the entire circumference. The initial hem may cause wrinkles because there is so much fabric being hemmed. When using this technique, as little fabric as possible is hemmed, therefore the risk of gathering is minimal.
Machine blind stitch
- Measure out a new hem and remove the old one.
The one who plans to wear this product must try it on, the second must measure how much material needs to be hemmed from the edge. After that, trim off the excess fabric with sharp scissors. Leave a 2.5 cm allowance from the edge for processing. The dress must be tried on together with prom shoes. The height of the heels matters when determining how the hem of the dress should be.
- You can measure the length of the hem using a tape measure and cut that way, but if you want a straighter hem, you'll have to mark the desired seam using sewing pins or a pencil around the entire circumference of the piece.
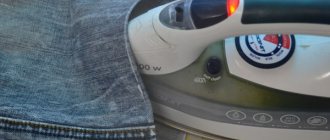
Fold over and press the raw edge. Fold the raw edge of the product inward and hide it on the wrong side of the product. You need to wrap about 6 mm of fabric. Press the new crease with a hot iron.
- There is no need to use sewing pins to secure the hem at this stage.
Fold and press the remaining part. Fold the remaining 1.8cm of fabric in the same direction as the original fold. Press the folded edge of the product with a hot iron.
Again, make sure that the folded fabric is hidden throughout the entire interior surface of the product.
- At this stage it is recommended to pin the new hem. Insert pins along the hem so that the heads are on the inside of the piece, away from the edge of the hem.
Attach the presser foot to the sewing machine. Screw the foot according to the directions on your sewing machine. This presser foot is needed to finish making the hem on the machine.
Read the instructions that come with it to determine how to do this.
- Fold the edges of the hem and place under the machine. Place the product on the wrong side. The folded edge should be placed towards the outside of the presser foot. Fold the edge over, leaving a narrow edge showing.
Place the product on the wrong side. The folded edge should be placed towards the outside of the presser foot. Fold the edge over, leaving a narrow edge showing.
- The heads of the pins will no longer be visible, but they will be facing out from under the fabric towards the sewing machine.
Move the fabric under the presser foot and place the presser foot flange on the new edge. When the needle comes down, make sure it sews up the remaining hem and sticks out the back of the fabric. Sew along the entire length of the edge until finished.
- Most seams will break at the edge, and every third seam or so will end up in the fabric.
The flange is the middle section of the presser foot and is often made darker or painted a different color to make it stand out. This part of the foot acts as a guide for the blind seam.
When finished, unroll the border and straighten the seam, carefully pulling out the hemming stitches so that the fabric remains as straight as possible. Use a hot iron to smooth out the gathers and try on the dress to make sure the new hem looks great. This completes the process.
- A blind seam will hide more sewing threads than a regular seam; this option is better for prom and other evening dresses. If the hem of the garment is too flared, or if you have hemmed the fabric too much, you may notice ruching along the hem.
Hand blind stitch
- Measure out a new hem and trim off any excess fabric.
The one who plans to wear this product should try it on, and the second one, using a tape measure, measure how much fabric needs to be hemmed. Then use sharp scissors to trim off the excess fabric.
- Make sure the dress wearer is wearing prom shoes when you take measurements. The height of your heels can make a big difference.
It will be easier for you to trim away excess fabric if the dress is removed.
- To make the seam even, it is recommended to mark the intended hem with straight sewing pins or a pencil.
- Leave about 1.25 cm of excess fabric beyond the length of the intended hem.
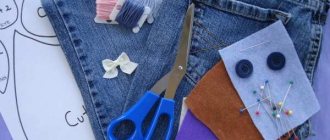
Hemming the bottom is one of those operations that even those who do not like to sew have to deal with. Of course, sewing curtains or adjusting trousers to fit your height can be entrusted to professionals, but almost every woman has had to deal with the problem of a torn hem or the need to shorten a skirt that is too long. This is not difficult to do, and perhaps, having mastered these simple operations, you will love to sew on your own.
Benefits of using a belt
The main purpose of the belt is to create an emphasis on the waist. This wardrobe detail will make even a simple dress stylish. A belt can hide figure flaws and highlight its advantages. It creates a horizontal line that visually corrects the nuances of the figure. With this accessory you can visually increase the length of your legs.
The belt can hide a protruding belly.
Depending on the shade and style, a belt can change not only your figure, but also your style.
Finishing the edge with a hem
The standard hem width for a skirt is 3-4 cm; for thin fabrics this value may be smaller. To make a neat hem line for a straight cut, it is convenient to use a sheet of paper with a horizontal line drawn at the required distance. Bend the edge of the hem this distance and iron it - you will get a perfectly straight line, and the hem will not be imprinted on the front side (Fig. 6).
In flared lines, the fold is much more difficult to perform. To facilitate this operation, two parallel lines are laid along the bottom of the product (Fig. 7). Then the bottom line is gathered up a little, the fabric is folded inside out along the line of the top line, pinned and pressed.
The simplest method for processing a folded edge, which even those who do not know how to sew can quickly handle, is to use adhesive tape. It is placed in the fold and treated with a hot iron (Fig. 8). For heavy textiles, it is recommended to insert two such tapes.
Professional dressmakers do not recommend using this method of fixing the hem, believing that it makes the fabric more rigid. In addition, the adhesive tape will most likely have to be re-glued after washing. In the time of our grandmothers, traditional stitches were used for products made from suit and coat fabric - blind (Fig. 9) and goat (Fig. 10), which are still made in expensive studios.
Beautiful execution of such a binder requires skill and a lot of time. In professional clothing production, this operation is most often performed with a hidden machine stitch. A simpler solution is to simply stitch the double-folded edge (Fig. 11), which is well suited for sportswear.
For a narrow hem, this stitch can be done using a special hemming foot. For thin fabric, as well as for flared models, a more suitable option is to process the edge with an overlocker, and then stitch it 0.2 cm above the ironed fold line (Fig. 12). To prevent the top edge from sagging, you can make two parallel lines with a wide hem.
One of the most beautiful, albeit complex, methods of hemming thin materials is the so-called Moscow seam. Its width is about 3 mm, with 2 lines on the back side and one on the front side. They are performed in the following sequence (Fig. 13):
- Leaving an allowance of 1 cm when cutting, make a hem of no more than 4 mm, iron and sew the fold as close to the edge as possible.
- Carefully cut the fabric from edge to stitch, leaving more than 1 mm.
- Once again turn the hem to the wrong side so that the stitching is approximately in the middle, and iron it.
- Sew the hem from the inside out as close to the first line as possible. Experienced craftswomen make the first stitch with a contrasting thread, and then remove it to get one seam from the face and from the back.
I can’t call myself such a fan of sewing, but every woman should be able to sew the simplest skirt, much less sew up a hole or sew on a button.
However, sometimes you have to work hard on the product. My headache is stitching on thick areas of the product. For example, when working with denim items.
It can also be difficult to tame a dress
or a skirt that is too long when you want to do it quickly and without the help of an atelier.
Ways to sew T-shirts one size smaller
When purchasing a new wardrobe item, it is not always possible to try it on. Especially when it comes to purchasing things through an online store. Additionally, clothes may stretch during the first wash. You shouldn’t immediately look for ways to return your purchase or put the item on the far shelf in your closet. For example, the same T-shirt can be easily stitched on your own.
How to properly shorten a dress made from different fabrics
Once everything is selected, you can start working.
Length Determination
First of all, you need to decide on the length.
- Put on the dress, make a mark for the future edge, and pin it with a pin.
- After removing the dress, fold the edge along the mark and secure it along the length of the entire hem.
- Try on the outfit again to make sure it is the right length. Then remove and mark the line with chalk so that it runs 1 - 2 cm below the desired edge. This is hem reserve.
Important ! This procedure must be carried out regardless of what fabric the dress is made of.
- Cut the fabric along the marked line.
Slice processing
Lightweight natural fabrics
The easiest way to process the bottom of a dress is made of light fabrics (cotton, thin linen, etc.). It is necessary to make a hem and perform a machine stitch or overlock processing.
Dense heavy fabrics
If the fabric is thick enough, for example, suiting or jersey, then you can sew trouser tape or bias tape along the bottom edge .
- Attachment is carried out on the front side. Then fold the hem inward and gently steam with an iron. It is better to carry out the procedure through damp gauze or thin cloth. This will prevent the dress material from sticking to the iron. The bottom can be reinforced by sewing a straight seam, or you may not need to perform this action.
Knitwear, silk
A knitted dress requires special finishing of the bottom
. This will allow you to avoid stretching the seam lengthwise. Processing is carried out either with a cover (flat) seam or with an overlock stitch.
- Overlock processing is very simple. The only condition is that you need an overlocker. The product is cut 0.5 cm below the desired mark . Then a stitch is made along the edge, without any folds. It is better to use a medium stitch width for knitwear; for chiffon and silky fabrics, use a narrow stitch with frequent stitches.
- The cover stitch needs an additional hem of 2.5 cm . Along the bottom edge of the hem, the seam is processed using an overlocker. Then a hem is made along the marked line. And along the wrong side, a second seam is made, spaced 1 cm from the edge of the product. Then, stepping back the width of the foot (0.5–0.7 cm) from the edge upward, the second seam is sewn. After this, carefully iron through a damp cloth or using a steamer.
Processing a dress with decor at the bottom
If there is a need to sew braid or lace to the bottom edge, then cut off the excess fabric from the beginning. Then the edges are processed and the lace is sewn on the front side , placing it on the fabric of the dress.
How to shorten a dress at the waist
For skirts or dress hems, where there is decoration with stones at the bottom of the product or pleats, shortening is done along the seam at the waist. The work is performed according to the following algorithm.
- Steam the belt or skirt.
- Measure the length at the waist on the cut piece, so that you can then combine it with the seam or waistband.
- Taking into account the seam allowances, markings are made.
- Trim off the excess.
- Try on the waist of a dress or the belt of a skirt.
- Subtract the smaller from the larger size and divide the result by two. The resulting number is the centimeters that need to be subtracted along the side seams. Otherwise, you won’t be able to match the top with the bottom of a dress or a skirt with a belt.
- After aligning the seams, parts of the product are ground down.
Where to wear it?
You can tie a belt not only at the waist. Here are popular placement options for this accessory:
- At the waist. This is a classic placement method. It is suitable for various styles of clothing.
- Above the waist. This option is suitable for knee-length dresses. This technique helps to visually lengthen your legs. If you combine a belt with brightly colored outfits, you can create a stylish and interesting look.
- Under the chest. This placement will emphasize the chest and make the figure visually slimmer. It is best used for empire style dresses.
- On the hips. This placement method is best used with a tunic dress. However, it is better for plump women not to consider this option, because in this case the belt on the dress will unfavorably emphasize the stomach.
Processing without bending
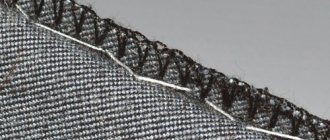
The simplest way, which does not require the use of special techniques, is to process the edge with an overlocker. In some cases, such a stitch, for example, made with a contrasting thread, looks very attractive (Fig. 2).
Processing the cut with a zigzag seam or a roller overlock, which creates a neat scar, is also good for thin fabrics (Fig. 3). After processing, the protruding threads of the fabric must be trimmed. An even more beautiful seam is obtained if you lay a zigzag stitch at some distance from the edge, and then carefully cut off the excess material.
A beautiful and neat hem is obtained by using bias tape. For thin fabrics it is attached in the form of a border. To do this, the bias tape (it’s better to take a ready-made one) is folded in half and ironed, then the edge of the fabric is placed inside it and stitched (Fig. 4). The same method is well suited for processing internal seams of bulk material.
To hem dense material in this way, you will need a hem of about 0.5 cm. The fabric and binding are folded right sides together and stitched along the bottom edge. Then the binding is folded over to the wrong side, ironed and stitched along its upper edge (Fig. 5). This hemming method is well suited when the skirt is not long enough for a standard hem.
Types of belts
There are a large number of models and colors of belts. A classic belt is 5 centimeters wide. Models made from soft fabrics can be tied in different ways. Rigid belts are not recommended for creating unusual knots. Leather belts with buckles go perfectly with denim outfits.
Here are the main belt models:
- Belt-sash. It came from the men's wardrobe. This is a long wide belt with tapered ends. It is wrapped around the waist 2 times, and a bow or knot is made from the free ends. The bow can be placed in the center or on the side. The sash can be decorated with fur inserts and rhinestones. This is a bright accessory that allows you to create a beautiful image.
- Corset. This is a large belt that can add a special piquancy to your look. It looks very feminine and goes well with wedding and cocktail dresses.
- Elastic waistband. This accessory is worn at the waist. It can be tied with a bow. Wide versions usually have a buckle.
- Openwork. This is an elegant lace option.
- Decorated models. The product can be decorated with fur, metal or wooden elements, rhinestones, semi-precious stones, textiles, glass, etc. Products are often decorated with embroidery, fringe, ribbons, and pearls.
Depending on the material from which the belt is made, accessories are divided into the following types:
- Leather. These are classic models that go with most outfits. A leather belt will favorably emphasize a woman's status.
- Textile. These are more affordable products and more popular. Such accessories can be tied in a knot or a bow. Silk and satin products look beautiful.
- Combined. Such products consist of several materials, such as leather and plastic, textiles and leather.

