It’s rare that fashionistas are satisfied with the standard size of the clothes they purchase. Even if it completely follows the contours of the figure, it does not always satisfy the girl’s needs in terms of length. Reducing the bottom of a product is not at all difficult, but the possible shortening option directly depends on the type of clothing and the fabric from which it was sewn. T-shirts and dresses purchased in a store are hemmed using a cover-stitching machine, which not everyone can afford. But there are little tricks with which you can sew a T-shirt with your own hands. In some cases, it is not at all necessary to unpick the model for this.
Clothing repair. How to cut a T-shirt to length
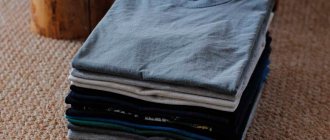
T-shirt length is a common problem for both women and men. It happens that the width of a T-shirt suits you, but the length turns out to be too big. Usually this happens to people of short stature. In this case, you need to shorten the T-shirt in length.
This is definitely not worth doing manually, as the knitwear stretches along the bottom, and hand hemming will not last long. Ideally, this operation is performed using a special stitching machine, but not everyone has one. It is also missing from my arsenal of sewing equipment. I only have a sewing machine and an overlocker. But even with them you can hem a knitted T-shirt very simply.
Many people are afraid to take on work with knitwear and this is completely in vain. If you know some points, then such an operation will not seem so complicated.
First, you need to decide how long you need to shorten the T-shirt. In this example, it was 5 cm. Then pin the T-shirt along the shoulder seams, folding it in half, along the bottom of the armhole under the sleeve and lay the product on the table. Flatten it so that there are no creases anywhere.
Pierce the bottom of the T-shirt with needles, draw a new length taking into account the hem of about 2-2.5 cm and trim. In this case, the bottom of the T-shirt is not flat, but slightly sagging. If you need to cut the T-shirt evenly, then draw a perpendicular line to the middle of the T-shirt. It is better to do this using a ruler - a square.
Then I overlocked the bottom and ironed it.
After that, I measured a distance of 2 cm from the cut and drew a new bottom line. I pierced the fold line with needles and basted the seam allowance slightly below the overlock stitch.
She pulled out the needles and ironed the seam allowance.
In order to hem knitwear on a machine, I use special needles for knitwear or stretch materials. I like this brand of needles the most. They are of very high quality and have shown themselves to be excellent in working with knitted items.
My machine has a special stitch for such operations, but I use it in the case of looser knitwear, when the stitch configuration is less noticeable. Here I was dealing with a smooth version of knitwear, so I chose a regular straight stitch.
It is better to lay it along the front side, having previously measured the length from the fold line so that the stitch covers the overlock seam from the inside. That is, a little less than 2 cm.
In order for the stitch to lie flat and have a small stroke as a result, during the operation it is necessary to slightly pull the fabric behind the foot. It's behind, not in front. If you do this slowly, the stitching will turn out smooth and uniform.
After this, you can remove the basting and finally iron the seam allowance along the bottom. This is what the T-shirt looked like after the repair. The long T-shirt became a little shorter.
If you master the simplest operations, then repairing clothes will not be anything daunting for you. With a little practice and time, you can save your family budget thanks to your new skills.
I will be glad if this lesson is useful to you.
Share it with your friends and subscribe to the site news so that you have the opportunity to receive useful and interesting letters from me!
I wish you all success in mastering new skills and successful repairs!
Source
How to sew straps on a T-shirt
The main condition for a stylish look is a perfect fit. Agree, if a tank top or T-shirt fits beautifully around the chest and the shoulders fall off, it looks careless. Or the top fits perfectly, the bottom of the knitted sweater dangles on the waist, hips or stomach. It’s better to spend a couple of hours of time, then it’s time to show off in a spectacular way.
It is much easier to sew a T-shirt - just cut a narrow strip in the center of the back, as Andre Tan shows in the video. Then you can decorate the seam, for example, with bows, so that an ordinary T-shirt looks like a designer item.
Alternatively, the fold on the back or along the front can be folded with a bow fold in the form of a fastener, sewing on beautiful buttons. Lightning is also suitable if it is decorative, for example, with shiny stones. Only a beginner will find it difficult to sew a zipper onto a thin knitted base; this is a task for experienced craftswomen.
The item to be altered must be clean, ironed, with a mark along the seam that is to be finished, regardless of whether you alter it yourself or take it to seamstresses. If you need to shrink the T-shirt a little on the sides, do not rush to cut off the excess jersey before using the machine. An overlocker in the hands of a master will finish the edge of the knitted seam and cut off the excess during the work. This can be easily done in any sewing workshop.
Most often you have to sew in things that are a little too big. Many T-shirts have a unisex cut (sports, for boys and girls) and require a perfect fit on a woman’s figure. In order for the item to fit perfectly after modernization, you need to check the proportionality in the main places:
- on shoulders;
- along the neck;
- in the chest;
- at the waist;
- in the hips;
- on the stomach;
- along the edge of the product.
It is easiest to suture when the shoulders are in place. Then there is no need to adjust the hem and armhole, or alter the sleeves. Even beginners can sew such T-shirts. However, if the item is sutured more than 5 cm along the edges, it is necessary to move the seam smoothly to the sleeve.
If the shoulders hang down, you cannot do without adjusting the entire product; you will have to rip off the sleeves and adjust the pattern. As a pattern, use a T-shirt that fits your figure perfectly. It is laid out with the front side on the wrong side of the T-shirt being altered. For symmetry on products where the front and back are separate during work, the pattern and altered parts are folded in half - symmetrically vertically.
Sew on the sides
To do this, you need to turn the prepared item inside out and mark it on yourself with tailor's needles (with colored balls) or pins along the width. You can simply pinch and make chalk marks. You ask, why turn it inside out? Any sewing work is done on the wrong side of the product so that marks do not have to be transferred.
It is advisable to try on the bra you will wear with (or without). Adjust the product on yourself so that it fits most comfortably, mark the waist points on the side seams just above the control tape. You can sew knitwear in different ways:
- on a sewing machine, setting the mode or option for knitwear;
- process with an overlocker, simultaneously cutting off the excess along the edges;
- manually, if you have the skill of working with knitwear and sewing frayed edges;
- in a workshop where everything will be done by specialists.
It happens that a T-shirt needs to be expanded. This is more difficult to do, but try to limit yourself to contrasting inserts, make a lace insert with lacing or “stripes” on the sides. A good trick is to make parallel cuts along the back and loop the braid directly on yourself, turning the front. It’s so easy to adjust the size, and at the same time you’ll get a new creative thing.
When a product needs to be shortened, be creative - this is an opportunity to make the item more interesting. The bottom seam of knitted products is usually processed using a cover stitching machine or an overlocker. Not everyone has such equipment. In order not to “fool” with processing the bottom seam, which is done on special equipment, use atypical methods of working with knitwear:
- make an oblique or curly cut, make small holes just above the cutting line in equal increments of 1.5 - 2 cm and thread a knitted ribbon of a contrasting color, but you can thread silk ribbons through the holes and tie them in pairs;
- make a figured cutout and finish it with a sharp hook, knitting a row of “shells” or a scalloped “crawfish step” stitch;
- fringe - cut off the bottom seam with sharp scissors, mark strips of 1 cm by 5–7 cm along the inside with a pencil and cut these strips, which do not require processing (if the ribbons are long, you can make knots at the ends).
These are the easiest ways to shorten a t-shirt and make it look designer. Again, you can give it to a craftswoman with sewing equipment and make a classic seam. As an option, stretching it a little, twist the oblique cut into a tube along the edge. It will also turn out interesting, but make sure that the knitwear does not unravel in texture.
It is very easy to shorten the straps on a T-shirt:
- the strap comes off on one side (preferably from the back);
- excess tissue is removed;
- the part is returned to its place and carefully sewn
Important! Before cutting off the length of the straps, you need to carefully measure the length that you should end up with.
Thin straps are easier to sew in
Hemming along the length
In some cases, the product fits perfectly, but you are not satisfied with its length. There is nothing easier than taking a dress or a T-shirt to a tailor, but it is not much more difficult to do the work yourself. You can reduce the length using a sewing machine or using the old time-tested method - manually.
Shortening a T-shirt is a fairly simple process.On a sewing machine
Hemming a T-shirt, tank top or any other product made of knitwear or synthetic material is carried out according to a similar principle. How to hem a T-shirt using a sewing machine:
- The product is cut to a certain length.
- The bottom of the T-shirt is folded along a pre-marked line and it is determined at what distance from the edge the seam will be made and basted.
- Place the garment to be shortened under the foot of the sewing machine, wrong side up.
- Align it so that the left needle is located at the very edge of the hem.
- Place a stopper and sew in a circle with a hidden seam, trying to avoid pulling.
- They tie knots and hide the threads.
Manually
In the absence of a sewing machine and the desire to seek help from a specialist in the studio, the least that can be done to reduce the length of the product is to figure out how to hem a T-shirt by hand.
If the knitwear is dense enough and not prone to unraveling, you can leave it alone; if there is a risk that the knitted weave may “work,” it is better to process the edge with an overlocker.
After shortening, the bottom of the T-shirt is hemmed by hand using a hidden cross stitch, which is popularly called a “goat”.
This is approximately how the Kozlik seam is made
This is done as follows: with a needle, grab one or two threads of the fabric from above and below from the cut of the allowance
It is important to carefully ensure that the stitches are not visible from the outside. The distance between the thread grips of the fabric should be about 1 cm
List of materials and tools needed when sewing a T-shirt
A good craftsman can be seen by his instrument. But if you have minimal experience in needlework, and you don’t have a sewing machine (especially an electric or industrial one) or an overlocker in your house, what should you do? Make do with simple craft tools:
- needle and sewing thread (No. 40, good quality);
- cotton threads of contrasting color for basting;
- thimble (optional) if sewing by hand;
- large scissors for cutting and small ones with sharp ends for adjustments;
- chalk for marking;
- tape measure;
- iron or steamer;
- pins or needles for basting.
Advice! Without experience working with knitwear, try training on things that you don’t mind throwing away. Do only the accessible part of the work yourself. It is better to master complex stages under the guidance of a master or contact specialists who will arrange the item for a small fee.
Useful tips
Sometimes creative people, inspired by the huge number of beautiful pictures on the Internet, forget about some important circumstances. Before you start cutting fabric, make sure that:
- you know exactly how to achieve the desired result;
- the chosen option will look good taking into account the characteristics of your body;
- you have suitable underwear for the model you are looking for.
It won't be very cool if you make a whole series of horizontal cuts across your entire back, but you don't have a bra in the right color. Or the created pattern of holes will reveal to the world, for example, a not very beautiful scar left over from the times when you mastered a bicycle as a child.
It’s easy to make something completely new and spectacular out of an old T-shirt using scissors. Try it yourself!
Workshop “from Idea to Result”
Now, the Creativity section has moved there. There will be master classes, courses, consultations on sewing, decorating clothes and creating accessories. In the “Blog” section, I publish posts on fashion and handicrafts. I created this platform for our communication. Let's be friends!
Progress:
The client's dress is made of satin fabric, there is no chalk left on it, so we only mark the center of the seam with a pin and set aside 2 cm to one side, draw a line for the seam towards the front and back. Photo 1.
Agree, this option is much easier and takes less time than if we ripped off the sleeves and sewed it into the adjusted armhole.
But, I remind you that you can’t always use it (we talked about this above). I think that you will like the described method, and you will use it more than once. And that's all for today))).
To achieve the perfect fit of the purchased product on your figure, it is often necessary to make some more changes. They are described in detail in the master class: “How to alter a dress with your own hands and give it a second life”
If you have questions, ask in the comments. I will answer everything.
Share information and subscribe to receive new publications.
Join us on VKontakte. Let's be friends!
All the best to you! Ilona was with you