How to tie a T-shirt at the waist?
At the waist
- gather the fabric on the T-shirt to the height you should get in the end;
- Pull it forward and squeeze it into a fist near your stomach. ...
- While continuing to hold it near your stomach, with your other hand make a loop out of it and thread the tip into it;
- With one hand, pull it away from you, with the other, tighten the knot towards you.
18 Sep.
2022 Interesting materials:
How to check a water heater safety valve? How to check the fuel regulator? How to check the Rtk x m relay? How to check a site's certificate? How to check if Ten has burned out? How to check a triac without desoldering? How to check the word presence? How to check an SMD capacitor with a multimeter? How to check the insulation resistance of a wire? How to check whether an ear of corn is ripe or not?
Various fabrics
As mentioned above, the technique of work and the choice of tools depend on the fabric. So, for linen, synthetics and cotton, you need to carefully consider the choice of scissors due to the high cutting resistance of the fabric, while for wool it is several times lower.
For thick fabrics, thicker threads and needles are used, and for thinner ones, vice versa.
The color of the fabric and thread should be as similar as possible so that the seam is not so noticeable.
There are fabrics that shrink after washing, so the product or only the area where it will be cut must first be subjected to a wet-heat treatment.
For silk and other fabrics that tend to fray, you need to leave a larger allowance, which will require an overlocker to process. Many professionals say that the edges of such fabrics should be finished at the basting stage.
Useful tips
Sometimes creative people, inspired by the huge number of beautiful pictures on the Internet, forget about some important circumstances. Before you start cutting fabric, make sure that:
It won't be very cool if you make a whole series of horizontal cuts across your entire back, but you don't have a bra in the right color. Or the created pattern of holes will reveal to the world, for example, a not very beautiful scar left over from the times when you mastered a bicycle as a child.
Important! Remember: something that looks great on an Instagram model will not always look great in real life.
It’s easy to make something completely new and spectacular out of an old T-shirt using scissors. Try it yourself!
How to cut a T-shirt to fit a top - Shay with me
Hello, my dear blog readers). Now summer is in full swing, I want the sea, shade under the trees and, of course, wear less clothes so that it’s not so hot.. Therefore, today we will look at the idea - how you can cut a T-shirt to fit a top, especially if you have it lying around a long T-shirt that you don’t wear anymore. I’m generally a fan of repurposing old things that it’s a pity to throw away, because in this way the old thing gets a new life.
So, I had this long T-shirt, almost like a dress:
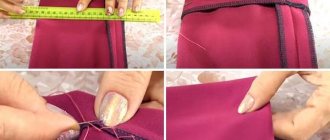
In order to cut it, you need to first put it on and measure it directly on the figure.
On the front side of the T-shirt, mark the desired level of the top with chalk or a piece of dry soap (in the photo the level is marked with an elastic band), add to this level the width of your purchased elastic band and + 1 cm for hemming the seam allowance.
Cut the shirt to the desired length:
Now there will be two processing options:
- You can treat the bottom with a special paper adhesive tape, which seals the bottom of knitted and stretch products, but in this case you need to take larger allowances than I described above.
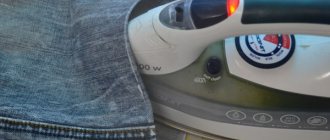
To process this paper tape, you need to attach it to the wrong side, right along the bottom line (as in the photo below), and iron it with an iron. Apply paper tape around the entire circumference of the hemline of the top. After this, simply remove the paper layer, and the adhesive layer will remain on the fabric.
The next step is to press this taped seam allowance onto the wrong side of the top along the bottom.
For more details, see the described process at the link about adhesive tape.
- The second option for processing the bottom can be done without gluing the allowance.
For example, you simply don’t have such a tape right now. In this case, we simply fold the centimeter allowance onto the wrong side, which we added at the beginning when we measured the level of the long T-shirt to be cut. This allowance must be machine stitched.
Don't forget to choose the right needle for your fabric before you start sewing.
I remind you about the needle because very often light summer clothes, especially T-shirts and tops, which fit so well on the figure, fit so well because they are sewn from stretchy stretch fabrics. For this reason, an incorrectly selected needle will not give you the straight stitch you need. Be sure to use a stretch needle; it has a round end that does not pierce the fabric, but pushes the fabric threads apart, and the stitching lies perfectly evenly and without gaps.
I will make the bottom of the top with elastic. To do this, measure the required length of the elastic directly on the figure. It is necessary that the elastic sits tightly, but does not press along the bottom line of the top, do not forget to leave allowances for sewing the elastic into a ring.
We cut the elastic into a ring and sew it on a machine using a zig-zag or straight stitch back and forth.
Now we lay the elastic along the bottom line of the top and stitch or pin along the entire circumference.
We sew with a straight stitch along the basting line from the front side of the top. If you don’t baste initially (to be lazy), you may end up with an uneven stitch.
This top was made in just 15 minutes:
So let's join me in giving new life to old things.
See also:
You may also be interested in:
xn--e1aialfecu4d.xn--p1ai
Hemming along the length
In some cases, the product fits perfectly, but you are not satisfied with its length. There is nothing easier than taking a dress or a T-shirt to a tailor, but it is not much more difficult to do the work yourself. You can reduce the length using a sewing machine or using the old time-tested method - manually.
Shortening a T-shirt is a fairly simple process.
On a sewing machine
Hemming a T-shirt, tank top or any other product made of knitwear or synthetic material is carried out according to a similar principle. How to hem a T-shirt using a sewing machine:
T-shirt with side lace inserts from an old T-shirt
1. Measure the side panels and, based on the measurements, cut the sides of the T-shirt (including the sleeves).
2. Cut each insert in half to sew onto the T-shirt.
3. Lay the T-shirt flat and sew on the lace inserts on the left and right using a machine.
4. Use pins to secure half of the lace inserts, leaving the areas where the sleeves will be untouched.
5. Using a machine, sew where you have marked with pins.
Manual hemming method
The fastest and cheapest option is to hem the T-shirt yourself at home.
If your product is made of dense fabric that does not fray, then you can safely trim it. And if there is a risk that the fabric may “move” or fall apart, then it is better to pre-process the edge with an overlocker.
After cutting, the bottom of the T-shirt must be finished with a hidden cross-shaped seam, which is usually called a “goat”.
Goat seam
This type of seam is quite simple to make; even a novice seamstress can handle it. One or two threads (at your discretion) are grabbed with a needle from below and above the cut allowance. In this case, you need to carefully ensure that the seam is not visible from the outside.
The item you are going to trim and hem must be clean and ironed.
Suture
There is another way to make a T-shirt, T-shirt, sweater or other item smaller. And this is suturing.
If the T-shirt has stretched in length, there is nothing difficult here. Take another similar item and measure the length from the armpits to the very bottom.
Then fold over the part that needs to be removed and baste with a brightly colored thread. Then you can carefully sew it on by hand.
You can make a decorative edge, or even make pendants at the bottom. Use your imagination and come up with something unusual.
If the product is stretched in width, there will be more hassle with suturing. It will be easier to sew the shirt in; from the back center of the back, you can cut out a piece of excess fabric and make a neat seam.
This seam is then decorated with buttons or bows. The same can be done on the front of the T-shirt.
Another option is to sew in a zipper.
There are more problems with a T-shirt.
Reduce as follows:
You can make a T-shirt smaller, and there are many ways to help. Choose the most comfortable one and make the item smaller.
List of materials and tools needed when sewing a T-shirt
A good craftsman can be seen by his instrument. But if you have minimal experience in needlework, and you don’t have a sewing machine (especially an electric or industrial one) or an overlocker in your house, what should you do? Make do with simple craft tools:
Without experience working with knitwear, try training on things that you don’t mind throwing away. Do only the accessible part of the work yourself. It is better to master complex stages under the guidance of a master or contact specialists who will arrange the item for a small fee.
Hem hems in knitwear
T-shirts, dresses, and pullovers purchased in a store are hemmed using a cover stitching machine. You can buy such a household assistant, but not everyone can afford it.
In one of the master classes we talked about how to sew knitwear on a sewing machine. Today you will learn how to properly hem the bottom of knitwear without the help of a cover machine.
Sewing knitwear: little tricks and tips
The hem of the bottom and sleeves of knitwear can be hemmed with a blind seam by hand, on a sewing machine or on an overlocker.
On an overlocker, this can be done using a special foot for blind stitching. For details, see the video tutorial “Overlock Feet.”
A blind seam made on a machine or overlocker will be practically invisible on voluminous knitted fabrics, knitwear with a relief pattern and printed fabrics.
But if you want, on the contrary, to make the hem seam noticeable, you can highlight it using double or triple decorative stitching. Moreover, it is fast, beautiful and reliable, since the stitching is durable. The optimal stitch width for this hem is 2.5 mm.
Hand blind stitch
Finish the bottom of the garment and the sleeves with an overlocker.
Turn the hem allowance to the wrong side and press. Hem with a cross stitch "goat". To do this, grab with a needle one or two threads of the fabric from above and below from the cut of the allowance (edge of the overlock stitch). Make sure that the stitches do not go to the right side of the fabric. The distance between the grips should be no more than 1 cm. Before finishing the stitching and securing the thread, slightly stretch the fabric.
The finishing seam “goat” is most often used to hem the hem allowance for items made of thin, delicate, silk and elastic fabrics.
Machine blind stitch
Finish the bottom of the garment and the sleeves with an overlocker. Turn the hem allowance to the wrong side and press.
Turn the hem allowance to the right side so that on the wrong side the cut of the allowance protrudes 0.7 cm. Set a blind stitch on the sewing machine and adjust the stitch width so that the needle only slightly catches the fabric on the fold. Try it on a scrap piece.
Then stitch along the exposed edge of the hem allowance. The optimal stitch length is 1 mm.
Finish stitch or double needle stitch
Finish the bottom of the garment and the sleeves with an overlocker. Turn the hem allowance to the wrong side and press.
Stitch with a double or even triple needle. Using these needles allows you to maintain the elasticity of the finished seam.
If you are sewing from thick or low-stretch knitwear, you can sew one or two or three parallel straight lines with one needle.
The raw edge should be cut close to the stitching on the wrong side.
Adviсe
Hem hems in knitwear
T-shirts, dresses, and pullovers purchased in a store are hemmed using a cover stitching machine. You can buy such a household assistant, but not everyone can afford it.
In one of the master classes we talked about how to sew knitwear on a sewing machine. Today you will learn how to properly hem the bottom of knitwear without the help of a cover machine.
Sewing knitwear: little tricks and tips
The hem of the bottom and sleeves of knitwear can be hemmed with a blind seam by hand, on a sewing machine or on an overlocker.
On an overlocker, this can be done using a special foot for blind stitching. For details, see the video tutorial “Overlock Feet.”
A blind seam made on a machine or overlocker will be practically invisible on voluminous knitted fabrics, knitwear with a relief pattern and printed fabrics.
But if you want, on the contrary, to make the hem seam noticeable, you can highlight it using double or triple decorative stitching. Moreover, it is fast, beautiful and reliable, since the stitching is durable. The optimal stitch width for this hem is 2.5 mm.
Hand blind stitch
Finish the bottom of the garment and the sleeves with an overlocker.
Turn the hem allowance to the wrong side and press. Hem with a cross stitch "goat". To do this, grab with a needle one or two threads of the fabric from above and below from the cut of the allowance (edge of the overlock stitch). Make sure that the stitches do not go to the right side of the fabric. The distance between the grips should be no more than 1 cm. Before finishing the stitching and securing the thread, slightly stretch the fabric.
The finishing seam “goat” is most often used to hem the hem allowance for items made of thin, delicate, silk and elastic fabrics.
Machine blind stitch
Finish the bottom of the garment and the sleeves with an overlocker. Turn the hem allowance to the wrong side and press.
Turn the hem allowance to the right side so that on the wrong side the cut of the allowance protrudes 0.7 cm. Set a blind stitch on the sewing machine and adjust the stitch width so that the needle only slightly catches the fabric on the fold. Try it on a scrap piece.
Then stitch along the exposed edge of the hem allowance. The optimal stitch length is 1 mm.
Finish stitch or double needle stitch
Finish the bottom of the garment and the sleeves with an overlocker. Turn the hem allowance to the wrong side and press.
How to cut beautifully at home?
Let's assume you've already chosen the foundation. And now you’re figuring out which side to take on the matter. You should start by preparing the tools and choosing a sketch. The following tools will be useful in this case:
Important! Scissors must be sharp! Check your main working tool before you get started. If necessary, sharpen it.
Look at the examples, think about exactly where and how you want to cut your T-shirt. These can be horizontal stripes in the back area, symmetrical triangular holes on the shoulders, weaving on the stomach.
Having decided on your own desires, try to draw a life-size sketch of future cutouts on cardboard or paper. The next stage is transferring the design onto the fabric. Pin the sketch to the wrong side of the T-shirt, trace the outline of the cutouts with a special chalk. To get the most accurate lines possible, use a ruler. Now you can start cutting.
What to make from an old T-shirt: a scarf
You will need:
- t-shirt
- scissors
- fabric paint (if desired).
1. Cut off the bottom of the T-shirt. The width of the cut part is about 20 cm.
2. Cut the resulting ring to create one long strip of fabric.
3. Cut off the bottom seam.
4. At the ends of the scarf, make cuts about 10 cm long.
5. Pull the resulting strips so that they curl a little.
6. If desired, you can paint the ends of the scarf with fabric paint.