Denim trousers have gained popularity for their practicality. This is a dense, strong fabric, which consists of an interweaving of 2 types of threads. The fabric is based on a matrix of cotton fiber with different thread thicknesses (depending on the type of denim).
To make the fabric softer and more comfortable for daily use. a certain percentage of viscose, lycra or artificial elastin is added to it. When buying jeans, you need to adjust the length to the buyer’s height and body shape. You can shorten your jeans yourself without cutting off the bottom of your trousers.
Material and tools
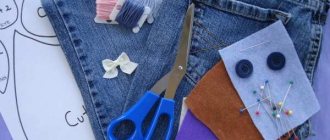
Having only trousers, it is pointless to start hemming - you need to prepare a complete set of tools and auxiliary material, depending on the chosen method:
- white threads and pins for primary fixation;
- plain threads for classic models, or material of a different color for jeans;
- needles;
- sewing machine, if we choose mechanical hemming;
- trouser braid;
- chalk or soap;
- adhesive tape (web) when choosing the appropriate method.
How to shorten trousers without web sewing
Cobwebs cannot be used for all types of material. For example, it is not advisable to use it when hemming knitted pants, since the materials are very elastic and can lose their extensibility with cobwebs. It is also better not to use cobwebs on thin materials. It can thicken the product, creating extra volume. As for expensive materials, it is better to entrust the work of hemming things to a specialist.
Other types of fabrics can be easily processed using gossamer.
Attention! One of the big benefits of using duct tape is that there will be no visible threads on the outside of your pants.
Execution order:
- Turn the trouser legs inside out;
- Bend to the required length;
- Place a piece of cobweb between the fold and the leg;
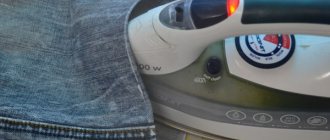
- Use a hot iron from the inside out.
If the web is of poor quality, then it will not glue the place together. Therefore, you will need to use adhesive tape and spray water on it.
In stores there is tape that is applied to a paper base. This type of web has a number of advantages compared to the classic one. The fact is that it is quite difficult to place it so that it ends up in the right place. It is much easier to do this if it has a paper base.
Ribbons are inserted into the fold and ironed several times at high temperature. Therefore, you need to heat the iron very hot. The tape melts well and glues the fabric.
Tips for use:
- Practical application proves that the tape can peel off after three washes. In this case, it needs to be glued again. Therefore, you should try not to pollute things;
- When washing, the water temperature should not be more than 50 degrees;
- Sometimes during operation, the cobweb sticks to the iron. Here you need a small piece of fabric soaked in alcohol. It removes tape residue well. To avoid staining the iron, it is advisable to cover it with a bandage or cotton cloth.
Preparation and first recommendations
Any repair and tailoring of clothes begins with fitting - only the thing that fits your figure looks perfect and improves your appearance.
Video tips for beginners on hemming pants
A few tips to properly hem men's trousers:
- Having put on trousers, choose shoes that match them;
- use the belt;
- classic models should reach the middle of the heel;
- narrowed models can be located a couple of centimeters higher;
- Fold the legs and pin them, or sew a few stitches with white thread.
Now take off your pants and lay them on the table. Draw the first line along the fold line - this is the future level of the length of the trousers. Now put about 3-4 cm down for the hem. A large length will spoil the appearance and is used exclusively for children's models.
Fold without trimming
It is advisable to fold children's trousers without cutting the length. If you simply make a large allowance for the seam, bend it to the required length and sew it up, during wear the edge will fray slightly, so that after a year, if you tear off and press the trouser legs, there will be a noticeable strip at the height of the old hem allowance.
To avoid this, make a “denim” hem:
- After putting the trousers on the child, mark the desired length of the new item on the front side.
- Measure the height of the excess.
- The resulting value is set aside from the original hem seam and a line is drawn.
- Fold the trouser legs so that the branded stitching and the marked line are aligned.
- Baste or pin with pins.
- Stitch by hand or on a machine, departing 0.1-0.2 cm from the branded stitch.
- They straighten their trousers.
- From the inside or from the face, iron the seam through gauze so that the seam allowance goes up. There is no need to steam the allowance itself - otherwise it will press through the fabric and leave an unsightly strip on the front side, especially noticeable on shiny trousers.
Technique for hemming trousers
Methods using tape and blind stitching are described in the relevant articles, which are linked below, but here we will touch on the simplest hemming using a sewing machine.
After fitting and marking, we trim off the excess fabric. The resulting edge should be overcast with an overlocker - this way it deteriorates less and retains a pleasant appearance.
Now, more about the stages of hemming pants:
- First of all, we sweep the trouser braid along the level of the hem of the trousers;
- the stitching is carried out along special textured stripes around the entire circumference;
- when you go through the entire circle and approach the overlap of the ends, you should lower the needle and raise the foot of the sewing machine;
- Sew a seam across the tape and proceed to stitching the other edge of the tape;
- now iron the trouser tape;
- we bend the trouser leg and stitch it with suitable threads, or manually sew a blind seam;
- iron the seams and enjoy the excellent trousers.
How to Hem Jeans Without Cutting Them
- threads to match the fabric being hemmed;
- needle;
- scissors;
- ruler;
- tailor's pins;
- tailor's chalk;
- iron.
- Put on your jeans and mark the length to which you want to shorten them.
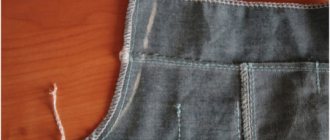
- Fold each pant leg outward without cutting it and secure it with tailor's pins.
- When tucking, make sure that the crotch seam lines up exactly with itself at the top of the legs.
- Sew the pant legs directly under the bottom factory seam - so that your threads are “hidden” under it.
- Fold the resulting fold inward and iron the product with an iron.
For hemming jeans this way, a backstitch stitch is also suitable. But you will need to make another seam on the inside of the legs so that when putting on the product, the leg does not fall into the resulting “pocket” inside. To do this, you need to carefully sew the fold using a “blind seam”. You need to do it like this:
- First, iron the pants and prepare the thread and needle.
- Insert the needle into the edge of the fold created inside the trouser leg after hemming.
- After this, grab a little fabric (1-2 mm) from the other part of the leg, inserting the needle exactly opposite the place where you inserted it into the fold for the first time.
- Now you need to grab a small section of the fold again, exactly opposite where the needle came out of the pant leg.
By making a seam in this way, you will carefully pull the resulting fold inside the trouser leg towards itself. When the jeans are put on, the leg will not cling to anything inside them.
Quick repair - hemming trousers with tape
Most often, ready-made models of trousers from stores and boutiques have a slightly higher length, which has a number of inconveniences:
- spoils the view - the trouser leg, dragging on the ground, turns away the eyes;
- premature wear of the material;
- does not match the style.
The problem of long trousers can be easily solved - you need to shorten the trousers and the easiest way is to use adhesive tape.
Video of using trouser braid - cobwebs
Materials and tools for hemming trousers with tape
If you decide to repair new trousers yourself, rather than using the services of a workshop, then in addition to the trousers themselves you will need:
- adhesive tape - cobweb;
- threads matching the style and color of the trousers;
- white threads for basting;
- tailor's scissors;
- ruler, meter;
- soap or chalk;
- sewing machine, needles.
Most of the sewing equipment is constantly available to any housewife; missing items and tools can be easily purchased at any fabric and accessories store.
Some tips
- Since some materials tend to shrink after washing, it is recommended to wash the item before starting work to avoid unpleasant consequences.
- If you are working with jeans, you should leave a margin of about one centimeter.
- For summer trousers, braid is used only on the back side, and the allowance is less than a centimeter.
- Soap marks are easier to get rid of than chalk marks.
- If sewing is urgent, you can use double-sided interlining. It is worth understanding that this solution is temporary. However, to use it, you need to apply the tape to the work area - fold it and steam it on one side. Next, fold the other edge and do the same on the other side.
- For knitwear and jeans, you can use special needles and threads.
- If the needle is already rusty, it should be replaced.
- For products made from fabric that has decorative elements, you can shorten it at your own seams.
- After the marks are applied, it is better to cut off the pants on a flat surface.
- Make sure that the seams are not visible.
- In order for classic trousers to look as decent as possible, the back of the legs should be slightly longer than the front, which covers only 2/3 of the shoe.
- If you choose the right length, the trouser leg gathers at the shin into a fold.
Women's vest pattern
How to fix a hole in a down jacket
How to make abrasions at a seam
You will need a brush, a spray bottle of water and fabric paints.
- Wet the edges of your pants with water from a spray bottle.
- Mix purple and blue paint and apply with a brush to the machine seam area. Let it dry. To speed up the process, use a hairdryer.
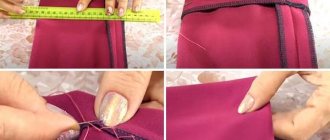
- To imitate abrasion, you need to gather the edges. Take a thread and a needle, make large stitches (about 0.5 cm) at the top and bottom, and gather the fabric into an accordion. They don't have to be even.
- Wet your jeans again with water. Load up some white paint to keep your brush semi-dry. Lightly move along the gathers and hem of the legs.
- Once the paint has dried, you can unravel the stitches. Now the seam is difficult to distinguish from the factory one.
Sew on the sides
If the item is too big for you in the hip area, then it should be sutured along the outer seam:
- We turn the product inside out, try it on, if possible, actively - squat, walk.
- We mark with pins the places where the volume needs to be reduced. We distribute everything equally so that there is no curvature as a result.
- Draw a straight line with chalk and sweep it by hand.
- We turn the product inside out and try it on (again, actively).
- We rip out the factory stitching and sew along the entire length of the trouser leg along the intended new seam so that there are no distortions.
- Cut off the excess fabric and trim the edges.
- Sew on the belt and bend the edges of the trouser leg.
- We do the same with the second leg.
You can sew the sides of the trousers along the outer and inner seams. In some cases, for example, if there is decor, it is not advisable to touch the external seams. Then the item is sutured along the inner seam. They also work if you need to adjust the waistline of your trousers.
- We turn the trousers inside out, try them on and mark the excess.
- We take the thing off and lay it out on the table.
- We tear off the belt and cut it in half at the back.
- Apply a new seam using thread and needle to both parts of the item.
- We trim off the excess, process the edges, stitch.
- The last step is to sew on the belt.
If you need to significantly reduce the size of your trousers, for example, by two sizes or more, then you will have to stitch along both the outer and inner seams. The procedure is the same as in the case of decreasing one seam at a time, the indicators are simply divided by two.
Choosing the right length
When figuring out how to properly hem trousers, the first thing you should do is choose the appropriate length. It directly depends on the type of clothing and shoes used. According to the standard, for women, the trouser leg should reach the center of the heel. Men's boots should remain completely open. Taking into account the style, you should adhere to certain rules. For female models:
- straight. To the center of the heel;
- wide. Partially covers shoes;
- tapered. Reach to the ankle;
- flared. They go to the floor;
- sports. They expose the leg a little, the bottom of the trousers is above the ankle.
In the case of men's clothing, the requirements will be as follows:
- classic. Cover the heel, but only partially;
- with turns and narrowed. The top of the shoe remains open.
By following these recommendations, you will be able to hem your trouser legs exactly according to the rules. Naturally, this will have a positive effect on your appearance.
Causes
There may be several reasons why you have to change the size of an item:
- Firstly, even new trousers may not fit your figure as perfectly as you would like. The problem in this case is complicated by non-standard parameters and proportions.
- Secondly, if washed incorrectly, the fabric can become deformed, and you already get a model that is, as they say, “to grow.” Most often this happens when the temperature or spin mode is not observed. Usually the width and length of the model are subject to correction.
- Thirdly, you may simply lose weight, and your favorite item becomes baggy and uncomfortable. As a rule, in this situation you have to change the width of the trouser legs, as well as reduce the size of the item at the hips and waist.
- Fourthly, the item was purchased obviously not in your size, simply because there was no other size. And now, in order to wear the item you like, you need to change the size yourself.
- Fifthly, the reason for the “reconstruction” is changing fashion: today wide trousers are in trend, and tomorrow – tight ones. In order not to purchase a new item for each season, it makes sense to adjust existing models.
- Sixthly, and this is perhaps one of the most common options, the item fits well, but not in all places. For example, the waist suits you, but the hips are too wide.
- Seventhly, the reason for alterations is the discovery of defects in the fabric or abrasions. In this case, having minimal seamstress skills, you can easily “hide” the defect.
There are many reasons why you may need to sew in your trousers.
Preparatory manipulations
Before you fold the bottom of your trousers, you should prepare for this process. As already mentioned, the length is determined taking into account the model of the pants. It is most convenient to carry out such manipulations with an assistant. One person tries on clothes, while the other notes the desired height. You can also use an already hemmed product for this purpose. In order to avoid making mistakes, you need to follow simple instructions.
Purchased clothing is turned inside out. The same manipulations should be done with old pants. These products need to be folded so that the crotch seams touch. After this, the cutting line is marked.
Now you need to draw a right angle from the arrow and draw a horizontal line on both legs.
All that remains is to build the allowance line that is needed for the hem. Another line is drawn at this point. It should be approximately 3 cm below the first.
It is most convenient to mark all the lines on the material with an ordinary soap. Before cutting off the intended element, it is recommended to pin the trouser legs together with pins. This prevents the hem from shifting. Perform similar manipulations in turn with each trouser leg. As a rule, experienced needlewomen resort to this method, but novice craftswomen can also use it.
Finishing
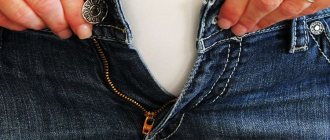
After shortening, the clothes should be washed and ironed. Before performing these manipulations, you must fasten the zipper on your trousers, as well as all buttons without exception. It is recommended to give preference to detergents intended for delicate items.
If washing is done by hand, you can additionally use a brush. It will act as an additional tool. Powder or regular soap is applied to it, after which the entire surface is thoroughly wiped. Particular attention is paid to the hemmed part. It is strongly not recommended to wring out clothes after this. The water should drain from it naturally.
Ironing after shortening should begin from the pocket area . Then you need to go over the waist with the iron. With its help, you need to carefully straighten all the folds. To form the arrows, the top and inner seams of the product are combined. The surface of the iron moves as smoothly as possible. This way it is possible to avoid the appearance of unevenness and folds. When processing a fold line, be sure to turn on the steaming function.
Often the arrows disappear very quickly. In order to preserve them for as long as possible, you can use one trick. Before ironing, you just need to rub the fabric with soap.
On light-colored items, the iron often leaves scorch marks, which significantly spoil the appearance. To avoid their appearance, we recommend ironing through thin fabric folded in layers. In this case, gauze should not be used. It has a heterogeneous structure and unevenness may appear on clothes.
To shorten a piece of clothing, it is not at all necessary to contact an experienced craftsman. It’s quite possible to do these steps yourself, even at home. You just need to accurately determine the appropriate length and prepare everything that will be useful in your work. If you strictly follow the instructions, the trousers will turn out beautiful and fit perfectly.
Reducing the waist
There are several ways to sew trousers in the waistband: insert darts or cut off the excess with scissors along the side seams or along the step cut. The first method is good for light and medium fabrics, and it is better to adjust jeans at the seams. Reducing the sides is suitable if you are going to alter a man's trousers. There are practically no darts made on them.
Correcting the middle seam
Reducing the step cut (located at the back, in the center) is the best solution if your figure has a large difference between the waist and buttocks. The operation is simple; the only thing that can complicate things is the belt loops, which will need to be moved.
- Open the waistband stitching by 10-12 cm and step the cut to the hips or below. Open the belt loops if there are any.
- Mark a new center seam line with chalk, adding an inch on each side for the seam allowance.
- Place a line. Try it on and make changes if necessary.
- Cut the belt in half and reduce it to the new size.
- Move the belt loops to a new distance, and then sew them in the same way as the rest.
Don't cut the fabric without making sure you leave an allowance. It is better to first lay a new line, and then cut off the excess, so that there is still an opportunity to fix everything.
We correct only on the sides
The operation is similar to the method described above with the difference that now we are making adjustments only on the sides.
- Unfasten the waistband at the sides and spread the product out to the sides by 20-23 cm.
- Mark new lines, hand baste and try on.
- Sew stitches on a sewing machine.
- Reattach the waistband the same way it was finished.
Reduce with darts
You can reduce the waistband of your pants by adding darts. They are placed on both sides, at a distance of approximately 10 centimeters from the center. Darts are useful if the fastening is located on the side. This method is often used to sew in women's trousers.
- Decide where you will place the darts. Undo the belt in all these areas: you will have to rip it off almost completely, leaving only the clasp intact.
- Try it on and fold in excess fabric and pin it.
- Baste by hand and then stitch by machine.
- Iron the darts, placing them mirror-like from the center line.
- Cut the belt, remove the excess length and stitch again.
- Sew it to the waist.