What types of tapes are used for hemming trousers?
Slim, straight, flared trousers look elegant if the hem is finished with a special trouser hem tape. With its help, the bottom of the product is protected from abrasion and deformation. Buy braid by the meter in the sewing accessories department.
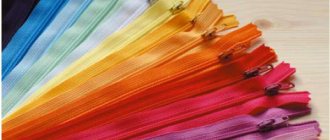
Braid or grosgrain ribbon
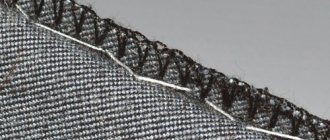
For high-quality processing of the bottom of the trousers, trouser braid is used. This is a textile product made of cotton and polyester of increased strength. The width of the tape is 15 mm, there is a slight thickening along one edge.
Rep tape (braid) is applied to the bottom of trousers made from medium and thick materials.
Processing the hem of the bottom of the trouser legs with braid increases the wear resistance of the product. It protects the edge from wear. The braid is sewn on by machine, the connection is strong, so it is not afraid of repeated washing (hand, machine). Trouser braid lasts for many years. It doesn't fade or wear out. Advantages of finishing the bottom of the product with tape:
- strength;
- durability;
- resistance to deformation.
Spider web tape (with adhesive base)
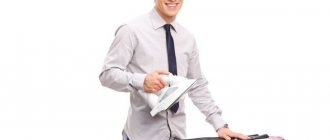
Hot-melt adhesive tapes for hemming fabrics are made of polyamide. This is a strong adhesive connection. It can withstand light hand washing. To hem the bottom of the trousers, use adhesive tape (double-sided). It is produced in two colors (white and black) of different widths: 10, 15, 20 mm. Glue it using a hot iron and steam.
For heavy suiting fabrics, hot-melt mesh is produced. This is a type of cobweb, but tougher. It has a paper base on one side. After gluing (ironing), the paper layer is removed, an allowance is applied and heat treatment is carried out.
Correct fitting of trousers
Trying on is a very important operation necessary to eliminate various defects in the fit of the product on the figure. Before trying on, it is advisable to carry out a wet-heat treatment, since many types of fabric shrink after the first wash.
- It is customary to try on trousers with shoes, and if their owner wears a belt, then you should not forget about it.
- The optimal length of men's (school) trousers is to the beginning or middle of the heel, so they will not look too short and at the same time will not drag on the ground. Women's trousers should always end in the middle of the heel.
- If fitting is done without shoes, then the back of the trouser leg should reach the floor. Make sure that the back of the trousers does not form folds, although a slight fold is allowed in the front.
- Another option for choosing the length is by model and depending on fashion. If the trousers are narrow, for example “skinny”, then they should be made a little shorter so that they do not take on a wrinkled appearance.
- During fitting, the bottom of the trouser leg must be turned outward and the front and back sides should be pinned.
Important! The front half of the trousers is usually 1-1.5 cm shorter than the back half.
How to hem men's trousers with braid?
Classic models of men's trousers are made from dense materials. To finish the bottom, a special braid is used, it is called differently (trouser, grosgrain). The name does not play a special role. There are certain rules for how to hem trousers using such tape.
How to try on pants
Long pants need to be cut. Before doing this, determine their length. The fitting is carried out with or without shoes. Be sure to wear a belt if trousers will be worn with it. When a person is wearing shoes, the bottom of the trouser leg falls in the middle of the heel.
When trying on without shoes, their bottom edge is at floor level. Using this rule, the correct length is determined. They fix it. To do this, at the desired level, the trouser legs are turned to the front side, and each fold is secured with pins in the area of the crotch and side seam.
Steps to prepare the bottom of the trousers to sew on the tape
The product is turned right side out. Using a centimeter, measure the distance from the waistband to the fold of one trouser leg. Make a mark with chalk. The same distance is measured on the second leg. From a mark perpendicular to the side seam, draw a line with chalk, first on one half of the trouser leg, then on the second.
This line determines the length of the trousers. The operation is repeated with the second leg. Using a centimeter, measure the distance from the waist to the line along the side and crotch seam. They should match on both legs.
Step back 4 cm from the bottom line and make a mark. This is the allowance size. If the length of the product is not enough, then leave 2-3 cm for the hem. From the mark perpendicular to the side seam, draw a cutting line on both legs. Fold the trousers in half. Check the accuracy of the markings. Trim off excess length.
Materials for filing
In order to properly process the bottom of the trousers, the grosgrain tape is given the same shade as the trouser fabric. Before making a purchase, measure the width of the trousers (S) along the bottom line. Do the calculation:
- length of grosgrain tape for processing one trouser leg L = S + 3 cm;
- total consumption for both legs R = L * 2.
Before use, the grosgrain ribbon must be soaked in hot water and dried. After this treatment, it will not change size after washing the product.
To work you will need threads: contrasting ones - for stitching, matching threads - for hemming. You will need a sewing machine, sewing needles and pins for chopping fabric, and scissors. To apply markings you will need:
How to remove “cobwebs” from fabric: checking known methods
October 10, 2019
We decided to personally check the methods for removing “cobwebs” from fabric described on the Internet. Results and conclusions are in the master class.
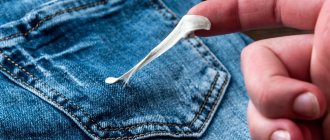
“Gossamer” or adhesive tape/edge is a non-woven adhesive material that is used to join parts together. For example, when hemming the bottom of trousers, when connecting parts of a collar or cuff, hem and hem, and so on. Gluing the “web” is simple: we lay it between the parts and iron it. But how to remove already glued cobwebs, if there is such a need? We have collected popular tips on this topic and tested them.
We used a simple “gossamer” braid without a base and thick wool blend fabric. We specially took contrasting materials for clarity. We glued pieces of cobwebs between the scraps and began checking.
Life hack: how to fix the “web” with steam
Method 1: steam
The most popular advice: treat the glued “web” with hot steam.
How to proceed: place the fabric with the “web” on the ironing board and, without touching the iron to the fabric, but bringing the sole closer, treat it with hot steam. Option - use a steam generator. After this, we immediately separate the layers of fabric; the “web” should separate from the fabric.
Result: after exposure to steam, the glued layers of fabric are easily separated, but remnants of the “cobweb” remain on both sides where it is glued. It is almost impossible to remove them without additional funds.
Method 2: iron + piece of fabric
The second option involves gluing the “web” onto a piece of unnecessary fabric.
How we proceed: we separate the layers held together by a “cobweb”. Apply a piece of fabric to the ribbon and iron it. We remove the flap - the “cobweb” should come off with it.
Result: I had to iron the fabric with the “web” through the patch several times, but hints of the presence of glue still remained.
Method 3: solvent
Exposure to alcohol or another solvent (for example, nail polish remover), according to advice, should remove the “cobwebs”. Surely this method is not suitable for all types of fabric. First, you should check how alcohol or solvent affects your material in an inconspicuous area.
How we proceed: we separate the layers of fabric with the “web”. Apply alcohol or another solvent to a cotton pad and clean off the tape.
Result: we used cotton wool soaked in vodka for one side of the scrap, and cotton wool with nail polish remover for the other. Vodka showed its best performance, quickly and cleanly removing the “cobwebs”. Nail polish remover didn't work as well.
Method 4: washing
To remove the “cobwebs”, it is recommended to simply wash the fabric with the tape attached.
How to proceed: separate the glued layers of fabric and wash. We took a sample from method 1 (separated layers of fabric from which the “cobwebs” were not removed) and washed them by hand with a liquid detergent.
Result: in the middle of the patch, where it was convenient to wash it, the “cobweb” came off well. Along the edges, where it was inconvenient to rub the scrap, pieces of the “cobweb” curled up, but remained on the fabric. The edges of the flap are frayed. This tissue is dense, and the flap has hardly changed its shape, while a more mobile material could have been significantly deformed.
Method 5: mechanical
If the fabric is quite dense and fleecy, you can try to mechanically remove the “cobwebs” from it.
How to proceed: separate the layers of fabric and remove the “cobweb” with your hands or helping yourself with tweezers.
Result: the “cobweb” was removed almost without a trace. However, this method is suitable for materials with pile: the tape is removed with particles of pile. Another disadvantage is that removing the “cobweb” this way is quite time-consuming and labor-intensive.
* If the fabric allows it, try removing the “cobwebs” with a cotton swab and vodka or medical alcohol. The simplest and most effective way. But after this the fabric will have to at least be rinsed and dried.
* In second place in terms of effectiveness is washing. However, not every fabric item will retain its original shape after such exposure. The edges will definitely fray.
* If it is not necessary to remove the “web” to the last drop of glue, but you need to preserve the shape and edges of the part, you can use the method of re-gluing the “web” onto a piece of scrap. The method gives a good result, and there is no need to wet or rub the fabric.
Master class and photo: Natalya Pykhova
How to properly duplicate details of coats and jackets
How to cut faster - 9 tips and life hacks
How to shorten trousers using web tape?
When there are children in the family, it is very convenient to have a tape for hemming trousers with an iron. They grow quickly and you need to constantly lengthen old pants or shorten new ones. With the help of a web, it is easy to shorten women's trousers made of light fabric.
The operation does not take much time. They do a fitting. How to do this is described above. If the trousers are shortened, then the trouser legs are not rolled up at the floor, but at the required height and pinned together.
Turn them right side out. Lay out on a flat surface. In the place where the fabric is pinned, place a mark with chalk. A bottom line is drawn perpendicular to the crotch seam. To bend, 1.5-2 cm are removed from it, and a cutting line is drawn using a ruler.
Compare the markings of both trouser legs. If the marks are placed correctly, cut off the excess fabric. If the fabric frays, the edge is processed with an overlocker or a zigzag seam on a machine. Perform sequential actions:
- The allowance along the bottom line is turned to the wrong side.
- Pinned with pins.
- Iron it.
- Measure out the required amount of web.
- Carefully place the tape under the edge of the hem.
- Pin it to the fabric to prevent it from slipping.
- Pass a hot iron along the bottom of the legs so that the adhesive tape melts.
How to sew trouser tape on a sewing machine
I won't talk about how to straighten and cut pants. You can learn more about this in the article How to Hem Jeans. I’d rather dwell in more detail on the “nuances” of the technology, since the entire result of your work will often depend on these little things.
So, how to sew a trouser tape on a sewing machine. It would seem that there is nothing complicated, just carefully stitch the tape in two lines and do not forget to tuck the edge of the tape at the place where it joins. You should not tuck the tape, since the joining seam will become quite rough. In men's trousers made of thick fabric this may not be very noticeable, but on light fabrics the hem will stand out like a stick. It is best to singe the cut section of the trouser braid with matches and overlap it. Trouser tape is usually synthetic and melts very well.
When adjusting the tape, you need to accurately align its edge with the hem line marked in chalk. Moreover, the top line, which will become the bottom line when finished, must be sewn exactly 0.1 mm from the edge of the tape. No more and no less. In the finished product, the tape should “peek out” a little to protect the trousers from rubbing along the hem seam. By the way, the color of the ribbon should be matched to the color of the main fabric of the trousers.
Also, when adjusting the tape, do not tighten it. If you pull the tape, the pants at the bottom will be very narrow. If, on the contrary, you “pull” the fabric, then the lower part of the trousers will turn out, which is even worse. When adjusting the tape, make sure that neither the fabric nor the tape sits under the presser foot. Be sure to adjust the correct thread tension and check the presser foot pressure on the fabric.
As for the tape itself, buy a tightly woven braid. It may be more expensive, but over time, tattered areas will not appear on it.
Features of hemming trousers with adhesive tape
The tape is not used if the product is subject to frequent washing. It is not suitable for expensive and heavy fabrics. It is convenient to use for adjusting children's clothing. And also hem models for adults if their length often changes. This problem happens to women when they wear shoes with different heel heights.
The web is used by mothers of fast-growing teenagers. When shortening the pants, they leave a large allowance. When they become short, the seam allowance is peeled off and the trouser legs are lengthened. Classic models of women's and men's trousers are hemmed using tape.
Some features of using gossamer to shorten a product:
- You can’t place the web directly on the fold, you need to step back 5 mm from it;
- wash the product at 60 °C;
- if a wide tape is glued (more than 10 mm), the edge of the product looks rough.
Using a web you can shorten new trousers or restore old clothes. In just 5 minutes you can return your trousers to their normal appearance if the hem comes off after washing. You can quickly hem the hem of a skirt or dress with a web. It is universal.
Modern materials used in sewing greatly facilitate the work of tailors and improve the quality of sewn products. Glue, adhesive tapes and fabric webs are indispensable for sewing, repairing clothes and various types of needlework. What are they? What types of them exist? How to use them correctly?
What is it and where is it used
This tape is not an analogue of dublerin, because is a set of glue threads connected to each other into a thin layer, forming a single web, which allows you to cut out a part of any configuration and size from it. Under the influence of heat, the glue begins to melt and spread over the surface of the material. Drying after a while, the glue holds the parts together.
Cobwebs for clothing repair are actively used in the clothing industry at 2 levels:
- individual (in sewing studios);
- mass (in garment factories).
It serves as a cushioning and gluing material for cut parts that cannot or should not be joined in any other way (for example, by hand or machine basting). Most often, this method of laying and fastening parts is used in sewing in clothing factories. It allows you to reduce production costs and reduce the cost of the final product.
In what cases is it necessary to glue fabrics rather than stitching?
Adhesive materials are used in cases where it is necessary to fasten textile parts without seams. Also, the need for gluing fabrics often arises when sewing, repairing clothes, creating crafts and toys, applying stripes, appliqués and decorations to fabric, performing work using patchwork, quilting, decoupage, and scrapbooking techniques. Adhesive materials are indispensable when joining parts made of difficult-to-process, thin and loose fabrics. They are often used to hem the hems of trousers and skirts, and are especially appreciated by those who sew infrequently.
Hemming trousers using a web
The web is very convenient to use for hemming the bottom of the product. It’s just not advisable to glue the hem of a skirt made of thin and “delicate” fabric. The cobweb will definitely be “stamped”, and the bottom of the skirt will become stiff. It is better to hem the skirt by hand, with a very thin thread and needle. In other cases, it is better to use the adhesive web in combination. That is, first fix the hem of the trousers with a web. After this, you can also hem them manually, since adhesive materials lose their properties due to frequent washing and over time, the glued area will come loose and you will have to hem the trousers by hand.
Adhesive tape and web
Among the adhesive materials, the most popular and convenient to use are adhesive tape and web. With their help, you can hem the edges, strengthen the seams, glue the fabric to give density to some elements, and repair the product without applying patches. This will require a minimum of time and effort. To glue fabric with them, you only need an iron.
What does it represent?
Glue web is a thin translucent non-woven fabric made of polyamide fibers, which melt when heated and firmly connect the fabric layers to each other. Available in the form of strips 0.5–5 cm wide or solid sheets rolled into rolls, which can have different sizes (5–70 mm) and thickness (0.17–0.2 mm).
Sometimes the adhesive sheet is applied to a paper base with a mesh structure. It is convenient to work with such tapes - they can be easily laid out on fabric and glued in the right place. They are also used to work with elastic materials, as they tend to stretch.
How to use?
Adhesive tape or web is placed between two layers of fabric and ironed for a few seconds. The size of the web should match the size of the fabric. An adhesive web on a paper base is applied to the wrong side of the fabric and ironed. Then the paper is peeled off, another layer of material or part is placed on top, inside out, and ironed. If the gluing is not strong enough, the iron is reused, setting a higher temperature (but not higher than allowed for the type of fabric used) and sprinkling the product with water.
Adhesive tapes and webs are not used for gluing very thin or, conversely, dense fleecy fabrics, such as flock, velvet, corduroy. They should also not be used when working with expensive materials without sufficient experience due to the risk of damage. Such adhesive materials are often used if you need to secure lace. Despite the fact that lace requires additional sewing by hand or by machine, working with an already attached openwork part is much more convenient.
The adhesive web or tape is glued, positioned 0.5 cm above the fold line. No one is immune from mistakes, so sometimes it becomes necessary to remove excess or the entire sticky layer. This is done in the following ways:
- Steam the joint. Steam treatment is carried out for 2 minutes, usually after this the glue is easily removed from the surface.
- Use alcohol. Apply the liquid to a cotton pad and moisten the problem area.
- Take an unnecessary piece of fabric, apply it to the sticky layer and iron it with steam, the glue will stick to the new fabric.
How to tape the hem of men's trousers with adhesive tape
To make the trousers look aesthetically pleasing and beautiful, you need to choose a web tape that matches the color of the fabric. If you glue light-colored trousers with dark tape, there is a risk that it will show through. Knowing some secrets, you can easily shorten your pants at home, without seeking help from professionals.
To accurately determine the length, the help of an outsider is required. For example, you can ask a relative or friend. If this is not possible, the optimal length of the pants is determined by other trousers.
Despite the fact that by tucking the legs with a web, the seam turns out smooth and beautiful, some people still stitch the bottom using a machine for higher reliability.
If you can't find adhesive tape in the right color, don't worry. For dense fabric, the color of the web is not important. This problem only applies to lightweight materials. If at the time of gluing, some of the glue remains on the iron, you can eliminate the problem using a cloth and alcohol.
Using fabric glue: types, composition and method of application
You can glue the fabric not only with adhesive web or tape, but also with a special textile glue that does not leave marks. Manufacturers offer a wide range of adhesive materials with different compositions. The selection of glue should be carried out taking into account the type of fabric and the conditions in which the finished product will be used, therefore, before use, be sure to read the information on the packaging.
Rubber based adhesive
Rubber-based adhesive is a solution of rubber or its mixtures and synthetic resin in a solvent. It has great elasticity and resistance to low and high temperatures. Suitable for working with thick fabrics, bonds fabric and leather well. After application, the adhesive based on natural rubber remains in a liquid state for several hours, so it is suitable for joining large parts - you can straighten the fabric and smooth out folds at any time. It is applied to the fabric, allowed to dry a little, another layer of fabric or part is applied and pressed.
Perchlorovinyl glue
Perchlorovinyl adhesive is a solution of perchlorovinyl resin in organic solvents. It is moisture resistant, resistant to oils and gasoline. Suitable for gluing materials of different compositions - fabrics, leather, rubber. Operating temperature range – from -20 to +100 degrees. Widely used in the shoe industry. The glue is applied in 2 layers with a break of 10 minutes, then the surfaces to be glued are pressed and left under load for 2 days.
Some useful tips
- Practical use shows that the web can come off after several washes. In this case, you just need to do the above processes again. This must be taken into account and, if possible, apply adhesive tape to products that are less susceptible to washing and have less contact with water.
- When washing items with cobwebs, avoid high temperatures.
- There are unpleasant situations when, during the ironing process, the adhesive composition remains on the iron. A small piece of cloth soaked in an alcohol solution will come in handy here. It removes glue residue perfectly. To avoid staining the iron, it is recommended to use a thin cloth or gauze. This way, the iron will be protected and will not have to be cleaned.
The web is very easy to use and is an indispensable material. We hope that this article will help you properly shorten your pants in a simple and convenient way.
Pattern of a kimono robe with wrap and sleeves
Knitting patterns for women's jumpers
Steps to prepare the bottom of the trousers to sew on the tape
Before you start working on your trousers, they need to be ironed well. Next we perform the following manipulations:
- Turn the pants inside out.
- Fold the trousers in half and place them on a flat surface.
- The hemline is not always the same on factory-made trousers, so you can use the waistline as a guide.
- We pin the trouser legs evenly aligned along the side seams.
- Next, take a ruler and use soap or chalk to draw a line from one pin to another. Along this line we place pins through both legs, turn the product over and draw the resulting line.
- We lay lines along the resulting lines with stitches of approximately 0.5-0.7 cm, since chalk or soap may disappear during steaming of the product and during other operations. Along this line we will iron and fold the trouser legs.
- From the resulting line down, you need to set aside approximately 4 cm in men's trousers and 3 cm in women's trousers (for an adult, you can leave a larger margin for a child) for the hem and also draw lines. You also need to take into account the fact that the size of the allowance according to the standards is dictated by the model of the trousers: for flared ones the allowance is on average 2.5 cm, and for classic straight ones - up to 4 cm.
- Now you can cut off the excess fabric along the bottom mark.
Important! If the trousers are tapered or flared at the bottom, then the hem allowance should be symmetrical to the shape of the trouser leg, otherwise the bottom of the product will be deformed.