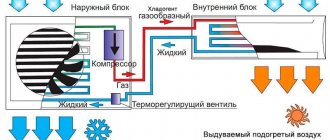
Like all computer equipment, laptops require care and good cooling. This is especially true for devices with a plastic case and a passive cooling system for the graphics and central processors.
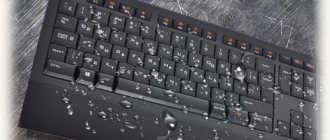
If you do not monitor the temperature of your device, sooner or later this will lead to critical consequences, such as breakdown or complete failure. In addition, computer keyboards of all types are often tested by all sorts of drinks, such as coffee, tea, juices or beer.
They also accumulate dust, crumbs and hair. All this not only interferes with ventilation and disrupts heat exchange, but also leads to breakage and “sticking” of the keys.
Why film
Anyone who has ever tried to clean a laptop keyboard on their own understands perfectly well that doing this is not as easy as with a personal computer. Due to the small size of the device and space saving, as well as due to different types of mounting, problems may arise.
Removing the keyboard in a laptop, disassembling the device completely and disconnecting the cable from the screen may be necessary in cases where it is necessary to perform one of the following operations:
- Solving problems with elevated temperature, including:
- disassembling the laptop to vent the cooling radiator;
- cleaning the fan from dust, hair and debris;
- replacing thermal paste, which promotes better heat transfer between the processor and radiator;
- checking the presence of oil to lubricate fan bearings;
- repair or replacement of a damaged system configuration element;
- solving keyboard problems such as:
- cleaning the keyboard from spilled liquids, dust, debris and hair;
- checking, replacing or repairing a damaged board or button.
Inserting a button
Now we’ll look at how to make a spacebar button on a laptop.
To work you will need super glue and a flathead screwdriver.
First we must pry the old key from the bottom on both sides with a screwdriver or a mild knife and pull it up slightly. In this case, the button should bounce off on its own. Malfunctions in operation could be caused by a breakdown of the system itself. If the system is really broken, then you should select some other button, for example Ctrl, Shift, CapsLock and remove it.
Carefully disconnect the spring mechanism, which ensures pressing the button, and insert it in place of the space bar. After the work has been done, return all the buttons to their place.
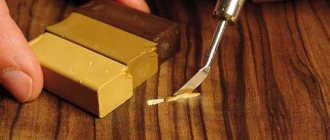
If suddenly the button fails to work due to the fact that it is broken, you should take super glue and fasten the parts of the button. Glue is applied to both surfaces in a small amount. The parts must be pressed against each other and held for 10-15 minutes. It is also important to remove excess glue before it dries so that you don't have problems with it later. Ideally, you should wait 12 hours before sitting down to work on your laptop again.
On almost all laptops, the buttons are repaired in the same way, but still, different manufacturers have their own subtleties and nuances. Now we will analyze them.
Types of keyboard mounts
There are two types of fixing the keyboard in the device:
- modern netbook and laptop keyboards are mounted on a special panel using plastic latches. Depending on the model and manufacturer of the device, there can be from 4 to 8 mounts. In order to see them, you need to look very carefully, since they are well hidden so as not to interfere with the design and appearance of the device, and not to disturb the user. Fasteners are usually marked with small notches. And this type of securing the keyboard in the device is the most common and complex;
- Less known, but more easily removed, are keyboards secured with screws. This applies mainly to old and rare laptop models.
As a rule, 1-2 screws are used for fixation. After unscrewing them, you just need to pry the keyboard panel with a sharp object.
Withdrawal procedure
If liquid gets on the keyboard, it is recommended to immediately turn off the power to the device to prevent leakage to the motherboard and other live parts.
After de-energizing your laptop, do not forget that the basis for its uninterrupted power supply is the battery, so you need to get it out. Only then can you begin to study the type of fastening and other operations.
You can remove the keyboard in a laptop yourself. The main thing is to exercise maximum caution. The fasteners are very fragile and break easily. To get started, you'll need a pair of small, thin socket head screwdrivers.
If you have a common type of fastening, you need to follow these steps:
- 1. You need to start with the latch located in the upper corner. You need to press it with a screwdriver without making much effort;
- 2. with the second tool you need to carefully pry up the corner of the keyboard;
- after that, you can move on to the next mount and so on.
When opening the first latches, hold them with a second screwdriver or other thin object. Do not use your fingers or rush, as the plastic of the device is not very thick and can easily crack.
Disabling the loop
After disconnecting the keyboard, do not forget that it is connected. You can't tug or pull it. It is connected to the motherboard using a cable, which is very easy to damage. Therefore, this must be done carefully and correctly.
The cable is located directly under the keyboard and is attached to it using a special lock. These fasteners can be of different types and require actions such as pinching the tabs, lifting the fastener, or lifting the spring latch to release.
If your goal was to replace the keyboard as a device, then the job is done.
Progress
First you need to remove the old button. Take the violin, straighten it, then you need to insert a paper clip under the bottom of the key, and then pull it towards you. Proceed with caution. In almost all cases, the keys can be easily removed. Once you have removed the old key, you can easily insert the new one.
To do this, you should place the new button in place of the old one and press lightly, it will stand up on its own and be fixed with plastic fasteners. The work is ready!
If cleaning is needed
If the laptop is left open for a long time, it may become dusty. During operation, a lot of hair, household debris and food crumbs get into the keyboard. If you need to clean up such debris, you can easily do it yourself by carefully vacuuming the device.
At the same time, the main thing to consider is that it is best to use a specialized vacuum cleaner with professional attachments and brushes; if you have to use a regular one, then you cannot use high power.
The laptop does not connect to wifi, it says limited access. Read on for what to do.
The keyboard is the main data input device. Most users like to drink tea or coffee while sitting at a computer or laptop, without interrupting work or entertainment. As a result, it suffers from damage from all kinds of liquids.
In this case, you cannot do without disassembling the device. It is necessary to dry and thoroughly rinse the keyboard, otherwise over time this will lead to “sticking” of the keys or complete inoperability of the device.
Video: remove the keyboard from a laptop
Buttons on laptops from different manufacturers
Acer laptops
The buttons on Acer laptops are arranged as follows: inside there are two frames connecting in the middle and forming a so-called clamshell. Two protrusions are also attached there, which serve as fastening of the button to the keyboard. The button designs are simple. You may have a situation where the connection between 2 frames is broken.
To solve this problem, you should take a thick needle with which you will push the small pins into the recesses. After the work has been done, you should put the button in its old place. To do this, you should fix the folding bed in a slightly raised position; this can be done using a paper clip.
Repair of Acer laptops in 1 day
Order repairs from our service center and receive a working device on the same day, with a warranty of up to 1 year
Find out the exact time and cost of repairs Thank you, no need
Comments (0)
Add a comment
Leave your question using the feedback form and the specialist will call you back and answer without imposing any services.
Sometimes, as a result of improper handling of the laptop or due to a strong impact, the keys fall out. While inserting it into place on a desktop keyboard is easy, it requires some skill. If you are not ready to put the key back in place yourself, then you should contact a service center. Specialists will be able to perform all the necessary actions within five minutes. And the cost of this service does not exceed 100 rubles.
Removing regular keys
- Turn off the laptop through the “Start” menu: “Start” - “Shut down”.
Open “Start”, click on the “Shut down” option
- A thin, curved screwdriver is placed under the edge of the key.
A thin, curved screwdriver is placed under the edge of the key
- The screwdriver handle is gently pulled down until it clicks. After this, pulling out the key will not be difficult, since the key will already be removed from the mounts.
- If you need to clean the space under the key, you need to pry the lock at the top right with the sharp end of a screwdriver. Repeat the same on the opposite side.
Use the sharp end of a screwdriver to pry the lock at the top right
- Remove the fastener.
Removing the mount
What is required for self-repair
If you decide to insert the key yourself, then you will definitely need a needle and a paper clip or items that can replace them. If you need to make minor repairs, additionally take a soldering iron, knife, screwdriver, glue and small tweezers.
Important!
Incorrect actions may result in the need to completely replace the keyboard on your laptop. Therefore, if you do not have the skills to repair computer equipment, it is better to turn to specialists.
Disassembly instructions for Samsung R510 laptop
Let's start disassembling the Samsung R 510 laptop by removing the battery. There are 3 small screws under the battery, unscrew them.
Remove the cover covering the RAM compartment of the laptop by unscrewing 1 screw.
Next, remove the hard drive by pulling the black tab to the left.
Unscrew the remaining 19 screws along the surface of the case.
Next, turn the laptop over in an unfolded state and remove the keyboard by moving the latches at the bottom of it - 3 pcs.
Disconnect the laptop keyboard cable.
Separate the upper half of the body by prying the edges with a tool (it is held on by latches).
Remove the matrix by unscrewing the 2 screws on the matrix mounting arms.
Remove the decorative panel above the power connector by unscrewing 1 screw.
Unscrew 1 screw in the upper right corner of the laptop motherboard and carefully remove it.
Laptop motherboard with laptop cooling system and memory module.
Removing the memory module was not the purpose of this analysis; disassembly was carried out for the purpose of getting to the cooling system for cleaning it and replacing thermal paste, so the module is held in the slot; to remove it, you need to move the latches to the sides.
The cooling system is held on by 8 screws, unscrew it. Dried thermal paste is visible on the cooler and processor, which should be removed and new one applied. You should also clean the dust-clogged radiator of the cooling system between the cooler and the heat pipe.
Source
The process of installing a button on a laptop
Before installing the key, you must carefully examine the swing to ensure its integrity. If any part is damaged, you will need to change the button from specialists or order it yourself from specialized stores.
The installation process is as follows:
- Installing a swing on the metal part of the keyboard. Moreover, you must first place the antennae under the larger part, and then, by applying slight pressure, the two remaining antennae will fit into the grooves.
Important! If the cover falls out along with the swing, then it is necessary to install these parts separately from each other, as indicated above. If you do not disassemble these two parts, then there is a high risk of damage to the antennae by which the button clings to the keyboard.
Installation of large buttons occurs as on a regular keyboard. There is a small metal stabilizer that needs to be inserted into the grooves on the keyboard. And then you will need to lift it in order to install the lid strictly on it. If the installation is done incorrectly, there will be no springing effect.
If the key antennae are broken, but you manage to find them, you can use super glue to fix them.
Extracting the “Shift”, “Ctrl” and similar keys
- Pry off the fastener on one side.
We pry up the fastening on one side
- Pry up the second fastener.
We pry up the second fastening
- Pull out the released key.
Pull out the released key
- Remove the fasteners as described above.
Removing the plastic clips