Wooden chairs not only have an attractive appearance, comfort, and exquisite design, but are also highly durable and environmentally friendly. Unfortunately, over time, such chairs tend to wear out, dry out, become damaged, or their legs simply become loose.
Unlike plastic products, they consist of many small parts that are connected with special glue and several tools. If your chair is drying out, you've probably asked yourself the following questions: how to glue it yourself at home, what kind of glue to choose for quality, and how to do the job correctly.
Repairing a broken leg
This structural element breaks quite often due to improper use or too much load.
The problem manifests itself in two ways:
The leg is broken along the grain of the wood; when combined, the parts fit tightly against each other along the break. No small splinters.
Fragments and thin slivers formed. Such a leg cannot be glued or pulled together, because the weak point will break again very quickly.
Repair instructions:
To eliminate the problem, apply an adhesive composition to the ends, insert the legs into the socket, and press firmly. The gluing is strong and of high quality. The problem remains if the wood texture in this area is weak - there is a possibility of a break near the connecting seam.
Using a hand router, a groove is formed with a width of 10 mm, a depth of 10–12 mm, and a cut length of 100–150 mm.
Using a caliper, measure the dimensions of the groove and saw off the strip to size. They make the part so that it fits tightly, but not tightly (if you hammer it in, you can break the leg). The depth is cut with a margin in order to cut off the top that does not fit in after the glue has dried.
Cut the strip to length, place the glue in the groove, insert the fasteners, and wait for it to dry. Immediately remove all remaining glue with a dry cloth.
Press the elements. The clamps are removed after drying, the protruding part is removed with a chisel, and the joint is sanded.
Select the shade of varnish or paint. Apply the coating in several layers, each subsequent after the previous one has dried.
Restoration of a stool
I would like to point out to Rhinestone that decoupage of an old stool is not a complicated process, but it does require patience. After each process of applying paints, varnishes or primers, you must wait the required time for them to dry, otherwise the stool will not look better than it was.
For work you will need
Before you begin, you need to make sure that you have the following materials at hand and at any stage of the work, you don’t have to drop everything and run to the shops:
- primer (for wood to level the surface);
- sandpaper (preferably coarse sandpaper);
- paraffin candle;
- acrylic paints (white and brown are required, and for additional finishing you can take any desired color), if there is a shortage, you can use wall paints;
- fan brushes (flat) for creating decoupage;
- special stickers or napkins;
- PVA glue;
- sponge (can be used for washing dishes);
- acrylic lacquer;
- To decorate the stool along the edge, you can purchase guipure;
- The guipure is glued using a glue gun. You can find out about cheap kitchen corners by following the link.
The video shows how the restoration takes place:
Don't rush to quickly purchase stickers. Go shopping and take a closer look. In office supply departments, such stickers can be found 3–4 times cheaper than in specialized stores.
Preparation
- Before you can start updating your old stool, you need to completely disassemble it.
Disassembling the stool - Next, any remaining varnish that has not yet been erased during use is removed from all surfaces. The procedure is carried out using sandpaper, not forgetting the legs.
- Since many stools are made of pressed material, the surface is likely to be rough. Don't be upset. To rectify the situation, wood primer was purchased. It is applied in 1 – 3 layers depending on the result obtained.
Each layer must be dried, on average 3 hours. Don't forget about priming the ends. In the future, this will help avoid moisture ingress and the work will not deteriorate.
For a better result, some craftsmen add a little acrylic paint (white) and PVA glue to the primer and after each layer, lightly sand the parts. You can find out about the kitchen glass sliding table here.
In cases with perfectly smooth surfaces, the process of stripping and priming is skipped.
Process
Next, once all surfaces are prepared and dry, you can begin the main work:
- At the first stage, the entire surface is covered with white acrylic. Brown acrylic is applied along the edge and in small areas in the center.
- After the paint has dried (about 3 hours), the dark areas are rubbed with a candle.
- The entire surface is again treated in two layers with white acrylic and left to dry (for a day).
- A day later, the surface is lightly rubbed with sandpaper so that dark acrylic begins to appear through the white layer. You can’t overdo it and remove all the applied layers. You want to create the effect of a slightly worn item.
- The base is ready and you can proceed to the design itself. The intended compositional pattern is assembled from napkins. It is better to tear off fragments taken from napkins at the edges rather than cut them out. This method will make the borders of the edges less noticeable.
- The entire composition is folded, and you can start gluing it. Here we need a brush and PVA glue. It is better to dilute the glue slightly so that it is not too thick and does not drag on the brush. Each fragment is carefully treated with glue and applied to the surface, while all irregularities are smoothed out and the folded edges are straightened. Also, you will need to carefully remove air if it suddenly gets under the fragment.
- The entire composition is assembled and ready. To finish it off, you can create an accent color along the edges of the stool using a sponge and a pre-selected color. The lip is dipped in acrylic and the entire edge is soaked with light movements.
- All completed stages of work are repeated for the legs.
- After everything has dried well, all surfaces are coated with acrylic varnish. It is advisable to repeat the procedure in 2 - 3 layers, while waiting for the preliminary drying.
- The stool is assembled, and its edge is decorated with guipure, which is more convenient to attach with a glue gun.
You can find out how to make a wooden table yourself here.
The video shows the restoration rule:
How to repair a wobbly chair
An unstable chair has wobbly uprights, the geometry of the frame is disrupted, such a product is dangerous for sitting, because it can slide on its side and fall at any moment.
The chair loses stability for various reasons:
- Weakening of the drawer joints or damage to it. This is a frame around the perimeter of the chair under the seat. The seat rests on the frame; it also holds the parts of the frame together.
- Relaxation of the frame occurs due to a broken drawer.
- If the legs are installed directly into the base of the seat, which is made of thick boards, the diameter of the seats increases or the glue loses its original qualities.
The spruce tree swings its leg and strengthens the nest. To do this, pull out the part, trying to do it carefully so as not to destroy the wood. All dry glue is removed from the hole, and a new compound is applied to the end. The chair is placed in its usual position, a load is placed on the seat.
If the problem is in one seam that has come apart , drill a hole and inject glue with a syringe.
It is more difficult to repair a rickety chair with a drawer and cross bars . There are many adhesive joints that become loose over time. Such structures are disassembled, weak points are identified, and glued.
Curved posts are glued in stages, one at a time, and not all at once. This makes it easier to find the correct position for the part so that the chair stops wobbling. If, after strengthening with glue, one leg becomes longer, it is trimmed with a saw.
Andrey Peregubsky
Furniture handyman
Ask a Question
Sometimes it is difficult to remove the element from the socket, so the remaining glue is heated with steam. To do this, put a hose over the spout of a boiling kettle, and bring the other end to the joint. This is done even with seemingly strong seams, because in order to strengthen the connection, it must first be separated.
Decoupage technique
The method involves gluing drawings, pictures, or a cut-out pattern to the surface. The resulting collage is treated with varnish to secure and extend its service life. The work is performed in one of the styles: Victorian, Provence, ethno, military, country, simple city, shabby chic.
Step by step execution:
If the coating is porous, it is puttied to make it smooth. For grinding, first use mesh nos. 240, 320, and finally finish with mesh nos. 600 and 800. Be sure to prime the surface.- The base is usually painted in a light shade, for example, beige, baked milk, dull blue, but it all depends on the chosen style; most often they choose a white color.
- On the flat surface of the stool, the napkin is glued whole; if there are uneven spots, this will not work; you need to cut or tear the edges of the pattern.
- For gluing, use varnish, PVA glue, pencil glue or egg white; it is more convenient to work with a polyvinyl acetate composition.
- The glue is diluted 1:1 with water or the pattern is placed on the undiluted composition; in the first case, the napkin will get wet and tear faster.
- The picture is pasted on, carefully smoothed with a soft brush for drawing and fingers; after straightening all the folds, the collage is dried and varnished.
Ivan Bokorezov
Furniture columnist and designer
Ask a Question
For work, acrylic paints and similar varnish are often used. Inspired natures additionally tint the drawing after drying with paints and add bright details. A primer before gluing is needed to reduce absorption - in this case, the napkin will slide and align more easily.
What to do if the chair squeaks
The strength of the product may not suffer from the appearance of squeaking, but the sharp sound is distracting and creates inconvenience.
Creaking often occurs with computer chairs:
The bolted connections that secure the steel parts to the wood have become loose The screws are unscrewed, lubricated, and reassembled in the reverse order.
The creaking noise comes from the mechanism that connects the backrest and seat. The problem is solved in the same way - using lubricant.
Noise occurs when the connection between the crosspiece and the gas lift operates . Change the bearing or lubricate it.
In wooden chairs, the connections between the horizontal crossbars and the legs . Some models of chairs are equipped with oblique crossbars. If they do not fit tightly with adjacent parts, they need to be strengthened to eliminate friction between the parts. Sometimes it is enough to replace the glue in the connection.
Andrey Peregubsky
Furniture handyman
Ask a Question
If the lintels and crossbars are cracked, they also creak when loaded. It is better to replace them with new ones. Parts are cut out of hardwood according to the dimensions of the old ones. They are glued into the structure; in addition, screws or wood screws are used. The shape and angle of the end cut are chosen so that it exactly matches the joint in the frame. If you cut it carelessly, the skewed product will still creak.
Repairing a dry wooden chair
Wood can dry out over time if there is not enough moisture in the room or if the chair is permanently placed near a heat source. In this case, the dimensions of the parts are reduced, the adhesive joints become movable around the legs and crossbars. At the same time, the ends of the elements are still firmly attached to the glue, so the integrity of the structure is not compromised.
Methods for eliminating defects:
- remove the element from the seat and re-glue it;
- place the wedge in the slot next to the part.
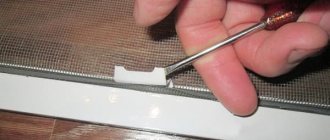
The leg or crossbar is removed from the hole; if the joint is strong, steam is used. The nest is thoroughly cleaned of glue, using a knife, chisel, and scrapers. After this, lubricate the landing site and the end of the part. A paper strip is wrapped around the end to increase the adhesion tightness.
Sometimes the adhesive joint cannot be separated. In this case, the cracked joints are sealed with wedges . A cut is made on the leg or side in a place close to the joint. A thin wedge is placed in it, which only protrudes slightly beyond the dimensions. Use waste of any wood. The part will slightly widen the end of the crossbar, resulting in a strong connection. Glue is injected under the tenon.
During the gluing period pressure is applied so that the joint dries in the correct position. The clamps are tightened tightly for 12 - 14 hours, but do not overload - a large amount of glue will leak out. The chair should not be warped at this time, so that subsequent loading does not lead to the destruction of the chair elements or connecting seams.
In complex structures with supports, when the frames are inserted into the legs, all the dried elements and the frame are disassembled in order to glue the joints. If it is difficult to disassemble the entire chair, work alternately with each corner.
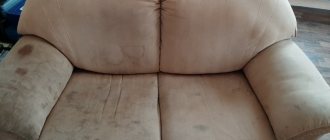
Replacing the filling and upholstery of an upholstered chair
To sew new upholstery, fabric and soft padding are prepared. If there are leftover materials from other work in the house, they will be suitable for a seat, since the sizes are usually small.
The material is selected from the options:
Jacquard and tapestry. These materials are similar in appearance, but the second type has greater density and lasts longer. Jacquard is produced from natural or artificial raw materials.
Flock and velor. Budget-priced fabrics are suitable for restoring seat upholstery. The fleecy surface collects small debris.
Chenille. High-quality fabric is recommended for those with allergies. The moisture-resistant material does not react to grease and dust and is used for kitchen furniture.
Matting. It is one of the types of chenille, the fabric is denser and thicker, with large weaving.
Leatherette and genuine leather . Materials vary in quality. Artificial turf is cheaper than natural turf, but less durable.
Sometimes the seats are covered with fur or suede .
The filler can be padding polyester or foam rubber . Previously, the second variety was not durable, fell into disrepair, and crumbled. The modern version of foam rubber does not compress, has good shock absorption, and is elastic.
Work order when reupholstering a chair:
- the chair seat is separated from the frame;
- the upholstery layer is removed from it, the foam rubber is removed;
- the old fabric is left for cutting;
- a layer of filler is stuffed onto the plywood seats, which is cut to size;
- the old sheathing is smoothed out with an iron to remove creases, then it is laid on new material and the part is cut out;
- The upholstery is placed on the insulation, the edges are turned over to the reverse side, and stapled with a stapler with a staple step of 20 - 30 mm.
The finished seat is placed in the chair frame. If the fit is tight, no fastening is required.
Other ways to update furniture
In addition to the decoupage technique, a stool can be restored in other equally interesting ways:
- The soft upholstery on the surface of the stool changes. By the way, it can be created even if the stool did not previously have a soft seat. The legs are processed as in working with decoupage (cleaned, painted and varnished). On the lid itself, a square of foam rubber and fabric is cut out 10 cm larger for the size of the lid itself. On the reverse side, the fabric is attached to the base using a stapler or small nails.
- You can sew a regular cover made of thick fabric onto the stool. By the way, this method is also good because the cover can be removed at any time to wash it. But using this method, the stool will still need to be restored by painting.
- And the easiest way is to repaint the stool. All work will take place in the same order as during decoupage. The difference is that you don't need to apply a pattern. You can find out about a folding stool for the kitchen in this article.
The video shows ways to update a stool:
As you can see, there are enough ways to restore an old stool, and the thing can last for a long time. But can at least one of them compare with the art of decoupage, thanks to which you can create a truly unique thing. We also recommend that you familiarize yourself with wooden kitchen facades made of pine in this material.