In this article we will consider the following questions:
- What materials and components are the frame mosquito net
- we will determine for what reasons which part of the mosquito net fails
- How to repair a mosquito net at home.
A typical frame mosquito net includes the following elements:
- aluminum painted mosquito net frame profile from which the frame is made
- profile of the cross member of the mosquito net, thanks to which the geometry and stability of the mosquito net design is maintained
- connecting corner for mosquito net profile
- rubber cord for rolling up the mesh fabric
- the mosquito net itself, which comes in different types
- frame mounts
- handles for removing the mosquito net.
Why does a mosquito net break?
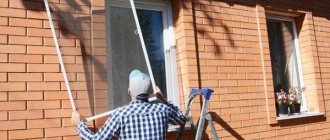
Mosquito net is one of the most fragile window accessories.
Its frame is made of thin aluminum profile, and the handles are made of plastic. And the canvas itself cannot be called overly durable either. The reliability of the design is enough for several years of operation if all operations are performed correctly. But the risk of breakage remains significant throughout the entire period of use. There are several reasons why a mosquito net can fail. Knowing the main causes of breakdowns will allow you to avoid operational errors and extend the service life of this useful accessory. In addition, when the causes of the breakdown are clear, it is much easier to plan repairs.
Here are the factors that cause the grid to fail most often:
- Errors when installing a grid on a window. If the fasteners are not installed accurately (for example, errors were made during marking) or are selected incorrectly, it will be difficult to install the mesh in place. And then unsuccessful application of force will lead to breakdown.
- Trying to remove the mesh or install it on the frame without understanding how it's done.
- Actions of domestic animals, accidentally flying birds.
- Destruction of plastic under the influence of solar ultraviolet radiation and temperature changes. Under such conditions, plastic ages and becomes brittle.
- The whims of nature. Strong gusty winds, frequent rain or hail may well cause damage to the canvas or frame.
To extend the service life of the mesh, it is worth carefully studying the rules for installing it on a window and removing it from its mounts (and also teach this to everyone at home). From time to time, the structure needs to be inspected for cracks, signs of corrosion, and holes. If all detected faults are corrected in a timely manner, the mesh will last for many years without requiring major repairs.
Common breakdowns
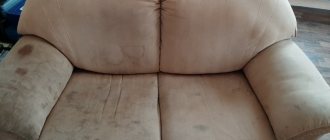
Pets and netting
Generally speaking, mosquito nets become unusable for three reasons:
- Time.
- External factors.
- Internal "aggressors".
There is another reason - poor quality components and improper installation. For example, if you do not live on the first floor, then if it is installed incorrectly, the risk of the mesh falling from a great height increases. As a result, plastic elements may be damaged and the frame profile may bend. It will also not be possible without breaking the grid. In a word, after a fall, the mosquito net will definitely need repairs, but in the worst case, a complete replacement.
So how can you tell if your mesh needs to be repaired?
- If curvature of the frame frame is observed.
- Waves appeared on the mesh.
- The fastenings have failed.
- The canvas broke.
- The product does not have its original appearance.
The most common failure is a tear in the canvas. Especially if you have pets at home. Claws, teeth, beaks and the like can easily damage the mesh. As a result, uninvited guests in the form of mosquitoes and midges will fly into the apartment through the breakouts.
Also, the cause of failure may be careless use of the mesh, sudden temperature changes and wear of fittings, as well as due to exposure to precipitation. In most cases, the problem can be solved with one call to a suitable company from which you can buy a new mosquito net. However, in order to save money, you can fix the breakdowns yourself.
Replacing glass in a double glazing unit
Sometimes repairing plastic windows also includes replacing glass. This is much more complicated. First of all, you will need glass cut strictly to size. You can, of course, cut it yourself, and then process the edge so as not to get hurt. You can also order glass from a workshop and ask them to polish the edges.
Then the glass unit is removed from the plastic window frame and laid on a flat surface. It’s more convenient to place it on a table, but you can also use it on stools. If you work on a table, cover it with something.
Then use a sharp knife (or a wallpaper knife) to trim the silicone around the perimeter. Then the damaged glass is finally separated from the glass unit and removed. A new one, washed to a shine, is placed in its place and leveled. It should be the same size to the nearest millimeter.
Next, seal the glass with silicone sealant (not acrylic). We insert the tube with sealant into the construction gun, go around the perimeter of the glass, making sure that the seam is filled evenly. We wait until the silicone dries, then we take 40 mm wide tape and seal the glass unit around the perimeter. The glass in the double glazed unit has been replaced and can be replaced.
Replacing the canvas
However, there are times when installing a patch is not enough. In this case, you have to completely replace the mosquito net fabric. To do this, work should be done in this order:
- To release the mesh around the perimeter at the joint, remove the cord.
- Eliminate the old canvas.
- The new mesh should be put in place.
- The mesh should be tightened in stages. You can start from the short side. Having placed the mesh in the gutter, use the blunt side of a ballpoint pen or screwdriver to squeeze the lace back. Make sure there are no folds.
Main window adjustment points
To understand how to repair a plastic window, you need to know how it works. Almost any plastic window installed in an average apartment has three levels (or planes) of adjustment. This, first of all, makes it possible for the window part itself to be in an optimal (tightly pressed and not skewed) position to the frame, plus it ensures a reliable connection to the seal. All the “magic” is in the loops. The lower hinge is responsible for the vertical position of the sash and the lower vertical angle; the upper part of the sash is responsible for adjusting the upper hinge; The clamping force directly depends on the eccentrics. That's all the tricks.
Plastic window
The main problem here is the well-known displacement of the mechanism, which does not allow the sash to open and close correctly, or to do so at the desired angle. This is the so-called “sagging”, due to which the window touches the frame and may eventually simply stop closing at all.
In this case, we are interested in window awnings. We do not take the lower one into account; it does not play any role here. You need to open the window and at the very top of the window find two screws that are adjustable using a hexagon. We loosen the lower one slightly, and work with the upper one: using a hexagon, we turn it back and forth until it is in the desired position.
Features of repair of plastic window fittings
The window is used daily. The most used part of it is the handle. Over time, it may become loose or break completely. How to repair plastic window fittings?
Repairing a loose handle
In fact, repairing plastic window fittings is quite simple. If the handle is loose, you can very easily tighten it. To do this, you need to pry off the rectangular pad, which is located under the handle. Never use a screwdriver or other tools for this, as you may scratch, break or deform the edge of the plug. Next, you should rotate the entire part 90 degrees and tighten the two bolts using a Phillips screwdriver.
We are replacing the handle
Sometimes it becomes necessary to completely repair the handle of a plastic window, that is, replace it. This requires a little more effort. So, start repairing plastic window fittings:
- Gently pry the plate up with your fingers.
- Rotate it 90 degrees.
- Unscrew the two bolts using a Phillips screwdriver.
- Rock the handle in the connector with light movements, then carefully remove it.
- Install the new element in the same position as the old one.
- Use the bolts to secure the handle and place the rectangular plug over it.
Mechanism jamming
Often the opening mechanism jams. The fix is quite easy:
- We are dismantling the PVC window handle.
- Using a brush or vacuum cleaner, thoroughly clean the mechanism from contamination. If necessary, you can use a glass surface cleaner.
- We treat all moving mechanisms with oil. Experts recommend using WD-40 lubricant, which comes with a tube attachment.
- We are installing the entire system back.
Some users encounter the problem of the plastic window handle getting stuck when the locking mechanism does not operate correctly. This state does not allow changing the position of the window when it is open. To fix this you need to:
- Carefully remove the clips (lever) of the lock from the side of the handle at the end of the sash.
- Release the motor system of the lever.
Is it worth installing plastic windows? Do-it-yourself repair of such systems requires investing a certain amount of money. The price of accessories depends on the quality and manufacturer of plastic structures. Select all parts and mechanisms carefully. Not only the appearance of the window, but also the duration of its operation depends on this.
Experts recommend periodically adjusting the window mechanism, at least 2 times a year. This process allows us to ensure minimal stress on the window fittings and prevent major repairs of the product.
Average prices for specialist services
Prices for repairing mosquito nets by specialized organizations depend on the modification of the window and net, as well as the type of damage.
Average prices by region for the restoration of protective nets for PVC windows:
- Replacement of one set: 4 corners, mesh fabric, seal, 4 Z-fasteners and 2 handles RUB 2,500.
- Replacement PVC corners, 4 pcs. and fastening the canvas 1900 rubles.
- Replacement of blade and seal RUB 2,040.
- Replacing the canvas 1890 RUR.
- Replacement of 4 Z-mounts 700 rub.
- Replacement of 4 Z-fasteners with rivet fixation RUB 900.
- Replacement of Fiberglass cloth 2000 rub.
- Replacement Anti-dust 2500 rub.
- Replacing the Anti-Cat mesh RUB 2,700.
- Replacement of fasteners with metal ones RUB 500.
- Handle repair 500 rub.
Damaged double-glazed windows - no problem, step-by-step guide to action
In more complex cases, a complete replacement of the double-glazed window or glass will be required. It is advisable to invite professional specialists for such work. If desired, all manipulations can be performed at home yourself.
Complete glass replacement
A double-glazed window is a sealed structure that consists of several sheets of glass. Sometimes there is a need to replace it. This may happen in the following cases:
- glass is broken or cracked, respectively, depressurization of one chamber has occurred;
- condensation appears on the glass surfaces, and the desiccant rolls down in the form of yellow resin;
- street noise can be heard in the room, it became necessary to install a noise-absorbing double-glazed window;
- drafts have appeared that are not regulated by any of the above methods. Accordingly, heat is not retained in the room;
- the structure has lost its tightness, or it is necessary to install a double-glazed window with a large number of chambers.
Depressurization of a double-glazed window
To replace a double-glazed window, you must perform the following manipulations.
- Determine the marking of the glass unit, which is printed on the aluminum frame, and order a similar one from the manufacturer.
- First, remove the bead from the vertical side of the glass unit, then the closest one from the free corner. After dismantling all beads, remove the glass unit. It is advisable to use a spatula and mallet when working.
- Install a new double-glazed window, having previously laid the straightening plates.
- Secure the beads until you hear a characteristic click.
Glass unit marking
The procedure for dismantling a double-glazed window
How to replace glass in a double-glazed window with your own hands
Replacing glass in a double-glazed window requires certain knowledge and skills. Let's look at the whole process in more detail.
| Illustration | Description of action |
| Remove the beads around the perimeter of the glass unit. | |
| Remove the glass unit and place it on a horizontal surface with the broken glass facing up. Using a utility knife, cut through the sealant around the perimeter to the spacer frame. | |
| Remove the broken glass from the glass unit. | |
| Cut off the sealant layer at a slight angle, wipe the new glass with a cleaning agent, remove all dirt and place the washed side inward on the glass unit. | |
| Thoroughly treat all connections with plumbing grade silicone. Acrylic sealant cannot be used in this case. Wait until it dries completely, cover the edges of the structure with tape, insert it into the frame, and install glazing beads. |
You can watch the entire process in more detail in the video:
Repair of plastic doors
We talked about possible malfunctions of plastic windows. But we should also consider breakdowns that occur in the system of plastic doors, which have recently become very popular. Such elements have a fairly attractive appearance and a fashionable modern design. But it should be remembered that even the highest quality door during long-term operation requires regular inspection and prevention. In fact, repairing plastic windows and doors has a lot in common.
The most common malfunctions of a plastic door are:
- Broken handle.
- Sagging hinges.
- Failure of the rod.
- Problems with the closer.
Handle repair
The most common malfunction of any door is a broken handle. In this case, it is best to replace it. It's very simple. Replacing a door handle is very similar to repairing plastic window fittings. First of all, you need to rotate the decorative plate, which is located near the base of the handle, 90 degrees. After this, use a screwdriver to unscrew all the screws and install a new one in place of the old faulty element. The question arises: do all breakdowns require replacing the entire mechanism? No, not all. If the handle is intact, but turning it is difficult, then all moving mechanisms should be treated with a special lubricant.
Door sagging problem
Often all consumers are faced with the problem of door sagging. This is quite easy to fix. First of all, you need to adjust the position of the door. To do this you will need a hex socket wrench. It needs to be inserted into the bottom loop and turned clockwise. In this way you can quickly and easily lift the door leaf into the desired position.
Rod repair
One of the most common problems is a broken lever (rod). Owners most often encounter it being broken, bent, damaged at the fastening point, or jammed in the joints. Be careful here, because on your own, without the help of specialists, you can only repair some damage to the rod. To do this, as a rule, welding is used, but it is better to replace the broken part with a new one. Do you understand that you cannot cope with this breakdown? Then contact the specialists of a company that repairs plastic windows. Customer reviews will help you make the right choice.
Door closer repair
The door closer may also fail. This mechanism is responsible for the smooth and quiet closing of the door. You can repair it yourself. Often the cause of malfunction of this mechanism is the leakage of working fluid from it. This mainly happens in the cold season due to depressurization of the seals. As a result, the door loses its smooth movement. Be careful, because the closer is not designed to be disassembled, so you will have to completely replace the mechanism.
Each element in a plastic door can wear out over time. Long-term use affects the operation of all mechanisms, so regularly monitor their condition. For example, if you notice that your PVC door has started to close too slowly or quickly, then you need to turn the adjustment valve clockwise or counterclockwise. After this, with the door open, tighten the latch as tightly as possible at a right angle. This will improve the door closing delay function.
How to repair or change the handle on a plastic window?
As a rule, fittings and other components for plastic windows are of high quality, and many manufacturers of structures can reduce the cost of their products due to other factors, but preferring not to skimp on working mechanisms.
But sometimes problems happen and, for example, a window handle can become loose over time. Repair in this case comes down to:
- First you need to get to the screws that secure the handle, and they are located under the decorative strip. And it is this that, with some effort, but carefully, needs to be turned 90° and pulled back;
- after access to the screws is open, they should be tightened if the handle is loose, or unscrewed if it is necessary to change the mechanism;
- Then everything is done in the reverse order: first the screws are tightened, then the protective element is fixed.
In the event that it is necessary to install a comb - a special mechanism for controlling the restriction of the opening of the sash in the folding position - this element is first mounted, then the handle is installed and screwed on.
It is important to take into account one more important point: the cause of a malfunction of the handle can be, for example, sagging of the sash. Therefore, you must first eliminate this problem, and only then proceed to adjust or replace the handle
Other problems with the plastic window handle
Another problem with window handles can be their blocking, that is, in the “open” position, the mechanism does not turn, and the window, accordingly, does not close.
In this case, the culprit should most likely be assigned to a blocker - a special mechanism on the handle that does not allow it to be switched to another mode: if the window is open in the folding version, then it will not be possible to open it.
In principle, the function is very useful, but it should be used carefully, avoiding abrupt switching of the sash to another mode, at which point the handle can jam.
Therefore, before making a decision about a malfunction of the mechanism and thinking about how to remove the handle from a plastic window, you need to make sure that the problem is in the lock, and then, being careful, begin to eliminate the cause. You can unlock such a handle, but you must take into account the features of the installed fittings:
You can unlock such a handle, but you must take into account the features of the installed fittings:
1. If products from AUBI are used, the sash must be in a rotating position. In the area of the handle you should find a small metal plate with a spring that needs to be pressed against the seal. In this case, it is necessary to simultaneously move the handle to the desired position.
2. If fittings from Roto, Maco, GU or Winkhaus are installed, then everything is much simpler. You need to find a small mechanism in the form of a tongue located under the handle, and press on it until it takes a position parallel to the sash, and then turn the handle.
In some cases, it may be necessary to adjust the position of the response mechanism mounted on the frame.
Sometimes the blocker simply cannot cling to it, for example, due to thermal expansion of the metal. The problem can be corrected by installing a thin plastic or metal lining under the response mechanism, thereby bringing it closer to the blocker.
In some cases, the problem with the handle may be caused by lack of lubrication or drying out of the lubricant. The problem can be solved by servicing all moving mechanisms (you shouldn’t limit yourself solely to the handle), for which you can use both universal products, for example, “WD-40”, and buy a special lubricant for these purposes, intended for plastic windows.
Setting the clamping mechanism
Before you start fixing anything, you need to know if it needs fixing. We close the window and use a lighter to identify the presence of “through” areas. If the flame flutters, we get down to business. If you look at the window sash from the end, you can see three oval (most often) eccentrics. Try to turn the window handle - and you will see that ex. So, they need to be tightened, but just a little, often a couple of millimeters is enough. Plus there will be a reserve for a few more twists: do not forget that the seal also wears out. And, most importantly, do this so that the eccentrics are strictly in one position. To work with them you will need either pliers or a hexagon. It is very useful that there are certain marks on the eccentrics themselves: if you see that they are “looking” towards the street, you need to press harder, but if the lines are directed towards the house, the pressure is very good.
Setting the clamping mechanism
Now let's look at different types of adjustments, which have their own significant differences. In order to move the frame to some extent or get rid of the bevel, horizontal adjustment is necessary.
It is carried out as follows: a hexagon is inserted alternately into the upper and lower loops (there are special holes there). When you begin to rotate the hex clockwise, the window will noticeably rise. When rotating in the opposite direction, that is, counterclockwise, you will see that the window, on the contrary, lowers. This procedure must be done strictly with the window open and the sash must be moved no more than 2 mm, so as not to “tighten” the mechanism and damage it.
AdjustmentWindows made of metal-plastic can be adjusted using the bottom hinge. In this case, vertical adjustment is used. You need to remove the plug and open access for the hexagon, then turn it clockwise. As you can see, there are no difficulties here either.
Ventilation of PVC windows
I would like to briefly describe the principle of ventilation for plastic windows. 90% of such windows do not have the good old vents, but they do have the ventilation mode everyone loves. For three seasons this regime makes you happy, but in the fourth – frosty – a person finds himself in a difficult situation: either freeze or don’t ventilate at all. If you are not the lucky owner of a plastic window with self-ventilation, you can use a comb, which will one hundred percent perform the function of a ventilation regulator (and it costs a penny). This simple device fits almost every plastic window and has 4 modes (or rather, 4 “arches” to regulate the flow of air into the room).
How to fix a breakout
If there is a small tear in the mosquito net, then you should not immediately spend money and buy a completely new canvas. Let's look at a simple method for eliminating this type of breakdown. The work will look like this:
Cutting the canvas
To do this, you will need a small piece of suitable mesh that could block the gap. You can use an old mosquito net if you have one.
Finished patch
So, cut out a suitable piece of mesh with a margin of 2.5 cm on all sides. Afterwards you will need a curved needle and a strong thread, preferably the same color as the fabric. You can also use a thin fishing line that will be practically invisible
Please note that you can also use a regular straight needle. A curved one is necessary if only one side of the mesh is accessible to you.
Curved needle
Now cover the hole with the cut mesh. It’s most convenient if you can remove it from the window. Next, all that remains is to sew the patch to the mesh using small stitches. Tighten the stitches moderately, otherwise there is a chance that the mesh will become deformed.
Final result
This is how you can very easily and quickly fix a small gap in the grid. The only disadvantage of this method is aesthetics. Therefore, it is better to approach the issue of eliminating a breakthrough creatively. For example, cut a patch in the shape of a butterfly in a contrasting color or something else. You can use your imagination, and from the outside it will seem that this is how it should be.
Quick repair with tape and hot glue
When any hole appears on the mesh, decisive action must be taken immediately. Waiting will definitely not bring any benefit: insects will begin to fly into the house, and the hole may expand. As an emergency measure, they usually seal the hole with electrical tape, tape (regular or masking tape), or adhesive tape. You need to cut a suitable piece of adhesive tape, seal the hole, and then repeat the procedure on the back side of the mesh.
Of course, this is only a temporary solution. When exposed to sunlight, the adhesive will melt and the patch will fall off. Such “repairs” give a very unsightly result, so tape and other tapes are only suitable for the initial elimination of the problem.
A “patch” made of hot-melt adhesive will be much more reliable. If you have a glue stick and a heat gun, proceed as follows:
- Without removing the mesh from the window, clean the damaged area from dust, dirt, and wipe it with a solvent;
- after drying, melt the glue in a gun, apply the mixture to the edges of the hole and stretch the product over the hole;
- After hardening, the hole will be completely sealed with glue.
How to replace double glazing in a plastic window?
This type of repair can be considered rare, and the need for it appears only when the old double-glazed window breaks for some reason - this does not depend on the service life of the window.
Therefore, many owners of such structures may not even think about how to remove a double-glazed window from a plastic window in order to replace it with a new product.
It should be immediately noted that to solve this problem, it is best to contact specialists, although you can do all the work yourself, which does not present any particular technical complexity, but is quite labor-intensive and requires accuracy and some skills.
You will need to purchase a special wooden hammer - a mallet, as well as a spatula and/or chisel.
Even if you decide to do the work yourself, you will still have to contact a specialized company to order the production of a new double-glazed window exactly to the size of the old one.
But before you remove the plastic window, or rather, remove the broken double-glazed window, you need to remove the protective elements - glazing beads - using a spatula. The process looks like this:
- A spatula blade is inserted into the thin gap between the glass and the glazing bead, with which you carefully lift the protective element. Sometimes you need to make an effort and start the spatula using a mallet, lightly hitting its handle;
- then the remaining glazing beads are removed in the same way and the glass unit is carefully removed;
- the damaged glass unit must be laid on the floor and measured with maximum accuracy using a tape measure;
- Using the data obtained, you need to order a new product with the required dimensions.
When performing this type of work, you must take into account that although you can do it yourself, you will definitely need to hire an assistant.
It should be taken into account that the double-glazed window has quite a lot of weight, which, coupled with its size and design features, will not allow you to carefully remove it yourself. However, to install a new one you will also have to get an assistant.
After the new double-glazed window is ready, it is necessary to install special plates, the location of which depends on the type of sash and its size:
- for blind structures, the plates are installed at the bottom;
- for opening ones - in the corners, but with a distance of 100 mm from them. When installing large double-glazed windows, their number can be increased.
It is allowed to use sealant for plastic windows to more securely fix the glass unit in the frame, and then install the glazing beads in place.
Methods of glazing balconies and loggias. Types of windows. - there is more useful information here.
Why do plastic windows need strips?
As a rule, the installation of plastic windows is carried out using polyurethane foam, which closes the opening and ensures the tightness of the entire structure.
You will be interested in this article - Panoramic windows in a private house and apartment.
Next, the window opening is decorated, for which a variety of building and finishing materials can be used.
But sometimes there is still a need for a more accurate and reliable design of the junction between the frame and the wall, and for these purposes, a strip for plastic windows, which is essentially a false strip, is ideal.
For their manufacture, both plastic and wood or aluminum can be used, and their choice is determined not only by the window material, but also by the design features of the interior of the room or facade (depending on the location of their installation).
In addition to their decorative function, the strips also serve to protect the assembly seam from damage, while installing both self-adhesive products and models for which screws are used for fastening is not particularly difficult.
It should also be noted that, although this element is not mandatory in the design, it allows you to give it an aesthetically attractive appearance and guarantees the windows a long service life.
What materials and tools are required?
If the protective structure has multiple damages, but the aluminum structure is in good condition, then the work can be done independently; for this you just need to purchase a repair kit.
They are well represented on the construction markets, their cost depends on the model and is based on the replacement of 1 m2 of canvas :
- Standard, 720 rub.
- “Anti-cat”, 1490 rub.
- “Antimoshka”, 1350 rub.
- “Anti-dust”, 1980 rub.
- “Maxi Vision”2200 rub.
In addition, to perform restoration work you will need the following tools :
- screwdriver with bits,
- rubber mallet;
- pliers,
- screwdriver;
- putty knife;
- hacksaw for metal;
- roller for sealing the cord;
- curved needle, strong thread.
The importance of winter-summer modes
Despite the fact that in warm weather the windows are opened for ventilation, adjustment of the sash in summer mode is required to create a good microclimate in the room. It is also effective when there is a need to leave for a certain period of time. Then there will be no musty smell in the house due to a small draft through the cracks of the sash. When setting modes, you should lubricate the mechanisms with machine oil or Vaseline so that their operation is smooth and of high quality.
Experts recommend adjusting the pressure density to the winter position gradually to reduce the load on the seal and not deform it. Before this, you should thoroughly clean the window frame from dust and debris, which can form a draft due to the loose fit of the sash. In winter, blowing is excluded, so the tightness of the closure is checked with a lit match. Its attenuation or fluctuation of fire indicates the presence of cold bridges.
How to make holders with your own hands?
Craftsmen offer many ways to make holders yourself and attach them to a mosquito net. For the work, various available materials are used: plastic lids, carbonated drink bottles, thin metal staples for fastening drywall and others. The Internet is replete with all sorts of “recipes” for repairing protective nets, and they are all so simple that any housewife can do the job.
Plastic bottle loops
The handles on the mosquito net should be strong and elastic. The plastic from which bottles for selling mineral water and other drinks are made fully meets these requirements, so it makes high-quality holders. The main thing is to choose a container with not too thin walls.
Holders made using the method described below have an unusual shape, but do not spoil the appearance of the window and perform their function perfectly.
Method of making holders:
- The middle is cut out of a plastic bottle. The neck and bottom will not be useful - to make handles you will only need an even, flat part of the dish.
- Now you need to mark and cut two identical strips 1 cm wide and 12 cm long. The dimensions are approximate, and there are no restrictions here. However, when choosing the length of the loop, you need to focus on the thickness of your index finger.
- To install new holders, you need to choose a place 2-3 cm above or below the old one, where the cord has already become thin. Otherwise, the handles will constantly fall out.
- Pull off the seal and insert a plastic strip folded in half.
- Roll the cord into the groove using a special roller or a thin shaped screwdriver.
Perhaps this design will not last too long, but as a temporary option it will do just fine. Now, by pulling the two loops, you can easily remove the mosquito net and install it back.
"Ears" from a plastic cover
In this method, a regular plastic cover is used to repair the mosquito screen. The parts cut from it are almost no different in appearance from purchased ones, and even surpass them in the strength of the material and fastening.
- The destroyed holders are pulled out of the mosquito net and, applying them to the surface of the lid, a stencil is made. To make it easier to attach the new handles, they are lengthened a little.
- Using scissors or a stationery knife, cut out the holders according to the pattern.
- Using a self-tapping screw passing through both walls of the plank on which the mosquito net is stretched, new handles are secured.
This type of fastening is more reliable than the traditional one (using a rubber seal). Now you don’t have to worry that the elastic band will break and weaken, causing the homemade handles to fall out of the profile.
The handles of the mosquito net are the weakest point of the structure. They often break, and sometimes for no apparent reason. Therefore, you need to have a repair kit with spare parts on hand to quickly fix the problem, or be able to make holders from available materials.
Replacing the Z-profile
On a plastic window, z-fasteners on the outside can also break. A mosquito net is installed in it. The repair can be as simple as buying a new one and installing it in its place. You can also make such fasteners yourself from tin. It is important to give it the necessary shape. When the workpiece is made, you can secure it with a self-tapping screw to the window.
So, as we have discussed, there are many reasons why a mosquito net can break. On the one hand, you can always buy a new part to replace it, and on the other hand, you can make some parts yourself. To help, we also suggest watching a video on this topic.
How to change the plastic corner on an anti-mosquito structure?
To do this, you need to remove the top bar of the structure. An inexperienced person is strongly advised not to completely disassemble the frame, because in this case the tension of the mesh will be broken, and it will be quite difficult to correct this. In order to remove the part, you need to use a thin screwdriver to carefully pry up the sealing cord, which tightens the protection on this side.
After this, without sudden movements, the cord is pulled out of the frame groove, followed by the mesh itself. After this, you need to carefully remove the broken corner. If it does not give in, then you can use a screwdriver to push it deeper into the cavity of the frame.
For a new corner, you can use a piece of sheet plastic; it is advisable to choose it in white, or in a shade so that it does not stand out too much against the background of the white frame. We measure the dimensions of the profile, taking them into account, we need to mark the workpiece. The required shape is given using a hacksaw for metal with a thin blade and small teeth, or you can use a jigsaw.
When cutting, you must also take into account the protrusion inside the profile, which gives rigidity to the finished structure when the stop is installed. All protruding nuances on the product can be cleaned with sandpaper or a small file, after which the new corner is tried on the profiles, and the shape and size are finalized locally.
It is necessary to control that the angle of the part is exactly ninety degrees, otherwise the frame for the mesh will turn out uneven and will spoil the appearance of the beautiful window.
If the workpiece fits very tightly into the profile holes, then this will be enough for fastening. However, if its thickness is slightly smaller, or you want to increase the reliability of the structure, you can make two holes on the sides of the metal profiles through the part, then secure it with rivets or bolts with a small cap. This is true for both profiles where the corner will be inserted.
After the frame is assembled, you need to tighten the released protection, use the same screwdriver to insert the sealing cord into place, securing its tension. After this, the mosquito net is completely ready for installation on the window.
Repair of mesh frame corner
Due to a fall or poor-quality components, the corners of the mesh design may break.
Alternatively, you need to buy a new corner and completely replace it. To do this, remove all remnants of the broken corner from the aluminum profile. New plastic corner
Carefully hammer the new one into the profile with a rubber or wooden hammer. You can use a wooden block for the stand; in this case, any hammer will do. The main thing is not to overdo it, because the corners are mostly plastic and can also break during their installation.
Replacing the corner
If the corners are simply loose, and you see that they could still serve, the mesh frame can simply be strengthened. To do this, you can cut out small corners from tin, rounding off the sharp corners and screw them on top of the existing corners. You can also buy small furniture corners.
Strengthening the corner
An important requirement is that they be thin, otherwise the mesh at the corners will not press tightly against the window.