The lacing of sneakers should not only be beautiful, but also durable. These are sports shoes designed for heavy loads, therefore they must be securely fastened on the feet. But at the same time, modern fashionistas who regularly play sports want to slightly diversify the appearance of their shoes.
It is not advisable to buy new sports shoes, but with the help of interesting lacing methods you can update even old sneakers that have become a little boring. We have collected different lacing options that anyone can easily master. They are reliable and will not come undone at the most inopportune moment of training.
Straight lacing
Straight lacing is a lacing classic. It is used for shoes with an even number of holes, which include most modern sneakers and sneakers. In addition, this technique allows you to experiment using different variable methods of straight lacing.
Hidden
The peculiarity of this type of lacing is that the internal constriction is not visible from the outside. Thanks to this, the shoes are neat, and the fixation of the foot remains quite reliable. To lace your sneakers this way you need:
- thread the lace through the first eyelets;
- pass one of the ends into the next hole along the same line and bring it out;
- remove the same end into the hole on the opposite side;
- the second end must be threaded in the same way, but through one hole;
- then pass it through the grommet on the opposite side.
This way, almost all the lacing will be hidden from view, which will help emphasize how stylish your shoes are.
With secret knot
Another interesting way to lace sneakers is to do it with a secret knot. To carry out this procedure you need:
- start lacing from the bottom holes;
- pass them through the holes, adjusting so that the right side is longer than the left (the difference should be small, so do not overdo it);
- Then the instructions are the same as in the previous case - parallel lines should be formed;
- at the end, do not lace the left tip, but pass the right one through the left hole;
- both ends should be on the left (that’s why the right side of the lace had to be left a little longer);
- tie the ends in the corner and tuck them inside.
The knot will not be visible, but the lacing will be strong and will not unravel.
Simple
If you tie your sports shoes this way, the lacing will never get in the way. It will be a laconic addition to your everyday look. It is very simple to make such lacing on your shoes:
- thread the laces through the lower openings inward;
- bring one of the edges up through a hole on the same side;
- bring out the second by missing one hole, but also on your side;
- You need to thread the laces into the holes that are located parallel to the one from which they came.
- tie the ends so they don't dangle under your feet.
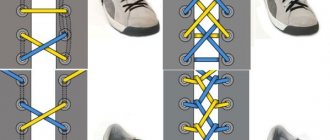
Lattice
fieggen.com
This beautiful weave of laces is quite popular. It looks best on shoes with an average number of holes: from six to eight.
- Insert the laces into the first holes from the inside.
- Cross and insert from the outside into fourths.
- Pass the first end into the second hole from the inside along the same side, and then from the outside into the fifth hole on the other edge.
- Insert the second end from the inside into the second hole on the same side, pass it under the lace of the first cross and insert from the outside into the fifth hole on the other edge.
- Pass the first end into the third hole on the same side from the inside. Pass the lace over the first cross and under the second and insert it into the sixth hole on the other side from the inside.
- Do the same with the other end.
- Tie a knot.
Standard lacing methods
Over the centuries of the existence of lacing, humanity has come up with various types of weaving so that the ribbons do not unravel and hold shoes in place. Many of them have become so familiar that they are regularly used in everyday life.
Classical
Not one, but two methods, which are equally popular, can be called classic.
First method:
- pass the ends of the lace through the lower holes in the shoes;
- pull the ends to the outside;
- cross and pass again through the higher holes.
According to this pattern, the lacing continues to the very top. This will allow the sides of the shoe to tighten and secure your foot.
The second method differs in that the lacing must be crossed alternately. Let's look at the method in more detail:
- the ends of the rope need to be pulled through a couple of lower holes, so that the ends are inside;
- cross them inside and pull them through the next couple of holes;
- pull the ends out, they also need to be crossed and threaded inward through the next holes;
- continue lacing until the end.
This weaving allows the laces to wear out less, which is especially important for sports shoes.
European
There is a separate way to tie sneaker laces like in Europe. The diagram looks like this:
- pass the ends of the lacing through the lower openings, bringing them out;
- lead one of the ends crosswise through the upper hole;
- send the other end through the hole that is located through one hole (also crosswise);
- Continue lacing in this way until the very end.
As a result, the look is attractive, and the process itself is simple and fast. The end result looks like a zigzag design that securely fastens the shoes.
By cutting the laces, the sweatpants will be easy to remove, which is especially important if a leg injury occurs and unnecessary manipulations only cause pain.
Without a bow
Lacing without bows will appeal to those who hate dangling lace loops. There are many ways to get rid of them. One of these methods has already been described - this is straight lacing with a hidden knot. But there are others, no less interesting. Let's look at one of the most popular:
- before you start lacing, a knot is tied at the tip of the lace, which will fix the side;
- pass the second tip through the upper opening outward;
- stretch it into the hole directly opposite, pushing the end inward;
- draw the tip diagonally out and in;
- At the end, thread the remaining lace through the lacing at the top. Next, tie a knot and trim the rest of the material.
With a bow "Butterfly"
Many people like to tie their shoelaces with a standard bow. But there are also more unusual and original options, for example “Butterfly”. This lacing method got its name due to its similarity to tying a bow tie. This lacing option looks cool and unusual, which is why it is popular among young girls.
This will work if your shoes have short laces. With their help you can achieve reliable fixation. How to do it correctly:
- the lacing is passed through the lower holes and brought inside;
- each end is pulled vertically to the next pair of holes, forming a “gap”;
- after the space, the tips are crossed and threaded into the higher pair of holes;
- the alternation continues until the end of the shoe.
The end result will be an interesting and very specific drawing that may not appeal to everyone. Also, the disadvantage of this lacing is the strong tightening, due to which the leg may feel discomfort.
Cobweb
Another way to tie laces on sneakers with a bow is the gossamer technique. It looks especially cool on sneakers with a lot of holes.
Instructions:
- the tips are passed through the holes from the bottom from the outside;
- Then two pairs of holes are passed through and the laces are threaded through the fourth pair;
- on the reverse side, the ends are threaded into the second pair (that is, it goes back);
- the ends are outside and threaded through the fifth pair;
- from the fifth, the laces return to the third pair, and after that to the sixth.
- weaving continues until the holes come to an end.
Crisscross
An interesting technology for attaching sneakers to your feet that everyone can use:
- the ends of the ribbon are threaded through the lower holes and crossed;
- crossed, threaded into the next pair of holes;
- weaving continues until the holes run out.
The technique is very simple and accessible to everyone. Its advantage is that the tension can be easily adjusted.
Hexagram
fieggen.com
The lacing is quite loose: you won't be able to tighten it too much. But it looks super original - you are unlikely to see this on the street.
- Insert the laces into the first holes on the outside.
- Cross and insert into the fourth holes from the outside.
- Insert the laces into the third holes on the same side from the inside.
- Bring the first end over one edge of the first cross and then under the second and insert into the third hole on the other side from the outside.
- Pass the first end through the fourth hole from the inside, then into the opposite fourth hole from the outside, and into the third hole on the same side from the inside. Now both ends of the laces hang out of the third row of holes.
- Cross the ends. Pass the first end under the first cross and above the horizontal line and insert it into the sixth hole from the inside. Slide the second one over the first cross, under the horizontal line and over the second end, and insert it into the sixth hole on the opposite edge.
Unusual and fashionable lacing methods
Sneakers have long ceased to be exclusively sports shoes. With their help, they create fashionable looks for every day and for holidays. That is why there is a need to find an idea on how to originally improve sportswear using ordinary lacing. Let's look at the most popular ways to tie sneaker laces beautifully.
Roman
The peculiarity of this weaving is the alternation of the symbols X—I—X—I, lined with laces. This is how such a name appeared. Weaving looks cool on sweatpants where there are small gaps for lacing.
The result depends on the number of holes in the shoes. To get the perfect pattern, you need an even number of perforations. Let's look at an example with six holes:
- the ends of the ribbon are passed from the left into the lower hole and raised vertically to exit through the upper hole;
- the tips cross and are threaded through a pair of holes on the right;
- the lower end rises a couple of holes higher;
- the second end is moved higher, passing one pair of holes, into the fourth pair of holes;
- the ends are crossed and directed to the left;
- At the top, the lacing is tied in a knot, forming the letter “I”.
This weaving looks very interesting, but it will be difficult to tighten the lace.
Checkered
A sneaker laced in this way resembles a chessboard. To get a better effect, you can use multi-colored flat laces.
Step-by-step instruction:
- The sneakers are laced in one color in a straight way;
- taking a different color, the ribbon from below twists in a wave-like manner to the top of the “frame”;
- Having reached the top, he turns around and goes down;
- The ends are tied and hidden inside the sneaker.
Be prepared for the fact that tightening the sneaker will be difficult and you will have to spend a little time on it.
Lightning
To wear a zipper on your sneakers you need to be a creative person. Lacing in this way is very simple:
- lacing begins from the two lower holes from the inside;
- one tip is pulled through all the holes to the last one and turned inside out;
- the second end is threaded from the outside through the second hole on the reverse edge and threaded through the third hole on the same side;
- lacing continues until the end, after which a knot is tied.
Railway
The unusual way of lacing shoes in the form of a flight may also appeal to extraordinary individuals. In addition, it is practical because it holds the foot well. To lace your shoes you need the following:
- the laces are inserted from the inside into the first holes;
- without changing sides, they are passed from the outside through two adjacent holes;
- the laces cross and are inserted into the second holes;
- the ends are pierced from the outside into third holes on the same side;
- when the ends cross, each time there will be a different lace at the top;
- This lacing ends with a secure knot.
Reverse two-color loop
Two laces of different colors are used:
- one of them is threaded from one side, and the second from the opposite;
- then they are connected on the reverse side;
- the lace is threaded through the hole on the same side, leaving a small loop free;
- the same operation is performed with a lace of a different color;
- weaving continues until the holes run out;
- A bow is tied at the end.
Lacing is convenient because the length and symmetry of the loops are adjustable.
Five pointed star
This species can rightfully be called a leader in unusualness. You can do it according to this scheme:
- the ribbon is passed through the third hole from the top and directed inward;
- the edges are passed inside the sneaker and pulled out through the bottom hole;
- the tips cross and are inserted into the third hole inward;
- the left tip is inserted into the upper left hole from the inside and outside, and then threaded through to the right;
- the right lace is passed inward, threaded through the lower hole, and brought out;
- the right end is passed through the third right hole from above and hooks onto the top of the “star”;
- the left lace is passed in the same way;
- The final touch is to thread the left lace through the top left hole so that it comes out from the inside to the outside.
Tightened loops
The weave looks very nice on white sneakers, provided the lacing is black. To get the original pattern you need:
- the ends are threaded through the second holes, the length is equalized;
- the laces are passed through the right and left holes, free loops are formed;
- two free holes are left at the bottom;
- the ends are inserted into the left stretched loops (should look outward);
- the right end is threaded from the bottom up through the left loops and inserted into the left hole on the right;
- the same scheme for the left lace, which goes into the left hole.
If these are running shoes, then it is recommended to use all the holes.
Double helix
To make a double spiral pattern and avoid mistakes, you need to know exactly how to do this type of weaving correctly:
- the laces are threaded through the lower holes so that one end is inside and the other outside;
- the outer tip moves through the opposite hole;
- the inner end is threaded in the same way as the outer one.
The result is a spiral pattern.
With hidden knot
For fashionable looks it is often necessary that the lacing knot is not visible. This adds to the attractiveness of the shoe. To get the desired effect you need to perform the following sequence:
- one end should be shorter than the other;
- the one that is longer remains unlaced;
- both laces must be inside the sneaker;
- The tension is adjusted, after which the lace is tied into a knot.
It’s already clear where to hide the laces of the knot - they just have to stay inside the sneaker.
Lace-up without tying
To prevent the lace from coming undone, you can simply leave it untied. The ends that remain loose after lacing are tightened tighter and then tucked inside the shoe.
This saves time, although the leg is not fixed so securely, so this method is not suitable for active sports.
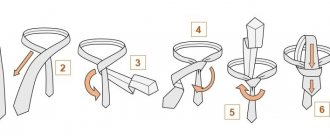
How to tie shoelaces so they don't come undone
The good thing about a straight academic knot is that it cannot untie itself, but it is easy to untie it with your hands even when wet. To tie a reliable knot, it is necessary to perform movements on both the right and left ends of the lace strictly from top to bottom or from bottom to top. To tie a strong knot, you need:
1) the working part of the lace must be at least 15 cm. Make a loop from the right half by folding the working part in half with the letter U, the rounded part to the right, the ends to the left. 2) then pull the left half of the lace through as follows: the lace goes around the bottom strip of the U-shaped design on the side of the shoe 3) then, in an upward motion, pull the left half of the lace to the top strip of the U-shaped construction of the right end of the lace. 4) the left end of the lace should move from top to bottom around the loop. 5) grab the right and left ends and tighten the knot tighter
How to tie shoes with different numbers of holes
Modern shoes are so diverse that even among sneakers there are models with different numbers of holes. It would seem that there is nothing wrong with this, but problems may arise during lacing. Especially if it is a complex figure method. That is why it is worth knowing how to behave when there are additional holes for laces.
With 3 holes
Typically, three pairs of holes are used on sneakers. Straight lacing is perfect for this type, since the small number of holes will not allow for more complex designs, or they will not look as attractive.
There is one rule that must be followed when lacing with the straight method on such shoes. You need to start lacing, threading it from top to bottom so that the ends are inside the shoes. Then, when you finish the lacing, it will be complete, and the ends can be hidden inside without destroying the “composition.”
With 4 holes
Four pairs of holes give a little more room for creativity, but this is also not enough for tying laces in particularly curly ways.
There are many varieties of cool lacing to decorate such shoes. The most popular type of lacing is criss-cross.
Even lacing also looks good on such shoes, which visually makes the sneaker more elongated.
With 5 holes
This number of holes is considered the most common for sports shoes, so almost any lacing method is suitable for it.
The choice depends on the characteristics of each specific pair of shoes and your personal preferences.
With 6 holes
Tying laces on such shoes is an art. Long and flat laces are best for this purpose. Make sure that they are not too thin or thick - this may ruin the beautiful design.
Patterned weaving options for this type of shoe are the best option. But nothing prevents you from using the simplest and most basic lacing options if you are not in the mood to experiment and find it difficult to lace your shoes.
With 7 holes
Such a large number of holes is not very common, but if you have just such a pair, tying your shoelaces can be a fun activity. Don't forget that such a large number of holes requires long laces.
Any complex patterned weave will look very flattering on this type of shoe.
Wide crosses
fieggen.com
These lacings are difficult to tighten or loosen, so you shouldn't lace your shoes this way if you have to take your shoes off often. But it looks very original.
- Insert the laces into the first holes on the outside.
- Cross and thread from the inside into fourths.
- Cross again and insert into the third holes from the outside.
- Pass the ends under all the laces, cross them and thread them through the sixth holes from the inside.
- Tie a knot.
Lacing high top sneakers
The height of fashion for high-top sneakers was observed in the eighties, and today their popularity is again returning. This is not surprising, because these sneakers are very comfortable and practical to wear. But given the unusual style, many modern fashionistas do not understand how to tie the lacing on high-top sneakers.
In principle, there is not much difference in how to lace high or standard models. You can choose any method you like. But there are several nuances:
- Since there are more holes in such pairs, the laces must be longer than standard parameters.
- When choosing a lacing method, focus on the one with a larger pattern (since fine lacing will require even longer laces and will take much more time).
- To make shoes easier to remove, it is better to choose lacing options that allow you to ease the tension.
How to tie long shoelaces is up to you. You can do it in the form of a butterfly, with a hidden knot, or not tie it at all, but simply tuck the ends inside the shoes.
Railway
fieggen.com
Lacing is similar to the rails and sleepers of a railroad. Due to frequent crossing, it is rigid and holds the leg well.
- Insert the laces into the first holes from the inside.
- Without changing sides, pass them from the outside into the second holes.
- Cross the laces and insert them from the inside into the second holes.
- Pass the ends from the outside into the third holes on the same side.
- Cross and insert into the third holes. When crossing, each time there is a different lace in front.
- Continue lacing in this manner until you reach the end.
- Tie a knot.
Lacing with just one hand
For athletes, various injuries are nothing new. But if your hand is injured, this is not a reason to give up your favorite pair of shoes. There’s just one problem: it’s difficult to tie your shoelaces with one hand.
There is a method for tying shoelaces that saves everyone in such situations:
- a knot is tied at the end of the rope;
- the free end is pulled through the lower hole from the inside out until it rests on the knot;
- the lace is passed through the opposite hole;
- it is threaded further diagonally, making zigzag movements;
- the weaving continues all the way to the top of the shoe.
This way the laced sneaker is easy to put on and take off, which is also important if your hand is injured.
Ladder
fieggen.com
The lacing is very tight and reliable. Great for hiking boots and skates, but can be tricky to tighten.
- Pass the laces through the bottom holes from the inside.
- Insert both ends from the outside into the second holes on the same side.
- Cross the laces from the inside, hook them under the first eyelets and insert them from the outside into the third holes.
- Cross the laces from the inside again, but this time the other end should be on top.
- Hook the laces under the second eyelets and insert them from the outside into the fourth holes.
- Continue lacing in the same manner until the end.
Self-lacing sneakers
Self-lacing sneakers were first talked about in the movie Back to the Future. Since then, self-lacing shoes have regularly appeared on store shelves.
Self-tying laces allow you to adjust the shoe to your foot so that even non-standard feet feel comfortable. Nike released this pair. It should be noted that Nike is not the only “smart” shoe. So the modern buyer has a good choice of options.
To make the sneakers tighten themselves, a special motor is used. This design is controlled from a mobile phone and control keys located on the sole. Using the installed application, you can put on your shoes without even bending down to the floor.
The shoes themselves can change in size, although not dramatically. The maximum is half a size, but such improvement is also worth a lot, especially if your feet tend to swell in the evening.
Reasons for unleashing
First you need to figure out why the laces are untied. This will help you avoid mistakes in the future. There are several factors:
- Incorrect choice. It would seem that it could be easier to purchase laces. But the wrong choice can lead to permanent untangling. To avoid this problem, you should take shoes with you to the store. This is the only way to select laces that match the holes provided for them.
- Inappropriate length. In order to correctly form a knot, you should have free ends of sufficient length in stock. Otherwise, it is impossible to fix the knot tightly enough.
- Bad form. Can be round, oval and flat. The strongest knot is formed using flat laces.
- The knot is not tightened properly. This fact initially guarantees that the lace will come undone. Therefore, it is necessary to once again tighten the loose ends and tighten them as tightly as possible.
- Incorrectly tied knot. There are many options for knots that differ in their strength. If the usual option does not hold, you should familiarize yourself with other methods suitable for the specific material, length, and shape of the lace.
If the case of decoupling is isolated, then much attention should not be paid to this issue. Assuming regularity, it is necessary to determine the reason why the shoelaces are untied and try to eliminate it. If you cannot achieve a positive result, it is recommended to purchase new laces that differ from the old ones in quality characteristics.
Some tips
Tying your shoelaces may seem like a simple procedure, but only if you consider the methods that are familiar to everyone. Another thing is the original and more complex lacing. In this case, it is advisable to follow a few tips:
- When you tie a knot, you need to tuck your toes. Then the lacing will tighten tightly, but will not tighten the leg when the toes return to normal.
- The sneakers are tightened at the last hole so that the foot is firmly fixed. If you do it differently, there is a high risk that a person may twist his leg or suffer another injury.
- It is better to use semi-synthetic laces. They are more durable and will not fray at the most inopportune moment.
- If the sneaker has a high instep, it is recommended to use horizontal types of lacing.
- For wide feet, it is advisable to use criss-cross lacing.
- A narrow foot will be well supported and emphasized by the zigzag technique.
- To securely fix the lace, you can tie it with a double slip knot. And before you start playing sports, the strength of the knot must be checked.
But the most important piece of advice is that the lacing should fit comfortably on the foot, not tighten anywhere or give any slack.
How to tie laces on boots
Method 11.
Army - "army". It's like the reverse side of a Bow Tie lacing. This is an army type of lacing among soldiers of Western European armies.
Method 12.
Train Track - “railroad track” (photo 24). This lacing requires large holes because the lace goes into one of them several times.
Method 13.
Zipper - “fastener”. Suitable for lacing roller skates because this lacing is strong and reliable.
Choosing the right length
Laces have different characteristics, but even without knowing all the subtleties of their choice, you need to decide on one parameter right away - their size. The main criterion when choosing the appropriate length is the number of holes in the sneakers. Here is the standard size chart:
| Number of holes in sneakers | Required lace length |
| 2-3 pairs | 45 cm |
| 3-4 pairs | 60 cm |
| 5-6 pairs | 75 cm |
| 6-7 pairs | 90 cm |
| 7-8 pairs | 100 cm |
| 8-9 pairs | 120 cm |
| 9-10 pairs | 140 cm |
| 10-12 pairs | 180 cm |
| 16-19 pairs | 2-2.5 meters |
When buying well-known brand sneakers (Nike, New Balance, Adidas, Reebok, Puma, Asics, Converse), you will notice that manufacturers indicate the required length of laces in the description. If the old ties have become unusable, but they fit perfectly under the shoes, then you need to look at the box or under the tongue of the product. If there is no such information, you can simply measure them with a ruler and purchase the same ones.
Fastening the ends
Tie ends make lacing easier and protect cuts. They are made mainly from metal and plastic, less often from rubber, leather, and thick cotton. Designer products are made from glass, semi-precious stones, brass, copper, alloys and even gold or silver.
If the tips have fallen off, you can strengthen the sections by wrapping them with tape or soaking them in glue (epoxy, wax). A more labor-intensive repair of laces is gluing a suitable metal sleeve or a piece of heat-shrink tubing (for insulating wires). The choice of method depends on the skills of the owner, the design of the shoes, the type of material, and the availability of a certain set of tools.
Sneakers are a versatile type of footwear that are predicted to have long-lasting popularity. They can be with laces or without laces - women's, children's and men's. Which option to prefer depends on individual taste.