Laces are an important element of shoes; they allow you to hold them firmly on your foot. Today, there are many ways to tie sneaker laces so that the knot and bow are neatly hidden inside. An unusual pattern, a new type of bow or bright colors - all this can help in self-expression, which most often concerns the younger generation. In this article we will look at several ways to tie shoelaces so that the bow is hidden.
Regular cross lacing with hidden bow
Lace your shoes from bottom to top.
Remove the lace from the shoe. Pass the ends of the lace through the bottommost holes from the inside out. You will have a horizontal stitch on the inside. Stretch the ends of the lace and align them so that they are the same length.
- Cross lacing is the most common type of lacing. Shoes bought in a store are laced this way in most cases. Check how the shoes you buy are laced before removing the laces. If the lacing is cross, there is no need to redo it.
Lace your shoes crosswise.
Move the right end of the lace to the left and thread it from the inside out into the second hole from the bottom on the left. Then thread the left end of the lace through the hole second from the bottom on the right, so that the stitches are criss-crossed. Continue lacing from left to right and right to left, working from bottom to top until you reach the top edge of the shoe.
Thread the laces through the top holes from the outside in.
When you have one free hole left at the top of the shoe, thread the ends of the lace not from the inside to the outside, but from the outside to the inside. The free ends of the lace will be on the inside of the shoe.
Tie the laces with a double knot.
Pull the laces towards the toe of the shoe. Fold the ends of the lace crosswise at the level of the sock and wrap one end around the other. Do not tighten the laces too tightly - the knot should be at the level of the toe of the shoe. Then loop one end of the lace around the other again and tighten to make a double knot.
- When tying a knot, try not to tighten the laces so that the knot remains at the ends of the laces at the level of the toe of your shoe. The laces tied in this way are tucked inside the shoes so that the knot is in the toe of the shoe, in front of the toes.
Tuck the knot as far into the boot as possible.
Push the knot into the toe of the boot as far as possible so that it does not interfere with your walking. Every time you put on your shoes, check that the knot is in place.
What to consider when choosing a method?
Lacing varies. When choosing one method or another, it is important to remember some of its nuances. Don't forget that shoes are not only about beauty. Comfort is important . Properly laced boots not only look good: they don’t tighten your feet and don’t come off while walking. To achieve this effect, you need to consider:
- For what purpose is lacing selected? If you are going to be running, cycling or actively walking, you need to securely fasten your shoes to your feet. Therefore, you will have to tighten the lace a little more than usual (but you should pay attention to ensure that no elements of the sneaker put pressure on your foot).
- Foot shape. Some tying methods are completely unsuitable for people who have wide or narrow heels or high insteps (the shoes will rub).
- Shoe style. Not every lacing is universal. One method is suitable for sports sneakers, the other for classic ones.
Interesting! Many techniques for tying shoelaces without bows involve using the last extra hole. This helps distribute pressure evenly across the top of the foot. Thanks to this tying, there will be less discomfort and unpleasant sensations while walking.
With a pass in the center
To relieve the pressure of shoes on the instep of the leg, this lacing method is perfect. This method is not widely popular, since few people even think about such an unusual and original option.
- Insert the ends of the laces into the eyelets from the inside and pull through.
- Cross them and paste them to the next level.
- Cross the aiglets again and pass them through the other loops.
- Having reached the two middle holes, change the lacing method: without crossing them, pass the laces from the outside to the inside into the next eyelets.
- The next steps are to repeat the first three until all the lacing is done.
- Before tying the knot, cross the laces again and pass them inward, under the tongue of the shoe.
- To keep the ends of the laces out of the way, they are also hidden inside.
This method is perfect for shoes with an even number of holes for lacing.
How to lace without the laces sticking out
There are several lacing methods to prevent the ends from sticking out:
- You can simply hide them inside the sneakers under the foot, and cover the remains with the sides of the shoes. But do not think that this method will protect you from a possible fall. After all, without tying the laces, you will not be able to secure your foot tightly in your shoes, so there is a risk of losing both your sneakers and your balance while walking quickly. Use this method only in extreme cases, when you need to quickly put on your shoes and walk a short distance.
- This method is more reliable than the first, although it can also cause some inconvenience. Lace as usual, and tie the bow under the tongue, not on the outside. The problem is solved - the bow and the ends of the laces do not stick out. But another problem may arise - the knot will put pressure on the foot while moving.
- If the laces are too long and you can’t hide them under the tongue the first time, before tying the bow, pass them around the foot and only then tie it. If the laces do not rub your foot, you can use this method regularly.
- Try the double lacing method, which allows you to shorten long laces, which means significantly reducing the size of the bow. To do this, you need to pass each half of the lace twice through some holes, for example, in the center.
Double knot
This type of lacing is ideal for those who do not want to tie the laces every time they put on shoes, wasting such a precious and priceless resource, which tends to be finite, like time.
- We pull the laces from below so that their ends are on the outside.
- We thread the left end into the right eyelet, and the right end into the left, creating a criss-cross pattern of them.
- We repeat these steps in the same way until we reach the tip of the tongue.
- The laces must be threaded into the last holes so that their ends remain inside the shoes.
- Then you need to stretch the remaining laces to the toe, wrap one around the other, fix the knot and do this again. There is no need to make it too tight, because its task is to keep the lacing in its original form.
"Snake"
This lacing is ideal for shoes with six pairs of lace holes.
This is a rather complicated option. You need to be extremely careful when using this method.
We perform the following actions:
- We pass the cord through the first pair of holes, as everywhere else.
- We draw one of the ends, the shorter one, over the tongue diagonally and leave it like that. It performs only a decorative function.
- The second end of the lace passes under the first and comes out from the inside in the second row.
- Use a lace to make a regular horizontal line and thread it inside.
- Repeat the steps above until the holes run out.
On sneakers and sneakers
It is not always appropriate to tie the laces with a bow if a man prefers sports shoes. Therefore, it is worth separately considering the advice of experts on how to tie the laces on sneakers and sneakers to look fashionable and original. Several lacing options are suitable for this style of shoe:
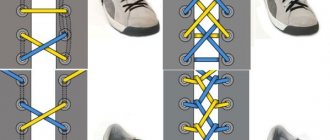
- Zigzag lacing - the laces are threaded through the bottom holes, crossing the edges, leading them to the next pair of holes above.
- Ladder - first, the wound laces are pulled out, then one edge is inserted crosswise into the top hole, and the second edge is drawn one hole higher. According to this principle, alternating lacing continues.
- External lacing - on the inside, the lace is crossed, passed through two holes, both edges are brought out and crossed again, after which they go inside and again repeat the whole principle of weaving.
- Straight lacing - one edge is drawn from the inside of the upper hole, stretching to the opposite side. Next, one hole is passed, drawing the edge of the lace higher from it, and the second end is passed according to the same principle through the missed holes.
Three crosses
This option is perfect for those sneakers in which the manufacturers provide only three pairs of holes for lacing. Everything is done very simply:
- The ends of the laces are threaded from the outside inwards into the lowest loops, and then pulled up to the next holes.
- Cross over and insert into the next row.
- This is repeated until the end of the pattern.
“Three crosses” are perfect for short laces, so you don’t have to tie a bow at the end.
Double weave
The method allows you to make a lace of any length convenient: you need to pull it twice through the same holes, returning to a step; It's best to do this in the middle part. With desire, patience and imagination, a simple weave can be easily transformed into a figured pattern, adding originality to the shoes. It is not necessary to tie the ends, just hide the laces - the sneakers will not slack thanks to the double fixation.
Fine motor exercises
To make stubborn laces manageable for small fingers, training is needed. Fun exercises will not only strengthen muscles, but also develop creative abilities, teach you to think logically, and improve coordination of movements:
Connect the dots. There are many educational publications on sale in which the task for the child is set out - to trace the outline dot by dot so that it turns out to be an image.
Mosaic. The ability to lay out a pattern of small elements in a certain sequence is the first step to mastering the basics of mathematics.
Sorting small items. In schools that teach children using the Maria Montessori method, clothespins, buttons, cereals and other small items are actively used. During classes, kids string beads, sort elements according to various criteria, and transfer them from one bowl to another.
advertising is not displayed
Coloring pages with stickers. The child’s task is not only to color the picture he likes, but also to find the corresponding image and carefully stick it on the desired fragment of the sheet.
Finger games. Two in one: gymnastics for little hands and learning funny poems.
Drawing on sand, semolina. There is real scope for creativity: you can learn letters, numbers, draw themed pictures, or simply pour warm sand with your hands.
"Web"
Recently, this method has been gaining popularity.
Lacing technique:
- Pull the tip of the lace into the second hole from the inside.
- Pass from the outside and through the first holes.
- Make the laces crosswise and pull them from the inside through the third holes.
- The ends must be pulled out under the upper holes and inserted from the inside into the fourth holes.
- Finally, thread the aiglets under the second holes and pull them from the inside into the fifth holes from the outside.
- The knot is hidden behind the tongue.
Eglet is the metal end of a cord.
By number of holes
In addition to dividing into decorative techniques and individual elements, lacing can be distinguished by holes - the complexity of weaving directly depends on them. Many variations can be repeated only for even-numbered versions, others will look more original only on unpaired analogues.
Therefore, it is worth taking into account the classical schemes
With 4 holes
The minimum set significantly limits the imagination for the implementation of original patterns.
A popular way out of the situation is to draw a cross outward:
- To do this, it is advised to thread the lace through the lower rings, then take them out, and then cross them again and tuck them into opposite holes.
- It is better to follow a clear algorithm: if you start on the left side, continue to stick to that side so that the final drawing seems correct and even.
With 5 holes
The generous volume gives more space to realize a beautiful look. After all, five rings are the most popular set of sneakers. “Knot” lacing is perfect for such shoes.
It's easy to repeat:
- It is worth inserting the lace into the lower holes from the inside and carefully pulling it out, while simultaneously aligning it along the length to avoid twisting into a spiral.
- Afterwards, you should cross the ends, intertwining them, and again place them on different sides.
- Then all that remains is to take each one out separately and make a knot from the outside.
With 6 holes
If you choose blanks of medium thickness, you will certainly be able to achieve the desired pattern. A method like “Shop lacing” for shoes is very similar to the knotting technique, but still requires care during the process.
The main secret here is how gracefully the two ends fit together:
- First of all, the laces follow inside and are pulled out, then they are pulled into the upper rings and returned back, after which each edge clings in a loop to the adjacent one and goes up again.
- The specified pattern is duplicated right up to the very edge.
On boots
The first shoe to consider in the context of lace weaving is boots. When choosing a lacing option, a man needs to take into account, first of all, the general style and design of the shoes; if the shoes are closer to the classics, it is worth choosing more traditional techniques; for shoes close to the sports style, creative and bold lacing is allowed.
Most often, stylists advise trying several lacing options for boots:
- Diagonal - this way you can lace so that the laces do not come undone throughout the day. An additional bonus will be the original diagonal pattern that is obtained from the lace. Stylists advise to weave both laces equally on formal shoes, and to make a mirror image of the weaves on casual and sports shoes.
- The traditional method - in this case, involves lacing the shoes in a zigzag manner, starting from the bottom holes, crossing the ends of the lace with each other, ending the process to the last holes.
- Straight lacing looks very strict and presentable on winter boots of both classic and free style. Its peculiarity lies in the hidden lacing, after which only straight lines of lace remain on top of the shoes.
If you plan to wear boots with lashes, experts advise using round laces, which are resistant to friction and will therefore last much longer. To keep the loops and laces firmly without kinks, it is better to use simple cross lacing. In this case, the edge of the lace is threaded into the lower loops of the shoe, after which it is distributed into two equal strips. Next, the edges are crossed, brought into the next loops higher, and so on until the very top.
Lazy laces
The Chinese also helped in this matter, releasing laces without any bows. The secret is simple: they are attached in two places to sneakers or sneakers, and they themselves are made of... elastic. Therefore, you can easily take off and put on shoes, and there is no tying or untying.
But reviews about such a new product are mixed. Consumers complain that the elastic bands break down very quickly and, as they stretch, they no longer secure the sneakers tightly on their feet. And the fastenings don’t look very presentable. But for sloths this is just a godsend.
Now you know how important it is to pay attention to detail and be sure to get rid of those annoying lace bows by putting them inside your shoes using any of the methods listed above.
DIY New Year's wool paintings
What should be longer: a dress or a coat?
Beautiful methods of lacing with ends inward
For aesthetes who not only don’t want the bow to stick out, but also want the lacing itself to look beautiful, we’ll tell you how this can be achieved:
1. Thread one end of the lace into the top hole, pass it straight horizontally from the outside and push it inside. Pull it out in the next hole, which is located one cell apart. Pass it horizontally again to the opposite side, push it from the outside inwards and pull it out through one cell. Having passed in this way to the very bottom, repeat the steps in reverse order, this time threading through the remaining free holes. And you will tie a knot from the inside when both ends of the lace come together.
2. This weaving is considered the most difficult, but it looks attractive. To begin, thread the eglet into the top sixth hole from the outside, pass it diagonally and stick it into the opposite fourth hole from the outside in. Then zigzag again and thread the lace through the second one from the outside to the inside. Pull it out through the first one, which is nearby, from the inside out. Then pass into the third opposite from the inside out, diagonally into the second from bottom to top. Next, pass into the second opposite hole from the outside to the inside and make mirror zigzags until the lace is again in the first hole.
3. If girls like the previous method more, then brutal guys will be more likely to be interested in this one. Pass the lace through the top sixth hole from the inside out, then into the opposite fifth hole from the inside out, return to the third diagonally, then into the second opposite one, and finally into the first. Always insert the eglet from the inside out onto the face. Then make a perpendicular stitch to the first opposite side, tuck the lace away from the face, then make mirror zigzags from the inside out. The ends will be on the wrong side, where they can be tied into a knot without anyone noticing.
4. Straight lacing will look good on high-top sneakers. We insert both ends into the first two holes from the outside to the inside to form a straight line. We insert one lace into the second hole on the same side from the inside out, and the second into the third. We continue to alternate the left and right parts of the lace until we reach the top, where we pass both laces from the outside to the inside in the sixth holes. And on top of the sneakers you will get beautiful even stitches.
Why protruding laces are unaesthetic
Young people pay a lot of attention to details. Where an adult “put on shoes and forget,” a teenager will spend a long time trying on, choosing the color and length of the laces. And then he’ll be upset because of the bow that’s sticking out. And it constantly comes untied, threatening the owner of a pair of sports shoes with a fall if he steps on the protruding end.
Of course, sneakers will look much more attractive with lacing that goes somewhere inside. But how to achieve this effect? It turns out there is such a possibility.