Many people are interested in how to properly beat meat . When you hear the word “chop,” your imagination immediately conjures up juicy pork chops, lamb chops on the bone, Wiener schnitzel, krucheniki, steak, escalope, beef stroganoff, Kiev cutlets, chicken chops and rolls, meat rolls with prunes or mushrooms. To prepare all these dishes, we need a meat hammer, which is probably found in every kitchen.
The meat is beaten in order to separate and soften the muscle fibers so that the meat remains soft when cooked. Beating also gives a piece of meat a larger area, so that it is convenient to make rolls.
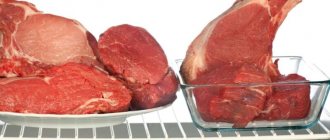
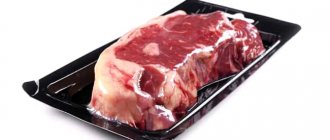
You can beat meat from various parts of the meat carcass. To prepare classic chops, a loin is used (with or without the bone), you can also beat the flesh of the neck or hind leg (ham), and a shoulder (mostly pork) is used somewhat less frequently.
How to beat chicken fillet
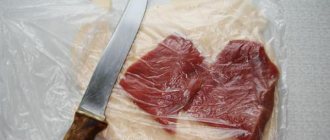
To prepare some dishes (for example, chops, Kiev cutlets or rolls), we need beaten chicken fillet. This task may seem simple at first glance, but a novice cook can, due to inexperience, beat tender chicken meat to holes. Look at step-by-step photos on how to beat chicken meat. To make a thin slice, make a cut and unfold the chicken breast in the shape of a heart. It is better to beat chicken meat with a wooden mallet, not a metal one, and better on the side so that there are no cuts that easily damage the tender chicken meat. If you use a hammer with metal notches, beat the fillet carefully so that it remains intact. The beaten meat can be breaded or filled with filling and rolled up.
How to hit correctly
Beginners in the kitchen who are planning to cook delicious food for the first time will have a rather difficult time. To do everything right, they will definitely need a few tips on how to beat meat without or with a hammer:
Read also: What is healthier, lard or meat?
- It is best to beat fresh meat that has not been frozen before. Such chops turn out juicier because they will not lose juice when defrosting. If, after all, the meat was frozen, then before processing, you need to wait for it to completely thaw. Otherwise, the frozen product will tear when beaten.
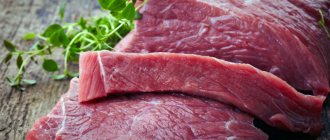
- Old meat with veins is least suitable for beating. It is best to choose pieces of young meat, not lean, but not too fatty.
- Meat should not be washed before cooking. If it was washed, then in order for the dish not to turn out dry, it must be dried.
- It is not advisable to season the meat before beating it. All necessary seasonings should be used immediately before frying.
- The product should not be beaten too thin, otherwise you can make holes in it or the chops will turn out very dry.
- You need to fry the prepared pieces in a very hot frying pan so that they turn out tasty and juicy.
Rare (Rare) cooked!
(This is a post about beef steaks)
There is an opinion that the way a steak is cooked is when inside the piece there is simply heated raw meat. And also with blood...
But this is complete crap))
Firstly, there is simply nowhere for blood to come from; all the blood is drained when cutting up the carcass.
Have you ever seen a piece of raw meat bleed when you cut it?
Well, secondly, even when cooked, it is never raw meat.
At this temperature, beef proteins are already coagulating; if you cool this meat and compare it with raw meat, it will differ from raw meat both in texture and taste.
I don't usually cook rai, but having a very nice ribeye steak in stock, I decided to give it a try.
Salt, pepper and the steak itself, the simplest grill, a homemade grill (actually a smokehouse, but used as a grill)
I poked the thermometer, it was about 40 degrees. I brought it to about 47 and removed it from the heat, covered it with foil for 4-5 minutes, due to thermal inertia the core just warmed up another 2-3 degrees.
So it turned out to be a little more than 49.
The meat is very tender, mega juicy, melts in your mouth, the taste is just super. But this is a good ribeye, the main thing is not to spoil it)
I just really liked the result, the next time I get my hands on such meat, I will fry it in the same way.
Short video with St. Petersburg dismemberment:
For comparison, a week ago I fried a ribeye until it was medium-medium, it was also tasty and juicy, but this time it was just mind blowing.
Unfortunately, at this time of year it gets dark quickly in our area (white nights give way to black days), and I can no longer take such juicy photos as in natural light ((
Procedure step by step
It is very important to know how to properly pound meat for chops. You don't need a lot of equipment:
- board;
- sharp knife;
- suitable tool.
The prepared piece of meat needs to be cut into wide steaks. They should not be too thin, otherwise the product will turn out dry. It is usually recommended to make a cut of at least 2.5 centimeters. Filet mignon allows a thickness of 5 cm.
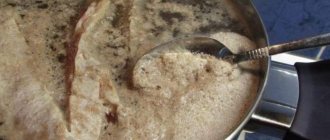
Now we take a device for beating meat and begin to apply even blows. After this, you need to turn the piece over and repeat the procedure on the reverse side. Repeat this procedure with the rest of the meat and turn on the pan.
Big tasty ribeye steak
Ribeye is probably the most hyped steak in the world. If a person likes to make snobbish speeches like “for me, steak is only premium marbled beef,” then most likely he is talking about ribeye.
Enough words, here are the pictures:
Large piece weighing more than 450 grams
I added salt and pepper about half an hour before
Not the best, as it is thin, only one and a half centimeters thick. I would prefer it to be twice as thick, but then it would weigh almost a kilo...
However, why complain about the shape of a steak from a sale, the main thing is what it tastes like.
We load the grill with coals so that it burns from the heart, and then we fry.
The steak is thin, I kept it on the grill for 4 minutes according to the scheme:
minute on one side, turn over to the other for another minute, then turn again for a minute, and back again for the last minute.
Thin steaks are also bad because their internal temperature is difficult to control. I obviously didn’t get into the medium rair as I wanted, but made a medium.
Which, however, didn’t really upset anyone, since the meat remained soft, tender, juicy, and sooooo tasty.
Although for some it’s still a crude email)))
PS the accordion meter showed naked women, however.
What is important to know
Before you think about how to beat the meat, if you don’t have a special hammer, you need to choose the right product. Otherwise, the effort spent will not pay off. In addition, there are a number of rules that must be followed:
- It is best to choose one that has never been frozen before. This is very important because meat loses its juice when defrosting. If you take it out of the freezer, be sure to wait until it thaws completely. It is best to leave it on the bottom shelf of the refrigerator for several hours.
- Old meat with veins performs the worst. Only long-term stewing will help this. Choose young, not too lean, but not greasy either.
- Do not wash meat before cooking. If this mistake is made, then dry it thoroughly with a towel.
- Seasonings can be added just before frying, but not during the battering process.
- You can't hit it too thin or too hard. You can make holes, but the meat will turn out tough and dry.
- Be sure to fry over high heat so that the crust sets.
Available means
If you don't find anything suitable in the kitchen, you can look in the pantry. Surely there is a glass bottle of wine or champagne. A great option: turn it upside down and strike with the neck. The dish will turn out no worse than if you used a professional hammer.
It also happens that there is not a single bottle at home. Then a toolbox can help out. Take out a regular hammer and attach a regular fork to it with tape. It is with this side that you will strike. Since a hammer is a heavy tool, preparing the meat will go very quickly. The main thing is not to be too zealous; you don’t need minced meat, but a juicy steak.
Adding spices
To prevent the meat from releasing its juices during frying and becoming over-dried, you should salt it only at the very end of cooking. In addition, it is recommended to choose sea salt. It is considered more healthy and successfully emphasizes the unique taste of the dish.
When adding seasonings, it is important not to overdo it. Spices should complement the flavor of the chops, but not overwhelm the dish. A great option is black pepper, which adds a sophisticated aroma. Rosemary, oregano, basil, marjoram, and garlic are also used. In this case, the choice depends on preference.
Often the meat is marinated in garlic or onion, which gives all its juice to the dish. Lemon juice, which will add sourness, and wine are suitable. It is very important to marinate the beef. There are many options for marinade, just remember that you need to marinate the meat for about 10 minutes.
Perfect meat
Salt, pepper or add spices should be added only after the meat is completely beaten. It can be dipped in flour, batter or breadcrumbs. Fry over high heat for no more than 4 minutes on each side.
Such chops turn out no less soft and juicy than when beating with special tools. And the taste is absolutely no different. And in situations where you are away from home (for example, at the dacha), this method is ideal for creating a delicious and tender dish. But even at home, using this method is very convenient and simple.
Ramp steak, or frying a piece of cow's ass
This is one of the cheapest steaks, no marbling and quite hard fibers))
But they still sell it as steak.
Today I decided to try to answer this question.
As usual, before doing anything with the piece, dry it with paper towels. Everyone knows that moisture is our enemy and interferes with roasting.
Next I salt with regular coarse salt and pepper.
The trick is that the salt first draws out some moisture from the surface, and then the moisture is absorbed back into the piece along with the salt, and the surface is further dried.
In English this is called dry brine, a very convenient salting method. In Russian it can probably be translated as dry marinade, but I’m not sure.
Our piece is 400 grams, this length
Just before frying, I coat the steak with oil to help it cook better. It's some kind of cheap refined olive oil that doesn't smell like anything special.
A little video of the frying process.
After frying, I removed the piece from direct heat and brought it to 54 degrees in the middle of the piece.
This took a couple more minutes.
And this is what happened, it looks great IMHO)
But is it possible to chew this normally?
As it turned out, the chewing is quite normal if you cut it adequately, but it is very far from premium steaks. It will be a little difficult to gnaw without a knife... you definitely can’t make a normal kebab out of this.
And juicy. Although the marbling is near zero, if you don’t overcook it, the juiciness is OK.
I think this is the case where frying beyond the medium can completely ruin everything.
PS This time the accordion meter showed boobs... I don’t know what’s wrong with the algorithms, but it’s nice, thank you))
What is a tenderizer
Meat tenderizer is a device used for tenderizing meat. It has several types of design, but the essence of their action remains the same - knives (spikes, needles) come out of the body, which pierce the product. The length of the knives is 1-2 cm.
What is a tenderizer for, and how effective is its use? Its effect disrupts the connection between meat fibers. Its structure becomes more delicate, the process of preparation and marinating is reduced. A processed steak requires less cooking time, the quality of heat treatment is improved, and the taste is improved. Processing can improve the taste of even middle-aged meat.
With its help, in your home kitchen you can prepare a dish that is not inferior in taste, tenderness and juiciness to restaurant masterpieces from chefs.
Recommendations for use
One of the characteristics of the device is the presence of sharp elements. When operating, pay attention to safety. Most models have a protective cover on the body that reliably hides the knives and prevents accidental contact with your hands. The exception is roller models. Special care must be taken when using them.
When processing the product, hold it with a fork or spatula. But in no case with your hand.
Areas containing bone are carefully treated. They should be avoided. Knives may break if they come into contact with hard elements.
Cleaning of the device is carried out according to the manufacturer's instructions. Removable parts are washed with hot water. All elements are thoroughly dried, then assembly is carried out. It is not recommended to wash the parts in the dishwasher, because... they may become dull.
Kitchen helpers
Dough rolling pins, mashed potato masher - any of these devices will perform this function perfectly. There is a small nuance - before starting work, be sure to wrap the piece of meat with cling film or put it in a regular bag. Meat splashes will not bother you. However, many housewives argue that a rolling pin for dough is not a very good option, because even with force, it is impossible to break the fibers.
Another point that you involuntarily think about is a strong knock that can disturb your neighbors. But this problem can be solved very easily. Just place a waffle towel under the cutting board.
We beat the meat quietly and without splashing
Many people, when they pick up a meat hammer and start working hard with it, create a terrible noise not only in the kitchen or even the entire apartment, but sometimes even outside the apartment. At the same time, bloody splashes and tiny pieces of meat are scattered throughout the kitchen, like in a horror movie. Then getting the kitchen in order after such a beating can be difficult. But everything can be done not so noisily and even very neatly.
To do this, the meat is simply wrapped in a tight plastic bag, or you can simply wrap it in the same cling film. After such “swaddling” of a piece of meat, splashes will not fly to the sides when beating it.
And so that your neighbors are calm during such a noisy procedure and are not indignant, place any towel under your cutting board (on which you will “chop” the meat). This will make the whole process much more silent, which will be noticeable even outside your kitchen.
Before you start beating, it is best to wet the board (if you are using a wooden board) with cold water. This way, the dry wood of the board will not absorb the juice from the piece of meat.
Also, you should not beat the meat almost to through holes. You just need to “stretch” it a little, this will make the piece a little thinner.
Some cons
When beating, some juice is released. With it, a certain amount of minerals and amino acids is lost, in addition, the final product is drier.
The harder you beat, the more fluid is released. The optimal solution would be to find a degree of tenderization that preserves the maximum amount of nutrients while maintaining a fairly soft meat consistency. This is achieved experimentally. Therefore, you should not fry a large batch at once. Start with one steak, take a sample and adjust the preparation of the meat.
The secret to preparing appetizing meat lies not only in the recipe, but also in the technique of preparing it in advance. Sometimes it really turns out to be not as soft as we would like. Beating it before cooking can save the situation. Even the highest quality meat benefits from this. Beating makes it not only soft, but also juicy. As usual, a special hammer is used for beating. However, other improvised objects also cope perfectly with this task.
You will need
- - knife;
- – rolling pin for dough;
- - Glass bottle;
- – wooden potato masher;
- - frying pan.
Instructions
1.
In the absence of a special hammer, you can beat the meat with a knife. To do this you will need a weighty and thick knife. Cut the meat into pieces and beat them not with a sharp edge, but with the back of a knife in different directions. You can also use the handle of a knife if it is quite wide.
2.
A traditional glass bottle, or rather its neck, can make meat soft. When beating with it, pieces of meat turn out even more tender and fluffy than when beating with a hammer. To do this, it is quite easy to tap the neck of the piece of meat. However, you can beat it off with the bottom of a bottle. In this case, it is more rational to fill it with water in advance.
3.
A rolling pin for dough and a wooden masher for mashed potatoes work well as a hammer. Just don't overdo it. Excessive beating can turn juicy meat into dry meat.
4.
You can beat off pieces of meat with the flat side of the frying pan. Only in advance they should be wrapped in cling film or a plastic bag for hygiene purposes.
5.
A stone works well as a meat hammer. To do this, you need to find a hefty cobblestone, place it in a plastic bag, and only then start beating the meat.
6.
You can beat off a piece of meat with the base or edge of your palm. True, to beat off is a strong word. Rather, you will be able to soften the meat easily.
Buying decorative tiles and covering the walls with them is a typical option when renovating a bathroom or kitchen. Before laying new tiles on the wall
, it is necessary to recapture the old one. How to do this correctly?
You will need
- - gloves;
- – glasses for eye protection;
- – respirator;
- - hammer;
- – chisel and chisel;
- – hammer drill;
- – polyethylene film;
- - blanket.
Instructions
1.
Prepare the place where you will work. Cover the floor with polyethylene film. Cover the sink, toilet and other breakable objects with an old blanket. This will protect the space from fragments of dilapidated tiles, and after the completion of the work you will only need to roll up the film and throw away the fragments.
2.
Wear safety glasses. It is better to protect your hands with gloves. To prevent dust from entering your respiratory tract, use a respirator. If you don’t have a respirator, make a mask from gauze and a thin layer of cotton wool.
3.
Start beating the tiles.
Start from the top row and work your way down little by little. Separate the tiles
from the wall using a chisel and chisel.
Remove the tiles one by one, carefully picking them up by the edges. If you cannot separate the tile
, you need to break it. Hit with the hammer, but not too hard. The tile should split into several pieces. Carefully remove them and proceed to processing the next area.
4.
After removing the tiles, you must thoroughly clean the wall of old mortar. Do this by working with a chisel. Clean thoroughly so that the wall becomes smooth - this determines how the new tiles will look. There should not be even small pieces of mortar left on the wall - this may interfere with the installation of new tiles.
5.
Carefully roll up the film together with the fragments of old tiles. Remove the blanket from the wrapped items. Your wall is ready for new tiles.
Video on the topic
Note!
Don’t think that removing old tiles is that easy. This is a labor-intensive process that can take several hours. However, you shouldn’t be afraid: if you do everything neatly, then no problems will arise.
Helpful advice
If you cannot break the tiles with a chisel and chisel, you can use a hammer drill. Be careful - if you use it carelessly, you can damage the surface, which will complicate further work.
The judge's gavel is an inseparable sign of the judiciary. His blow in the courtroom is a symbol of the indisputability of the decision made by the judge. In addition, if disrespect for the court is felt in the courtroom, then the judge, in order to restore order, has the right to remind about order by hitting a special stand with a gavel.
Instructions
1.
The judge's gavel is a sign of Western justice; it is not typical for Russia. It is made of wood and is nothing more than a symbol of the judge’s power. Most often, the judge's gavel is used when sensitive disputes and crazy discussions begin during the meeting. A hammer in such cases is a signal for calm and prudence. So that the judge does not raise his voice unnecessarily, he uses it. In the 20th century, the gavel acquired a new symbolic meaning; overseas judges strike it after the reading of the guilty verdict is completed, this is a sign that the decision has been made and is no longer subject to discussion in the courtroom.
2.
The history of the gavel dates back to biblical times. There is an Old Testament story about the construction of Solomon's temple in Jerusalem. This story describes the murder of the main builder Adoniram. One of the murder weapons was a hammer. That is, the hammer turned out to be some sign of sentencing a person.
3.
Based on this biblical story, the hammer, as a symbol of creation and punishment, was taken by the Freemasons, who, apparently, were engaged in the “construction” of a global religion. The hammer in Freemasonry is the sign of the chosen Master, the one endowed with strength and power. It was with this item that the Honored Master had the right to open and close Masonic meetings. Representatives of Freemasonry reacted to the sound of the hammer with great respect and admiration.
4.
Many researchers attribute the origin of the hammer to the mythological culture of the Sumerians, who lived in the 4th-3rd millennium BC. The Sumerians are an outstanding civilization, famous for their triumphs in the field of jurisprudence. During court hearings, they had a custom of knocking with a hammer, or rather hammering nails into the lid of the coffin in which the bandit was located. For any offense on the part of the defendant, the judge drove a nail in, but if there were excuses from the guards, the nails were removed. The meaning of this custom was that the more nails were driven in, the harder it was for the bandit to get out, and the more guilty he was. After this, the judges began to use a gavel in order to calm the noisy and violently reacting public.
5.
But despite its symbolism, the hammer is currently not an indispensable feature of the courtroom, and more often than not it is of a decorative nature. A hammer is such a custom. In Russia, the hammer is not used at all, but judges often put it on their table for decoration.
Note!
The judge's gavel is invariably used in conjunction with a special stand, which should be struck. It is believed that the first stands were in the form of a metal disk, symbolizing a clear circle, and therefore the power of the judge; later it was replaced by a wooden block, which is used to amplify sound.
Note!
Be careful not to beat the meat into holes; you only have to “stretch” it slightly, that is, make it thinner. There is no point in beating a piece of meat that is less than 2 centimeters thick. In this case, you will not improve, but rather will only aggravate its taste and relish; as a result, a piece of meat after frying will resemble a “cracker”.
Helpful advice
Before beating meat, moisten the cutting board with cold water so that the dry wood does not absorb meat juice. To prevent blood splashes from the meat from flying in different directions, put it in a plastic bag and only then beat it. To make the process of beating meat virtually silent, place it under the cutting board board towel.
Juicy and tasty chops, Kiev cutlets, meat rolls, beef Stroganoff, schnitzel and many other dishes are impossible without first beating the meat.
Why do you need to pound meat?
The meat has a tough structure, maintaining its rigidity even after heat treatment (frying or boiling). The reason for this is the muscle fibers, ligaments and tendons from which it consists.
A dish prepared from unprepared (unbeaten) meat may literally be too tough, and the digestive system will need additional resources to process it.
Pre-chopped meat is a completely different matter. Dishes prepared from it will not tire the chewing muscles, and the stomach will easily digest any such meat delicacy.
In addition, the beaten meat after heat treatment will be soft, juicy and tender.
Batting technology
It is better to use fresh meat for beating; if chops are prepared from frozen meat, let it thaw completely, since the smallest particles of ice during beating will destroy the structure of the meat, tearing it into pieces.
Before beating, wrap the meat in cling film or place it in 2-3 disposable plastic bags nested inside each other. Thanks to this, the kitchen table and kitchen walls will remain clean and you will not need to wash them from bloody splashes and stains.
Beat the meat evenly, striking with a hammer with equal force over the entire surface of the meat piece. After processing one side, turn the meat over and go over it on the other side. Process the edges of the meat piece with special care.
To beat a thick or tough piece of meat, it is preferable to use a hammer with large teeth; a tool with smaller teeth is useful for processing thin and soft pieces, and for beating edges it will be absolutely indispensable.
To prevent the kitchen from making noise like during an intensive renovation, place a kitchen towel between the table and the cutting board.
After placing the chopped pieces of meat in a properly heated frying pan, do not rush to immediately salt and sprinkle it with spices, otherwise it will release juice and become tough. It is best to do this at the moment when a light fried crust begins to appear on its surface.
If you don't have a hammer at hand
In this case, an ordinary kitchen knife will come to the rescue. Or rather, not quite ordinary, but with a thick and weighty blade. Taking a knife in your hands, methodically and evenly strike with the back (blunt) side of the blade over the entire surface of the piece of meat. By the way, this is how professional chefs bring meat to the desired condition, since they do not use hammers.
Another way to tenderize meat without using a hammer is to gently tap it with the neck of an upside-down glass bottle.
A masher for mashed potatoes or a rolling pin for rolling out dough can help out. By applying moderate blows to a piece of meat, you will quickly loosen it and bring it to the desired consistency.
May your meat dishes be delicious! Enjoy your meal!
A few secrets
There are a few more tips on how to beat meat without or with a hammer:
- It's no secret that when beating meat, splashes from it fly in all directions and stain everything. To avoid this problem, the product must either be wrapped in a bag or wrapped in cling film.
- Many housewives do not cook chops because it creates a lot of noise. To make this process quieter, place a towel under the cutting board.
- Thick pieces of meat should be beaten with large teeth of a hammer. The edges of the slices need to be beaten harder. This is done so that the chops do not change their shape during cooking.
- The wooden cutting board must first be moistened with cold water so that it does not absorb liquid from the meat. By the way, it is better to use wooden cutting boards for chops.
- The meat should be beaten carefully to prevent holes from appearing.
- carpenter's hammer
At the dacha or on a hike, you may have carpentry tools at hand. Something heavy with a flat, blunt side will do to deliver heavy blows without damaging the meat. For example, a small hatchet or hammer.
Heavy tools can break the fibers in beef and pork, but chicken needs to be handled very carefully to avoid tearing the whole piece apart.
- Cut the meat into pieces with a knife and wrap it in a bag.
- We also wrap carpentry tools in polyethylene to comply with hygiene rules.
- Without using too much force, we beat both sides twice.
What you need to know about steaks?
How tender, juicy and tasty the piece of meat on your plate will be depends on factors such as:
- selection (animal breed);
- nutrition (how high-calorie and how long the fattening was);
- physical activity (the less the animal moved, the softer the meat);
- part of the carcass from which the meat is taken.
You've probably heard about such a thing as marbling - that is, the presence of intramuscular fat in animal meat. By the way, this term applies not only to beef, but also to pork, and sometimes also to horse meat. The veins of intramuscular fat resemble marble in their pattern, hence the name.
In addition to tenderness, such meat is also distinguished by the fact that it requires special conditions for growing the animal, and not all breeds have a predisposition to marbling, plus types of marbled beef steaks make up a very small proportion of the carcass, and it is thanks to these three factors that this meat is considered a delicacy.
Thoughts on the topic of barbecue
Barbecue is probably one of the most dangerous topics that can be discussed on Pikabu.
But where am I and where is the truth... I’ll just share my little experience of a not quite standard kebab (can it be called kebab after this?) that I’ve been cooking lately.
So, what do we have here in the picture...
Pork, chicken, some vegetables and mushrooms, everything is not marinated in anything, the pieces are cut into ribbons no thicker than 1 cm before mounting.
Fry it once, fry it twice, coat it with sauce, fry it again and it’s done.
Here's just pork without anything (except salt and spices):
It turns out like this:
These mini-skewers are from Ikea.
Naturally, this dish does not require a special grill or small skewers. The same thing can be done perfectly in a regular grill, and on regular skewers:
And now the second option, the antipode of mini-shish kebab, mega-shish kebab!
Again, pork neck, not very even pieces from the tape:
In total, probably 3 kilograms.
We cut it horizontally so that we get two layers of meat from each piece, and marinate.
Well, salt and pepper, of course.
To better understand the scale:
Pieces marinated in different ways alternate here
(While it was still burning, I hung the meat higher and a little to the side, then moved the meat lower and right above the coals)
This kind of meat takes a long time to cook, about a couple of hours. But this is still a “kebab”, so the goal was to fry it thoroughly, and not simmer it like some ribs.
While the main course is frying, we fry a couple of steaks for a snack right there.
Back to the main dish (almost ready):
Before removing it, I poked it with a thermometer and made sure that the temperature inside was above 72 degrees everywhere, and that’s it! On the table and cut)
Oddly enough, it turned out to be a kebab) a lot of kebab))
I had two ramps, one was eaten yesterday (see previous post), the other was used for experiments. We will compare Veldan with medium level. A piece is about 400 grams.
Salt and pepper before cooking as usual. In the photo, all the salt has already been absorbed and the surface of the meat is dry again.
Cut it in half. Then we will compare how the thickness has changed. It is logical that where the cut is, the thickness is initially the same.
Covered with oil. The smaller piece will be welldan, the larger piece will be medium rair.
PSH PSH Let's go fry! The second steak started cooking about five minutes after the first.
I kept it under the foil for a bit, about 4 minutes. During this time, the meat in the middle will reach a little more.
And here they are! Let's cut it now))
View from the end, the difference in thickness is already noticeable.
Although the second piece was smaller from the very beginning, the thickness was the same.
Cut, general view:
This is a well dan close up. Perhaps someone will object and say that this is medium well, because there is a little pink left. But I don’t agree, because the meat was heated to 72 degrees. Smart people say that for various reasons, myoglobin may not turn completely gray when it reaches well dan temperature.
All together and sponsor of the event))
Visual comparison of thickness:
Personally, I think that both options have the right to life. Well dan is tougher and drier, but still tasty and chews quite well. The medium rair is juicy and soft, but it doesn’t exactly melt in your mouth. You also need to work on your jaws.
For me, medium rair is definitely better; in my opinion, more flavor remains in the meat.
PS @Liacamarn, post based on your request)