Every person is already accustomed to the fact that purchased boots, sneakers or shoes are already laced by the manufacturer. Most often, lacing takes the form of the classic method (or in other words, “Cross to Cross”).
Shoe lacing plays an important role and can be done in a variety of ways..
Each type of lacing helps to diversify the style of shoes.
Suitable lacing shape
It often happens that the laces become unusable and need to be replaced. And the question always arises: “Which laces are suitable for any particular shoes?”
You need to remember a few simple rules:
- First of all, you need to look at the length. It depends on how many holes there are in the shoes. For example, if there are three pairs of holes in the shoes, then sixty centimeters of rope will be required. The more holes, the longer the lace you need to buy.
- Certain American brands indicate lace length in inches. For sports shoes, sellers recommend using a special table, because they require tight lacing.
- If the laces are long, you can cut them. The edges will need to be secured to prevent them from unraveling. Synthetic laces can be burned, but this must be done carefully.
Lacing is needed in order to properly fix the shoes on the foot. According to experts, improper lacing causes diseases that are directly related to the feet.
How to tie laces on dress shoes correctly?
August 17, 2017
We often write that true male style lies not in the flashy elements of the image, but in its subtle details. Among them, shoe laces occupy a special place. With the help of this seemingly insignificant detail, you can make your shoes brighter and more noticeable, or vice versa, more strict and formal.
This is interesting: 2 years of marriage, what a wedding
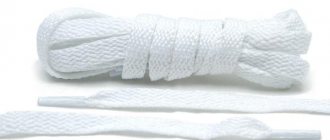
Shapes: Round and flat
For dress shoes, choose thin waxed laces. Fluffy synthetic ones, as in the picture in the middle, are only suitable for sneakers and sneakers.
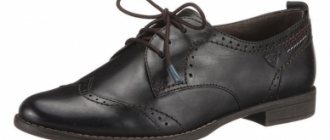
First of all, pay attention to the shape of the laces. When it comes to classic shoes, it is customary to use two options: the popular round ones and the less common flat ones. The latter look more original, which is why they have recently become fashionable. Flat laces are higher in formality than round laces, so they are more suitable for business and casual shoes than for country shoes. Even if your shoes are perforated (not through them, of course, but in the brogue style), then with flat laces they will be appropriate in a business atmosphere.
Colors: Bright and discreet
The colored laces should rhyme with one of the elements of your clothing - for example, socks.
Most ready-to-wear shoes come with matching laces. This is the safest option that is good for any style. But nothing prevents you from adding laces of an unusual color to your look as an accent. Here are some tips on how to choose this color:
- Match the color of the socks. A win-win option in which it is better for the socks to be plain or in a formal pattern. Anything more noticeable will overload the look.
- Matching the secondary tone of the shoe. This requires clarification: if your shoes are of a complex color (for example, black and burgundy), then both the primary tone (black) for a strict look and the secondary (burgundy) for a more cheerful look will suit it.
- Under one of the costume details. The most convenient options here are the color of the stripes or checks on the jacket, the color of the tie, or one of the colors of the pocket square. Just remember that there are usually fewer shoes in your wardrobe than ties. So the number of profitable combos will be disproportionately smaller than with laces under the suit fabric.
Laces: Formal and Casual
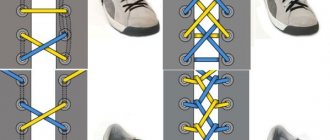
4 ways to tie shoelaces, from left to right: straight, cut knot, herringbone, cross.
The traditional lacing of men's classic shoes is straight, parallel. This is suitable for any situation, including a reception with the Queen of England, as it is the standard of formality. A more complex and not the most convenient, but aesthetically pleasing option is cut laces with a knot hidden between the first and second holes. Shoes with this are worn exclusively as slip-ons, without untying, so think before you decide on this.
How to tie laces on sneakers and boots: find your own way
With the right approach, laces can turn from an insignificant nuance into the main accent of the image. If you agree that style is all about the details, and factory lacing of boots and a bow knot is too boring, then we will be happy to tell you how you can tie your shoelaces in an original way.
- 1 Lacing for sports shoes
- 2 "Spiderweb"
- 3 “Out of two laces”
- 4 "Chess"
- 5 Lacing the shoes
- 6 "Direct"
- 7 "Butterfly"
- 8 "Staircase"
Lacing shoes: are there any rules?
There are no strict rules when choosing a lacing method, but there is one overriding principle. If shoes are worn “out” along with a strict classic suit, then it is better to prefer traditional options . When an informal event is expected ahead, you can take a little liberties and move away from the strict image. In this case, unusual boot lacing options will come in handy.
Lacing for sports shoes
Even the most unattractive sneakers or an old pair of sneakers can be “revived” with unusual lacing. You will find several ways to lace up your sneakers in a fun way, with detailed instructions below.
"Cobweb"
It seems that lacing sneakers using this pattern is quite difficult, but the principle here is exactly the same as in the classic criss-cross lacing, only the ends of the laces are threaded not into adjacent holes, but into the first and fourth. The diagram is simpler:
- pull the lace through the first holes so that both ends come out from the inside;
- make sure that the lengths of the ends are the same;
- cross the ends and tuck them into the fourth holes;
- then, without crossing the ribbons, pass them from the wrong side into the second holes;
- both ends are outside, cross them again and pull them through the fifth holes;
- we go back again, pulling the laces from the inside and bringing them out from the third holes;
- when the ends are outside, we cross them again and thread them through the sixth holes.
As you can see, tying the laces on sneakers beautifully using this pattern is quite easy. The main thing is to understand the principle - each “cross” is located in a conventional square formed between 4 holes.
"Out of two laces"
Let's get more complicated! Having 2 pairs of colored laces on hand, you should definitely try tying them in this way. Be patient and take time to properly tighten the lacing, especially if you'll be lacing up high-top sneakers. Instructions included:
- take the first lace (it’s blue in the diagram), thread it through the very first hole, near the toe of the sneaker;
- thread the second free end of the lace alternately into each hole, forming loops (their length can be the same or decrease);
- it is important to immediately tighten the loops of the required size, since this lacing does not involve pulling the ends into a knot;
- after the end of the first lace is threaded into the very last hole, proceed to the second lace;
- we thread it through the very first hole in the same way; if desired, the ends of the laces can be tied or simply tucked inside the shoes;
- Next we thread the second lace (yellow in the diagram) into the loop formed by the first lace, and then pull it through the hole and so on until the very top hole.
There is no need to tie, let alone tighten, the ends, otherwise the “pattern” will be disrupted. Using this pattern, you can lace up basketball or skateboarding shoes that have a wide upper.
"Chess"
Definitely a youthful and intricate lacing for those who are looking for a fun way to tie, or to be more precise, braid laces. You will need 2 long ribbons of contrasting colors, all your accuracy and a little patience, and we have prepared a step-by-step diagram for you:
- start lacing the sneaker from the bottom, threading the end of the first tape into the lowest hole;
- then thread the end into the first hole on the opposite side;
- bring the tape to the front side, threading its end into the second hole on the same side;
- now throw the lace to the opposite side;
- Pull it through the next hole again from the inside;
- According to this pattern, lace the sneakers to the very top;
- after that, take a ribbon of the second color, thread it through the first bottom hole to hide the end;
- pass the second end above and below the first lace, moving upward;
- make a twist and lower the second lace down in the same way;
- do not forget to straighten the tape so that it lies neatly;
- we rise up again, passing the end of the second lace between the loops of the first in a wave-like manner;
- Continue this pattern until the end of the tape is short enough to tuck into the shoe.
If you are looking for a way to beautifully lace your sneakers, but the tightness of the knot does not matter to you, be sure to try it! But keep in mind that the shoes will fit loosely on your feet, and perhaps even dangle. This option is not for track and field athletes, but for a walk around the city at a relaxed pace - just what you need!
This is interesting: How to Find Out Your Women's Clothing Size
Double knot
This type of lacing is ideal for those who do not want to tie the laces every time they put on shoes, wasting such a precious and priceless resource, which tends to be finite, like time.
- We pull the laces from below so that their ends are on the outside.
- We thread the left end into the right eyelet, and the right end into the left, creating a criss-cross pattern of them.
- We repeat these steps in the same way until we reach the tip of the tongue.
- The laces must be threaded into the last holes so that their ends remain inside the shoes.
- Then you need to stretch the remaining laces to the toe, wrap one around the other, fix the knot and do this again. There is no need to make it too tight, because its task is to keep the lacing in its original form.
Lacing up the shoes
It is unlikely that you will be able to lace your boots using the methods described above. Therefore, we have selected the most unusual and at the same time functional lacing patterns suitable for Oxford, Derby and Chuka boots. At the same time, functionality has become the main selection criterion, because you need to lace up your boots not only beautifully. It is important that the intricate intricacies can be tightened without crushing the leg or spending more than a minute on it. For men who prefer classic shoe models, lack of time is a pressing problem.
"Straight"
The most laconic and neat lacing - only parallel lines are visible from the outside, and there are no diagonal intersections at all. At the same time, it is done quite easily. The diagram and detailed instructions will make the process even easier:
- the ends are threaded into the first lower holes so that they go inside the boot;
- then one end comes out of the second hole on its side, and the second from the third;
- the laces brought to the front side are transferred to the opposite side and threaded into a hole located at the same level;
- from the inside, the ends of the tape are reinserted into the hole, passing one free one (through one hole);
- from the front side, the lace is again passed through the hole located opposite, and so on until the very top of the shoe.
Important: To tie a knot, the shoes must have an odd number of holes, otherwise the ends will remain inside the shoes.
This pattern can be used and, if necessary, laced with high-top sneakers or any other sports shoes. The result will look neat.
"Butterfly"
A very simple method, suitable for low boots. One of the advantages of this option is the ease of pulling the ends into a knot to regulate the fullness of the shoe. The technique is as follows:
- pass both ends of the lace inside the shoe;
- from the inside, pass the ends into adjacent holes and bring them out;
- cross the ends and pass them into the next holes;
- go up one hole again from the wrong side;
- bring the laces out and cross them;
- thread the ends through the next holes again;
- continue in the same way.
For sports shoes, this option is simple, because you can lace sneakers in more intricate ways, but classic shoes still require restraint.
"Ladder"
Despite its apparent simplicity, this scheme is considered quite complex. But if you have mastered the methods of lacing sneakers described above, then there will definitely not be any difficulties here. Step-by-step instructions to help:
- insert the ends of the tape into the lowest holes so that they come out inside the shoe;
- then we lace first one end, then the other;
- we take the first end (yellow in the diagram) out, threading it into the hole above;
- we throw it to the opposite side and pass the shoe inside;
- now we thread it through the hole on the opposite side through one;
- again we throw the end to the opposite side, but now, threading it through a hole located at the same level;
- we continue according to this scheme to the very top;
- We thread the second end (it’s blue in the diagram) using the same principle into the free holes, not forgetting to pull the lace under the existing loops.
Of course, there are many ways to beautifully tie laces on sneakers or boots. Our selection contains the most interesting patterns, the repetition of which will not cause any particular difficulties. Well, as they say, it’s better to see once - video instructions to help!
Without a bow
It happens that the hanging parts of the lace get in the way and sometimes get untied. Each time you have to hide the bow behind the side “sides,” but over time the laces come out again and get in the way.
There are several ways to lace shoes without a bow.
The first option is to pass the holes one at a time.
If a person knows the movements of a snake, then this method will seem very easy to him:
- From the inside, the left end will be laced through the left hole, and from the front - through the right.
- When lacing, do not forget to leave one hole free.
- When all the same actions have been completed, the ends can be tied into a knot on the wrong side.
The second method is called "Grid". All the same moves are made here, but there is no need to skip holes. As a result, the remaining part of the rope is laced inside the shoes, and the ends are tied into a knot on the wrong side.
How to lace men's shoes so that the bow is not visible is described in the video:
Method 1. Criss-to-cross lacing
Every child knows the traditional way of lacing shoes Criss-to-Cross. It is simple, functional and quite versatile. If you are a practical person, this is the best choice for you. The method is time-tested and will fit any men's classic shoes.
How to tie shoelaces using the Criss-Cross method:
- The lace is passed through the bottom holes of the shoe from the inside and out on both sides. It is important that the laces are the same length at this stage.
- Take one end of the lace and pass it through the next empty opposite hole.
- Repeat the operation with the second lace. You should now have a crosshair of laces.
- Continue this simple operation to the very top holes.
How to lace shoes with loops
There are many ways to lace shoes with loops in a beautiful and original way. Here are some of them.
Infinity
One part of the lace must be pulled through two loops, which are located one above the other. Go to the second side.
Such actions should be done to the end and with the second part too.
Zigzag
Run one end diagonally to the last loop. And wrap the other end around each loop diagonally.
Method 2. Diagonal lacing
The diagonal lacing method for men's shoes looks fresh and attractive. Once both boots are laced, it creates a rather interesting diagonal pattern. It can be either the same or mirrored on a pair of shoes.
How to tie shoelaces using the diagonal method:
- Pass the lace through the bottom holes on one side from the inside and the other from the outside. The side that came through from the inside will be visible on your shoe, but the other will not. It is important that the laces are the same length at this stage.
- Next, take the end that will be visible and thread it into the next, opposite direction so that the end enters from the outside, not the inside.
- Pass the other end (which will not be visible) through the next opposite hole from the inside. Please note that in this step, the side that was not visible will be on the outside of the boot.
- Continue the operation to the upper holes, alternating between the visible and invisible sides of the lace.
With 3 holes
This method lengthens short laces. They cross on the outside and stretch vertically on the inside.
Instructions:
- The essence of the method is that the lace is threaded through the lower holes and the ends remain inside the shoes.
- Next, you need to pull the same lace vertically through another pair of holes. It should look like a space.
- Now cross the ends and insert them into the next pairs of holes. It turns out to be a space.
- You need to continue until the very end, crossing and going up.
Method 3. Lacing Cross over and under
As the name suggests, after lacing your boots, you will have an alternating cross ABOVE your boots and UNDER your boots. This method looks best on boots with 5 or 6 holes on each side. Quite an interesting way of lacing, especially if you have classic Oxfords.
How to tie shoelaces using the over-under cross method:
This is interesting: The most beautiful indoor flowers
The first thing you need to determine is how many crosses OVER you will get. If you have up to 4 holes, you will only get one full cross. If you have 5 or more holes, then you will get 2 or more crosses OVER the boots.
If you have 3 holes:
- Thread the lace from the inside so that both ends come out from the inside. It is important that the laces are the same length at this stage.
- Next, cross the laces and thread them through opposite holes on the outside to form a visible cross.
- Next, do the same as in the previous step, only this time you will have an invisible cross UNDER your boots.
If you have 4 holes:
- Thread the lace from the outside so that both ends go inside. It is important that the laces are the same length at this stage.
- Next, cross the laces and thread them through opposite holes on the inside to form an invisible cross.
- Next, do the same as in the previous step, only this time you will have a visible cross ABOVE the ankle boots.
- The next cross will be invisible, after lacing both ends will come out from the inside to the outside.
If you have 5 or more holes:
- Thread the lace from the inside so that both ends come out from the inside. It is important that the laces are the same length at this stage.
- Next, cross the laces and thread them through opposite holes on the outside to form a visible cross.
- Next, do the same as in the previous step, only this time you will have an invisible cross UNDER your boots.
- Repeat both previous steps and you should have 2 visible and 2 invisible crosses (if there are 5 holes).
Method 4. Straight lacing
Straight lacing allows you to lace your shoes with parallel lines, which look quite unusual on any classic shoe. On the one hand, laced shoes look “easy”, on the other hand they look attractive. The direct method is interesting with any number of holes for laces. The only inconvenience is the difficulty of tightening the laces, especially if the shoes fit tightly on the foot.
How to tie shoelaces using the direct method:
- Thread the lace from the outside so that both ends go inside. It is important that the laces are the same length at this stage.
- Take the left lace in your hand and thread it from the inside out into the next hole on the same side of the row of holes.
- Take the right lace in your hand and thread it through 1 hole from the inside to the outside on the same row.
- Next, take the left lace in your hand and thread it from top to bottom into a strictly parallel hole on the adjacent row.
- Take the right lace and repeat the same action as in the previous step. You should end up with 3 parallel lines formed by the laces.
- All other holes must be laced exactly in the order stated until you reach the last row.
How to prevent unraveling
The most annoying thing about lace-up shoes, even with a beautiful design, is that the laces sometimes come undone. This creates dangerous situations. For example, a person plays sports, and while running he stands on an untied shoelace, after which he falls. That is why questions arise about how to tie your shoelaces so that they do not come undone. To do this, you need a strong knot, which is selected depending on the preferences and requirements for shoes. Below are instructions on what to do if your shoelaces come undone.
Straight knot
This node is called academic. Its peculiarity is that it does not come undone, but it is easy to stretch it with your hands, even if the lacing gets wet.
Even though it is visible, this method looks neat. The instructions are as follows:
- The lace must be at least 15 cm.
- Make a loop at the right end, connecting it with the letter U.
- The rounded part should be on the right, and the tips on the left.
- The left lace goes around the U-shaped end from the bottom.
- From the bottom up, bring the left side up to the U-shaped structure of the right lace so that it goes around the eyelet.
Finally, the right and left ends need to be tightened.
Surgical method
This option is a variation of a straight knot, so that the ends themselves do not unravel at the most inopportune moment.
Surgical knots are used during operations in the hospital, hence the name. They can withstand enormous loads, but are easily untied if the ends are pulled, as in the previous case. Such a knot is indispensable, for example, when hiking in the mountains, where untied shoes can cause a tragedy.
You can tie the lacing in this way:
- A loop is made on the right lace through which the “working” part of the lace is passed. Make sure that its end is directed to the left. There is no need to tighten it yet.
- The left lace is passed through the hole in the loop and the working end.
- There should be two identical loops that intertwine.
- Both ends are tightened, forming a strong knot.
Such a knot cannot be untied even at a mass marathon.
Classic bow
A bow is one of the simplest but most universal ways to secure any weaving on shoes:
- Make a regular knot using both laces.
- Tie a regular bow, passing one of the loops inside, and do the same with the second.
- Pull the “ears”.
The knot may need to be corrected. But it is reliable and very simple to implement.
Using our tips, instructions and diagrams, you can easily fix any shoe on your foot quickly, simply and very creatively. All you need is a little care and perseverance!
Method 5. Reverse or Military lacing
If you love minimalism in all its manifestations, then I can recommend you to lace your shoes using the Reverse or Military method. This lacing method received its last name due to its practical use in many armies of the European Union countries.
How to tie shoelaces using the Reverse or Military method:
- Thread the lace from the outside so that both ends go inside. It is important that the laces are the same length at this stage.
- Cross both ends of the lace and thread them from the inside out into the next empty holes. You should get an invisible cross.
- Next, take the left end and thread it through the next hole in the same row from top to inside.
- Do the same operation with the other end.
- Next, cross the laces and thread them into the next opposite empty holes to create an invisible cross.
- Repeat steps No. 3 and 4.
Continue lacing your shoes until you reach the top eyelets.
With 4 holes
Lacing shoes with four holes will not be difficult. Here you can even show your imagination and come up with something of your own, or you can turn to the Internet for help.
The most common lacing is called “Diagonal”:
- So, take the end of the lace and push it through any lower hole.
- What is the result? This very end goes out to the opposite hole, and then slides through to the bottom, parallel to the first hole.
- Each step is repeated until the holes run out.