How to tie laces on men's shoes: practice together
With the help of seemingly insignificant details, you can create competent accents in the image. If a man takes a responsible approach to his appearance and the condition of his shoes, he will probably be interested in how to beautifully tie the laces on classic, sports and seasonal shoes. And the stylists, in turn, offer several interesting ideas on how to lace up shoes, sneakers or sneakers.
For many modern men, the factory version of weaving laces with a butterfly has already become something boring and ordinary. Another thing is new and creative options, thanks to which you can distinguish yourself with exquisite taste and originality. This question is especially relevant now, when men have at their disposal multi-colored laces from all kinds of fabrics, which are selected to match the overall style and image.
tie your shoelaces beautifully
There are about two trillion known ways to tie shoes. You don't have to test every one to become extraordinary. There are options that do not require the use of additional materials and special skills. Here are five easy ways to tie your shoelaces beautifully.
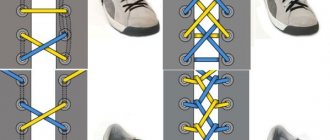
- Lattice. You need to thread the lace out through the bottom holes. Cross the ends and insert through the fourth pair of loops. Through the next one, bring each half out. Cross the ends again and thread them in through the second pair. Pull through the third holes, cross and pull through the sixth.
- Railway. The tie should be pulled out through the lower holes on both sides. Pass it through the second pair of holes inside. Cross the ends, thread them under the vertical weave on the opposite side, then insert them into the third hole inside. Repeat until the end.
- Double crossing. The laces should be brought in through the bottom loops. Cross the ends and bring them out through the third pair. Cross again from above and insert inside into the second pair. Cross again from below, bring out through the fifth. Cross at the top, thread through the fourth and out through the sixth.
- Lightning. The halves of the ties need to be threaded out through the bottom hole. Wrap under the stitch, cross and bring out through the next pair of holes. Repeat until the end.
- Chess. You will need laces of two colors. Use the first color to lace the shoes so that straight lines are created on the outside. Pass the lace of the second color through the first in a wave-like manner, starting from the bottom. Wrap the lace at the top and continue the “wave” down. Repeat several times. Tie the ends of the laces of both colors inside.
Lattice lacing and double crossing are only performed on shoes with six holes. If there are more or less of them, a beautiful drawing will not work. Or the final knot will come out crooked and will have to be hidden under the weaving.
Universal methods
The main purpose of any lacing is fixation. The foot should not fidget from side to side or pinch. The slightest discomfort or pain is a reason to lace up your shoes again. Don't be upset if you have to choose simpler-looking options to do this.
Straight lacing
Straight lacing allows you to easily adjust the degree of tension and, if necessary, leave the top stitch without a bow or knot. To do this, you need to pass the lace inside on both sides. Then bring one end out through the second right hole and insert it into the second left one inside. The other is in the third right through the third left hole. Repeat to the top, leaving one end unlaced (make the last top stitch with the second end of the lace). Finally, bring both parts of the lace inside and secure. This method is sometimes used by athletes when lacing up their boots.
Nodal approach
If the ends are too long, the knotted lacing method will help. The lace must be threaded from below through the first loops. Weave the ends together with a simple knot and bring them out through the second holes. These steps must be repeated all the way to the top of the shoe. This fastening is very secure because each stitch is reinforced with a knot. It is suitable for fixing skates or ski boots.
Without tying
The halves of the shoes are connected with special silicone strips and secured with clamps. The characteristics of the material and the variety of colors allow you to create unique designs and patterns.
To hide the bow, it is tied under the “tongue” or leg. This way it remains invisible with any lacing method.
Knots for tying a cross rope
There is no specific technology for tying knots (their number, shape, size). It is worth using the method that is convenient, easy to implement, reliable and durable. There are many types of such nodes.
Some of the simplest methods are the following nodes:
Straight
| Step 1. The two ends are intertwined once. | Step 2. Next they are placed under each other. | Step 3. The ends should be parallel to the main rope and tightened. |
Mother-in-law
| One tip bends into an incomplete loop. The second part is threaded through a loop in the floor from above, going around its upper part. It is brought out under an incomplete loop. The ends are located on different sides of the knot, diagonally. The ends are tightened. |
You can use slightly more complicated options:
Flat
| Step 1. A loop is made on one side. The second part is superimposed on it. | Step 2. Bringing the loop to the end, then passing through the loop. |
| Step 3. Drawing from above itself, it comes out of the loop from below. | Step 4. By pulling both ends, the knot is tightened. |
The ends of the knots can be processed using a lighter (burned) to ensure the reliability of the bundle.
Read also: Ivolginsky datsan in Buryatia
"Straight braid"
In a similar way, a “straight braid” is tied to a hoodie. It thickens and shortens the lace and prevents it from passing through the eyelets. It is better to tie a knot on a horizontal plane. You should:
- Fold the lace, leaving a long end.
- Wrap the base in a loose zigzag pattern.
- The zigzag should braid the base either from above or from below.
- Pull the end of the rope through the zigzag downwards.
- Pull the rope tightly.
Scheme:
Roman
The lacing received its name due to the alternation of Roman numerals I and X. It is suitable even for six pairs of eyelets.
- Here the tie is inserted from the side on the left into two holes, crossed to create a ten.
- Then the end that passes through the lower hole on the right is threaded into the third right hole and the third left one. It turns out to be one.
- Next, it is transferred to the fourth left grommet for the crosshair.
- The second end goes through the second hole on the left and immediately goes into the fourth hole on the right to cross and create the second ten.
- Then the ties are pulled out for fixation.
"Tree"
You can weave a knot from two laces that vaguely resembles a tree. Weaving is easy, quick, and can be completed in less than a minute.
- You need to tie an Ian Figen bow from long loops.
- Make the same knot on top.
- Add another one (or a couple).
- Leave short loops at the top.
Here's what the weave on sneakers looks like:
Tips with photos on how to tie shoelaces
To update your favorite pair of shoes, you can choose original lacing methods. With the help of photo tips, you will be able to create neat lines and patterns on your shoes, emphasizing your own unique style.
When following fashion trends, it is important to remember comfort. Sneakers should not only be laced nicely, but also firmly, taking into account the type of activity planned for the coming day.
Read also: They didn’t give me a book of complaints. What to do?
"Monkey chain"
Like the previous option, the knot requires a long length of lace. The “monkey chain” is easy to weave. Scheme:
- You need to form a loop at the eyelet on the jacket.
- Press the crossing point with your fingers.
- Make another loop a little lower and thread it through the first.
Then the steps are repeated until the chain is braided to the end. With the help of the “monkey chain”, even the most frail and inconspicuous lace can be turned into thick and strong. It can be easily woven on pants, jackets, and any other clothing.
Unusual and original ways
Knowing how to tie shoelaces in a non-standard way, as well as different types of lacing, you will be able to independently make your sneakers even more stylish. The lacing methods differ from each other, they can be changed even daily, adding your own “zest” to the image.
Checkered
Shoes laced with a checkered pattern look unusual and inimitable.
Lacing technique:
- The first cord is led through the lower holes with the eyelets inward.
- The second one is carried out from below, thus completing the “weaving binding” to the top, wrapping it around the first one and going further down.
- They do this until the cord runs out. The knot is hidden inside the sneaker.
Lightning
This is an unusual way to tie shoelaces. It is preferred by hockey players and figure skaters because it perfectly fixes the leg and looks very beautiful. This pattern looks most impressive if you use high-top sneakers or boots.
Lacing instructions:
- First you need to insert the laces into the lower holes from the inside.
- Cross the edges and thread them through the next holes.
Railway
This method looks original and is good for thin laces, since they are threaded through the hole twice. Begin lacing from the bottom, threading the eglets from the inside. Then they go parallel upward, threaded inside, pulled out and intertwined. Then there are vertical “strokes” again.
Reverse two-color loop
This is another lacing method using two cords, the ends of which are tied into a bow. Lacing technique:
- Take 2 shortened laces (red and blue).
- Pass the red through the bottom, leading out.
- Make a cross and pass the rope through the eyelets through the aiglet above.
- Continue lacing, skipping a few holes.
- Take the blue cord and start manipulating with the 2nd pair of eyelets, repeating steps 2 and 4 until the tip of the red one matches the blue one.
Five pointed star
You can tie your shoelaces creatively using this lacing option. The order is:
- The first line is made in the middle row, then the edges on the inside move perpendicularly down, cross, and return to the original row.
- Thread diagonally through the lower eyelets, forming a five-pointed star.
Tightened loops
Lacing will especially appeal to young and creative girls. Technique:
- Starting from the top, the rope is threaded into the 2nd eyelet.
- The aiglets are threaded right and left in order, resulting in long loops on the outside.
- At the bottom there should be one eyelet on one side and the other.
- Thread the aiglets into the resulting loops on both sides (see step 2) so that they look out.
Chess
This method involves using two pairs of laces, different in color. Take flat and wider laces, so the checkerboard will look more interesting. Technique:
- Thread lace A through the first holes from inside the boot. One end of the lace is short - it is required for the knot. Work is carried out with the second end.
- Pass the second eyelet into the 2nd eyelet from the inside, then from the outside into the hole opposite. Tuck the cord end B under the shoe trim near end A.
- Draw parallel lines with lacing to the very top.
- Pull cord B down, threading it alternately over and under A.
- Make a couple more waves with cord B, raise and lower it.
- Bring the eglet under the edge of the shoe near the first hole.
Rhombus
This traditional technique allows you to make patterns not only in the form of geometric shapes, in particular, a rhombus, but also other ornaments. It all depends on where the edges of the laced ropes intersect. The knots can be hidden or left outside.
Spiral
This is an easy way of lacing, which is interesting for its style and novelty. Technique:
- Thread the plastic eyelet of lace A into the top eyelet, only from the inside.
- Direct the other cord (B) into the hole in the adjacent row from the inside and up.
- Slide A through the opposite eyelet in the other row on the outside.
- Send B to the opposite hole on the next row.
- As a result, the first eglet is carried out into the grommet, located opposite in the top row on the inside, and the second - on the outside.
Wide crosses
This lacing looks quite fancy, but it is difficult to tighten and loosen. If desired, lace like this:
- Insert into the 1st eyelets from the outside.
- Cross and thread from the inside into 4ths.
- Cross again and thread through 3 eyelets.
- Throw it crosswise and thread it through the 6th eyelets from the inside.
- To tie a knot.
With a pass
If we lace our shoes correctly, there will be no pressure on the instep of the leg, and the mobility of the joint will remain normal. Technique:
- Insert the rope into the inner loops, cross them and thread them there again.
- Make a pass - stretch the egglets vertically into the next row, again forming a cross.
- If the rope is constantly untied, the pass can be performed lower or higher.
Ladder
Lacing with a ladder looks cool and fashionable. You can tie a ladder like this:
- Pass the ropes from the inside of the shoes through the bottom eyelets, pull both plastic eyelets up to create two identical parts.
- Thread one and the second part through the eyelet located opposite.
- Intertwine the ropes so that the second part is located above the first, and both pass under equal sides.
- Thread both eyelets into the eyelet opposite (from the outside) and intertwine as indicated in point 3, only now the first part should be located above the second.
- Continue to the top eyelets on the boot.
"Bunny Ears"
The knot resembles a bow that is usually used to tie sneakers. On the hood of a hoodie it looks very aristocratic. More suitable for girls than boys. It is not difficult to learn how to tie it. Scheme:
- Cross (weave) the ends of the ropes.
- Form two long loops (two “bunny ears”) - one on each side.
- Intertwine them together.
- Pull the “ears” into the center of the weave and stretch in opposite directions.
- Correct it so that the knot looks beautiful.
Strong knots
Tying a knot is quite simple, but it is not always strong. To securely secure your shoes, you should explore several options for how to tie the laces so that they do not come undone. The most common methods:
- Standard or otherwise “bunny ears”. Consists of two loops that are simply formed into a bow. The easiest and most common option.
- Ayana Figena. Two loops are formed, then simultaneously withdrawn one through the other. The result is a strong knot. There is another option when the loops are pushed into the middle. It turns out quite original, beautiful and symmetrical.
- Surgical or Sherpa knot. A common option, famous for its reliability. At the initial stage, a standard knot is formed, then one loop goes around it again for better fixation.
- Furrier. So strong that you will have to untie it with some effort. A loop is formed with the free end from below. The second part of the lace is passed through the loop from the inside to the outside in the opposite direction, then it is wound under the main part in the same direction as the first part of the lace. Afterwards, both ends are passed through the middle of the formed loops. The knot is tightened tightly.
- Turquoise turtle. The original name appeared thanks to the shop of the same name, in which this was the only way to tie shoelaces on shoes. Initially, “bunny ears” are formed, then one loop is threaded through the middle again.
- No bow. A distinctive feature is the fixation of the knot on the inside of the shoe. The last hole is where the laces are inserted. Then a knot is formed from the wrong side, the loops are hidden. This option is especially relevant for sports, as it is considered the safest (there is no risk of getting caught on sports equipment).
Each of these options requires training. But subsequently you get not only an original, but also a fairly reliable knot on the laces. The main thing is to show a little patience when learning.
Double slip knot
bunny ears
Ain Figen's method
Standard
Surgical knot
On boots
The first shoe to consider in the context of lace weaving is boots. When choosing a lacing option, a man needs to take into account, first of all, the general style and design of the shoes; if the shoes are closer to the classics, it is worth choosing more traditional techniques; for shoes close to the sports style, creative and bold lacing is allowed.
Most often, stylists advise trying several lacing options for boots:
- Diagonal - this way you can lace so that the laces do not come undone throughout the day. An additional bonus will be the original diagonal pattern that is obtained from the lace. Stylists advise to weave both laces equally on formal shoes, and to make a mirror image of the weaves on casual and sports shoes.
- The traditional method - in this case, involves lacing the shoes in a zigzag manner, starting from the bottom holes, crossing the ends of the lace with each other, ending the process to the last holes.
- Straight lacing looks very strict and presentable on winter boots of both classic and free style. Its peculiarity lies in the hidden lacing, after which only straight lines of lace remain on top of the shoes.
If you plan to wear boots with lashes, experts advise using round laces, which are resistant to friction and will therefore last much longer. To keep the loops and laces firmly without kinks, it is better to use simple cross lacing. In this case, the edge of the lace is threaded into the lower loops of the shoe, after which it is distributed into two equal strips. Next, the edges are crossed, brought into the next loops higher, and so on until the very top.
Unusual knots
Not only the lacing style, but also the knots themselves can look impressive.
Aina Figena knot
A fast and reliable option, the result is similar to the classic “bow”, but will be more durable.
Surgeon's knot
Another way to secure your shoes tightly. Suitable for travelers who are on the road for a long time.
Double slip knot
Such a knot begins to be tied like a regular bow, but gradually the pattern becomes more complicated, making it more durable.
You learned how to tie your shoelaces correctly and do it in unusual ways. You can use this in your image or teach others how to make fashionable patterns from laces.
"Monkey Fist"
An intricate knot looks impressive on a hoodie and on a sports jacket. In order to tie it, you will have to be patient. And a long cord - 150 cm, no less. You will also need a bead or other small round object.
We recommend: How often should you replace your toothbrush with a new one?
Step-by-step master class on tying a “monkey fist”:
On the other cord, a “hanging man's loop” is usually made so that the hood can be quickly tightened.
Choosing a pattern for different types of shoes
Unusual and complex techniques attract the attention of others, quick and simple ones look laconic, and securely hold shoes on your feet. There are different lacing options; the choice of a suitable pattern depends on the height of the boot top and style:
- Sport shoes. It is important to choose a method that fits into the design of the models and ensures uniform pressure and a tight fit. Footbag sneakers are laced using the straight method, with knots, the classic zigzag, and the railroad. For cycling, the best option is to place the knot on the laces on the side.
- Winter boots. The ladder is suitable for tall and medium models, the railway for low ones.
- Women's boots. The most interesting options: diagonal (fast, practical), cobweb (decorative) with contrasting color laces.
- Male shoes. Strict models look best with a straight or parallel circuit. Many representatives of the stronger sex use lacing with a hidden knot, which looks attractive, although it causes inconvenience. For informal footwear, creative methods, such as stairs, work well.
The selection of patterns for sneakers is carried out taking into account the design of the boot. Low looks great with a double cross, high with a railway.
Suitable lacing for 5 holes are straight and classic zigzag.
Women's boots
Winter boots
Male shoes
Sport shoes
Nuances depending on the number of holes
The fewer eyelets, the simpler the lacing method should be. Using voluminous, complex designs will require a lot of space, because only in this case will they look attractive. So, for shoes with 3 holes, a direct or parallel technique is optimal. For tying models with 4 holes, the traditional crosswise method and the original diagonal method are suitable.
To create lacing for sneakers with 5 holes, you can use any beautiful patterns, despite the odd number of holes. The optimal cross method is to remove the ties from the front or inside. Another suitable method is direct.
Shoes with 6 holes are most common, so this is the number most patterns are designed for. The chess method using multi-colored laces looks interesting. The combination of red and blue colors looks organic.
The 7-hole models look attractive with a cross pattern. For lacing shoes with more than 8 holes, various patterns are used. So, women's boots look interesting with Roman technology or “Butterfly”. For men, “Molniya” and military equipment are suitable.
For an even number of holes, any lacing pattern is suitable. For models with an odd number, you need to use some “tricks”: skipping holes, one diagonal tie at the beginning, cross and double stitches.
"Medallion"
The “Josephine knot” looks very nice on a sweatshirt. It is also called the “diamond medallion”. This is an exclusively girly option - delicate, intricate. The correct way to tie it is to take off your sweatshirt and place it in front of you. The laces should be dense, thick and rigid.
- You need to form a loop on one lace.
- Lay a second rope under it.
- Wrap the end of the second lace at the top and the base at the bottom.
- Bend the same rope and stretch it under the lace laid in the center of the loop, as shown in the diagram:
We recommend: Why you can’t put foil in the microwave, but semi-finished products in foil can
Basic rules
The most common method of lacing shoes is cross lacing. If you wish, you can choose any other method, the basic rules will be identical:
- The process always starts from the toe area with gradual tightening of the lace from one pair of holes to another.
- Lacing is done with uniform pressure, slowly. You can’t pull the ends, trying to finish faster. Although the step-by-step process takes more time, the finished product will fit perfectly on your foot.
This season it is fashionable to lace up everything: sandals, boots, ankle boots. Various techniques look chic in tandem with a high stiletto heel and a pointed toe. In this case, the laces on the shoes can either match the color of the top or contrast with it. Stylists recommend choosing models with multiple eyelets, which will allow you to use a variety of tying patterns and beautifully lace any styles of shoes, including those decorated with fringe or straps.
Before putting on shoes, the laces are loosened - this makes it much easier to insert your feet into the boots, the eyelets do not stretch, and the shoes last longer.
Fashionable techniques for outdoor sneakers
Fashion trends have been affecting shoe lacing patterns for many seasons now. They didn't ignore street sneakers either. Popular brands usually use their own original methods:
- Fila. The manufacturer designs its own products using a quick lacing system.
- Reebok. They use the original method with a hidden knot.
- Nike. The sneakers are equipped with wide ribbons that harmonize perfectly with saw, European lacing, reverse loop or zipper patterns.
- Balenciaga. Branded models have 6 pairs of eyelets, the length of the laces allows the use of an athletic system.
- Adidas, New Balance. Manufacturers use a zigzag pattern. To add originality, you can use a European, straight parallel loop. Romantic people will like the butterfly pattern.
Adidas
Balenciaga
Fila
New Balance
Nike
Reebok
To figure out how to lace shoes correctly, you need to pay attention to the style of the product and the number of eyelets. The color of the laces also matters. For black and brown boots, matching ribbons are optimal. The casual model can be interestingly decorated with contrasting shades according to the following principle:
- burgundy shoes - crimson laces;
- blue - blue;
- gray - white;
- brown - beige.
Bright ribbons that match the shade of the sole or accessories look beautiful: scarves, handbags, gloves, socks. White sneakers are complemented with laces of the same color. Fans of non-standard solutions will be able to use ties made in rich colors. The first option is classic, the second is creative.
Unusual ideas are very popular today. For example, it is fashionable to wear sneakers tied around the ankles. The idea is quite simple, but attracts attention.
If there is a loop on the tongue of the shoe, you can thread the laces through it after implementing the chosen pattern. This ensures that the boots are securely attached. If you don’t want to tie the ribbons, you can simply thread them through the upper holes, then hide them under the tongue.
Sneakers and sneakers often have side holes that serve for ventilation. They can be used for lacing, cross, and zigzag. This method is relevant in hiking conditions, as well as for fitting the model to a narrow foot.