Types and causes of drill jamming in an electric drill
There are several reasons why an electric drill may jam.
- Marriage
The most obvious reason for the breakdown is a manufacturing defect; this problem most often occurs in very cheap and low-quality drills. That is, tools from Bosch, Makita, Metabo, Interskol companies will be less likely to be defective. That is why such equipment is popular.
- Violations of the rules for using the tool
Even the most reliable tool can fail if used incorrectly. And here it doesn’t matter who the manufacturer is - the same Bosch or Makita are even more susceptible to breakdowns if operating rules are violated.
This reason is not tied to a specific brand or tool parameter, but some brands provide for this point and provide protection from an inexperienced user.
- Chuck malfunction
If the tool is used or stored incorrectly, the main part of the drill can easily break. This is a very common problem, but it cannot be called a marriage.
Attention! Most often, the device breaks down due to user negligence.
In the first two cases, it is most likely impossible to repair the instrument at home. In the case of the third problem, you can do everything yourself. But first you need to determine the type of cartridge.
Recommendations for work
Before cutting a thread, you should know certain rules for working with the tool.
If they are not followed, the thread may turn out to be of poor quality, and the threading tool will not last long or may even be damaged during cutting. There are a number of requirements not only for the tool, but also for carrying out work of this type:
- work should always be performed only with the help of a serviceable and sufficiently sharp tool;
- Before starting work, the metal pipe is pre-prepared - old paint, rust and dirt are removed from the cutting site. The surface is cleaned to bare metal;
- using a file or grinder, an external chamfer is made at the end of the pipe;
- When creating turns, it is necessary to periodically lubricate the cutters and the working surface of the pipe. For this purpose, a lubricant or a special composition is used. They are applied both before starting work and during the process.
How to find which drill bit for thread without a table?
Suppose you need to cut an M10x1.5 thread.
- Let's find out the nominal thread diameter: 10 mm.
- Find out the nominal thread pitch: 1.5 mm
- Subtract the second value from the first: 10-1.5 = 8.5 mm
- The result is 8.5 mm!
Having mastered this method, you can easily and simply select the right drill bit for cutting threads.
Types of drill heads
Before you figure out how to remove a drill from a drill, you should understand what fastening mechanisms manufacturers use.
There are only two main types:
- Key or toothed
The key type is very reliable, but as the name suggests, a special key is needed to tighten it. It activates special cams that firmly fix the drill. This type is the most reliable, but the drill fastening time leaves much to be desired.
Gear chuck
- Quick-clamping
Quick-release sockets are keyless and are tightened by the user's manual efforts.
Keyless chucks are divided into two more types:
- Double coupling
It consists of two couplings, which means you need two free hands to fix it. One of the advantages is that such couplings are more reliable and require less effort for fastening.
Double coupling quick-release
- Single coupling
Single-coupling ones are much more convenient, since only one hand is used for fastening. This type of chuck ensures no backlash, but more force must be applied to tighten it.
Single coupling quick-release
Replacing the cutting tool
The “tail” of the screwdriver drill is fixed in the chuck. It comes in different sizes, as do attachments. If the cutting tool is installed incorrectly, the screwdriver can cause damage to the work process and harm to health. For example, due to the “wrong” drill, holes of different sizes may result with a damaged surface. A sharp element flying out of the cartridge will cause serious injury.
Most modern screwdrivers have jaw chucks. They consist of a cylindrical body, as well as a sleeve and cams. When the sleeve rotates clockwise, the cams simultaneously press the drill.
The process of replacing it is simple, but has a number of individual features. The whole process can be described as follows:
- it is necessary to select the necessary attachment (bit) for the drill;
- then you need to take the cutting tool and install it in the center of the chuck (between the open “cams”);
- after this, it should be secured by turning the sleeve clockwise (with a key-type cartridge, the key is installed in the recess);
- twist the sleeve until the nozzle is secured.
Changing a drill is easy, but first you need to pull out the previous one. There are the following options for the development of the situation:
- standard removal of the drill (the chuck is not damaged);
- pulling out the drill in the absence of a key;
- removing a stuck cutting element.
If the screwdriver is working properly, there should be no problems when replacing its working tool - the operation is elementary. To do this, you need to take a key, which is designed to loosen the cartridge, and insert it into the recess. Turn counterclockwise. Unwinding is carried out due to special teeth that are found on objects. There is also another option for removing the drill. To do this, turn on the reverse rotation mode on the screwdriver, hold the outer body of the chuck and press the “start” button. This will allow the drill to come out easily.
If you do not have a special key, the drill can be removed using a Phillips screwdriver or a nail. It must be inserted into the recess on the cartridge and fix its half. We twist the opposite part of the cartridge by hand. However, if such unwinding does not bring results, then we take a gas wrench or a vice - these tools will help increase the rotation of the cartridge. If the previous options for pulling out the drill failed, then you should resort to “heavy artillery.” In some cases, external damage to the drill makes it difficult to get out. In this situation, it is necessary to relax the “fists” using gas wrenches and a vice. We completely clamp the cartridge with the keys and rotate (unscrew).
A radical option in the most hopeless situation would be to twist the cartridge from a screwdriver. To do this, you need to squeeze it in a vice and forcefully knock out the cutting tool from the inside using a punch. Naturally, after such a procedure, the screwdriver should be taken for repair. To summarize, it is worth noting that the procedure for inserting a drill into a screwdriver is quite simple and even someone who has never done this can handle it. The main thing in this process is to follow the recommendations.
To learn how to insert a drill into a screwdriver, see the following video.
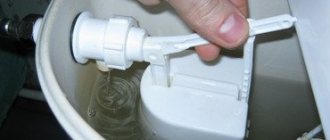
How to release the keyless chuck
To release the double-clutch chuck, you need to turn the clutch so as not to break the ratchet. To do this, you need to use various plumbing products. keys, otherwise you will have to completely disassemble the drill and unscrew the head. This means that you need to unscrew the screws on the body and, remembering the location of the parts, go through the drill.
With a single-coupling structural element, the procedure does not change, that is, try to first unscrew it with the help of a plumber. key, and then simply disassemble the drill and remove the chuck, disassembling it.
If the drill is expensive, you need to make several cuts. Dirt that gets inside and causes the mechanisms to get stuck can also be a problem. It could be sand, soil with water or rust. In this case, you need to remove the insides of the drill and thoroughly clean it, and then start removing various pebbles and pieces of grass.
Note! It is better to film or record a video of all stages of disassembling the tool on your phone, as there is a chance of forgetting something or starting to pull out the wrong parts.
Rotating the double-sleeve chuck
Removing a threaded chuck
First of all, you should unscrew the screw located in the center. To get to it, you need to open your cams all the way. Next, insert a screwdriver or impact wrench inside and pull it off very sharply. The central screw has a left-hand thread and is usually filled with sealant. It is very difficult to move it. Therefore, to promote it, you need to use only high-quality tools. Since they are cheap, they may simply not take it.
The screw is out. We begin to remove the cartridge. It, unlike a screw, has a thread in the right direction. To make your task easier, you need to use a hex key that is clamped in the chuck. With its help, the lever will become longer, and it will become easier to unscrew it. We turn the made lever to the left.
How to release the key chuck
The key cartridge is much easier to release. First, you should try to free the drill in the usual way, simply by increasing the handle of the key and asking for help.
If the part is jammed tightly, you need to sort out the drill, then remove the head and replace it with a new one. If the drill is expensive and you need to get it anyway, you should disassemble or saw the chuck itself.
You can also find dirt that has gotten into the drill and is preventing it from spinning. Then you need to remove all components and remove dirt from the cartridge.
Chuck malfunction
The drill chuck, like any other mechanism, is subject to wear and tear and may fail over time. Also, the cause of jamming of the cartridge can be a manufacturing defect. The spring in the locking mechanism may also break, causing the control element to no longer release after pressing the button. A standard drill chuck is designed for long-term use, subject to operating instructions and periodic maintenance. However, if it fails as a result of wear of the components, it is more advisable to replace it with a new one.
How to spin a drill without a key
How to unscrew a drill without a key? Many people ask this question, especially when the key is lost, which happens quite often.
You need to get two screwdrivers: a Phillips and a flathead. The first step is to insert a Phillips screwdriver into the key hole and a flat-head screwdriver into the groove for the teeth. Then they pull the screwdriver in the direction of unwinding, and the Phillips acts as a lever. In this case, with a minimum of effort, you can unscrew the head and solve the problem of how to unscrew the drill without a key.
Unscrewing the key chuck
How to remove a drill from a wall?
Construction work now requires the use of various tools, one of which is a hammer drill. Using this device, workers make holes of various diameters, and also dismantle various reinforced concrete or stone structures.
Situations often occur when it is very difficult, if not impossible, to remove the nozzle from the device socket. In this regard, the question arises of how to remove the drill from the hammer drill without damaging the device. To do this, you first need to figure out why such troubles arise.
Return
Types and causes of drill jamming in a hammer drill
There are two most common variants of this problem:
- the drill jams in the drill chuck or in the buffer element, which is used to install an ordinary attachment in a hammer drill;
- the product gets stuck in the clamp of the hammer drill itself.
In the first case, the problem appears due to the fact that solving the problems requires a drill, which is used for a conventional drill. There is a special product for its installation - an adapter chuck, the same as in a conventional electric drill. It is inserted into the clamping element of the hammer drill, after which you can begin work.
Diagram of a standard hammer drill
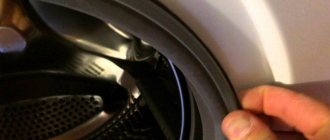
After they are completed, in some cases it is not possible to simply remove the drill, since the lips of the clamping device hold it tightly. This problem is quite easy to solve, since its root lies in the incorrect use of the clamping mechanism. Some craftsmen simply forget to lubricate it regularly, which is why the tool jams.
To open the lips of this device, you should treat them with special compounds, for example, WD-40. If such a substance is not at hand, and the hardware store is far away, then kerosene can be used as a working fluid.
Then you should wait about a few minutes for the composition to take effect. After this, you should tap the surface of the clamp with a hammer, while simultaneously loosening the product. After such manipulations, the lips of the device will give in and the drill can be removed.
Finally, you need to dismantle the cartridge, clean it and lubricate it.
To remove the drill bit from the hammer drill, you can use WD-40 fluid
In the second case, the drill got stuck in the hammer drill. This trouble appears for completely different reasons than getting stuck in a transition node. The nozzle in an electric drill moves around its axis, in some cases making weak reciprocating movements. This is due to the transfer of energy into the tool body through the jaws of the clamping mechanism and the bottom of the chuck.
The hammer drill uses a different technology for transmitting energy, and accordingly, the nozzle in the clamp moves differently. Since the hammer drill provides rotational-impact and simply impact vectors of tool movement.
Energy is transmitted to it through a special striker, which is driven by a power unit powered by electricity.
This striker exerts a mechanical effect on the shanks of tools installed in the chuck, such as a drill, a drill, a crown or a chisel.
Sometimes a vice is used to remove the drill from the hammer drill.
These elements are equipped with special grooves, with the help of which they are securely fixed in the clamping device. These grooves also serve to provide the tool with energy to perform rotation.
Low quality tools are made from soft alloys that are not heat treated. The shanks of such products cannot withstand high and prolonged mechanical loads, and therefore become unusable.
In this case, before removing the drill from the hammer drill, you may have to disassemble the tool.
Return
Ways to get a drill out of a hammer drill
As soon as the drill jams in a concrete wall, floor or any other similar structure, you must immediately turn off the rotation mode, if enabled, and leave only the impact.
After this, you need to pull the tool towards you, while tugging it in the other direction from the surface in which it is stuck. These movements will cause the drill to break part of the concrete layer holding it, after which it should simply and effortlessly come out.
This method will help both when the drill gets jammed in a wall structure due to a large fraction, and if the product gets into the reinforcement.
Another easy way to remove the drill bit from the surface is to use the reverse rotation function. This function is not available on all instruments; in addition, its use leads to the licking of the drum assembly of the mechanism. If the device has a warranty, then you can try to remove the drill using this method.
By following the link https://vse-postroim-sami.ru/equipment/tools/9620_samodelnyj-vibrator-dlya-betona-iz-perforatora/, you will learn how to make your own concrete vibrator from a hammer drill. Read about how to choose the right hammer drill in this article. You may also be wondering what types of crowns are available for drilling concrete.
There is also a rather extravagant way of extracting the drill. To do this you will need a gas key. It must be screwed onto the nozzle, and then unscrewed in the opposite direction.
This method works because the gas wrench has a fairly long lever that can be used to apply a lot of force. But if this method still doesn’t work, you can try knocking on the handle of the key with a hammer.
At the same time, the hammer drill should be loosened from side to side. The combination of these movements will cause the drill to come out fairly quickly.
In some cases, before removing the drill from the hammer drill, you will have to make several additional holes with another tool.
As a result, a large hole should form around the drill, the diameter of which should be about 10 centimeters. The drill will come out along with a fragment of the wall; the resulting hole can later be repaired.
This method is suitable in cases where it is impossible to either close the drill in the wall or cut it off.
If none of the above methods work, then the nozzle will simply have to be cut off with a grinder, beaten with a sledgehammer, or covered with something.
Now let's talk about what to do if the drill gets stuck in the hammer drill. Most often this occurs due to the fact that the shank material cannot withstand the loads and is deformed. To remove the tool, it must be firmly clamped in a vice.
After this, you need to turn on the reverse on the instrument, it is advisable to set it to maximum power.
The start button must be pressed with some breaks, since prolonged operation in this mode will lead to damage to the power unit of the device.
After the product is wedged, the hammer drill should be sharply pulled out of the vice. They will contain a drill that is no longer suitable for use. If there are no vices nearby, you can limit yourself to a thick wooden board. The hammer drill must be configured for drilling, but at the same time turn on reverse. You need to drill until the tool “bites”.
Return
The drill is stuck in the wall: how to get it out?
In some cases, the drill may become permanently stuck in a wall or any other surface of reinforced concrete structures. In most cases, such a nuisance occurs if a hole is drilled at a slight angle of 6 centimeters. There are several ways to remove the tool.
Instructions
The first step is to check whether the hammer drill has a reverse rotation function. If there is one, you need to turn it on and, swinging the instrument from side to side, remove it from the wall.
In addition, you can arm yourself with a drill and make another hole not far from the existing one, and by loosening the hammer drill, remove it from the structure.
If the above steps do not help, you will have to use a gas wrench. If its size is too large, you can use a steel plate as a spacer. The key should be screwed onto the drill and hit its handle with a hammer from the wall. These movements are not the most convenient, but the method is quite effective.
To remove the drill, you can also use a reverse hammer, which is easy to find in any auto repair shop. If this tool is not available, you can connect the hammer drill to the SDS connector of the attachment and pull it away from the surface being processed. This method is effective when the drill is stuck at a depth of no more than 10 centimeters.
If the drill gets stuck in the wall while drilling through and there is very little left until the end of the process, you can break through the stuck tool using sledgehammers. It is necessary to hit in the direction of drilling. It is important to remember that you cannot strike the nozzle itself - you must use a board or any other spacer to soften the impact on the drill.
To avoid these problems, it is enough to remove the drill and the hole being drilled as often as possible and clean it of dust, concrete fragments and other contaminants.
In addition, a drill or other accessory can jam in the surface if too much pressure is applied to it, so the tool must be held lightly. If the structure is reinforced concrete, that is, it has metal reinforcement, then there is a risk that the drill will get stuck in it.
Therefore, before starting this work, you should check the location of these metal elements with a special device.
In some cases, it happens that the hammer drill jams. Typically, this is due to the use of cheap, low quality tools. In such products, the fastenings cannot withstand the load and become deformed.
In some cases, it is enough to hold the tool in a vice and try to unscrew it. In the most difficult cases, you will have to disassemble the cartridge.
To do this, the first step is to dismantle the upper rubber product, as well as the retaining ring that is located under it.
Return
Recommendations for preventing such cases
In most cases, the use of drills that are made by well-known manufacturers is a reinforced concrete guarantee that the tool will not get stuck in the hammer drill. Unfortunately, the modern market is flooded with low-quality products, so you should check the purchased product immediately. To do this, you just need to make several holes in the concrete product.
Using a vice
Coupling or quick-release elements can be unscrewed using a vice. To do this, firmly secure the vice, then tighten the coupling(s) into it.
If the drill is switchable and it is possible to turn it in the other direction, then start turning it slowly, increasing the power, and with a small probability the chuck may become wedged.
When the drill turns only in one direction, you need to wedge it manually, with your hands or a plumber. keys.
Note! You cannot immediately accelerate the drill to maximum speed, because there is a chance of breaking the vice or breaking the chuck.
Is it possible to disassemble a removed cartridge for repair?
Not all types of cartridges are disassembled, but conical ones can usually be tried to disassemble.
There is an interesting way to disassemble a cone cartridge without barbaric methods such as sawing or cutting with a grinder.
- The jaws are brought together inside the cartridge.
- A plate of elastic material - polystyrene foam, polystyrene foam - with a thickness of at least 15...20 mm is pressed to the front surface of the cartridge using a board or thick metal sheet (bar).
- Press the drill itself tightly onto a flat surface (table) and turn on the impact mode. If such a mode is not provided in the tool, the chuck is first screwed (removed) from the drill and mounted on the hammer drill. After 10...15 seconds of operation of the device in impact mode, the cartridge can be disassembled for repair.
Taking into account the fact that after repair the performance of the cartridge is usually not fully restored, it is still better to replace the part with a new one with a similar marking. At the same time, it is important to remember: even if you manage to understand without problems how to remove a cartridge from a Soviet drill of a model from about 1950, you may not be able to install a new imported one on it - there is a mismatch both in the diameter of the thread and in the her pace and type.
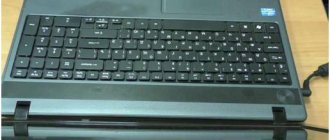
As an example, it is shown how to remove the chuck from a Makita drill and what the thread looks like in the connection between the chuck and the shaft.
Using Spring Wire
The opposite problem can also happen when the drill bit gets stuck in the workpiece. In this case, unscrewing the drill is not too difficult, but problems may arise with the available tools. There are several steps you need to take:
- Use a welding machine to heat the stuck part.
- Make grooves at opposite ends.
- Place the spring wire into the spiral groove.
- Start twisting the stuck drill until it starts to unscrew itself.
- Start removing the drill.
It is worth noting that you need to take out the drill slowly and slowly, since the work requires precision.
In order to avoid getting into such situations and not wondering how to remove a drill from a stuck drill chuck, you need to use the tool according to the instructions and follow all the rules. Well, if such a situation happens, you can re-read the article again and no longer wonder: the drill is stuck in the drill, how to get it out.
What is the function of the chuck in a drill?
The drill chuck is one of the main components of the electric drill mechanism. It serves to transmit rotational motion from the electric motor to the working tool. Its task also includes fixing the drill in such a way that during operation the maximum accuracy of drilling holes, reliable fastening and quick replacement of the tool are observed.
In any drill, the tool is fixed in a chuck
Attaching the chuck to the spindle of an electric drill
Actually, there are two methods of fastening:
- cone mate;
- threaded connection.
You can find out the type of fastening by the marking:
- the inscriptions B10, B12, B18, etc. characterize the parameters of the Morse cone, the special shape of the mating surfaces (in total there are 9 standard sizes from B7 to B45); before this designation, the range of drill shank diameters is marked, for example, 1−6 B10;
- type designations 1−15 M13×1.3; characterizing the parameters of metric threads (diameter of drill shanks, thread diameter and thread pitch);
- abbreviation UNF (the full marking is similar in structure to the marking of metric threads, for example, 2−13 mm ½ - UNF, where ½ denotes the diameter of the thread in inches, and the number 20 characterizes the number of threads of thread per length of one inch), which indicates fastening using an inch thread ; this type of connection is typical for imported instruments.