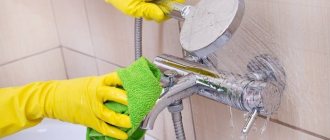
Our habit of solving small everyday problems on our own is ineradicable. And it’s not even about saving money, although they are never superfluous. There is something very attractive and understandable about living in an interior that is not only lovingly conceived, but also independently realized.
But do-it-yourself repairs of modern plumbing fixtures can be complicated by the variety of designs of the same faucets. Today we will tell you how to disassemble a ball mixer and repair it. This will help you avoid resorting to the help of specialists if the problem can be fixed on your own.
General recommendations for work
A mixer is a device that a person uses every day.
The design of many manufacturers is approximately the same. But there are distinctive features that relate to a specific manufacturing company. To disassemble the faucet you need to know about them. Before work, you need to turn off the water supply. Open the tap to release the pressure and allow any accumulated water to flow out.
To avoid damaging the coating, use cloth covers for the keys. Before dismantling the handle, unscrew the fixing element.
There is no need to disassemble too much. If you are not sure that you can put it back together correctly from memory, film the actions on camera.
It is convenient to carry out repairs without removing the mixer. If the situation requires it, unscrew the housing from the wall. You need to unscrew the union nuts using an adjustable wrench.
Even if you buy a high-quality faucet, over time you still have to repair it and replace some parts. How to disassemble a faucet such as Grohe, Esko, Oute, Damixa, Swes, G Lauf, Ledeme, Molinari, Kaiser, etc. If you do it yourself, it’s very simple, you don’t have to turn to professional plumbers to solve this problem.
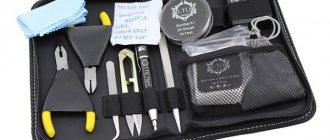
Faucet disassembly tool
The kitchen faucet fails more often than the bathroom faucet, as it provides water to residents many times a day. To repair the structure, special construction tools will be required. There is no particular uniqueness in the devices, but their presence is important when disassembling the mixer.
Before repairs you need to prepare:
- hammer;
- knife;
- an adjustable wrench to remove the nuts;
- hex wrench to remove the handle;
- Phillips, flat screwdrivers;
- socket wrench to remove and reattach bolts.
- You will need lubricant and dry rags. If the faucet leaks, you need to purchase a cartridge, ring-shaped gaskets, and a faucet axle in advance. When repairing a mixer, there may be a need to replace the supply hoses. you need to purchase parts with braiding, a union nut with fittings. Priority is given to products made of non-ferrous metals: copper, brass.
If some elements cannot be unscrewed, use special tools. For example, WD-40. The liquid dissolves rust and plaque. A few minutes after application, you can try to unscrew it again.
In advanced cases, a drill comes to the rescue. It is used to drill out the screw that holds the handle. The drill bit should be smaller in diameter than the bolt head.
Plumbers have special tools in their arsenal. a special key for unscrewing aerators, keys with rubber gaskets for them to prevent damage to the outer body of the mixer, a universal key for dismantling the ball valve, and so on. You can carry out repair work at home without any professional tools.
Application area
Taps are used in home and street water supply systems - wherever it is necessary to manage water consumption. In a house or apartment they are installed in the following places:
- sink in the kitchen;
- Sink in the bathroom;
- bath or jacuzzi;
- shower cabin;
- utility room - for collecting water for cleaning.
On site, cranes are used for:
- watering green spaces;
- sink in the summer kitchen;
- garden shower;
- car wash connection.
In the bathhouse, mixers are also installed in the washing room (shower room) and in the steam room - for filling containers with water.
How to disassemble a single-lever mixer in the bathroom and kitchen - step-by-step instructions
Single-lever (with one handle) are the simplest of all existing faucets (Damixa Arc - Damixa, Franke, Oras - Oras, Iddis). Their design consists of a spout, a rotary lever, a locking nut, a gasket, and a replaceable ball or cartridge.
Disassembling a single lever ball mixer
A ball water tap (Gustavsberg, Haiba, Rubineta, Shruder, Varion, Flora) is one of the types of single-lever valves. It is used for mixing water; two pipelines are connected to it: hot and cold. Temperature and pressure control is carried out using a ball, which also acts as a locking element. The ball is a replaceable element.
Single lever ball mixer design
Step-by-step instructions with a video on how to disassemble a single-lever ball mixer in the kitchen or bathroom:
- Before starting work, you must completely turn off the water supply. Otherwise, during disassembly, boiling water may pour out of the water supply pipes;
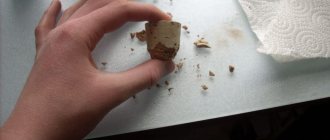
- Next, you need to remove the decorative plug, if you have one;
Step 2: Remove the decorative plug in the faucet - After this, remove the screw using a screwdriver that presses the rotary control. This screw connects the handle to the valve stem;
Step 3: Use a screwdriver to unscrew the screw - Then the handle (control handle) should be removed from the body. It is necessary for water supply and is a regulating part;
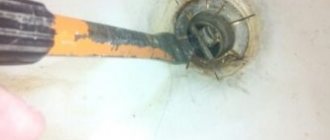
Step 4 - Next, use a key to unscrew the cap;
Step 5: Unscrew the cap - We take out the cam by hand;
Step 6 - After this, you can remove the ball mechanism. You need to be careful, there are often springs mounted under the balls that help control the flow and temperature of the water. Remove the locking mechanism carefully so as not to damage the fragile springs;
Step 7: Take out the mixing ball - Using a screwdriver, carefully remove the valve seats and the springs to them;
Step 8 - Remove the rotary block of the mixer spout;
Step 9 - In addition to the shut-off mechanism, any water tap is equipped with 2 gaskets (O-rings), which are often located directly under it. They also need to be removed and cleaned. If the gasket has rubbed against the base too much, it needs to be pryed off with a thin flat screwdriver or knife and replaced;
Step 10: remove and replace, if necessary, o-rings - Of course, it is advisable to change both the ball and the gasket. But if you need to find out the exact location of the breakdown, then you should turn on the water for a while and see where the water will ooze from.
If the cause of the breakdown lies in the fact that the tap is simply clogged, for example, with lime salts or other debris, then the repair will progress much faster. Follow the instructions above to remove the housing and clean it with a special gel. Depending on the material of the spout, you need to choose the right cleaning agent. They are different for brass, copper and steel. Please note that often an imported faucet (Italian, German, etc.) is equipped with a special mesh, which is located directly under the spout. It needs to be cleaned with an old toothbrush and blown out.
READ in more detail about other types of faults here: What to do if the faucet is leaking
Disassembly and repair tips from an expert:
- Many models (Blanco Elipso, Hansberg Prestige, Hansgrohe, Sentosa, Mofem) are decorated with a special decorative panel. It can only be removed with a thin screwdriver. The cover is lifted from below, from the side of the body, and carefully lifted up;
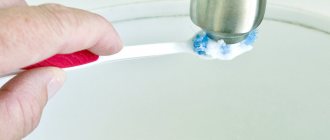
- If your aerator is dirty, you can immerse it in a container with food vinegar for 1 hour to remove various dirt inclusions. Be sure to rinse with water before installation.
- Ideally, you need to buy a complete repair kit for your model in advance;
- Before disassembling, first study the structure of your particular type of mixer.
READ in more detail: Design of various types of mixers
Video: how to disassemble an articulated single-lever faucet/mixer in the bathroom
How to disassemble a faucet with a cartridge
It should be noted that now single-lever faucets with ceramic cartridges are often installed for washbasins or as kitchen faucets. They cannot be replaced, so if they break, they must be disassembled and thrown away. But in most cases, a faucet with a ceramic cartridge will last a long time, so it rarely needs to be replaced.
Photo - device of a single-lever mixer with a ceramic cartridge
Photo - diagram of disassembling a mixer with a cartridge
and another video instruction on how to disassemble a kitchen faucet with a ceramic cartridge
Advice from professionals
We have figured out how to remove or install a faucet, now all that remains is to give a few tips.
- Install filters to extend the life of the faucet. An ordinary water filter is not that expensive, but its efficiency is very high.
- During installation work, find ways to install check valves on the water line after meters and filters. The valves will prevent water, either hot or cold, from flowing through the faucet due to different pressures.
- Carry out preventive maintenance of apartment water supply systems. Prevention refers to replacing faucet gaskets once a year, cleaning faucets from dirt and scale, and replacing flexible hoses at least once every two years. Carefully inspect your plumbing system every month to proactively identify any leaks.
Professional plumbers advise wrapping nickel-plated surfaces with electrical tape before dismantling and installing any faucet. Take your time, carry out all the work thoughtfully and carefully, and then the result of the work will only please you and will not lead to an emergency. Think not only about yourself, but also about the people who live next door, then there will be no problems.
How to disassemble a two-valve mixer - step-by-step instructions
It is quite simple to disassemble a two-valve semi-rotary water mixer (Hansa Stela, Vidima, Frap) with a cartridge, since each drainage outlet is connected to a separate lever, it is simple and practical to use. Valve models are most often equipped with special plates that are tightly ground to each other.
READ article on the topic: How to disassemble a shower switch
When you turn one valve, a flow of water at a certain temperature opens. To protect these plates, rubber or plastic gaskets are used, which ensure their sealing and softness during movement. There are two types of kitchen faucet with a double lever mechanism:
- Herringbone (Wasser Kraft, SMARTsant, Swes, Zegor, Roddex, Vega);
- Branch pipe (Jacob Delafon Carafe, Ferro Standard, Kludi O-Cean).
The domestic herringbone faucet is still one of the most popular types of faucets for the kitchen and bathroom. A special feature of this design is the presence of a kind of tee in the body, through which the drainage pipes are connected to the lever.
The branch pipe is connected using pipes that are inserted directly into the spout, without the use of additional splitters.
Installation of a wall-mounted two-valve mixer for sinks
How to disassemble a mixer with two handles:
- A modern double-lever faucet can only be disassembled after unscrewing the locking screw, which is located under the decorative panel. But at the same time, the old Soviet crane has a more complex design. Here you will need to remove the locking nut, under which the valve is located; it also unscrews, opening access to the internal parts;
- Under the screw there is a faucet-axlebox, which acts as a valve; it must be carefully disassembled and removed;
- Under the valve axle box there is a gasket or ring, which is necessary to seal the structure. It must be checked for integrity and cleanliness. Even a small speck can cause a leak in the faucet;
- You need to assemble a double-lever mixer using the reverse procedure, after first checking the connection of the pipes and the integrity of the housing.
If the body of a herringbone faucet is cracked, it cannot be repaired. This most often happens with cheap Chinese faucets, such as Calorie and others.
Video: How to disassemble a two-valve bathtub faucet
Ball
A very repairable type of fittings. Rubber spring-loaded seats, springs, a cuff, and less often a ball must be replaced. Elementary disassembly:
- We remove the plug.
Remove the plug. - Let's release the stopper.
Let's release the stopper. - We remove the lever.
We remove the handle. - We unscrew the clamping ring with a special key or pliers.
Unscrew the ring. - Unscrew the cap.
Unscrew the cap. - We take out the leash, cuff, ball.
We take out the ball. - Use a screwdriver to remove the seats with springs.
We remove the saddles with springs. - By pulling up, we disconnect the gander; if there are no leaks at the connection when turning, the operation is unnecessary.
Visual aid from Canadian experts:
How to disassemble a crane axle box
The faucet box is the main part of the valve mixer. Thanks to this element, you can turn on the water, adjust the pressure, temperature, and turn off the water supply. The element consists of a rod and seals. On top there is a metal housing with threads.
To remove the valve axle:
- shut off the water supply. Prepare tools: a set of keys, pliers and screwdrivers;
- dismantle the flywheel by lightly lifting it up. This way you can get to the bolt that secures the valve. Unscrew it. Remove the valve. If it is difficult to remove, tap gently with the key and the movement will begin;
- remove the decorative trim, if any. This is usually done with a key of 17;
- access to the crane box is open. To unscrew it, you need to take an adjustable wrench and start turning it counterclockwise.
Once one element has been extracted, you can begin working on the second. The chronology of actions is identical.
Next, proceed to repair and replacement of specific elements of the crane axle box. it depends on the type of damage. In some cases, you only need to replace the rubber seal. In some situations, metal parts may need to be replaced.
Reasons why cranes fail and require dismantling for replacement
Each type of crane has its own typical breakdowns. Repair steps also vary
These breakdowns usually manifest themselves in a very similar way - the tap does not close completely, water leaks from it
Worm
| Cause | Actions |
| Wear of the working gasket | Remove the axle box and replace the gasket |
| Wear of the sealing gasket | Remove the axle box and replace the gasket |
| Thread wear | Remove the axle box and replace it entirely |
| Valve seat wear | Remove the entire faucet and replace it |
| Hull destruction | Remove the entire faucet and replace it |
Ball
| Cause | Actions |
| Cartridge wear | Remove the cartridge and replace it |
| Wear of the sealing gasket | Disassemble the housing and replace the gasket |
| Hull destruction | Remove the entire faucet and replace it |
How to disassemble a water aerator
The aerator is a prefabricated structure. It consists of a plastic and metal body with mesh inserted inside.
Any plumbing store has special plastic keys for unscrewing the aerator. If you don’t have such a tool at home, an adjustable wrench will do the job.
- Using an open-end or adjustable wrench, you need to grab the aerator and rotate it clockwise when looking at the faucet from above. To avoid damaging the body, place thin material, leather, between the instrument and the aerator.
- Several grids stacked on top of each other in a certain sequence - the design of the aerator. To remove the contents of the case, press your finger on the mesh from which water flows out. A small cylinder will appear.
- To remove the grids, insert a flat-head screwdriver into the side hole of the cylinder. This will create a double mesh. Use the tip of a knife to pry up the mesh and separate it from the coarse filter.
- Remove the thin spherical meshes from the housing.
You can start cleaning the components. After washing, reassemble everything in reverse order. As a result, the water flowing from the tap will be saturated with oxygen.
Disassembling a Grohe faucet
The Grohe faucet, despite the fact that it is disassembled according to similar rules as a single-lever faucet, I have placed in a separate subsection of this article. The reason lies in its popularity and reliability.
The peculiarity of Grohe is that it does not have flexible water connections on the threads like other faucets. That is, if we rotate them, we will not unscrew them. They are fixed from the inside. To do this you will need:
- Remove the handle. This is usually done with a hexagon.
- Then remove the cap - Grohe can have it either threaded or non-threaded.
- Then remove the cartridge - usually you need to unscrew 2 screws with a screwdriver.
- Carefully push out the plastic spacer with a screwdriver;
- Remove the O-rings from the flexible hoses;
- Remove the clamp that holds the liner in the housing.
All! Access for flexible connections is obtained and the mixer is disassembled. As you can see, the disassembly process is very similar to the instructions that I gave at the beginning of the article. It is important to understand that taps from different manufacturers are disassembled in a generally similar way, but there may be some nuances, like Grohe with the same gasket, the type of tool used in the work, the number of screws to unscrew, and so on.
Shower switches
The outdated ball design is being replaced by piston (spool) switches: eccentric and push-button. The first ones are located in the central bore of the housing or in a separately attached diverter. The latter are typical for single-lever options and are located on the spout.
The plunger is removed from the central bore as follows:
- We disconnect the gander and remove the handle in the same way as a ball switch.
- Unscrew the rod fitting. We take it out together with the eccentric rod.
- Using a small hexagon, we remove the piston down.
Let's look at disassembling the push-button option using Grohe as an example:
Sequence of operations:
- Disconnect the shower hose.
- Use a screwdriver to keep the valve from rotating.
- Unscrew the button cap.
- Use a hexagon to unscrew the assembled mechanism.
KOHLER diverter replacement process:
Mixer with thermostat
If a model with a thermostat is malfunctioning, you will need the help of a specialist. The fact is that the connection diagram for the temperature indicator depends on the manufacturer. In addition, this device has very delicate contacts that can be easily damaged if disassembled incorrectly. The figure below schematically shows the main components of a thermostatic mixer.
Photo - disassembly of a model with a thermostat
Prevention
It is not always possible to get rid of problems with the mixer with the help of repair work. More often you have to buy a new faucet and install it to replace the one that has become unusable. To extend the life of the crane without breakdowns, it is recommended to choose a product from manufacturers with a good reputation. In addition, it is necessary to regularly prevent damage.
When buying a faucet, it is better to choose a brass model. They are heavier and stronger than sulimine. In addition, they are more reliable and last longer. Most faucet failures occur due to solid particles in the water supply and poor quality water. You can prevent them by installing filters.
Before disassembling the mixer yourself, you need to carefully study the instructions for it. Additionally, it is recommended to watch a video on how to do this, or consult with an experienced plumber.
When connecting parts, you need to use a sealant for greater reliability. If there is a thread, foam tape is used to strengthen it. To ensure that breakdowns are not unexpected, faucets are regularly inspected and seals are replaced.