How to fix the strings on a floor-standing clothes dryer with your own hands?
Often housewives, without calculating the strength of the dryer, hang a lot of laundry and they cannot withstand such pressure and the solder breaks. Metal is now made cheaply and it breaks easily, this is especially sad, since after washing you want to dry your clothes properly, and not have to deal with long repairs.
I believe that it is better to fix it once efficiently than to “stick it with tape” every time and get angry.
Step-by-step instructions for repairing a clothes dryer, making it “like new”
First, let's drill holes in the places where the strings break on your floor dryer; select a thin drill according to the diameter of your string!
We remove the paint at the joints of the dryer
In order for our connection to be strong, we need to remove the tape on which you glued the torn strings before and sand them with sandpaper, a file, natfil, or a machine for sanding surfaces.
We bend the dryer strings on which we hang clothes after washing.
We drilled holes in the tube, then we make hooks from knitting needles and insert them into the drilled holes!
It is also better to bend the tip of the knitting needle about half a centimeter and bend it down. The hole should be in the place where the rod is bent, insert the bent tip into the hole and wrap it with electrical tape, or make it better and solder it and paint it so that it looks like new!
Next, we sand and solder them, having previously treated everything with soldering acid for a better connection!
Sand it well with a file.
To ensure that nothing unnecessary sticks out or pricks, we carefully process our dryer with a file, in the areas of soldering!
Everything is fine, now you can paint, we use any waterproof paint, I used alkyd paint from a spray can, but you can use any metal paint! Ready!
Watch my video on how I repaired my clothes dryer at home:
How I repaired dryer legs
The legs of the dryer also often break, I used a hacksaw, sawed it at the joint, straightened the tube until it was even, turned a tube out of strong wood, inserted it into the broken dryer leg on both sides, and sealed it with electrical tape. It held up well, you can also drill small holes and secure an additional wooden rod inside the leg! The method works! Which one did you use?
Source
Gear wear
How to repair a clothes dryer if the rope does not want to move? In this case, you will need a new gear. In principle, you can buy it in a store that sells all kinds of fasteners. If you have an old sewing machine at home that no one needs, but it’s a pity to throw it away, you can remove the necessary part from it - it was used for winding threads.
Important! This is better because old machines used high-quality metal components, so your gear will last for decades in its new quality.
If you have obtained the required part, proceed in the following order:
- Find the metal pin that holds the wheel in place.
- Take it out - this is easy to do with pliers.
- The worn gear is located in special grooves - pull it out from there.
- Place the new part in the same grooves.
- Check if the design works.
- If you hear a squeak, lubricate the rod with machine oil.
Important! Do not use vegetable oil for such purposes - it is an organic substance and is not particularly useful for metal.
What to do if your clothes dryer bursts: fixing the defect
Reading time: 4 minutes No time?
In ancient times, and more specifically - in the first half of the last century, when cities were in many ways similar to large villages, and life in them was arranged as in the village - they washed in the kitchen in troughs, washed clothes were dried in the yard on ropes. Here, from the laundry, they brought the linen, dry, ironed, and placed in neat piles. And now almost everyone has personal machines (washing machines), and their laundry needs to be dried somewhere. It’s good if there is a balcony, but the apartment is not on the first floor. For other people, room dryers have been invented and produced. But, like any equipment, the dryer can break down. So what should I do? If the clothes dryer bursts, we correct the defect.
Read in the article
Repairing legs
This is a more complex process than repairing crossbars. There are only two options:
- welding;
- replacement.
Welding
Welding is good because you don’t have to change all the legs. It is necessary to weld only one, and at the same time carry out prevention, that is, strengthen problem areas using the same welding. If you had to resort to this method, be sure to do two more things:
- Bent tubes must be straightened, preferably with a hammer.
- To make the product look good, it is best to paint it.
Replacing legs
Before you fix your floor clothes dryer, you will have to take a trip to the hardware store. You will need:
- wooden slats (approximately 7 linear meters);
- carpentry tools;
- metal plates.
When everything you need is at hand, the rest is done in this order:
- Saw off 4 slats of 150 cm each.
- Make 2 identical crosses out of them.
- Screw one side of each leg to the body using a metal plate.
- In the second, make indentations in the middle, as was done with the old ironing board.
- Make 2 jumpers from the remaining segment.
- Screw one between the slats on the side of the legs that is screwed to the body, the other between the free ends.
Dryer designs
Dryers are available vertical and horizontal. The first model takes up less space in working condition, the second one is easier to fold out into working form, but at the same time takes up a little more space. However, if you dry it at night, it’s not so scary.
The basis of the design of any model is assembled from steel or aluminum tubes. The laundry is hung to dry on metal rods fixed in parallel in the frame, or on rope strings stretched in the frame. Any technique, even such a simple one, does not last forever. Over time, something is bound to break.
Types of breakdowns
Dryer thin-walled tubes break, usually in places where holes are drilled for strings, rods or hinges. Due to poor-quality welding, the rods on which the laundry is hung break off. Skillful hands can cope with this disaster. In such a case, the most effective is a radical solution. Without a doubt, all the rods must be torn off.
PHOTO: ad-cd.net The rods broke off from the frame, the rest were torn off
Then purchase (for example, in Leroy) 20 m of two-millimeter cable in a vinyl sheath. In those places where the rods were “welded”, drill holes with a 2 mm drill. To prevent the edges of the holes from cutting the cable, you need to tap them a little with a core.
Then a cable is passed through these holes and pulled tightly along each string. The ends of the cable are tied to the frame.
PHOTO: ad-cd.net Cable threaded through holes in the frame
PHOTO: ad-cd.net Repaired and modernized dryer
There are other repair options available. The rod-string that has fallen out of its socket in the transverse pipe of the frame must be reinserted through the socket and the tip bent. And then carefully wrap this place with electrical tape and fill it with epoxy glue or “cold welding” compound.
PHOTO: stiralnihremont.ru Preparing the string for “eternal landing”
PHOTO: cs12.pikabu.ru Strengthened connection between string and frame
And the most effective and impressive way for the advanced is to weld the string with high quality. But this is only if the dryer is made of stainless steel.
Related article:
Ceiling clothes dryer for a balcony : types, advantages and disadvantages, selection criteria, self-production, installation without errors, manufacturer ratings, tips and recommendations - in our publication.
Breakdowns occur in other places as well. The legs often break, because they bear the main load - the entire weight of the wet laundry. People deal with this problem to the best of their ability and skill. A simpler option is to strengthen the leg with a wooden overlay. Not very aesthetically pleasing, but cheap and durable. Metal brackets look more elegant.
We repair crossbars
In dryers, mainly crossbars made of two materials are used:
Important! In some models there are also wooden ones, but this is relatively rare, and besides, it is much easier to repair such a dryer than others. The wood can simply be glued together - most special adhesives hold such a load perfectly. As a rule, such crossbars do not fall off the frame. As for plastic, any repair will be a one-time thing, so it’s better to just replace the cheap dryer with a new one.
There are several ways to repair a metal crossbar:
- using nylon ties;
- using wire;
- cold welding method;
- in some cases it can be soldered;
- replace the rod with a longer one and fasten it with self-tapping screws;
- weld.
Nylon zip ties
The simplest, but also the least reliable way. In order to fix a clothes dryer this way, you will need:
- nylon cord;
- epoxy resin;
- drill;
- metal drill.
The result should be something like a fastening made of composite material. The method is not the most convenient, but the repair will not take much time. The dryer will still serve for some time:
- Drill identical through holes in the frame and in the rod.
- Thread the cord through them and tighten them properly.
- Make several turns on the crossbar and on the frame - preferably crosswise.
- Fill the mounting area with epoxy.
- After the structure has dried, the dryer can be used.
Wire
This method is also unreliable, besides, the attachment point looks extremely unaesthetic, and you will have to hang the laundry with care. But still, consider this option for repairing a dryer with your own hands:
- Drill through holes.
- Insert thin steel wire into them.
- Screw the rod to the frame.
Important! Wire should only be used from stainless steel, otherwise the laundry can be damaged.
Cold welding
It is made using a special composition. In fact, it is a special glue that provides a fairly strong connection. You can buy it at a hardware store, but you must act strictly according to the instructions. In this case, there is no need to drill anything. True, those who have ever used dryers that were repaired in this way claim that the connection does not hold for very long, and it is not worth hanging heavy laundry on this rod.
But you can combine two methods:
- We drill holes in the frame and rod.
- Apply the composition to a piece of steel wire.
- We pass the wire through the holes.
- We wrap sections of the frame and rod.
- Let it harden.
Soldering iron
It is very tempting to attach the rod by soldering. In some cases this is possible and gives good results. For example, if the crossbars and frame are made of stainless steel, there are no problems; this metal is connected in this way quite easily and firmly. But this method is not suitable for aluminum.
Self-tapping screws, screws and more
The crossbar can be screwed on using any fasteners you have on hand. Not a bad fastening method, but if the connection is not done very carefully, there is a risk of tearing the linen.
To fix a clothes dryer yourself, you will need:
- narrow steel strip;
- self-tapping screws or screws with nuts;
- vice;
- drill;
- metal drills;
- marker.
The strip must be bent at an angle of 90° and 2 holes drilled at the ends. Then we proceed like this:
- Attach the crossbar to the frame as it stood when it was in good working order.
- Attach a metal strip from below so that its corner coincides with the junction of the rod and the body.
- Mark the locations for the holes.
- Drill through holes.
- Secure the entire structure with screws or self-tapping screws.
Important! For greater strength, you can attach the strip to universal glue or epoxy.
Bend the rod
If it is possible to bend or flatten the rod, extend it or replace it with a longer one, you can do this:
- Bend the edge of the crossbar down 5-10 mm.
- Drill a hole in the frame so that it matches the bend.
- Insert the curved end into the housing.
- Wrap it all with electrical tape or fill it with epoxy.
Important! The most reliable method is spot welding: for prevention, you can weld the joints of other crossbars.
Where and how to dry clothes
Previously, clothes were most often dried outside, stretched on a rope between two poles or trees. Many still remember similar pictures from childhood. The main inconvenience of this method is the inability to dry things in cold or rainy weather. Nowadays, apartment residents no longer hang laundry in the yard, but use a variety of devices to dry things at home.
This is how our ancestors, as well as grandparents, dried clothes
In the retail chain you can find many portable folding models of dryers (hereinafter also referred to as drayers, from the English dryer - dryer). In most cases, such structures are bulky and inconvenient to use. More practical are hand-made drying products, mounted on the wall or ceiling in the bathroom.
A simple drying device that attaches to a battery
Homemade homemade drayers can be attached to batteries. In this case, the laundry dries much faster after washing than on a standard dryer, and the design itself takes up very little space (see photo above). A loggia or balcony can also be used to install modern structures.
Installation and repair of clothes dryer in the bathroom | For home, for family
Hello dear readers of the site sesaga.ru. In this article I want to share my experience on how to install and repair a clothes dryer in the bathroom .
Before renovation (new)
After renovating the bathroom, the question arose of how to make a clothes dryer. The proven old-fashioned method of driving in self-tapping screws and securing clotheslines to them immediately disappeared.
We decided to join civilization and buy a wall-mounted clothes dryer. Out of all the variety of dryers to choose from, I liked this model. I don’t remember whose production, but not China.
The first problem arose with the installation, since there were no instructions or pictures. The repair kit included: two corner hooks, two self-tapping screws, four dowels and a plate with a hole.
But I finally figured out how to install the dryer.
Installing a clothes dryer
We center and mark where the dryer should be located on the wall. First of all, we install a block with a drum - a tensioner on which the rope is wound.
First, we attach the plate, then we insert the right edge of the block with the drum into it, move it to the left until it stops, and after that we mark the hole for the self-tapping screw on the left side of the block.
At the next stage we attach the counter part. Here I recommend taking a “level” and an assistant.
We stretch the counter part to the opposite wall. Here, an assistant applies a level to the rope and helps you level the mating part in height. You can do it by eye, but there is a possibility of making a mistake.
We draw two lines with a pencil - at the top and bottom of the response part. Now we align the counter part horizontally and diagonally, and make markings for the brackets to which it will be attached.
When you attach the mating part to the wall, pay attention to the fact that the brackets “look” down, since the mating part is put on them from the bottom up. The picture on the right shows where the staples go.
But over time, the working ropes begin to sag, and all attempts to tighten them did not lead to anything good.
Here it turns out that the rope is snake-like and evenly distributed throughout the tensioner drum, passing through the ear holes of the mating part.
That is, leaving the first window of the block with a drum, the rope is passed through two ear holes of the mating part, returns to the second window of the block, is again wound onto the drum and comes out of the third window, etc. It is precisely because of this winding that sagging occurs.
After another pull, the second ear in the back of the clothes dryer broke.
I didn’t want to throw it away or buy exactly the same one and have to suffer with it in the same way. Moreover, the holes in the wall have already been made, and making new ones is also not an option. What if the new dryer doesn’t fit?
How to fix strings on a floor-standing clothes dryer with your own hands
Often housewives, without calculating the strength of the dryer, hang a lot of laundry and they cannot withstand such pressure and the solder breaks. Metal is now made cheaply and it breaks easily, this is especially sad, since after washing you want to dry your clothes properly, and not have to deal with long repairs.
I believe that it is better to fix it once efficiently than to “stick it with tape” every time and get angry.
We remove the paint at the joints of the dryer
In order for our connection to be strong, we need to remove the tape on which you glued the torn strings before and sand them with sandpaper, a file, natfil, or a machine for sanding surfaces.
We bend the dryer strings on which we hang clothes after washing.
We drilled holes in the tube, then we make hooks from knitting needles and insert them into the drilled holes!
It is also better to bend the tip of the knitting needle about half a centimeter and bend it down. The hole should be in the place where the rod is bent, insert the bent tip into the hole and wrap it with electrical tape, or make it better and solder it and paint it so that it looks like new!
Next, we sand and solder them, having previously treated everything with soldering acid for a better connection!
Sand it well with a file.
To ensure that nothing unnecessary sticks out or pricks, we carefully process our dryer with a file, in the areas of soldering!
Everything is fine, now you can paint, we use any waterproof paint, I used alkyd paint from a spray can, but you can use any metal paint! Ready!
How I repaired dryer legs
The legs of the dryer also often break, I used a hacksaw, sawed it at the joint, straightened the tube until it was even, turned a tube out of strong wood, inserted it into the broken dryer leg on both sides, and sealed it with electrical tape. It held up well, you can also drill small holes and secure an additional wooden rod inside the leg! The method works! Which one did you use?
TOP stores of washing machines and household appliances:
- mvideo.ru/- household appliances store, large catalog of washing machines
- holodilnik.ru – Inexpensive store of household appliances.
- techport.ru - profitable modern online store of household appliances
- citilink.ru is a modern online store of household appliances and electronics, cheaper than offline stores!
- ru.aliexpress.com - spare parts for washing machines
Manufacturers
The German company Leifheit (the leader in Russian sales), the Italians Melicone and Gimi, Dogrular from Turkey are leading companies in sales and quality with a good name in the market. However, the brand affects the price. For example, Leifheit products start from 2000 rubles, Gimi - from 700.
The best Chinese and Delta. Prices from 500 rubles.
Whatever manufacturer you choose, be sure to read the product characteristics when purchasing: the material from which the dryer is made, coating, types of strings.
Each dryer has a number of advantages and disadvantages, this must be taken into account when choosing.
“Liana” is a difficult structure to install. You will have to re-read the instructions more than once. In addition, the retractable ropes are fixed with a plastic mount on the wall. Part of the weight of the laundry falls on this fastener, and plastic is plastic. However, among housewives this model is recognized as the leader in convenience.
Any long dryers have a slight sag. Therefore, if you choose a 1.8 meter long dryer, the ideal material for it would be stainless steel, not plastic.
If you choose a short dryer, the strings should not be too thin, otherwise it will not withstand anything other than socks and T-shirts.
How to choose a good dryer for the balcony
If building such a useful thing as a dryer is not part of your plans, you can buy the structure. But the choice is wide, and how do you know what is convenient for you?
The following tips will guide you:
- Folding drying rack. Usually these are inertial models in the form of a drum, on which ropes are wound. Some models may only have one rope, while others contain up to 10 ropes. This device is used like this: the ropes are unwound and fixed on hooks on the opposite wall. When the laundry is dry, the ropes are removed from the hooks and they themselves wind around the drum. The “disadvantage” of this dryer is that it cannot handle a lot of heavy laundry.
- Telescopic dryer. The principle of its operation is that the tubes simply slide into each other. And when folded, it simply looks like a towel holder. Metal tubes and sometimes strings are used for laundry. This increases the strength of the structure, as well as its load capacity.
- Console dryers or accordion. They look like sliding mounts with metal tubes (5-7). The tubes are round, so there are no unwanted creases in the laundry. This dryer can withstand a large weight of laundry, about 10 kg.
- Rope dryer. A cheap product, but the rope, no matter how you look at it, will sag over time. But the structure quickly and easily folds to a minimum size. And for very small or cluttered balconies this is the only acceptable option.
These are just the most common types of wall dryers
Of course, you should also pay attention to the material from which the structure is made. For example, plastic dryers
They are inexpensive, their color palette is wide, they look light and bright, without weighing down the interior of the balcony. Quite durable.
Aluminum polished dryers are a compromise option. They will decorate the balcony, light, durable, beautiful.
The type of dryer with textile elements is also popular now. If the fiber on them is synthetic, the structure will last a long time, since synthetics are not as afraid of fungi and mold as natural material. Typically these devices have a tension regulator.
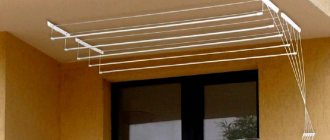
How to assemble a hanging clothes dryer yourself
A ceiling-mounted clothes dryer for both the balcony and indoor space can be made with your own hands. This is the most profitable option for manufacturing and installing the device. It is enough to assemble it once and you can use the structure for many years. When planning the placement of the dryer, you need to calculate how many consumables you will need and what tools you need to prepare. Material consumption will depend on both the design and the size of the product.
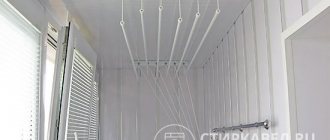
Rules for installing a ceiling-mounted clothes dryer on a balcony
Installing devices for drying clothes on the balcony is justified if it faces a quiet courtyard. You only have to dry things over a busy highway if there is no other place.
A glazed balcony is convenient because even if the location of the house is unfortunate, you can hang laundry by closing the glass. You can ventilate at night, when traffic on city streets subsides.
A long-tested version of the device for washing clothes on the balcony is a pair of rows of bent nails hammered on opposite walls, through which a clothesline is stretched. Today there are special hooks made of stainless steel on sale. More modern options are “liana” or “lift” type dryers. Both of these structures are lowered down for hanging, and then raised up and fixed at the desired height.
“Liana” consists of 2 slats with holes through which a rope is passed. Each section of the dryer is a hollow rod through which a rope passes. To fill, the rope is released and the rods are lowered down. The structure with laundry is lifted by pulling a rope, which is tied to a clamp fixed to the wall.
To assemble this design yourself, you will need 2 metal or durable plastic strips with holes, a thin clothesline and several hollow rods. The slats are fixed to the ceiling, the rope is successively passed through the holes in the slats, threading it through the rods. A stainless steel hook can be used as a fastener.
Making the “elevator” even easier. It is a frame with ropes or rods, rising on blocks. For this model, you will need to make a frame out of wood or use the frame of an old cot and drill holes on the narrow sides of the frame. A clothesline is pulled through the holes in the frame, and then the device is suspended on blocks from the ceiling. It is advisable to use 3 blocks, 2 of which will hold the frame, and the 3rd will be a control cable for lifting the dryer.
If you don’t have anything to make the device from or it’s too difficult, you can purchase a ready-made version and hang it yourself. Installation of a purchased structure must be carried out according to the instructions supplied with it.
What tools are needed for the job?
To carry out installation work, you will need a hammer drill or drill. Dowels must be inserted into the holes made in the ceiling. To secure them more firmly, you can use glue. The planks or blocks are fastened with self-tapping screws, for screwing them in it is convenient to have a screwdriver. If you don't have one, you can use a screwdriver.
A properly selected and well-assembled dryer with your own hands will make drying clothes easier and will last for many years. The main thing is not to rush and calculate everything in advance.
Video
Watch the video to get expert advice on choosing, using and caring for dryers:
Electronic engineer with many years of experience. For several years he was involved in organizing the repair of household appliances, including washing machines. Loves sport fishing, water tourism and travel.
Found a mistake? Select it and click the buttons:
Astronauts, while in Earth orbit, solve the problem of dirty things using an original method. Clothes are dropped from the spacecraft and burn up in the upper atmosphere.
Vertical clothes dryers
Gimi Modular 3 – equipped with wheels for easy movement
The dryer consists of three levels, on which the laundry is directly hung. Thanks to its vertical design, the product will not take up much space in the apartment. The right and left parts fold, thereby saving even more space.
The dryer moves using durable furniture wheels, even if it is fully loaded with things. Made of steel, coated with powder paint. If you do not scratch it with metal objects, its presentable appearance will remain for many years.
- foldable;
- mobile;
- there are strips for placing hangers, 4 pieces can fit on each side;
- metal structure;
- compact dimensions – 132 x 72 x 72 cm;
- maximum load – up to 20 kg;
- low cost - 1800 rub.
What types of dryers are there?
The simplest dryer is a frame made of metal or plastic on which rods are attached. Depending on the location, the models are:
- floor;
- ceiling;
- wall;
- mounted
Important! The first two types are the most popular; they are the ones that break most often. On sale you can find quite complex high-tech products with a microlift, remote control, etc. They are quite expensive, and electronics almost always have to be repaired, so it is better to contact a service center.
Electric hangers
Heated dryers occupy a special place among accessories for drying clothes in the bathroom. They are excellent helpers for the housewife, as they allow you to quickly dry washed clothes. This occurs due to the fact that the rods on which the laundry is hung heat up. As for manufacturing options, an electric clothes dryer can be represented by several models:
Electric floor clothes dryer
Electric wall-mounted clothes dryer
Electric ceiling clothes dryer
All those models that were discussed above, but with a significant difference - this is an automated clothes dryer that does not operate in manual mode. In addition to its function of quickly drying things, an automatic heated dryer can also have an additional option such as disinfection. The ideas of designers and manufacturers are widely implemented in terms of safety. A number of models are equipped with a bactericidal lamp, which allows you to fight any microorganisms in the bathroom. The design of such a drying rack varies. For example, this could be a rack where wet laundry is placed. The top of the stand is covered with a cover, under which warm air penetrates using a fan. Women compare this mechanism for drying clothes with drying hair with a hair dryer.
When choosing such a product, it is important to carefully read the manual. For example, the instructions for electric dryers state that it is unacceptable to place it near heating appliances and pipes.
The same item is a washing machine. This is due to the increased risk of overheating of the device. The instructions for such products recommend not hanging the automatic model close to a water source. The best option would be to place it on a neutral surface.
Despite such a variety of options, you should choose a clothes dryer carefully. If the renovation of the apartment is still at the planning stage, then it is worth making a drawing of the room, which will indicate the approximate location of the dryer. Ideas on where it will look more profitable and practical can be suggested by various resources and qualified specialists, and then they can be transferred to the drawing
It is important to consider the width of the room and the width of the dryer, what design is in the bathroom, the height of the ceilings, the routing of pipes and the need to place this part in the bathroom. For example, the need disappears when the washing machine is equipped with a clothes drying function or there is a large heated towel rail on which wet clothes can be hung, and of course, do not forget that there are convenient clothes dryers over the bathroom
see also
Comments 115
I tied the torn rods back in place with thin steel wire. Then I coated the top with glue from a hot-melt gun so that the ends of the wire would not cling. There was always a welding mark on the rods, due to which the rod does not slip out of the wire. The glue cools down and turns white and the wire does not show much on the white dryer catches your eye.
Each cable must be tensioned separately because it will stretch quickly.
By pulling each cable separately, you will end up with two knots for each installation, and as you know, tying a cable is very difficult. If you use special fasteners for fastening, then this will again involve additional costs and the massiveness of the product. If the cable stretches out in my case, then it is enough to untie (try to untie) one loop and tighten everything again.
So you don’t have to cut the cable right away, you can push it through entirely☝️
I didn't understand anything from your comment. I have three pieces of cable: the middle, and on the sides on the “ears”. You wrote to tighten separately - as I understand it, this means to tighten each string separately... write more clearly, not everyone understands you.
Here you go