A washing machine is a complex household appliance, the breakdown of which entails expensive repairs. But there are some breakdowns that you can fix yourself. One of these problems is replacing the seal in the washing machine. The article, using examples of models from several manufacturers, describes in detail the sequence of work when replacing a part, and describes what materials and tools are used. Recommendations are given for preventing damage to rubber parts.
Replacing the cuff of the washing machine hatch
During prolonged use of the SMA, the cuff of the loading hatch may be damaged and will need to be replaced.
The purpose of the cuff is to hermetically seal the loading opening of the tank during washing. 1. Causes of cuff damage:
Natural wear and tear of rubber. Infection, destruction by fungus. Loosening of rubber by aggressive substances added during washing. Abrasion of the cuff on the internal parts of the body. Abrasion of the cuff from large hard laundry items and their metal accessories (sneakers, baseball caps, etc.). Damage to the edges of the cuff due to rough loading/removal of laundry items.
2. Removing the cuff
Almost all front-loading SMA cuffs can be replaced from the front without disassembling the washing machine. True, this requires a certain skill and patience. When starting replacement, make sure that the new cuff is identical to the one you are replacing.
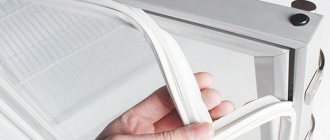
Remove the front clamp
The outer edge of the cuff with its curved part is recessed into the groove of the front wall and is held there using a plastic or wire clamp. The wire clamp is tensioned using a screw, spring and hooks, the plastic clamp is fixed and tensioned with latches. The plastic clamp is removed if you pull towards you with force where the latches connect. The wire clamp can be removed by unscrewing the screw or carefully prying the spring with a flat screwdriver.
Remove the second (inner) clamp
Before removing the inner clamp, you need to find the alignment mark on the collar. The mark determines the strict position of the cuff relative to the tank, which ensures proper drainage and tightness. If the mark is not found, you need to mark with a marker the location of the old cuff relative to the tank. This will be useful to us when installing a new cuff.
3. Preparing to install the cuff
We thoroughly clean the mounting edges and recesses of the tank from dirt and deposits, and generously lubricate them with soapy water. The slippery surface of the edge will make it easier to install the new cuff.
4. Installation of the cuff
Pulling the cuff over the edges of the tank is the most important operation, requiring a certain skill and effort. First you need to align the installation marks of the tank and cuff.
Our task is to pull the shaped recess in the cuff onto the edge of the tank. We take the cuff from the inside and with two thumbs we push it in a circle. The cuff fits easily along the lubricated edge. When most of the cuff has been inserted, a situation will arise where further advancement will become difficult due to the sliding of the already inserted part.
If you've ever installed a drive belt, you'll quickly understand which direction to go. In our case, the remaining area needs to be planted, walking with two thumbs towards each other. Did you manage? Now run your fingers along the entire perimeter of the ring, checking the tightness of the cuff to the edge of the tank.
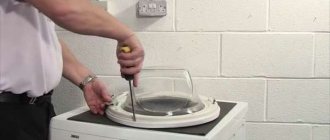
How to put on the inner clamp
If the clamp has an adjusting screw, unscrew it to the required diameter of the clamp, put the clamp in place and tighten it, tightening the screw. The situation is more complicated if the clamp is spring type
It is important here that the clamp is fixed at the initial tension point. To fix the spring clamp, use a screwdriver, which must be inserted all the way into the hatch locking hole. Putting the spring on the screwdriver, stretch it and put it on in a circle, gradually pushing it inward to the seat
Putting the spring on the screwdriver, stretch it and put it on in a circle, gradually pushing it inward to the seat.
When about 2/3 of the spring is laid down, it will become difficult to hold the spring due to the change in tension angle. You will have to show skill and a little patience.
On older SMA models, tensioning the clamps is carried out only with the help of special round-nose pliers, since their clamps do not have adjusting screws and springs.
Installing the front (outer) clamp
After installing the internal clamp, this task is simple, since the installation site is open for manipulation. Only clamps that do not have tensioners in the form of a screw and a spring will require special L-shaped pliers. Using round-nose pliers, the spring mounting hooks at the ends of the clamp are opened and closed.
Checking the work
Such labor-intensive work requires careful verification. We start the SMA in rinse mode, after 2-3 minutes we drain the water. After draining is complete, tilt the washing machine back and inspect the cuff from below (shine it with a flashlight) for fresh signs of leaks. They shouldn't exist.
to the master - get advice on how to repair a washing machine yourself!
Do-it-yourself washing machine repair - more than 50 detailed PHOTO INSTRUCTIONS for do-it-yourself repairs.
Cleaning methods
When solving such a problem as cleaning the drum seal in an automatic washing machine, the methods involved depend on the nuances of the upcoming procedures.
From dirt and stains
For the comprehensive removal of dirt under the rubber band and yellow spots, specialized formulations with chloride substances are relevant.
Sequence of procedure:
- Use a damp cloth to remove dirt and deposits from the surface of the rubber rim;
- carefully bending the edges of the flexible structure, clean the inside of the cuff from debris;
- soak a damp sponge with a specialized product and wash both surfaces of the seal;
- for better effect of the cleaning composition, close the unit door and leave for half an hour;
- Next, run the washer in idle mode to clean the drum.
Cleaning the rubber band in the washing machine from dirt and stains
After completing the cycle, wipe the rubber seal dry and leave the door ajar for ventilation.
From plaque and rust
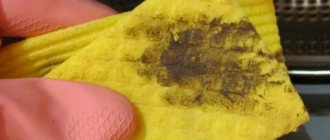
Rusty stains will grow along the perimeter of the drum seal if measures are not taken in a timely manner:
- Use a damp sponge to remove the top layer of dirt and rust particles;
- Treat the affected areas with acetone-based nail polish remover;
- leave for 40-60 minutes.
Next, turn on the rinse mode at a temperature of 60°C, after which the rubber ring is wiped dry.
From mold and mildew
If you plan to clean the rubber liner from pathogenic microflora, it is advisable to use monarda extract. To do this, 15 ml of liquid is diluted with 200 ml of distilled water. The substance is sprayed onto the surface to be treated; there is no need to wash off the composition.
To eliminate mold in hard-to-reach places on the o-ring, a solution of copper sulfate will help:
- prepare a solution from 50 g of copper sulfate and 2 liters of boiled water at room temperature;
- treat the rim by spraying liquid using a spray bottle;
- After 6-12 hours, start the unit in idle wash mode, then wipe the cuff dry.
When deciding how to clean the rubber band of a washing machine to prevent the development of microorganisms, hydrogen peroxide is often used. Treat the surface with an undiluted solution. The sponge is soaked in peroxide and surface stains are removed. Next, using a swab moistened with a substance, carefully treat the cuff from the outside and inside. The application does not wash off, just wipe dry.
From an unpleasant odor
Lemon works great as a washing machine freshener:
- remove the zest from the citrus into small shavings, place the aromatic mass in a bag or special container and place it in the drum;
- juice is squeezed out of the pulp, the liquid is filtered through a fine sieve;
- soak the sponge with lemon juice, treat the internal surfaces, including the cuff on both sides, the walls of the drum, and the door;
- pour 2 tbsp into the tray. spoons of citrus juice.
Lemon is a remedy for unpleasant odors in the washing machine.
Start the rinse mode at a temperature of 40°C, after the cycle the seal is wiped dry.
What are the reasons for wear of a part?
There are not many reasons why the cuff stops performing its functions. Moreover, most of them occur when the rules for using household appliances are not followed.
The main ones are the following:
- mechanical damage from rough objects;
- strong vibration of the drum during spinning;
- exposure to aggressive agents;
- mold on rubber;
- inaccurate loading of dirty items or removal of already washed items;
- natural wear and tear.
READ MORE: Desk 38 photos black models furniture options wenge colors bleached oak and shimo ash brown gloss and dark walnut
Damage from objects occurs when rough items are often washed in the machine, for example, sneakers, outerwear with hard “snakes,” etc. Metal products (nails, keys) and plastic that have fallen into the drum due to user carelessness can also cause the formation of significant defects on the rubber.
Cracks, cuts and tears in the rubber part can appear either as a result of a malfunction of the washing unit or due to the carelessness of users. Before loading clothes into the machine, be sure to check pockets for rough or sharp objects. They can easily damage the cuff
The acids and alkalis used to clean the machine act in the same way. But again, if they are used incorrectly. For example, some users believe that the higher the concentration of the product, the more effective the cleaning. At the same time, they do not take into account the aggressive influence on the parts available for processing.
Mold is microscopic fungi that live in colonies. Having settled on soft rubber, the mycelium of these tiny creatures is able to germinate deeply. If the damage is severe, dark gray spots that emit an unpleasant odor cannot be removed with anything. In this situation, only replacing the cuff with a new one will save you.
The washing machine does not last forever. Even if you handle it very carefully, the parts gradually wear out. The rubber seal is no exception. It constantly experiences friction from the rotating drum of the washing machine and laundry, temperature changes, and exposure to detergents. All these factors make rubber brittle and brittle over time.
Main predisposing factors:
- damage to the surface by cutting objects or parts of clothing;
- wear of internal parts or incorrect installation, due to which the drum begins to vibrate strongly in the “spin” mode;
- the use of aggressive alkaline agents and various acids during cleaning;
- violation of surface integrity due to fungi;
- careless loading and unloading of the drum;
- natural wear and tear process.
Due to various objects, the cuff is damaged when housewives load shoes, clothes with metal locks, and various decorative elements into the washing machine.
Damage can also occur as a result of careless washing of items that have keys and other metal or plastic objects in their pockets. All this leaves characteristic marks on the seal.
With frequent use of the washing machine, the elastic quickly loses its elasticity.
In most cases, rubber wear is associated with the use of chemicals and acids during washing. After all, some housewives believe that the higher the concentration of the product used to clean the washing machine, the better. However, this is a big misconception, due to which you have to change the cuff outside of normal hours.
Much to the surprise of many users, even fungi can destroy the integrity of rubber. This happens due to the constant accumulation of mold on the surface, which grows deeper over time. If there is such a problem, all that remains is to change the cuff, because it is no longer possible to restore it.
However, even if you follow all the manufacturer’s recommended care rules, the rubber wears out over time, like any other element of this unit. The reason is strong friction of the cuff during washing, exposure to hot and cold water.
Why is this happening
The cause of a cuff tear should be understood at the very beginning. It will become clear whether it makes sense to carry out such home renovations, as well as how to avoid a similar situation in the future. There may be several reasons that caused the gap.
- Cracks that occur as a result of strong vibration of the machine drum. Repairs can be made, but the issue with vibration must be resolved, and this is much more difficult.
- Sometimes rubbing of the cuff occurs if something in the mechanism is broken and the cuff rubs against some part. Drum displacement can lead to such a breakdown. Before carrying out repairs, the cause of the damage must be eliminated.
- A tear or cut that can be caused by small items forgotten in pockets.
- “Incurable” damage, the repair of which does not make sense.
Causes of damage
The cuff is most often replaced due to the appearance of ruptures or cracks in the seal that allow water to pass through during washing. As a result of the formation of such damage, the owner of the machine will see water leaks under the hatch, and upon examining the cuff itself, he will notice cracks or tears, which may have different sizes. The reasons for this situation are the following factors:
- Natural wear of the seal. During operation of the machine, the cuff is constantly subject to friction between the drum and the laundry. It heats up during washing and then cools down. In addition, it is affected by detergents. Over the years, this leads to brittleness and brittleness of rubber.
- Poor quality washing powder. Under the influence of cheap powder and detergents of dubious quality, the rubber of the cuff begins to deteriorate, so saving on powder leads to expenses for replacing the seal.
- Excessive dosage of detergents. If you use an excessive amount of powder or liquid, the structure of the sealing rubber may also be damaged, which will require the cuff to be replaced.
- Parts of clothing that could damage the seal. Such elements can be metal and plastic fittings. In addition, screws, nails and other objects can get into the machine from clothing pockets, which can cause tears in the cuff.
Over time, if the sealing collar is not cleaned, mold may grow on it. Therefore, it is necessary to periodically clean the washing machine. You can see how to do this in the following video.
Related article: Do-it-yourself plastic ceiling: preparation and installation
Let's sum it up
Replacing and repairing the drum seal are simple steps that do not require the involvement of a specialist. The critical stage in this process is the disassembly and assembly of the structure, so it is necessary to remember or photograph the location of the parts.
The sealing tape, also known as the rubber band, is of great importance for your washing machine. It protects the internal mechanism from moisture and acts as a sealant. If the rubber wears out, there is a risk of leakage, even flooding the room. Replacing the seal in a washing machine can be done independently without the involvement of a specialist.
Preparing for replacement
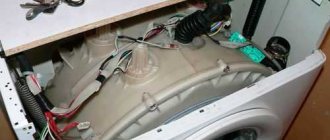
In order to replace the bearing, the washing machine will have to be disassembled. You need to be prepared for the fact that the repair may take several days, therefore, if possible, it is better to carry out the work not in the bathroom, but in the garage, shed or other utility room.
It is necessary to prepare new bearings and oil seal. You can find spare parts in specialized stores if you name the model of your unit. It is better to purchase parts manufactured by the washing machine manufacturer.
Also required for repairs:
- a set of flat and Phillips screwdrivers;
- socket and open-end wrenches;
- hammer;
- bit;
- hacksaw for metal;
- pliers;
- glue;
- sealant;
- WD-40 product.
The washing machine is disconnected from the network, the water supply tap on it is turned off, and the water supply and drainage hoses are disconnected. If there is water left in the tank, it is drained through the emergency pipe.
Call the master
Replacing the cuff is a rather lengthy process that requires certain knowledge of the structure of the LG washing machine.
If there is no understanding of what needs to be done, then it is better to entrust the replacement of the rubber seal to the professionals of service centers. It’s not difficult to find the necessary contacts on the Internet or use the recommendations of friends.
The cost of a specialist’s services to replace a cuff starts from 2000 rubles. This amount includes: diagnostics, dismantling of the washing machine, installation of a new element, reassembly. A new rubber seal is paid separately.
To avoid unpleasant moments of poor-quality repairs, you need to inform the technician of the exact model of the washing machine. If the specialist is little interested in the essence of the problem and the main emphasis is on paying for repairs that have not yet been carried out, you should refuse.
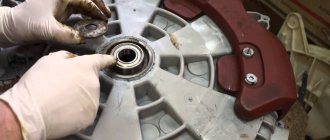
What is an oil seal?
A washing machine is one of the household appliances whose operation is directly related to water. However, some elements should never come into contact with water, as this can lead to poor performance and equipment breakdown. The problem of isolating parts from water is solved by a seal, without which not a single modern washing machine can do.
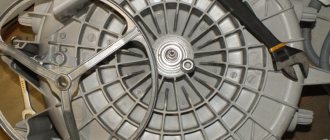
The drum of the washing machine is fixed on a bracket, which, in turn, usually has 3 or 4 legs. In the center of the bracket there is a steel axle shaft, the main task of which is to secure the drum housing to the bearing assembly. It is thanks to this design that the drum has the ability to rotate in different directions and at different speeds (this is necessary to implement different washing modes).
The oil seal is a small but very important part on which the efficiency and operating life of the washing machine directly depends.
It is located in a special bushing, which is located in the center of the axle shaft. The main task of this part is to prevent moisture from coming into contact with the bearings. Its malfunction entails the appearance of rust on the bearings. In this case, the machine begins to make grinding sounds, and after a while serious problems with operation may begin.
The tightness provided by the sealing element is achieved due to the materials from which it is made. This is usually rubber, silicone rubber, fluorine rubber, or something else. There is a metal insert inside it, thanks to which the part retains its shape. Even though the insert is made of metal, it is extremely fragile, so you need to be especially careful when replacing and lubricating the seal.
During operation of the device, the machine shaft constantly interacts with the inside of the oil seal.
Lack of lubrication on the sealing part leads to increased friction, which results in rapid wear. Obviously, the tightness in this case will be compromised, and the safety of the bearings will be jeopardized. Grease for washing machine seals will help avoid the problem.
What is a cuff?
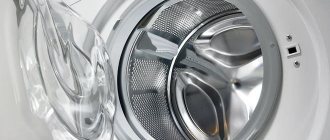
The main purpose of the rubber part installed on the hatch of an automatic washing machine is to hermetically seal the loading tank during operation of the machine. This layer does not allow even a drop of water to seep out.
The location of the cuff and its appearance completely depends on the model of the machine. If loading is frontal, a rubber layer connects the tank to the front wall of the unit and has a round shape. In models with vertical loading of laundry, the part combines the tank with the upper wall and has the shape of a rectangle.
Without a door seal for loading laundry, the machine door cannot be closed tightly. The special composition of rubber or silicone from which the part is made ensures complete sealing of the tank during washingPreviously, seals were made of very flexible rubber. In modern models, cuffs are almost always installed from a similar material of artificial origin - silicone. It does not lose its elastic properties over a wide temperature range and does not “tan” over time.
Cuffs of different models differ in size and shape. If the washing machine has additional functions, for example, drying and aquaspray, the part may have additional holes.
Purpose of the rubber seal
In any model of washing machine, the rubber seal performs the same function - it serves as a sealant.
It reliably isolates the space between the body and the tank. If the integrity of this part is compromised, then water can leak onto the electrics - the control board. The second rubber band - the one you see every day - is located on the door. It prevents water from overflowing from the drum and prevents short circuits.
How to install a cuff on a washing machine
Before installing a new element, you need to compare it with the dismantled one to make sure it is similar in size. After this, we find the places where the cuff is fixed:
- there will be a triangular protrusion on top, which, during installation, fits into the tank mark;
- for the bottom, not only marks, but also drain holes can serve as reference points.
Tagging is an important feature. Otherwise, the cuff will move, and over time, damage will appear on it again.
Replacing the cuff on an Indesit washing machine starts from the top point, its protrusion should be aligned with the mark. Supporting the upper section, we press the second rubber seal inside. Then, moving from the top point to one side, the inner part of the elastic band is put on the washing machine tank.
To make it easier to put on the cuff, it is recommended to view it from above, looking through the opening of the dismantled cover. Having attached the inner part of the seal, check the alignment of the marks. If they move during installation, it is best to remove the sealing collar and re-install.
Now let's move on to installing the clamps. This stage of work is the most labor-intensive. For convenience, it is recommended to tuck the outer edge inward and disable the hatch lock by unscrewing a couple of screws.
A screwdriver is inserted into the hole under the blocker, and a clamp clings to it. This is necessary so that when tightening it does not jump off and remains in place.
The clamp is tensioned around the perimeter in a convenient direction, while the position of the screwdriver is constantly monitored
This is especially important if you are working without a partner. The fact is that with any loosening or sudden movements, the screwdriver moves and the spring slides off
Once the spring is fully inserted and located in the recess of the seating point on the seal, you will have to hold it and carefully remove the screwdriver. Now we probe the entire perimeter of the spring with our fingers to make sure that it fits into the recess everywhere, and that the cuff edge fits exactly against the tank, without jams
If loose spring connections are detected, they are corrected.
Now we probe the entire perimeter of the spring with our fingers to make sure that it fits into the recess everywhere, and that the cuff edge fits exactly against the tank, without jams. If loose spring connections are detected, they are corrected.
If you fail to place the cuff tightly in the intended place, the likelihood of leakage increases.
At the same working stage, you should make sure that the Indesit washing machine is tight after installing the purchased cuff:
- water is poured into the tank in such a way that it does not flow out of it;
- when no leakage is detected, the spring is inserted correctly;
- otherwise, the area of leakage is determined, the liquid is poured out, the problem is eliminated, and a recheck is performed.
Before fastening the outer part of the sealing collar, the door lock is installed and the fastening screws are tightened. The front part of the seal is curved in a certain shape, corresponding to the bend of the edge of the hole in the front panel of the Indesit washing device. Having bent the front part, it must be pulled onto the body of the washing machine, performing similar steps in a circle.
When the rubber part is completely put on the front, you will have to inspect it and feel it to completely fill it.
The final stage is the installation of the external clamp. It doesn’t always work out in one go, because the spring is quite stiff. But there are ways:
- taking the clamp from both ends of the spring, stretch it, insert it into the recess, and, continuing to hold it, put it on completely;
- You can fix one spring end and pull it to the side, placing a clamp.
Cleaning Rules
To prevent mold from developing in the machine drum and a rotten smell from appearing, you must keep the door ajar. Also, after washing, be sure to rinse the powder tray of any remaining detergent. Wipe it with a dry cloth, and also wipe the connector where this tray is inserted. However, let's return to the drum rubber and tell you how to clean it.
Use a damp cloth to remove mold and other deposits from the outside of the gum. Fold back the edges of the cuff and wipe the inside, where mold usually grows. Soak a sponge in bleach or another chlorine-containing product. Wipe the inside and outside of the gum with a sponge, as well as the surface of the drum.
Particular attention should be paid to the grooves of the cuff, applying more product. Close the drum and leave the machine for half an hour
After disinfection, you need to start the rinse mode to rinse the drum and elastic band from the detergent.. You can effectively clean the cuff from mold with a solution of copper sulfate diluted in a ratio of 30 g per liter of water
It is enough to apply a small amount of solution to the cuff, wait about a day, and then rinse with water and wipe with a dry cloth. You can run the machine in the “Fast 30” mode so that the remaining substance is washed away thoroughly
You can effectively clean the cuff from mold with a solution of copper sulfate diluted in a proportion of 30 g per liter of water. It is enough to apply a small amount of solution to the cuff, wait about a day, and then rinse with water and wipe with a dry cloth. You can run the machine in the “Fast 30” mode so that the remaining substance is thoroughly washed out.
If too much mold and debris has accumulated under the cuff, you will have to remove it completely. This is not difficult to do; the whole process is described in the article on how to replace the cuff on a washing machine. This has its advantage, because this way you can completely and more thoroughly rinse the rubber in a basin in a large amount of water, then dry it and install it back. And if it is damaged, then replace it with a new one.
Complete washing machine cleaning
In addition to weekly and constant care, the washing machine requires complete cleaning. To carry out a complete custom cleaning of the “washing machine” you need:
- clean the drum from scale;
- clean the drum cuff;
- clean the hatch door;
- clean the drain filter;
- Rinse the powder tray.
Since the water in the water supply contains salt impurities, it causes scale to form on the internal parts of the washing machine. Scale settles on the heating element, on the drum, and also on the cuff. To prevent excessive scale formation, you can use water softening agents, one of which is Calgon. However, even in this case, at least twice a year, you need to descale the washing machine. To do this, many housewives use citric acid or a special anti-scale agent.
To effectively clean the machine from accumulated scale, you need to take 100-200 grams of citric acid and pour it directly into the drum, then select the longest program with a water heating temperature of up to 60 degrees. You can set an additional rinse to better wash away any remaining scale. At the end of the program, be sure to wipe the cuff and make sure that there is no plaque underneath.
It is also easy to clean the hatch door of an automatic washing machine from drops of soap solution and other substances. Use any glass cleaner and the door will shine again. As for cleaning the filter, it should be done as often as possible. After all, the filter can become clogged and lead to malfunctions of the washing machine.
To clean the drain filter, you must first unscrew it from the washing machine. But before that, turn off the machine from the network and close the water supply tap. Then, at the bottom of the case, open the panel or door and find the filter cover. Unscrew it counterclockwise and take out the filter. Do not forget to put a cloth, as residual waste water will flow out of the filter. Rinse the filter to remove debris and dirt under running water and reinstall.
Thus, when planning to clean the rubber band of an automatic washing machine, you will need both a drum and a tray for detergents. Such care will extend the life of the parts and the washing machine as a whole.
Preliminary work
To protect yourself from electric shock, you must first turn off the power to the unit. Then remove the front panels, starting with the cover. It is secured with a pair of hex bolts on the rear side. To speed up the process, you can use an electric screwdriver.
The detergent dispenser is removed by pressing the latch located on the inside of it. Access is provided to the control panel, attached with several screws, which is also detachable. After dismantling, the fasteners should be placed separately, since they are made of stainless steel. Then use a flathead screwdriver to remove the bottom panel and drain hose.
Replacing the cuff
Removing a deformed and installing a new hatch cuff of a BOSCH washing machine consists of the following steps:
- The cuff is detached from the front panel. The fastener is a spring clamp. To remove the part, you need to pull out the spring. The cuff moves inward towards the drum.
- Unscrew 2 screws securing the front wall and 2 holding the lock. The lock and hatch door are removed.
- On the drum side, the cuff is secured with a spring clamp that runs along the entire perimeter of the hatch. To disconnect the element, you need to take the cuff along with the clamp and carefully pull it off. In some car models, you must first remove the counterweights. The hatch is ready to install a new seal.
- The new cuff should be positioned so that the drain holes are located at the bottom only in the center. The part must be put on from above and moved down on both sides, while making sure that the holes do not move.
- The one-piece clamp fits into the technological recess located along the edge of the seal. The tension on both sides should be the same as when putting on the cuff.
- Then you need to assemble all the parts in reverse order. Pull the outer part of the cuff onto the front wall and install the front clamp. The wire component of the clamp is placed into the technological groove of the seal, the spring is stretched, and the remaining part of the fastening is tightened until it is completely seated.
Leak test
In order to determine how tightly the cuff fits to the hatch and whether there are any gaps, you need to run the washing machine in the rinse or short wash mode.
For a more reliable check, you can put a sheet of paper under the door and then check if there is moisture on it.
Is your cuff leaking? Contact our specialists. Call (495) 766-12-13. Do you want to order a cuff? Call. Prices for labor and parts are low.
Back to section
Subtleties of cuff repair
Sometimes situations arise when the “elastic band” located on the hatch of the washing machine breaks, and it is not yet possible to replace the cuff.
When might repairs be needed?
For example, at the moment it is impossible to find a part suitable for the existing car model, or it is on order, and delivery will take a long time.
There are also circumstances when right now it is impossible to allocate money from the family budget to purchase a new part. In such situations, repairing the cuff, that is, sealing the damage site, will help out.
High temperature, detergents and constant friction of the laundry will soon take their toll, and the hole in the cuff will make itself felt again
Please note that gluing the patch is a temporary measure. Therefore, you need to try to replace the worn seal with a new one as quickly as possible.
How to select and prepare a cuff?
First of all, you need to inspect the leaky cuff and determine the cause of the damage. This is the only way to find out whether it is advisable to repair the seal or whether there is no point in it. To do this, you will have to remove the cuff from the machine using the method described above.
Only by removing the front clamp and pulling the cuff towards you can you detect damage, assess its size and the possibility of repair
If the cut, puncture or abrasion is small, then repair definitely makes sense. And when the damage is large or there are several of them, it is better not to rush with sealing.
After determining the cause of the repair, the material for the patch should be selected. It must be durable and at the same time elastic. Some experts recommend using condoms or medical rubber gloves for this purpose.
A great option is special patches designed for repairing swimming air mattresses. You can find them in sports stores.
The glue planned for use must have excellent adhesive properties. In this case, the substance must remain elastic after complete drying. This is exactly how products intended for repairing shoes and rubber products behave.