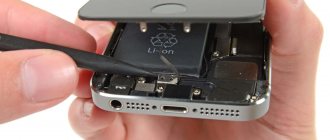
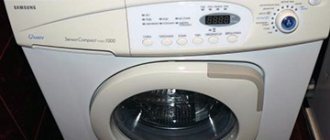
Repairing a home multicooker begins with studying the electrical circuit. Let's take a brief look at two photographs: an image of the pattern of the tracks and the installation of the printed circuit board, which generates the power supply voltage for the control panel and contains a relay that connects the heating element at the right times. Let's first consider the operating algorithm of the device, then we will discuss repairing the multicooker with our own hands. Informing readers, we bring information: equipment that allows you to prepare porridge by pressing one button is produced exclusively for the CIS. Polaris, Brand, Scarlett, Supra, Vitesse, Redmond - sonorous names, and a good half have nothing to do with the West. America recognizes the famous Philips; in Europe, too, the home multicooker has not yet gained popularity. We believe that the current state of affairs is caused by a war of ideas. The United States believes that an air fryer plus a microwave oven can replace the Universe of culinary household appliances.
Rules for using a multicooker
To avoid unexpected malfunctions of the device, you must always strictly follow certain rules and requirements. The sequence of actions when operating the device is also very important:
- choose the required recipe, prepare the necessary products;
- remove the bowl from the appliance, load it with food;
- lower the bowl into the multicooker;
- check that it is connected correctly to the electrical network;
- set the required program;
- turn on the appliance for cooking.
Operating rules
Each instruction manual for the device contains certain rules, such as, for example:
- The device should only be installed on a solid, level surface;
- connect the device only to a grounded outlet;
- before turning it on, be sure to check the tightness of the closed lid;
- after each cooking, the bowl must be thoroughly washed, dried or wiped dry with a towel;
- The lid and the pressure valve located in it also need to be washed well and wiped dry.
When should I contact the service center?
If any cases of the device turning off or its incorrect operation occur, you must first check everything step by step, from correct inclusion to detection of burnt food or dirty contacts. When using a multicooker, you need to check all your actions with the operating instructions.
Many faults, such as dirty or oxidized contacts, can be eliminated independently.
Attention. If the multicooker does not work, the desired cooking mode is not set, or it turns off on its own, before deciding what to do, you must immediately disconnect the device from the network.
Before contacting the service center, it is advisable to perform a number of manipulations:
- turn off the device and try to plug it into another outlet (if the problem is a faulty outlet, the device will work);
- check all wires for damage or maybe a wire has come loose somewhere;
- check the instructions to see if you are doing everything correctly;
- try emptying the multicooker, washing it, drying it thoroughly or wiping it dry with a towel.
If all these manipulations do not help the operation of the device, then you need to contact a service center. But remember that if the device is under warranty, the workshop may refuse free service and repair if the device was opened at home yourself.
Watch a video about multicooker repair
This is interesting: Drain check valve for a washing machine: types, principle of operation, how to install
Malfunctions that need to be excluded
- Valve clogged . Steam escapes through it. And if the valve gets clogged, the steam has nowhere to go, it stays inside. Then the device overheats and that’s why the multicooker does not work. The situation is quite common.
- The mode is not set correctly . For example, if you cook meat and select the porridge mode, there may be little water.
- Marriage of the Cup . The container may be deformed, which also affects the cooking process and the operation of the appliance. If the warranty is still valid, return the multicooker to the store.
The multicooker does not turn on: reasons and solutions
When studying the question of why the multicooker does not turn on or stops cooking, what to do in such cases, you need to pay attention to the causes of malfunctions. These reasons can be of the most varied nature and properties.
Checking whether the plug is inserted into the socket
If your home multicooker does not turn on, do not immediately panic. The reason may be the most trivial - it was connected to the network incorrectly or you simply forgot to plug it into the socket. It often happens the day before the next cooking, the plug is disconnected from the network (perhaps the socket is needed for another appliance).
Incorrect operation
Before turning on the multicooker for the first time, be sure to study the operating instructions in detail. Because even such simple actions as incorrect connection or incorrect installation of the bowl can cause the device to malfunction. When detecting incorrect actions, the device can:
- reset settings;
- do not respond to commands;
- sound signals;
- show error codes on the display;
- switch modes yourself.
Sometimes it is enough to turn off the device, check that the bowl is installed correctly, turn it on again and the device will work safely. But there are reasons for the incorrect operation of the device that are more complex, for example:
- the device detects the presence of breakdowns, as a result of which its protective functions are activated;
- improper operation, the bowl does not fit the device or is inserted incorrectly;
- ingress of bulk or liquid products into the mechanism;
- non-compliance with the established temperature conditions between different types of cooking (if the “frying” mode was working, then when switching to “cooking”, the device needs to cool down), otherwise the overheating protection will turn on;
- when cooking or stewing, a steam supply is required, even if the recipe does not require water, it must be added (at least a little) to create steam, otherwise the overheating protection will turn on again;
- Failure to comply with the proportions of the products included in the recipe, or a clogged pressure regulating valve, can also cause the multicooker to operate incorrectly.
Low or no mains voltage
If the multicooker does not heat, then often the reasons for this depend on voltage drops in the network. The device may display an error of incorrect operation or simply not turn on due to lack of voltage. You need to check the presence of light in the apartment and wait for it to come on.
Wiring problems
Wiring for a multicooker is usually designed for low power (no more than 3.5 kW). If the wiring itself is working properly, but the device does not work, you need to look for the problem elsewhere. But if there is a surge in voltage in the network, then the wiring of the device may display an error under the corresponding number (all error codes are usually indicated in the instructions).
Thermostat failure
Voltage surges almost always have a negative impact on the fuses, which can eventually blow. If this happens, it is enough to replace the blown fuse. For this:
- open the inside of the multicooker;
- find the heater;
- Having disassembled the button, you can see two colored wires, next to which there is a fuse under a special insulating tube;
- cut out the blown fuse with pliers, insert a new element.
An error occurred
When a malfunction occurs, some numbers or letters usually appear on the display screen. This device gives an error code like this. Knowing its decoding, you can understand the malfunction that occurred.
Repair and service specialists usually know the meanings of all codes. Some of the most common ones are often indicated in the instructions for the device, for example:
- E0, indicates a break in the temperature sensor wire, or the lid does not close due to improper placement of the silicone seal;
- E1, moisture may have gotten inside, the heating element has failed, or the relay contacts are clogged;
- E2, short circuit of the temperature sensor or broken wires;
- E3, moisture getting inside, break in the temperature sensor wire or missing bowl;
- E4, pressure sensor clogged, microcircuit fault found;
- E5, the system turns off automatically when overheated.
The microcircuit is broken
Often, cleaning the contacts of the thermal relay, which is responsible for heating the bowl, helps to find a solution to a malfunctioning device. It is quite difficult to get to it; you will have to disassemble the entire device, find it, open the contacts and clean it well with sandpaper.
If an error code appears on the microcircuits, you need to carefully study and inspect them. You may see problems such as:
- blackening of resistors;
- swelling of capacitors;
- peeling of tracks;
- violation of solder seams;
- soot formation.
If anything from this list is discovered, then you need to repair or replace the corresponding parts, and restore the tracks on the microcircuits by soldering.
Dirty contacts
The contacts of the device often oxidize; this can happen from boiling liquid getting inside when the bowl is loaded incorrectly or overloaded. The multicooker does not turn on often due to this reason. To clean oxidized contacts, you need to disassemble the device by unscrewing the screws on the bottom cover. Clean the contacts from dirt and grease residues with a soft brush soaked in alcohol, and sand with sandpaper.
Timer problems
The timer in the multicooker serves to count down the cooking time, as well as to delay the start of cooking. Correct operation of the device clock is disrupted if:
- the timer refuses to work in some cooking modes;
- The timer for the delayed start function does not work.
Here you need to take into account that the timer usually starts counting when a certain temperature inside the bowl is reached. It is recommended to close the multicooker lid, wait 15-20 minutes until the bowl warms up and only then load it with food.
Attention. If the timer stops working, especially after using the device for the first time, it is best to contact a specialist.
Lid problems
The presence of steam escaping from the device not through the valve, but partially from under the cover of the device, indicates that the lock is broken or the seal of the cover is broken, that is, the silicone seal is worn out. The multicooker itself can work as usual, but the “multi-cooker-pressure cooker” cannot turn on any mode other than “frying”.
The seal must be replaced by contacting a workshop or independently by ordering it from the manufacturer. If the lock is broken, this problem can only be solved at a service center.
Switching power supply for a home multicooker
The transformer is clearly shown in the figure. Carefully wrapped with electrical tape and filled with transparent compound. On the right is the input filter. Preventive measures help protect the device from input pulsations (a home multicooker does not create voltage fluctuations). On the board turned upside down, you can see: a resistor plus a capacitor is on the way to the transformer, protecting the low-voltage part. The heating element is powered in a separate way.
An interesting feature of the above diagram. The transformer carries two secondary windings connected in parallel. We believe that this exotic step increases the reliability of the device, since large consumption is not planned on the horizon (energy is spent on heating elements), the element base was created to serve as the basis for the construction of other (household) appliances, the multicooker went along with other factory jewelry.
Ringing a transformer is extremely simple. In the off state, the relay is open; it is unnecessary to disassemble the home multicooker. There is a fairly low resistance between the input terminals of the plug. There is a nuance, the photo shows: there is an electric filter in parallel. To understand whether the winding is faulty, you will have to find out the value of the resistor. When connected in parallel, the sum of ohms is less than the smaller resistance. The winding has a small rating, a maximum of two digits. The capacitor is unusual, if it breaks, the device will continue to work, only the protection will be reduced. The check is simple. Charge the input circuit of the home multicooker with direct current, and place a voltmeter in parallel with the battery. Did the signal disappear immediately or fade out? It must be the latter.
After the transformer there is a full-wave rectifier formed by four diodes. Even a schoolchild can ring the bell.
We remind you: the diode conducts the direct current of the multimeter in only one direction. In a similar way, the integrity of pn junctions of bipolar transistors is checked in a simplified manner. An arrow in an electrical circuit indicates the direction of flow of positive charges (not electrons). Avoid confusion.
Following the rectifier, the switching power supply circuit of a home multicooker includes another filter containing a resistor of the largest dimensions and a nearby capacitor. Then we see an emitter follower with a small zener diode and a resistor that selects the operating point. The proactive step matches the circuit to the load. Attentive readers will notice: the blue and red wires supply power to the home multicooker. White controls the resistor that energizes the relay gate. It is easy to trace: the signal approaches the base (middle contact), at the right moment the voltage generated by the rectifier and filter switches to the relay of the home multicooker. A zener diode is connected in parallel, since (we assume) the rectified voltage has a different rating: the power supply to the microcircuits and the relay is supplied at a different voltage.
We see the disadvantage of the circuit: part of the power is lost, the on state is dominant during cooking. As soon as the control signal disappears, the transistor breaks the connection, the relay opens, and the heating element stops heating. It seems that, using the information, readers will easily repair the multicooker with their own hands, simply by poking where they should be with the probes of the multimeter.
Please note that there is a piece of double wire in the place where the schematic outline of a fuse can be seen in the photo of a home multicooker. Passing the indicated place, a current of 230 V is supplied to the relay. We believe that the jumper replaces a fuse that protects the local network from excesses. In the working position, the printed circuit board is located elements down. As soon as the current exceeds the permissible limit, the wire will begin to melt, the metal will simply flow to the bottom of the home multi-cooker (nothing can cover up such an incident). If during dismantling the indicated sign is visible, a short circuit has occurred inside. The heating element of the home multicooker is broken, or the reason is different. Take some time to restore the jumper.
Take a multimeter and call the heating element. One end will open the relay. Resistance is found from Ohm's law. It is necessary to obtain the power of the spiral of a home multicooker for 230 V, then we will calculate the resistance. First, the square of the effective voltage value (230 V) is divided by the power (watts). The result will be 30 Ohms, the calculated numbers will be shown by the multimeter. It’s easy to check the relay if you turn on the installed program. A voltage of 230 V will immediately appear on the heating element after a slight click. If there is no effect, it is time to change the relay, or the control circuit is broken. The latter is easy to check: control voltage will arrive at the base of the transistor (middle terminal) via the white conductor. Finally, the output parameters of a switching power supply can be easily measured.
It remains to add: detachable connections are often filled with compound, and it is quite difficult to disassemble the soldering. The designs are typical, the authors are 100% sure: repairs of Polaris multicookers are carried out according to the standard scheme, just like the Cuckoo multicookers. The main thing in the process is to maintain the presentation of the equipment. Each manufacturer strives to complement the design with new decorations and complicate the task for the repairman. The sophisticated marketing policy is understandable: companies want to know whether the self-taught person looked inside the acquisition before taking it to the service center. Repairing a Mulinex multicooker will certainly not go unnoticed by specialists.
For a similar purpose, the process of disassembling the product body becomes more complicated. The screws are selected non-standard. They are often screwed on “for show” and do not hold anything. An inexperienced technician will certainly leave marks, voiding the warranty of a scratched device. The further development of events is obvious: increased fees, refusal to service the damaged product.
Is it worth repairing it yourself?
You can repair the Redmond multicooker yourself only when the warranty has already expired, and before that it is better to take it to specialists, but check visually what repairs were made so as not to pay extra money.
When repairing multicookers of different models with your own hands, the main thing is to correctly diagnose why the multicooker does not start working. The reasons are quite different:
- an error message “E1”, “E2” or “E5” appears on the display (read more about Redmond multicooker errors here);
- failure of a microcircuit, resistor or capacitor;
- the thermistor has burned out;
- extreme case - the power supply burned out;
- heating element failure;
- The latch on the top cover is broken.
In addition, you need to know how to disassemble the multicooker. Only after a visual inspection and then a thorough diagnosis can you understand what happened to the product and how to repair the multicooker. It will be useful for the home master to watch this video:
Common breakdowns
Most multicooker failures occur due to contamination of various contacts - liquid or bulk products have gotten inside the product:
- various cereals: millet, buckwheat, rice;
- sugar;
- pepper, salt.
Such breakdowns are not difficult, and they can be eliminated by doing the repairs yourself, but the user must remember that the device should not be plugged in until it is completely cleaned - the consequences can be very disastrous and cause serious damage to the family budget.
Appliance cover
Today we will tell you how to repair the Redmond multicooker. We will try to fix the lid with our own hands.
This is a standard breakdown for most types of multicookers. Damage to this cover is due to planned aging, that is, the manufacturer deliberately makes it unreliable. The finger on the button broke... The lid moved as a result of the temperature... The rods reach special grooves and the lid is inserted, but a few millimeters are missing...
We will need small magnets and will make a magnetic lid that closes, is held on by magnets and is opened under force. You need to glue 4 magnets - two on the lid and on the body of the multicooker itself. The multicooker bowl is pre-removable.
We select the points where we will glue the magnets. Degrease the surface with alcohol. First, apply high-quality glue to selected points on the body and press the magnets. Let's wait until the glue dries. Now, not forgetting to respect the poles of the magnets, glue them to the lid. In this case, it is more convenient to apply glue directly to the magnet. If there is a need and the height of the magnets is insufficient, you need to glue two magnets on top of each other. Here we are already acting empirically.
This, of course, is not the most common way to solve the problem of a broken multicooker lid latch. Basically, experts solve it by replacing the handle, if the mounting points are not damaged, but the handle itself is broken. Or, as an alternative, drill holes in the handle and fix it with screws. The choice is yours.
This is interesting: Why the vacuum cleaner began to work loudly: causes of malfunction, how to repair
Cleaning the multicooker
To clean the inside of the product yourself, you must first study and strictly follow the algorithm of actions.
- We remove the lid of the multicooker - it is made of metal or plastic (depending on the cost of the product), then unscrew all visible elements that are secured with screws.
- We clean the internal elements from loose substances by turning the multicooker over and shaking it gently but vigorously.
- If no liquid is found inside, then collect everything in reverse order.
When a blockage occurs at the bottom of the device, where the contacts are located, the action algorithm will be as follows:
- disassembly is carried out from below - unscrew the screws securing the bottom cover;
- disconnect the wires going to the software and heating board;
- unscrew the screws securing the heating elements - after this they should be easily removed;
- carefully, so as not to damage, dismantle the internal thermocouple;
- We clean all microcircuits, temperature sensors and boards from bulk products.
If you do everything without haste, carefully and carefully, then you can clean the Polaris or Mulinex multicooker yourself without any problems.
Microcircuits in modern multicookers
Modern multicookers contain 2 microcircuits. The first is located in the very center of the device inside the working cylinder and is responsible for controlling the temperature regime. The second is located at the bottom of the multicooker and is a power electronic board.
If you carefully examine the microcircuit, you can find some types of faults with the naked eye:
- swelling of capacitors;
- damage to solder seams;
- soot formation;
- track detachment;
- darkening of resistors.
The best repair option would be to completely replace the electronic board. However, you can repair the solder joint or trace of the chip by using #0 grit sandpaper and tinning the broken areas. The jumpers are recreated from the legs of burnt resistors. It is advisable to use varnish to fix solder joints and tracks, as it protects the board from leaks and oxidation.
Cleaning the multicooker valves
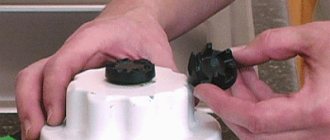
Problems with pressure in a multicooker can occur due to clogged valves. The operating instructions recommend cleaning the inside of the multicooker lid. We remove it by first unscrewing the central nut and wash the valve rubber, which was mentioned above.
Let's move on to cleaning the second valve. Using pliers or wrenches, unscrew the valve nut, remove the bushing and washer. Turn the lid over and remove the valve. Wash with cleaning agent and wipe the valve elements. We collect it in random order. Just pay attention: it is very important to place the valve rubber correctly, on the right side. We assemble the second valve, not forgetting that its rubber band should be on the outside of the lid. We return the lid to the multicooker, screwing it with a nut.
The multicooker does not work
In this section we will talk about possible breakdowns when the multicooker does not turn on at all. Option one is the Redmond RMC-PM380 multicooker. When the power is turned on, there is no indication, the buttons do not work.
Let's start repairing the Redmond multicooker with our own hands. Turn the device over and turn off the power. Unscrew the bottom. We begin the inspection with the thermal fuses, which are located inside, in the very heart of the multicooker. Usually they are covered with cambrics and dressed in wires of different colors. We test the fuse contacts with a multimeter. If they do not ring through, they need to be replaced. After replacement, we test the device. The indicator lights up, the multicooker is working. We remind you once again: the thermal fuse needs to be looked at first.
Changing thermal fuses
One or more thermal fuses are always located in the middle of the product, no matter what manufacturer the multicooker is, for example, from Panasonic. They are covered with cambrics, which in individual products are assembled into a common clamp, but most often they are not fixed.
Under the bowl in the multicooker there is a special unit, visually similar to a metal mushroom, which is supported by a spring from below: various fuses are located around it, you can get to them and fix them only by unscrewing the fastenings of the bottom cover.
When replacing a thermal fuse, only clamps are used: they cannot be soldered, because they are very sensitive to any increase in temperature. You can check the condition of the fuses using a tester to find out which one has blown.
Another temperature sensor is located in the lid; you can check it without opening the plastic device again: just measure its resistance while heating the lid. If there is no change in resistance, then you will have to disassemble and carry out unscheduled repairs of the multicooker lid and replace the part.
Every user should know that thermal fuses cannot be repaired; their specific purpose is to burn out when there is a sharp rise in temperature.
Control board repair
We have already explained how to remove the back cover earlier - you need to unscrew the fastening screws, then disconnect the thin wires that connect the control board to the power supply. Next, we disconnect the heating elements and, with special care, the thermocouple located in the center - this part is very fragile and is afraid of any mechanical impact.
To clean the board from carbon deposits, it must be disconnected, providing access from both sides. We carefully inspect it for the presence of grease stains; if there are any, wipe it with a cotton swab dipped in alcohol. For multicookers of different models, the arrangement of the boards may be different.
Microcircuits must be examined very carefully, using a magnifying glass, to identify areas of carbon deposits, violations of tracks and solder seams. If you don’t understand anything about this, then you shouldn’t contribute to causing defects on such a fragile and important part. Damaged parts are carefully desoldered and replaced with new ones, taking into account the matching markings. After repairing the boards of the Redmond multicooker, if you did it yourself, you need to varnish all the tracks to protect them from moisture penetration.
Problematic latches
Quite often, multicookers and steamers from the Redmond company have top lid latches that break. According to experts, this is one of the most common breakdowns. Some craftsmen claim that this is a defect introduced by the manufacturer, so that users buy new top covers after a certain period of use of the product.
Advice! Close the top lid of the Redmond multicooker with the latch already pressed and release it only after the lid fits tightly. Thus, the load will be much less.
If a breakdown does occur, then you shouldn’t immediately go to the store and spend money on buying a new lid, especially since with such a minor breakdown it’s pointless to go to the service center: they simply won’t undertake to repair the multicooker, advising you to install a new lid. There is an original method of repair at home that does not take much time and effort; you just need concentration, patience and the ability to work with superglue. In order to properly troubleshoot the problem, carefully watch this video:
Vitesse multicookers - negative, bad, negative reviews
Multicooker Vitesse VS-576 - reviews of breakdowns, defects, reasons for repairs, customer complaints
Marat Z.★★★ Advantages:
Beautiful appearance, carrying handle, many programs, ability to regulate time and temperature, removable cord.
Flaws:
Not very convenient selection of programs (1st button), low reliability, small number of service centers
Comment:
I bought this device for 4.5 thousand, the price is quite adequate for the declared functions. The box contains a recipe book and some accessories for use.
First of all, I tried to fry in it and was surprised by the fast heating and high power, so I burned everything first. Then, having gotten the hang of it, I started cooking soups and stews, and you can even bake a pie there. During operation, several annoying inconveniences emerged: 1.
You can select a program by pressing one button, which is inconvenient, since if you miss, you have to restart all the programs.2. The clicks during operation are very loud, you can hear them very well at night3. It is difficult to remove condensation from the rim.
As for the quality of cooking, it is excellent; preparing such dishes on the stove is much more difficult and requires more attention. But, after a month, the multicooker died, it simply stopped turning on, given that there are only 2 service centers in Moscow, one in Altufyevo, the other in Maryino , apparently she will be laid up for some time, which is a pity. Kuralesov
★★
Advantages:
It turns out delicious
. Disadvantages:
condensation!
inconvenient controls, inconvenient display and, as it turned out, disgusting build quality. Comment:
I bought it on sale for RUR 3,600. We’ve been preparing it recently, but there are already a number of problems. Condensation accumulates under the lid, but they could work on draining the condensate back into the container. The main drawback is that in the baking mode, the condensation somehow penetrated behind the glass and the display completely fogged up! This hasn’t happened before, but considering that it’s been used less than 10 times, this is definitely a bug! The price is clearly too high, now it would cost 2 thousand rubles. did not buy. :(I’ll add, one fine evening we decided to make soup. We poured everything in and filled it in according to the instructions and according to the volume. My wife put it on and went into the room to watch a movie. Half an hour later I went to the kitchen for water and there!!! All the walls were splattered with soup, there is a huge greasy puddle on the table and on the floor (((I was shocked, I opened it and realized that all the contents somehow ended up outside. I still don’t understand how this happened. Now it’s lying in the closet. ,
Common causes of failure of Redmond multicookers
Most malfunctions occur due to contamination of the device contacts. This can be caused by liquid or bulk products entering the inside of the device, such as:
- cereals (rice, buckwheat);
- sugar;
- salt.
This type of breakdown is the most harmless and will be easy to repair multicookers with your own hands. It is worth remembering that until the process of cleaning and assembling the structure is completed, the device must under no circumstances be plugged into the network.
Advice:
How to clean a Redmond multicooker?
To clean the device yourself, it is important to study and follow the sequence of actions.
- Remove the metal (plastic) cover, as well as other visible elements attached with screws.
- Clean the chips by turning the device over and gently shaking it off.
- Secure the lid and other upper elements.
If the clogged contacts are located at the bottom of the device, you must:
- unscrew the screws securing the bottom cover;
- disconnect the cables connecting the heating and software boards;
- remove the heating element by unscrewing the screws;
- carefully remove the internal thermometer without damaging the device;
- clean chips and boards from loose products.
If you follow the disassembly rules, cleaning the device will not cause much trouble.
See also -
Choosing an inexpensive but high-quality multicooker for the home
E4
Error E4 on the Redmond multicooker - a breakdown in the electronic board or a clogged pressure sensor. This error indicates a malfunction in the main board, which regulates all operating processes of the multicooker. If an error is displayed on a device that is turned on for the first time, then this is a software error - the device is defective and requires replacement.
Reasons E4
The appearance of error code E4 on the display is caused by several reasons:
- overheating of the bowl due to violations of operating rules;
- clogged pressure sensor;
- open circuit in the main board power supply;
- random software glitch.
In addition, the reason may be a manufacturing defect, when a circuit break is a failure in the manufacturing technology of the device.
Elimination E4
To eliminate the error, you need to carefully open the device, find the pressure sensor at the bottom of the multicooker and clean it thoroughly. Thin strips of fine-grained sandpaper are passed between the contacts and used to remove plaque and dirt.
If the device overheats due to a lack of liquid during cooking, it is necessary to increase the amount in the appliance bowl. To do this, you need to add a little sauce or water to the container and switch the device to the “Multi-cook” program. The device will continue cooking at a temperature of 90-95° C.
The problem of overheating most often occurs in the “Extinguishing” mode. To avoid this mistake, you need to make sure that when preparing stews, you add exactly the amount of water or sauce to the multicooker bowl as called for in the recipe.
In the event of a software failure, you need to perform several actions:
- Turn off the device from the network by unplugging the plug from the socket.
- Allow the device to cool completely, leaving it for 10-15 minutes.
- Turn on the multicooker again and start the same cooking mode.
This replaces rebooting the device and often helps to completely solve the problem. If the malfunction is caused by a malfunction of the internal elements, you will have to disassemble the device and try to fix the error manually:
- Unplug the multicooker and remove the bowl.
- Turn the device over and unfasten the bottom by unscrewing the fixing screws.
- Find the copper contacts in the thermostat and check them for traces of oxidation.
- Carefully release the elements and rub sandpaper between them several times.
Then you need to reassemble the device by installing all the components in the reverse order. If the failure was due to poor contact of electrical elements, then cleaning the temperature sensor should help.
Multicooker software errors
Usually, if the multicooker suddenly breaks down or refuses to turn on, a code appears on the display that indicates the cause of the failure. Typically, the cipher begins with the letter E and a number from 0 to 5 after it. The code indicates the possible cause of the malfunction, so further repair actions depend on this index.
The following message options are possible:
- E1. This means that the heating element has burned out; this happens when moisture, fat, or food particles get inside. You will have to disassemble the structure, clean it and dry it.
- E2. On Polaris models, this means a short circuit in the upper temperature sensor, which is mounted under the cover. In addition, this combination may indicate an open circuit, so you need to check the wire that goes from the display to the sensor. To assess its condition, you need to use an ohmmeter.
- E3. First of all, you need to check the tightness of the lid. It is also possible that the cause of the malfunction lies in the dirty inner surface of the case. It is necessary to disassemble the product, clean it and dry it.
- E4. The pressure sensor is broken. Most likely, the problem is that it is clogged, but a broken circuit is also possible. In addition, this error occurs when there is a malfunction in the microprocessor. This is the worst failure code, since you will have to check virtually the entire product.
- E5. The index is displayed when the overheating protection system is triggered. Perhaps you simply placed the device next to a radiator or a gas stove that was on. But the problem may also be hidden in clogged steam valves. If the appliance smells like smoke, then you have probably burnt the wiring.
When can you not do anything?
In the following cases, repairing a multicooker at home with your own hands is unacceptable. You need to take it to a specialized workshop:
- no reaction to actions;
- no temperature information;
- a different error code appears on the display;
- there is visible damage to the cable or housing;
- programming does not work;
- the multicooker does not heat;
- The lid is not sealed.
What problems can be fixed?
If E1 or E2 messages are detected, you must perform the following actions:
- Check the surface underneath the bowl. If there are drops of moisture or food crumbs, clean and dry the product.
- If everything is clean inside, then you need to turn the multicooker over and unscrew the fastener that holds the bottom cover. In this way you can disassemble the structure. Inspect all the insides; if there is dirt or moisture, remove it.
- If everything is clean inside, then you need to find a thermocouple - this is a tubular sensor with a connected wire. To clean, you will need fine-grit sandpaper (no. 0) folded in half. To disconnect the contacts, you need to press the top plate from the side of the adjusting screw so that you hear a click. After this, you need to insert the sandpaper and release the plate (let the contacts go back in). Then you need to carefully clean the terminals.
The easiest way is with error E3. To fix the problem, you need to turn the Vitek multicooker over and unscrew the fastener that holds the bottom cover. Then you need to take out all the insides, clean them and dry them. For quick drying, you can use a hairdryer, but with the setting on low intensity. Then assemble the structure.
The most difficult problem will be with error E4. To fix it, you will need to check all temperature and pressure sensors, inspect surfaces for dirt and moisture. Careful cleaning with sandpaper will be required. If you have some experience, you can try to do everything yourself, but it is better to take the device to a service center.
With error E5, overheating occurred in the Moulinex multicooker. If a problem is detected, you must immediately press the “stop” button (turn off) and also unplug the power cord from the network. Then you should open the lid and let the multicooker cool, you need to wait at least 20 minutes. At the end, it will be useful to assess the condition of the internal surfaces for contamination.
Do-it-yourself multicooker repair
If the multicooker stops responding to any actions, does not heat, beeps, does not heat up well, does not turn off, blinks or displays errors on the display, it must be inspected and, if necessary, repaired. This can happen with any brand of equipment, and it doesn’t matter whether it’s Samsung, Redmond or Vitek.
The main thing is to remember that you need to work with electrical appliances very carefully, observing all safety measures and be sure to remove the plug from the socket! Just turning off the multicooker is not enough!
Before you start repairing a multicooker, you should study the recommendations of specialists and watch a training video
What to do if the multicooker:
- It turns off before the appointed time - the cooking mode may have been selected incorrectly or there has been too much food. To do this, you need to turn off the device, check the recipe and restart it again. The thermal protection may also trip, the valve may become clogged, the food in the bowl will burn, or there may not be enough liquid to continue the cooking process. Sometimes the problem may be a violation of the integrity of the bowl or a sensor failure.
- It takes too long to cook food - most likely, the temperature is set incorrectly, there is too much food, or the bowl is not positioned as it should be. It is worth restarting the device, letting it stand for a while and checking the installation of the bowl.
- It switches to heating on its own - you can fix the problem by holding the “O” button and in a few seconds everything will return to normal.
- Doesn’t count down time - probably a software error has crept into the device’s operation or the timer is not configured. You need to carefully read the instructions and, if necessary, manually set the timer.
- It beeps - in this case, the contacts of the device may short-circuit. Sometimes it is enough to remove the battery for the squeak to stop.
What is the function of a thermal fuse?
The thermal fuse for a multicooker is one of its most important parts. It is a small piece of wire, indistinguishable from a resistor. The conductivity indicator is 10-15 A, based on the type of element. The highest temperature is 150-170 degrees. Exceeding the permissible limits will lead to the fuse burning and breaking the electrical circuit, which can be determined using a multimeter.
Operating principle and main structural elements:
The bowl sits directly on a heating element, which creates temperature from an electric current. Multicookers make little noise during operation. At the same time, due to the tightness, increased pressure is created inside, which can be regulated using a special valve for steam. There is a plastic sieve over the bowl, on which it is permissible to stew meat and vegetables. You can not only select the temperature, but also set it to automatically change during the cooking process.
The most common operating principle is heating the bowl from an electromagnetic coil. This method has high efficiency, and the design itself is reliable. A more modern heating system is that it is not the heating element that heats up, but the multicooker bowl itself. This happens under the influence of electromagnetic waves. Because of this, the multicooker bowl looks more massive in order to better retain heat.
Finding and replacing the thermal fuse
Most multicookers have several thermal fuses, which are covered with plastic to protect them from moisture. All of them are located inside the case, so to find the burnt element you will need to disassemble the device. To do this, you need to turn the multicooker over, find the fastener from below that holds the bottom cover, and unscrew it.
After the device is disassembled, you can see several wires inside; you need to find the one that goes from the electrical connector to the terminal of the heating element. The wire will go through a thermal fuse, which is located in a plastic thermal insulation tube.
In most cases, unsecured thermal fuses simply hang down, but sometimes they are fixed with clamps that are attached to a screw. Please note that fuses are very sensitive to heating, so soldering is prohibited.
In addition, manufacturers fix them using a crimping method, so the thermal fuses cannot be removed. Therefore, to determine the condition of each element, it is necessary, without removing them, to use a multimeter to determine the resistance level. Once the condition of each fuse is determined, the faulty parts must be replaced.
Replacing a thermal fuse using an example
Let's look at replacing one thermal fuse using a live example. There is a multicooker whose display does not turn on, initially we do not know what the problem is.
Let's disassemble the device. To do this, you need to unscrew one screw from the bottom and open the bottom cover. You can see that the design of the multicooker is extremely simple. Its insides can be divided into 3 parts:
- The power unit is a power supply and a relay switching heating element.
- Control board with display (which does not work).
- A heating element.
Let's look at the power part of the multicooker and its wires:
- The white wire from the network connector goes to the power supply.
- The red wire goes from the power connector through the thermal fuse to the heating element terminal.
- The black wire goes from the heating element terminal to the power supply.
- The red wire goes from the second terminal of the heating element to the power supply to the switching relay.
- Yellow is the common ground wire that connects the metal structures of the multicooker (external and internal casing).
- The white wire goes to the control board from the switching relay.
The figure shows wires by numbers
First you need to find out if the electricity is reaching the power supply. To do this, you need to connect the multicooker to the network and first measure the voltage at the terminals of the network connector itself.
Next, check the voltage between the connector terminal and the heating element terminal. We see that electricity does not reach the heating element through the red wire.
The red wire goes through the thermal fuse, most likely that is the problem. Let's take it off. To do this, you need to unscrew the screw from the metal plate with which the thermal fuse is attached to the multicooker body.
Unscrew the screw.
Let's look at the model:
- model – RY184;
- temperature – 184
OWITH;
- current – 10 A;
- voltage – 250 Volts.
Thermal fuse close-up
Disconnect the thermal fuse using wire cutters. We order a new element with similar characteristics.
The thermal fuse cannot be connected to the wires by soldering, so you need to make sleeves for crimping. They can be made from a radiator for a transistor. The resulting two plates need to be cleaned with sandpaper. And then bend them into open tubes.
Sleeves that came from the radiator
Using sleeves, we attach the thermal fuse to the wire by pressing it with pliers.
The fuse is fixed to the inner housing using a metal plate in which it is wrapped. It needs to be screwed back to its original place. After this, you can check the voltage at the terminals.
When we are convinced that everything worked out, turn on the multicooker and see the result.
Design and principle of operation
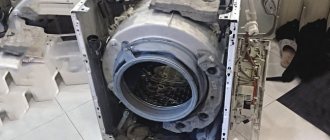
Before you fix your home multicooker, you need to understand its structure. The design includes:
- Outer casing (usually plastic or aluminum). All other structural elements are connected to it.
- There is a lid with a valve on top to release steam. The tightness of the connection is ensured by a rubber rim and a locking mechanism.
- There is a control panel installed outside. It often has a display. Buttons can be touch-sensitive or regular.
- It is controlled by a microprocessor. It is he who is responsible for turning the heating element on and off. Its operation is regulated by the control panel.
- Inside the case there is an electric heating element, usually one at the bottom, but there can be several. It is mounted in a housing and can heat up to 40-180 °C.
- Directly above it is a metal or ceramic bowl. It has a non-stick coating. It comes with a sieve with large holes - this is a plastic insert for steaming.
- In addition, the design includes a temperature and pressure sensor. It is installed between the bowl and the body, usually at the bottom of the structure.