Share on social media networks:
The chest of drawers can be used to store a variety of things. At the same time, in an online store that is located many kilometers from home, you can choose an option that will fit perfectly into the interior of any room. But these items are sold unassembled. Accordingly, after purchase they will have to be collected. The easiest option is to turn to professionals for help and pay for the services. On the other hand, this is not a very difficult task, you can handle it yourself, you just need to learn how to assemble a chest of drawers.
How to assemble a chest of drawers
Before moving on to a precise sequential instruction circuit, it is necessary to consider general principles.
First assemble the base body of the item, and then the remaining parts.
- It is better to start assembling any furniture, especially large-sized ones, from the largest parts, continuing downwards. In our case, first the main body, then the fastening of the drawers and other small aspects.
- Work exclusively on a flat surface to avoid problems with the relationship of the body parts to each other.
- Cover the floor with a protective material to protect both the furniture and the work surface from scratches.
- Some materials may be fragile, which is why you need to perform all actions carefully - slowly tighten the bolts, do not drop components, etc.
The bolts need to be tightened tightly, but not too much.
Necessarily! Perform assembly only in a well-lit area to avoid loss of parts and inaccurate measurements.
Preparing to create
Making a chest of drawers with your own hands begins with its design. Before making calculations, determining the appropriate size of the countertop, assembling drawers, etc., you need to choose a place to install the chest of drawers. Take a careful look around your room. Study the structure of the baseboards, see if there are switches, sockets, etc. on the wall, which must be taken into account when choosing the size of the chest of drawers. It is important that it does not cover anything and that nothing interferes with its use.
Making a chest of drawers with your own hands begins with its design. Before making calculations, determine the appropriate size of the tabletop, assemble drawers, etc.
Figure 1. Chest of drawers.
Next you need to choose the size of the chest of drawers. The most comfortable chest of drawers is considered to be one with a width of 80-130 cm and a height of 80-85 cm. The best chest of drawers is one that you would be comfortable using. If you can't figure out what your chest of drawers should look like, visit your local furniture store. Surely you will like something, and in the future you will be able to focus on the model you like.
Most often, home craftsmen make chests of drawers from wood. This is a relatively cheap and easy to process material. If you have never made furniture with your own hands before, opt for a wooden chest of drawers.
Next, you will need to create a project for your homemade chest of drawers. To do this, you can use special computer programs or draw it on paper. The main task at this stage comes down to determining what parts the chest of drawers will consist of. Next you will need to create a drawing. You can take the diagram in Fig. as a basis. 1.
A drawing is a must. If you can still do without a project, then you won’t be able to work without a drawing.
The drawing must show at least a side or top and front view.
It will be better if you can depict it in cross-section. Be sure to include the dimensions of each part. This will allow you to see how all the parts will fit, where indentations are needed, etc. When drawing up a drawing, it is recommended to focus on the following dimensions:
- thickness of wood or slabs – 1.6 cm;
- the distance between the outer parts of the drawers and the back wall of the homemade chest of drawers is at least 1 cm;
- a gap of 3 mm must be added to the dimensions of the inset facades, i.e. 1 mm for each individual end.
Return to contents
Inspect parts for defects
The path that furniture takes from production to the end user is usually multi-stage, and therefore no one is immune from defects. It is better to check the furniture for the latter immediately before purchasing.
First, examine all the parts of the dresser before assembling.
Sometimes the case may be scratched or slightly damaged, and sometimes the damage may be significant. The chest of drawers comes with an assembly diagram, so don't be lazy to check the package before starting work.
In addition, the instructions should have a picture of this chest of drawers.
Marking the mounting points for the guides
The principle of installing guides is much simpler than it might seem at first glance.
The telescopes (if you pinch the black antennae and pull out one half) can be disassembled into two parts, one of which is attached to the side of the drawer, and the second to the inner side of the chest of drawers.
Our main task is to determine the exact locations of these fastenings, screw each half with three screws and insert the drawer into the chest of drawers, thereby connecting the guide into one whole.
Required Tools
Some models involve “seamless” installation of all elements, which greatly simplifies the work. However, for reliability it is worth using fastenings such as nails and screws.
Use professional tools to assemble furniture.
To do the job well, we will need the following set of tools:
- A tape measure is a mandatory attribute; it is necessary for correct assembly and accurate measurements.
- We will also need a Phillips screwdriver that fits the size of the screws.
- It is most convenient to assemble the entire structure using a screwdriver. Since the self-tapping screws in the kit are of medium size, the drill chuck should not be less than 10 mm.
- A hammer will also come in handy.
Use professional tools carefully.
If possible, also use a level to assemble the structure perfectly accurately.
Assembly steps
After the initial inspection for defects, as well as equipping the workplace with light and tools, you must:
- mentally draw up an action plan guided by the principle “from big to small”;
- we start with the formation of the main body - the frame of the entire structure;
- Next you need to assemble the boxes;
- the next stage will be marking the installation of retractable mechanisms for drawers;
- after which you will need to correctly position all the fasteners;
- now - fronts for drawers and installation of handles;
- The final stage will be the top of the chest of drawers.
Important! The sequence of actions and the number of points in the plan may vary from model to model. Furniture is varied, which means the situation is individual.
Assembling the chest of drawers
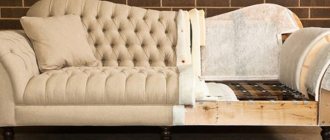
Pay attention to how placement on the floor is provided. Sometimes wheels can be used, which must be secured with separate screws. In other cases, legs are installed, or the chest of drawers stands on solid base strips.
Inspect the details of the chest of drawers.
It is with this element that the process should begin in order to immediately give the mechanism stability.
Assembling the chest of drawers
In order for the case to be strong and reliable, it is necessary to fix all the walls with tightening screws. The back of the chest of drawers is usually turned towards the wall of the room, and therefore is often made of thin materials; nails will be enough to fasten it.
First, assemble the chest of drawers.
If your specific design includes cross bars, they should also be installed at this stage. To ensure a flat surface and maximum compliance of the sides with each other, it is recommended to check the installation result with a level.
Before assembling the chest of drawers, it is advisable to read the instructions.
Assembling drawers
The correct assembly of the chest of drawers is determined by both the accuracy of the measurements and the accuracy of the installation of the entire structure. For greater convenience, you should immediately divide all the components into separate piles so as not to get confused.
Assembling the chest of drawers will not take much time.
First, we take short self-tapping screws (25-35mm) and connect the body with them. Then use slightly longer screws (40-50mm) to attach the bottom. It is advisable to complete the installation of the boxes by fastening the facades using self-tapping screws.
Standard assembly of a chest of drawers is a fairly simple matter.
But it is better to carry out this procedure after installing the roller guides along which the box will move. This way you will protect yourself from inaccuracies and errors.
Installation of guides
The key to quiet and smooth movement of all elements of the chest of drawers is the correct installation of the guide elements (ball or roller). Accurate measurements using a tape measure are necessary so that the drawers can be pulled out without touching anything or creating additional noise.
Secure drawers carefully.
Initially, you need to attach the runners to the inside of the chest of drawers, then the guides to the outside of the drawers. For successful fixation, you will need short-length self-tapping screws (no more than 30mm).
If you have drawers, the first thing you need to do is screw the guides to the inner surface of the chest of drawers (cabinet).
If the work done was successful and all the drawers are positioned correctly, all that remains is to attach the fronts and handles to them. You can use nails, screws, or even strong double-sided tape.
Developed chest of drawers assembly diagram
Before starting work on a wenge or other color model, you need to find out the presence of all parts. The manual should contain a list of what is in the package on a separate sheet. If something is missing, you should immediately contact the store where you purchased the item.
A necessary stage of assembly is checking the product for the presence of all important elements. This should be done at the stage of transferring the chest of drawers from the dealer to the client, since otherwise it will not be easy to justify the incomplete set of the product. If everything is in place, you can start assembly at any convenient time. Here are the instructions step by step:
- Read the manual. If you didn’t include it when packing the furniture, you can use advice from other sources.
- First you need to assemble the frame. The lower end is secured with the support of steel angles. They are also used to connect side walls. Screws are used to secure components. First of all, you need to screw them in with a screwdriver, which will speed up the process.
- Drill holes in the horizontal links to secure the cover. Screws with a diameter of 4 mm are used as clamps.
- Fold the pieces as directed in the instructions and insert them into the frame. Particular attention must be paid to the installation of guides along which the boxes will move. Before installing them, you need to find out the accuracy of the measurements.
- Attach the back cover. Often, fiberboard or plywood is used for this. To fix it, craftsmen mainly use nails. But to make a safe fastening, you need to use screws.
At the last stage, the handles on the drawers and other decorative components are installed.
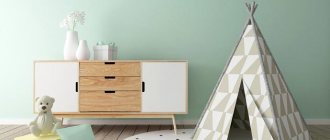
Where can you put a chest of drawers in the house (proper location)
The appearance and dimensions completely determine the place where the chest of drawers will be located most harmoniously and most conveniently. Since retractable elements take up a lot of space, this type of furniture should definitely not be placed in the aisle, near doors or in narrow rooms.
A standard chest of drawers will fit harmoniously into any interior.
The ideal location would be along the edge of the room next to other interior elements. The chest of drawers can also serve as an excellent table for cosmetics, in combination with a mirror, or as a good TV stand.
A common household item is the chest of drawers. This is a comfortable, functional, practical piece of furniture. Dressers differ in appearance and shape, but have many similar characteristics, including the assembly procedure. The chest of drawers is assembled according to standard rules typical for all types of furniture.
Dressers can be stationary or mobile. Mobile models are equipped with rollers with stoppers; they can be directed to different places in the room. The following groups are also distinguished:
- wall-mounted (stand near the wall);
- wall-mounted (they can be attached to the wall, for example, using a bracket);
- attached (stand next to the furniture);
- island (used as a partition).
The tops of the chests of drawers are also varied: a changing table, a built-in mirror or an ironing board.
Required Tools
Before assembling the chest of drawers, you need to stock up on tools. This will help you achieve the result of your work without being distracted by searching at the right time. To assemble such a piece of furniture, you do not need to have special equipment.
The main assistants will be:
- tape measure and pencil;
- screwdriver or screwdriver;
- hammer;
- pliers.
Sometimes you will need a drill. This does not happen often, since most furniture factories sell furniture with holes for fasteners.
How to use drawings
As a rule, everything is available; drawings of chests of drawers are made using the Compass 3D program, the file format of which is “cdw”. Therefore, to work with such drawings you will need the Compass 3D or AutoCAD program. That is, download any drawing of a chest of drawers you like and open it using one of the above-mentioned programs. The drawings show the main dimensions, so see if they will suit you.
Assembling drawers
Assembling boxes is a more labor-intensive and time-consuming process than connecting body parts. Since there are several boxes at once, it is important not to get confused in the details.
Components of roll-out boxes:
- two sidewalls;
- base;
- front and back walls.
Elements need to be grouped into separate piles to make the installation process easier and to avoid confusion.
The principle of assembling the boxes is the same as the frame: dowels and eccentrics. The sides are fastened to the walls. For wide drawers, a tie strip is added. It is attached between the front and back walls, protecting the base from sagging. A fiberboard base is nailed from below to the walls and tie strip.
When placing surfaces on dowels, a hammer is used. To avoid dents and chips, use a wooden block as a spacer. Hammer strikes are made not on the elements of the chest of drawers, but on the block.
The last stage is attaching decorative handles and facades. The facades are attached with short self-tapping screws. It is important to choose the correct length of screws so as not to damage the facade.
How to avoid installation errors
If the guide rails themselves are screwed at the same level, strictly opposite each other, and the drawer does not warp in any way during the extension process, then everything will “work” well.
This is the main rule in installing any box - maintain alignment.
The second rule is the need to correlate the height of the sides of the box itself with the height of the facades. Before you start “distributing” them in height. I recommend immediately making marks with a pencil on the end of the body, noting the position of the facades, in order to have a visual representation.
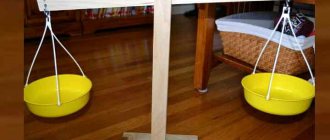
The main pitfall is the irrational distribution of the guides in terms of the useful volume of the box itself.
For example, in the photo, the drawers in the pencil case function absolutely normally.
But due to the fact that the top drawer was “lifted up” too high, its capacity was greatly reduced. It would seem that the middle drawer is more spacious. But no. The lower edge of the front of the top drawer “does not allow” the middle drawer to be loaded along the entire height of the resulting niche.
In fact, this point is not critical. And if you don’t highlight it, the owner himself won’t even notice. But the one who did it will definitely remember that it would have been better differently.
Installation of guides
The next stage of work will be the installation of guides. There are two types of retractable mechanisms: roller and ball (telescopic). Each of them has its own characteristics. But these designs are similar in one thing - they are separated before installation. One part fixed on the drawer ensures smooth sliding. The second part is mounted on the inner wall of the frame sidewall. Usually, the places for attaching the guides are already marked on the cabinet. If not, you will have to choose yourself. For this you will need a tape measure and a pencil. On both sides, equal intervals are marked on the walls of the housing. The guides are fixed at such marks with a screwdriver, which screws in the screws.
How to install a roll-out box step by step is shown in the video:
Finding the side parts and transverse elements
Let me remind you, we have a chest of drawers. We look for the side walls of the chest of drawers (cabinet) among all the parts. The instructions contain their size, so we take a tape measure and measure the length and width (believe me, this will be much faster than trying on every detail and looking for the right one).
If there are no instructions, we look for parts of the same size and compare the holes on the inside. They should be located symmetrically (except for the holes for the hinges).
So, the side parts have been found, we are looking for the transverse elements. Since the external dimensions are known to us (width and length are discussed before purchase), we are looking for shelves and lids of suitable width in accordance with the drawing, paying attention to the coincidence of the holes in the sides of the cabinet and the ends of the horizontal elements found. So, all parts of one structure (cabinet) have been found, let's start assembling.
Installation of drawers, completion of assembly
The assembled boxes need to be installed in their places. If the guides are properly secured, the drawers will slide in and out easily. Next, the stability of the structure on a flat surface is checked. The parts should fit tightly, without forming gaps or distortions, and the drawers should slide out smoothly. If necessary, tighten bolts and eccentrics.
The final touch will be the correctly attached plugs to the eccentric caps. This completes the process of assembling the chest of drawers with your own hands.
Drilling. Drawings and diagrams
When making your own chest of drawers, drawings along with a drilling diagram for all types of parts will also definitely come in handy. Regardless of what size chest of drawers you choose, the basic design looks universal for all cases.
If it is necessary to attach furniture to the wall, the back bar for attaching the tabletop must be turned at a right angle.
Marking of parts is carried out according to the diagram.
There is a separate instruction included in the package, from which you can take markings for ball and possibly roller guides. In addition, it is quite easy to find it on websites where suppliers display furniture fittings. For example, this may be a MDM kit.
Recommendations
A person who is not a professional can quickly and easily assemble a chest of drawers, following the general recommendations:
- Assembly begins “from largest to smallest”: first, the main body of the structure is assembled, and then the parts are attached.
- To avoid distortions, the chest of drawers is assembled on a horizontal surface.
- The work area is covered with material or film so as not to stain or damage the parts of the chest of drawers.
- Do not tighten the bolts too tightly to avoid cracks in the elements of the product.
To avoid the chest of drawers tipping over, if the structure contains a changing table, it must be attached to the wall using corners or brackets.
If the chest of drawers requires additional parts (mirrors, changing surface), then the assembly instructions will not change, a couple of new points will appear. Additional elements are attached to the finished product using a screwdriver.
In the article I will talk about what function a chest of drawers plays in the interior. I will list how to assemble it step by step with your own hands: a list of necessary tools, a diagram and instructions for the process.
Content
Decoration
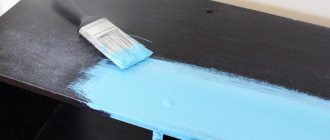
For chests of drawers made of wood, traditional finishing methods are best suited: painting, varnishing. The work is performed at the cutting stage or after final assembly. Models made from non-laminated boards or old surfaces are covered with self-adhesive films and veneer. Paint and varnish materials are applied to dry, cleaned surfaces with a roller, spray cans or brushes, in at least 2 layers. After covering the base, the facade is lightly sanded.
Among the original design finishing techniques are:
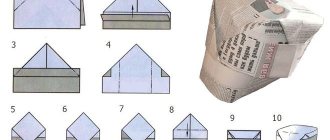
- pasting surfaces with posters with floral prints, fabric, lace, old maps, newspapers, notes or wallpaper;
- emphasis on the outer sides of pull-out elements (pasting drawers with bright textiles, painting them in contrasting colors);
- applying paint to varnished or laminated surfaces (alternating glossy and matte stripes);
- coating the chest of drawers with metallic paints, installing mirrors;
- artificial aging of surfaces using craquelure glazes;
- creating an “ombre” effect (a uniform or blurred transition from light to dark using paints or varnishes of different colors);
- use of stencils;
- lining the outside of the chest of drawers with wooden planks, bamboo wallpaper, coffee beans, colored pencils, old wooden rulers, beads;
- gluing moldings or other volumetric decorative elements;
- painting surfaces with magnetic or slate paints (relevant when making chests of drawers for children's rooms).
The above methods can be used when decorating both hand-made chests of drawers and when restoring old items. When choosing the final option, it is important to take into account the general style of the room and interior items (color, texture, compatibility of materials). Special attention is paid to the handles. For example, an interesting effect is achieved by replacing the usual accessories with ropes, pieces of leather, three-dimensional numbers or letters (house numbers, children's alphabet). Creativity and creative approach are welcome in this case.
What functional role does a chest of drawers play in the interior?
A chest of drawers is a multifunctional piece of furniture that remains relevant for many years.
There are various options both in the homes of grandmothers and among modern youth. Modernized models fit perfectly into any design. Modern and durable materials are used for their production. Thanks to this, it was possible to achieve a long service life. At the same time, the necessary level of comfort is organized, because the drawers can fit a large number of things.
Experts recommend choosing wood models. The material is highly durable, so it will last a long time without visible damage. However, if the family budget is limited, then it is permissible to purchase a chest of drawers made of plastic. It will fit perfectly into the decor of a bedroom or kitchen.
The size of a standard chest of drawers is small. That is why it can be successfully placed even in a room with a small square footage.
The chest of drawers has a large capacity in each drawer. It is a must buy for a large family.
The chest of drawers has a large capacity in each drawer
The furniture will not take up much space, but will delight you with its functionality. If you arrange things carefully, they will maintain a neat appearance for a long period of time.
Manufacturers offer models with open and closed shelves. Manufacturers also complement the furniture with stylish and original accessories.
Depending on the chosen decor, the style of the chest of drawers is determined. It can become a stylish addition to any interior. You can place vases or other decorative elements on top. Family photos look stylish. With them, any apartment becomes much more comfortable.
Depending on the chosen decor, the style of the chest of drawers is determined
We pick up the instructions or look at the diagram on the Internet
In our case, there are only two boxes. Let's unpack and first find the instructions. If it is not there, we are looking for at least a picture of the appearance of our piece of furniture. It can be pasted on the outside of the box. If this is not the case, then we can only rely on our own heads and these recommendations, or take a standard diagram as a guide:
First, let's look at the option with instructions. Depending on the responsibility of the furniture manufacturer, the instructions can be either detailed or brief (without part designations), but in both cases it contains an image of the appearance of the product.
Assembly should begin with the largest structure; in the case of a wall, it will be a cabinet with shelves for books.
How to assemble a chest of drawers yourself
When assembling cabinet furniture, it is recommended to use recommendations from professionals in this matter. Thanks to this, it will be possible to keep the furniture stylish and of high quality for many years:
- Furniture must be assembled from small parts . It is gradually possible to increase their size or connect them together.
- on a flat surface will prevent distortion .
- Parts may suffer from any mechanical damage. That is why you should first cover the work area with a soft cloth . Cardboard can also be used as a protective element.
- When tightening bolts, do not use too much force . Otherwise, dents or other damage may occur on the chipboard or MDF.
Assembling the chest of drawers on a flat surface will prevent distortion
Required materials and tools
You can assemble individual parts of cabinet furniture if you first stock up on the following tools:
- Roulette
- Phillips screwdriver
- Drill or automatic screwdriver
- Hammer
Today, to assemble some furniture samples you will also need to use special Euroscrews. Only they are suitable for connecting parts together reliably.
As a rule, manufacturers initially include Euroscrews in their tools. The product has a convenient structure and will last for a long time.
As a rule, manufacturers initially include euroscrews in the composition of the tools
Scheme and drawing
The guides can be installed inside the housing only after the side surfaces have been aligned. However, the preliminary marking is done with a pencil. It is recommended to use a tape measure to measure.
Self-tapping screws should be used to secure the guides. They will fit securely into the surface when using a screwdriver.
The drawers will only slide in smoothly if the guides are positioned correctly. Otherwise, during operation they may cling to each other. At the last stage of assembly, the horizontal cover is secured. To do this, you will need to organize reliable connections with the corps.
Drawers will only slide in smoothly if the guides are positioned correctly.
Step-by-step assembly by parts
Frame
Before starting manipulations, it is recommended to check the presence of all parts. Without them, it is impossible to assemble furniture quickly and efficiently.
The chest of drawers will include:
- Bottom
- Lateral and horizontal parts
- Some models must also have a plinth strip
- Rear wall
Some mobile models also include wheels. In stationary chests of drawers they are replaced with legs. They will need to be secured first. Only after this is it possible to proceed to further actions.
The last stage of assembly is fixing the back wall. For ease of further use, it is made of isorgalite or chipboard. Reliable fixation is achieved by using self-tapping screws or furniture nails.
After completing these manipulations, the assembly process can be considered complete.
Example of frame assembly diagram