All mothers have a lot of things to do, which they cannot always complete on time with a newborn baby. Leaving a baby alone in his crib is dangerous, and, for example, in the kitchen it is unlikely that you will be able to safely accommodate your baby. In this case, an excellent solution would be a nest for newborns, in which you can place the baby and move him around the house with you. The baby will always be under supervision, and you can calmly go about your business. Unfortunately, the offers on the modern market do not always meet the numerous requirements of responsible mothers: too high prices, poor colors, inappropriate shapes and other nuances make them think about sewing this necessary item themselves.
Cocoon design
By using a sleep cocoon, newborns will feel more protected and adapt to their environment faster. A newborn baby does not feel well in an open, free space, but the nest gives him the usual feeling of peace.
The child must constantly feel something soft around him, which is why the cocoon itself and its sides are very soft and completely safe for the baby. The nest must meet the criteria for children's products.
It turns out that making a nest for newborns with your own hands is quite simple, it all depends on the model you choose.
Safe decor
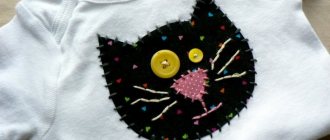
Many mothers strive to make not only comfortable, but also beautiful things for their babies. Newborns do not need special jewelry. Enough braid and ribbons. You can make soft bows and flowers. It is possible to use beautiful buttons and safe decor.
Small, sharp, poorly secured parts are not needed. They refuse fringes and other elements that can disturb the baby’s comfort. Children's clothes don't need extra decor. Jewelry often complicates the process of caring for the product and disturbs the baby.
Using a cocoon for a baby is an excellent opportunity to quickly adapt the baby to new conditions. The nest is easy to make yourself. This is not difficult and perfectly prepares the expectant mother for the arrival of the baby.
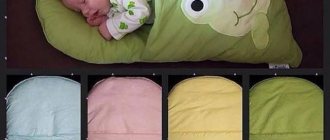
Basic criteria for a cocoon
- The fabric used for sewing must be hypoallergenic and completely natural
- When making a pattern, it is necessary to take into account the anatomical features of the child.
- The bottom of the cocoon must be elastic so that the development of the baby’s spine is correct.
The width and length of the cocoon directly depends on the size of the child; it should not be too big or too small.
Necessity of a nest
To sew a cocoon for newborns with your own hands means to build a cozy place for a child to sleep. In a cocoon, the baby sleeps much more calmly and longer, without reacting to irritants.
The baby will never fall out of the nest, even when awake, because the soft sides provide safe protection. The baby will begin to develop faster, raising his head and leaning on the soft sides.
Special devices
In addition to an improved fastener and a replaceable mattress, the cocoon can be “adjusted” with the help of handles that make it easier to carry the baby. They, like the retainer, are sometimes sewn on top of the fabric, cut out from the belt braid. It is also possible to make handles from the same fabric from which the cocoon itself is made. Then they need to be sewn on at the stage of assembling the product, inserting their tips into the seam of the bottom and top of the nest.
To avoid frequent washing of the cocoon, you can put it in a large pillowcase. It is best to sew it yourself, choosing the optimal size of the “clothes”, as well as a fabric that is pleasant to the touch.
We hope that our tips will help mothers and their babies rest more often and comfortably. Happy crafting and good luck with your creativity!
Materials for making a cocoon
- The fabric for the cocoon must be chosen from natural materials; soft cotton is ideal.
- Synthetic winterizer is used as lining.
- Threads matching the color of the fabric.
- If desired, ribbons or lace are used as decoration.
The pattern is made by hand; you can also use a ready-made pattern that can be found on the Internet. Use small pins to help you hold the fabric together before sewing it together. The pattern of a cocoon for newborns is very simple, the main thing is to know the sizes that are suitable for the baby.
Fabrics for the upper part of the product
The choice of material is based on an assessment of density, composition, and strength. The best option is pure cotton, which is not subject to rapid wear. Calico, flannel, and knitwear are best suited.
You can stop at linen, muslin, bike. As a last resort, use chintz. Fleece and plush are suitable for the outer part of the product. Combined options have recently become increasingly in demand.
Manufacturing process
The pieces of fabric need to be folded in half and placed on top of each other along the fold line. Then a pattern is placed on the fabric, the outline of which must be outlined in chalk. Then the cocoon is cut out, at least one centimeter must be retreated from the edge of the pattern.
A lace ribbon should be placed along the edge of the fabric; in the finished nest, the edge of the side should be trimmed with lace. The finished parts need to be sewn together, after which the fabric is turned outward.
The stitched parts must match, after which you can add the filler. It should be evenly distributed. Sewing a cocoon yourself is very simple; you can do the stitches by hand or use a sewing machine.
The finished cocoon can be taken with you on the road or into nature, the child will feel very comfortable and cozy in it.
Internal filler
It is imperative to sew a cocoon for newborns with a compacted base. To form the sides you will also need filler. It is permissible to use both friable and rolled printed materials of natural or artificial origin.
When choosing, be sure to take into account the time of year to be used. It would be a good idea to think about your baby’s tendency to allergies. For example, wool or feathers are natural, but the risk of negative reactions of the body to them is high.
Note!
- DIY satin ribbon bows: photos of original design ideas, step-by-step DIY master class
- DIY hair bands - ideas for decorating homemade rubber bands + step-by-step instructions for making them yourself
- DIY shadow theater: step by step how to do it at home! 175 real photos
For the bottom it is better to use rolled dense fillers:
- coconut coir;
- sisal;
- linen.
In industrial versions, artificial options are more common: latex, memory foam. For sides, holofiber, polyester microfiber, and synthetic fluff are more often used.
Artificial fillings are usually cheaper, more durable, and easier to work with. This explains the high demand for such fillers.
Detailed sewing instructions
- First, a pattern is made according to the selected shapes; it is important not to forget to mark the central part and immediately determine the bottom of the cocoon. The seam line is drawn manually.
- Two pieces of fabric need to be turned right side inward, then sew them together.
- The edges must be overcast and stitched so that they are neat and do not fray.
- Then the cocoon is turned inside out and stitched along the edges, leaving two centimeters for the lace ribbon.
- You can use padding polyester or holofiber as a lining; the corners of the filler need to be trimmed, they should be rounded.
- The open edges on the cocoon are best sewn by hand using a hidden stitch.
Obviously, sewing a cocoon for newborns is not difficult, the main thing is the desire and availability of all the necessary materials.
Transformable envelope for newborn
There are other versions of this product, for example, this one.
- Cut out rectangles of the same size from two canvases, rounding each one on one side.
Choose your favorite applique and sew it onto the front side of the top rectangle.
Place one cloth on the face, place sheet filler on top of it, cover with a second identical cloth, which must be placed wrong side up.
Sew along the edge of this multi-layered “sandwich”, leaving the bottom small side unsewn. Turn the mattress into a cocoon through it, sew up these edges on your hands or, turning the edge inward, using a machine.
Here is another interesting model.
It is created almost in the same way as the previous one, only at the top, ribbons need to be sewn to one and the second corner, another pair is sewn at a short distance from the data. It will be enough to tie these ribbons in pairs, and the child will have such a wonderful hood.
Some parents want their children to be fashionable from an early age. To do this, you need to sew the envelope using the same principle - pull the upper corners towards each other, secure this part with two buttons and loops. The dark fabric is designed as a suit, the light background will serve as a shirt. All that remains is to make a butterfly-bow and a handkerchief from red material, and sew these accessories in place.
And here is another envelope for a newborn. With her own hands, mom will sew half of the zippers to one and the other parts of the upper edge. When you catch them, this part turns into a convenient hood. Sew the hare's ears here, below - his paws, so that your beloved child looks even more beautiful here and the child is comfortable.
For the next option, you don't need a baby envelope pattern. You will do this with your own hands without a template. Cut out a rhombus from two fabrics, the length of which is 2.2 times the child’s height and twice the width. Sew these two fabrics together. If you want to make a warm envelope, then put padding polyester inside. It needs to be cut out without seam allowances, and the edges of parts 1 and 2 should be folded over this filler and stitched.
The seam at the top should be double, one line should be at such a distance from the second that the elastic would fit freely into the resulting space. Its ends need to be secured by sewing here. At the same time, pull the elastic a little to gather the fabric at the top of the envelope, turning the corner into a comfortable hood.
You can knit an envelope for a newborn using knitting needles. Measure the child's height, make the pattern a little looser so that the baby can freely stretch out his socks.
For such a product, use the following patterns:
- braid;
- honeycomb;
- garter stitch;
- elastic band 2x2.
Step-by-step instruction:
- Start knitting from the bottom, that is, from the part that will end up at the level of the baby’s armpits. Here you need to make a 2x2 rib pattern, that is, knit 2 knits, 2 purl.
Next, a “pigtail” pattern is knitted, and between these two elements there is a “honeycomb” or other three-dimensional one. On the left, make a cross elastic, performing two rows with purl stitches and two rows with knit stitches.To make holes for the loops, cast off 2-3 loops, in the next row make the same number of yarn overs here, and in the third row knit these yarn overs according to the pattern.
When you reach the top of the baby's back, perform the rib pattern, not only on the left, but also on the right. Here you need to knit, alternating, 2 rows with knits, two rows with purls.
Once you have closed the loops, fold the top edges together and sew them together to create a hood. If you have not knitted an elastic band here, then pick up a loop along the edge and knit it at this stage.
- Sew buttons on the left side of the envelope, fasten them, threading them through the pre-formed loops.
READ ALSO: Vest for girls with knitting needles: knitting methods, as well as patterns and descriptions of product options
You can make the fastener on both sides rather than on one side.
You can also easily knit a jumper for a newborn without a pattern. It consists of four rectangles; you need to make a cutout for the head.
Create a sample. Based on it and calculations, cast on the required number of loops for the front. Knit this rectangle, when you reach the armpits, pick up stitches on the right and left for the sleeves.
In the middle of the front, remove the loops onto a knitting needle; you will knit this part separately. Knit the sleeves together with the remaining front loops further. When you reach the back neckline, bind off the required number of stitches.
Having knitted the sleeves of the required width, close the loops on the right and left, then continue to knit only the back. Now all you have to do is tie the loops of the “tongue” onto the front neckline, here you will sew buttons to fasten the sweater on the child after he has been dressed. Sew the sleeves at the seams, this is what a wonderful knitted product you will get for your baby.
You can knit the two halves of the shelf separately, without making a “tongue” for the fastener. You will create it using loops knitted on the front placket and buttons sewn on the other side.
Knitting a vest for a child is even easier. Create two rectangular canvases - a shelf and a back. Sew them on the shoulders. Cast on loops at the neckline and knit the collar with an elastic pattern. Now sew the sides, and if the child is already big enough, then sew buttons here to make a stylish, original thing.
Benefits of a nest for newborns
The shape of the cocoon can be round or oval, and the sides of this product must certainly be soft.
You can use the cocoon anywhere and anytime, you can take it with you to a cafe or for walks, to nature, on a picnic, on a visit, or even just put it in the kitchen when mom needs to cook dinner. The base of the mattress should have an anatomical shape, with a small cushion located under the baby’s legs.
The relief of the cocoon follows the relief of the child’s body, which avoids stress on the head and back.
The design of the cocoon allows the baby to avoid unnecessary reflex movements, making him calmer. The pattern of a cocoon for newborns is very simple, so making a nest is not as difficult as it seems at first glance.
Review of popular models
Cocoonababy Red Castle
This is the quality of the French brand where it all began. The set consists of a pear-shaped base (polyurethane foam material, cotton pillowcase), a leg bolster (attached under the knees, adjustable for height), and a safety belt. The ergonomic dense base will not lose its shape. The position of the baby is such that the head and torso are located at the same level, and the slightly bent legs are higher. The weight of the mattress does not exceed a kilogram. The cocoon is universal in function (sleep, travel, wakefulness, visiting the doctor). Place him in a stroller for walks or in a crib, but don't leave him unattended! The only drawback will be the price - about 11 thousand rubles. Additional items included:
- Blanket CocoonaCover. A convenient device that fits onto the mattress and is fastened with Velcro at the bottom. The child will be comfortable, it warms well and does not slip. Made from 100% cotton.
- Spare pillowcase. It is necessary for frequent regurgitation, surprise when changing a diaper or feeding. It is easy to wash and does not require special care.
Cocoon "Yawn"
Our production “Cloud Factory”. When compared with, there will be the following differences:
- The price is almost 2 times lower (5-6 thousand rubles).
- Weight – “Yawn” is one kilogram heavier.
- Included: Our manufacturer has an additional pillowcase, which the French manufacturer does not have.
They are similar in appearance, almost identical in size. Our manufacturer has provided additional accessories: a “milk + stars” blanket, a “Lamb” rocking chair, a lightweight Simple cover, and a thick Heat cover.
Farla baby shell
Also a domestic product. The peculiarity of this model is the use of low elasticity polyurethane foam. This material is also included in orthopedic mattresses. There are cavities at its base for ventilation (the child sweats less and overheats in the heat). No glue is used when assembling the base (environmentally friendly Farla production). Additional accessories include: blanket, pillowcase, carrier.
Babynest for newborns
Swedish development since 2003. Many models are made in our country. There are large cocoons for twins. This is not an ergonomic mattress, but a soft flat nest with sides that can be tightened with a string. Like the classic cocoon, it is no less popular and wins in price (2 times lower). The base is made of cold foam, the cover is made of cotton, and the sides are made of holofiber.
Nest cocoon for newborn Sleepyhead
The company that came up with this product, Enfant Terrible Design, operates in Sweden. It was founded by Lisa Furuland, who came up with a multi-functional item for her young son. A special feature is the longest service life (up to 8 months, there are models up to 3 years). The non-ergonomic base and sides are made of antibacterial polyester fibers, and the removable cover is made of cotton.
- Sleepyhead Deluxe – cocoon from birth to 8 months
- Sleepyhead Grand – for older babies (8 months – 3 years)
The downside is the price. It reaches 11 thousand rubles. Using a cocoon for a long time is not always useful (and sometimes even harmful). Not all manufacturers are available on our market. It’s good that domestic products are not inferior to foreign ones in quality. World famous companies:
- Red Castle – France
- Woombie – USA
- Babynest and Sleepyhead – Sweden
Cocoon mattress from the manufacturer Woombie
The second most popular manufacturer is the American company Woombie. Their cocoon mattresses have similar properties. The price of these products is also quite high. Considering that the cocoon will be used for only four months, the cost turns out to be a strong argument in favor of finding a simplified analogue.
Cocoon - Mario's Cradle
The Askona company has developed a cocoon - the Mario cradle, the material is very high-quality hypoallergenic highly elastic foam, the nest was developed together with Russian neonatologists for a child from one to six months. The set includes two cushions for placing under the legs of a child for different ages and a removable cotton cover with a lock. Securing the child using a belt with silent Velcro. The price is 4,448 rubles, but the cost of the cocoon is often included in promotions.
Main types
The cocoon can be presented in the form of a pillow, mattress, diaper and nest. The pillow is most often used for the first days of a child’s life; it is very comfortable during feeding. The nest is similar to a cradle and is used as a sleeping place and as a carrier.
The mattress is famous for its orthopedic features, and the diaper has Velcro and a special design.
Ready-made cocoons are not cheap, so it is best to purchase the material and see detailed instructions on how to sew a nest for a newborn with your own hands.
Advantages
In the West, such products have long been popular. Russian mothers also understand that this is a very convenient device.
Main advantages:- swaddling takes less time;
- no extra folds are formed;
- prevents colic;
- the baby will not be able to turn around on his own;
- the child does not wake himself up with his hands during sleep;
- nothing restricts movement;
- does not cause an allergic reaction;
- You can unzip the bottom edge to change a dirty diaper;
- no seams on the inside;
- accelerates adaptation to the surrounding world.
How to care for a cocoon?
Individual elements of the nest can be washed in a washing machine at low temperatures.
It is not recommended to put foreign objects in the cocoon, since there is only room in it for the baby. It is not recommended to cover the baby in a cocoon, as it will be much more comfortable for him.
If you make such a nest with your own hands and at home, following the instructions, then you will provide your child with the coziest and most comfortable place for him. This is a practical and convenient product that you will certainly appreciate.