- May 4, 2020
- Crafts
- Elena Kerra
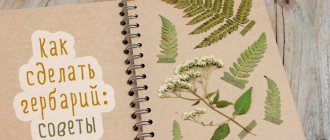
The Herbarium is a wonderful book that allows you to take a journey into the world of plants growing not only in your native country, but also far beyond its borders. Some people think that in our age, dried samples of flowers and herbs have lost their relevance, because now everything can be photographed. However, it is not. Not a single photo can compare with a natural sample (even a dried one).
Students are often asked to make a herbarium from leaves and flowers with their own hands at school. Kindergarten students are also sometimes asked to bring such crafts. Not only children, but also many adults enjoy collecting beautiful leaves and blades of grass, because they make unique decorative elements.
How to make a herbarium from leaves and flowers? How to properly prepare material? What crafts can be made from dry leaves? In the article you will find answers to these questions.
What it is?
Translated from Latin, herbarium means “grass.” It is a collection of plants dried according to the rules. Depending on their type, it can be either a single flower or branch, or a whole plant. Initially, herbariums appeared in Italy at the beginning of the 15th century. The founder of this art form was the famous botanist of the Pisa Botanical Garden, Luce Ghini.
To date, not a single copy created by his hands has survived, but some collections of his students still remain.
Almost all exclusive herbaria are registered in international databases. In addition, each plant is assigned a special letter code, which consists of six letters of the English alphabet. However, today plants are dried not only for the sake of science. Most people turn collecting plants, flowers and creating compositions from them into a hobby.
Under pressure
Professionals dry the plants using a special botanical press. It consists of two wooden frames. A metal mesh is stretched over them. The frames are held together with straps or screws. A jacketed sample is placed between the grids. The belts are getting tighter every day. The “shirt” needs to be changed regularly.
How to make a herbarium from leaves at home? Instead of frames, you can take a thick book. You should do the following:
- Gently straighten the leaf and place it between the napkins.
- Place this design in a book.
- Put some weight on it.
Napkins are needed in order not to stain the pages with the juice secreted by the plant. This method allows you to obtain a sample in approximately 3 weeks. To speed up the process, you need to change the napkins daily. Then the sample will be ready in 10 days.
Interesting facts about the herbarium
This term was first used by the French botanist Joseph Tournefort back in 1700. The word is derived from the Latin herba, which means “grass”. However, it was not he who invented the herbarium, but the Italian doctor Luca Ghini (founder of the botanical garden in Pisa), who was the first to come up with the idea of drying and attaching parts of plants to paper sheets with their description. This happened in the 16th century. Carl Linnaeus developed rules regarding the design of a herbarium. They are still relevant today. In Russia, the first herbarium sheet was made by Peter I. Our great sovereign wrote on it “torn in 1717.”
Those who believe that collections of dried plants are now of no use to anyone are mistaken. Even in the 21st century, a herbarium is necessary for specialists involved in the study of flora. Their collections are constantly updated. The largest herbarium is located in Paris (at the National Museum of Natural History). It has 8 million sheets!
But not only scientists need herbariums. They help children learn about the world around them and introduce them to the nature of their native land.
What is necessary?
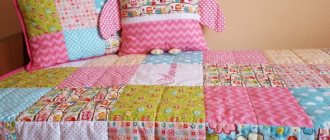
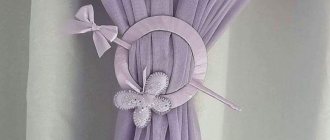
You can store the herbarium in a special album with files, which will contain not only dried plants, but also inscriptions about their origin. Albums can be purchased in special stores or made with your own hands. To do this, you need to take either very thick sheets of paper or cardboard and place them in files. There is no need to fasten them together. It's better to buy a regular binder. In addition, you can use dried plants as bookmarks in a book or create paintings or panels from them.
Some craftsmen also use herbariums to decorate boxes or plates, or make postcards from flowers.
Herbarium on one sheet
Most often this option is used for kindergarten. The children place dried samples of plants (for example, growing in a park) on one album sheet, and adults sign them.
This design of a herbarium made from leaves is also quite often used as a decorative element. The photo below clearly demonstrates what the decoration looks like in the interior of the room. The sample sheet should be placed in a beautiful frame under glass. Plants can be selected at your discretion. There are no restrictions here. The main thing is that they create a harmonious composition.
Some designers take several large leaves of the same plant, but in different colors (green, starting to turn yellow, completely yellow). Place each in a separate frame. From these elements the composition “Seasons” or “Mood” is created. Maple leaves are great for this purpose, as they have a beautiful shape. But you can take other plants.
Classification
A classification of herbariums can be made into several subgroups.
- Special. Such a herbarium is intended for a specific purpose. For example, a teacher at school can ask for the creation of a thematic selection of plants based on the material covered.
- Periodic. Most often, this distribution is done by season. For example, in the spring you can dry bird cherry shoots or cherry blossoms, in the summer - flowering medicinal or ordinary plants, in the fall - multi-colored leaves or bunches of rowan, and in winter - unusual branches from trees.
- Systematic. Most often, such herbariums are compiled on the basis of already collected plants. But they are placed in alphabetical order or by type. That is, everything is gradually being systematized.
- Thematic. Such a herbarium consists of certain specimens of species. Medicinal plants are included separately, such as chamomile, mint, sage or wormwood. Weeds or cereals can also be selected for the collection.
- Floral. Such a herbarium is collected in a specific place of residence.
- Morphological. In this case, an individual plant is collected in parts. In addition, you can collect the same plant at different periods of its growth.
Photo gallery: what kind of children's crafts and applications can be made from dry leaves
Dried leaves in children's applications often take the form of animals, birds, fish
If you stick identical leaves in rows layered on top of each other, you can get quite a three-dimensional image.
A win-win option is an image of plants themselves or landscapes saturated with vegetation.
If you choose carefully selected leaf shapes for applique, the picture can turn out quite professional
Rules for collecting plants for herbarium
Before going for herbs, decide what kind of herbarium you will make: for school, thematic, decorative. This will determine what herbs, flowers and leaves will be needed.
To collect plants you will need a spatula, a knife, a herbarium folder, paper sheets for laying out and recording data, and a pen.
Collect herbs on warm, dry days. You should not do this in the morning and evening - dew will interfere with quality drying. They cut or dig up two or three specimens of the same species, so that later they can choose the best option. Healthy specimens not damaged by insects are suitable. It’s good if they have both flowers and fruits. You cannot collect plants from the Red Book.
For decorative purposes, young plants should be taken; they will not lose color during processing. But sometimes faded flowers are also used to make the composition picturesque.
It is easier to create a herbarium from leaves than from flowers. It is enough to clean them with a damp flannel rag from dirt and straighten them. The leaves of plants with a silvery underside look great: coltsfoot, elecampane, poplar, and branches of ferns. Before drying, autumn leaves for herbarium are soaked in denatured alcohol or silicate gel to maintain brightness. Ideal flowers include violets, lavender, pansies, calendula, cornflowers, delphinium and yarrow.
Plants are either dug up by the roots or cut at an angle. The voluminous inflorescences are separated, and the thick rhizomes are cut lengthwise. When placed between paper sheets, the petals are straightened and the long stems are bent. Some of the leaves are turned inside out. Each specimen is marked, noting where and when it was picked. This rough label is used for the final description of the herbarium.
If you do not have time to process the raw materials, place the plants in water until the next day or wrap them in plastic and place them in the bottom compartment of the refrigerator.
It is more difficult to make a herbarium from flowers than from herbs and leaves. But if you know the nuances, the flower album will remind you of the sweet days of summer for a long time:
- To preserve the shade, blue flowers are placed in denatured alcohol for 30 seconds before drying.
- For luxurious dahlias, roses, asters, peonies and chrysanthemums, some of the petals are dried separately, otherwise they will fall off. They are placed under a load weighing 7 kg. And the rest are laid with cotton pads so as not to stick together.
- Tulips are dried either individual petals or whole. But they need to be laid under pressure slightly wilted. The same goes for rose buds.
- The juicy stems of crocuses, daffodils and tulips are cut lengthwise and the core is removed.
- The inflorescences of chamomile, marigolds, and gerberas are covered with cotton wool on all sides and placed in a “shirt” made of several layers of soft paper, and then under a 15 kg press.
- Small flowers (jasmine, marigolds, forget-me-nots, yarrow) are dried together with a twig, first lined with paper, then with cardboard. The required load is at least 15 kg.
Enthusiasts manage to dry the heads of ripe dandelions and other fluffy flowers for decorative purposes. To do this, thread a wire through the stems and lower the flower head into boiling water for ten seconds.
Conditions for drying a particular plant
The collected roots, so that they dry faster, are cut lengthwise with a sharp knife.
Flat drying is the most common. The material dried in this way can be used for decorative appliqués and albums.
How to make a herbarium yourself using the flat drying method.
Step by Step Actions
- What you need to consider before drying flowers: - Plants are collected only in dry weather; — It is advisable to find a place away from the roadway; — The time to choose is when the air has warmed up; - Only a fresh plant is suitable, without any signs of wilting.
- We choose a suitable book, such that our leaves can be placed freely on the page. Don't forget, if you don't want to ruin the book, and the plants dry out faster if you put them with clean paper on both sides.
- You need a press that will press the book. These may be other weighty printed publications.
Do you want your plants to dry quickly and reliably? Then it’s worth changing the paper every day for a week to clean and dry.
When the leaves dry, they release moisture, which is absorbed by the paper. If you do not change it, this will affect the quality and appearance of the material.
In the future, you can remove the plants from the book and store them in a dark place. Of course, losses are inevitable. But they can be reduced.
How long does it take to dry plants? A small amount of material will be ready in 2-3 weeks. For dense and voluminous ones, a month is needed.
In addition to the usual book, you can use a hot iron. How to dry them correctly? Lay the plant flat on a sheet of paper and cover it with another sheet. Press with an iron and then iron.
Interesting!
Blue/light blue flowers will not lose their brightness if placed in denatured alcohol for half a minute.
The density of the plant is achieved by letting it lie in a solution of PVA and water (4:1).
A solution of glycerin and water (60 degrees), 3:1, will preserve the shape of flowers. But at the same time, the solution makes the plants darker.
To dry the dandelion and prevent it from falling apart, it is picked when the box with umbrellas has opened slightly. Thread a wire through the stem and lower the dandelion head for 10 seconds. into boiling water.
The whole process takes just a couple of minutes if you use the microwave at the lowest power.
How to dry bulk material, for example, what to do with a flower bud? To do this, parts of trees or flowers are placed in boxes and covered with sand or silica gel. In this case, the buds should look down.
How to properly dry flowers for an outdoor herbarium? You need to do this in the shade. The flowers have their buds facing down. And the plants should not touch each other.
Suitable plants
- Herbarium leaves must be healthy and undamaged by insects.
- Carefully dig them out along with the roots; free the rhizome from the ground.
- You can make a high-quality and durable herbarium from leaves only if you collect them during the day in warm sunny weather.
- The sample must have blooming flowers, preferably fruits too.
- Don't limit yourself to just one sample. It is advisable to collect in reserve so that you can choose the best option for making an herbalist.
Necessary tools and materials for collecting material to make a herbarium of flowers: a spatula, a knife, an excursion folder (they can be made from two sheets of plywood/cardboard), newspaper “shirts” for drying, a label and a pen.
What to note on the label: name of the plant, name of the area and its designation (forest, field), date, who collected it (if there was a group trip, and if you collected it yourself or with your children, you don’t have to make such a note).
Using an iron
This electrical device is also often used to create a herbarium from leaves. Children will not be able to dry the samples with an iron with their own hands. Therefore, their parents should help them. You need to do the following:
- Lay out newspapers on the table. You cannot put a blanket under them, as the surface must be hard.
- Place a paper towel on the newspaper. You can also use a napkin.
- Place a plant leaf on a towel, straightening out all its parts. Cover it with a napkin and iron it with an iron. You need to keep the device on the sample for approximately 15 seconds. After this, you should replace the napkin and repeat the procedure.
If you use an iron, you need to make sure there is no water in it.
How to distribute herbs in an album
Making a herbarium begins with mastering the main rule: all plants are attached to the sheets of an album, and they are covered with tracing paper (there are special albums for herbariums that can be bought at a bookstore, in the stationery department).
To mount the material, you can use threads: white or green, paper straws and glue. But under no circumstances should you use plaster or tape.
How many plants should there be to make up a collection? What size the collection will be is up to you to decide. You can even compile many volumes.
If you don’t have a special album, you can make it yourself using regular album sheets and transparent files.
But in order to arrange everything beautifully, it is advisable that there be one type of plant on one sheet. If it is larger than the page, the material can be trimmed in several places.
Important! Each page must be signed.
How to make a herbarium with a child so that the baby will also find it interesting? You can decorate everything creatively by adding drawings.
See a few more ideas for creativity, perhaps this unusual design will inspire you to do something interesting and creative:
Collection design
Above we indicated what types of herbariums exist. According to the classification, select the leaves. For example, let's say you create a collection of fruit trees. You will need apple, pear, plum, cherry leaves and so on. To make the dried material more dense, keep it for about half an hour in a solution of PVA glue and water (1:1 ratio). Next, follow these steps:
- Take a herbarium album. It can be purchased at an office supply store. If you do it yourself, then place tracing paper between the landscape sheets. You can simply glue it along the top edge of each page.
- Place the sample on a landscape sheet. If you follow the rules, it needs to be sewn, but you can just glue it. There should be one plant on each page. If the sheet is too large, it can be cut into pieces.
- Write a description of the plant. If you have a photo, you can paste it next to the sample.
Fill out the entire album in the same way. If you create a herbarium of leaves for children with your own hands, you can create small compositions. Then it will be more interesting for the kids to do this activity. Come up with a plot for each sample.
For example, you can draw a vase and attach leaves as if they were in it. Another option is a hedgehog carrying samples you collected on its needles.
How to make a herbarium and decorate it beautifully yourself at home
The first herbariums appeared long before books with color photographs began to be published. At first, these were romantic attempts by girls to preserve the flowers given to their lovers.
Healers put dried plants in books and described their healing properties in order to pass on their knowledge to the next generation.
Along with the description of the properties there were legends and fictions about the magical powers of herbs. Such literature had drawings of plants instead of photographs.
Today, herbaria are used to obtain knowledge and develop skills. Both children and adults do this.
If the first children's herbariums are an attempt to make a craft, then adults can sell their works as exquisite handmade products.
Preparation stages
Before you go on a plant hunting trip, you should be well prepared.
Step-by-step preparation for collecting:
- Find out the weather forecast for the day you gathered to buy herbs for the herbarium. The weather should be dry and warm.
If it rained the day before, it is best to postpone the hike until the vegetation has completely dried out.
- Dress appropriately for the weather so you can fully work on the task.
- Have the necessary equipment with you.
It is not practical to go shopping for samples with just one bag. You should have digging tools with you and separate newspaper bags for each group of samples.
Stickers or sheets of notepad are needed to record the date, place of collection and type of plant.
When hiking, a small spatula will be useful to carefully remove the roots. A special knife or pruning shears will allow you to easily cut the desired samples.
A large, roomy backpack bag will allow you to keep all your equipment on your shoulders.
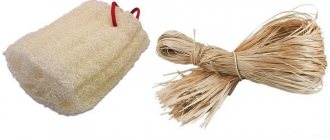
Absorbent cotton wool - an alternative to bulk substances
Flower petals are perfectly preserved when dried with absorbent cotton wool. Pieces of this material are placed between the petals. They must be separated from each other. The cotton wool must be placed carefully. Otherwise, the flower may be damaged and the petals will begin to fall off. Flowers are hung by the stems. Unlike creating a flower herbarium using bulk materials, you need to cut the plant completely. There is no need to separate the inflorescences from the stems. The flower heads take about 5-6 days to dry. Remove the plants a little later, when the stems are completely dry.
How to collect leaves for drying
You can collect both fallen leaves and those that have not yet finished growing. A sharp knife or scissors will be useful for this. Collection is carried out on a dry sunny day, after the dew has disappeared.
Collected wet leaves may become covered with brown spots after drying. This rule does not apply to the collection of mosses and lichens. They should just be collected after rain.
When collecting fallen leaves, be sure to pay attention to the following points:
- the leaves must be fresh, recently fallen from the tree;
- the leaf should be flat, not curled from old age;
- the plant must be clean in appearance, without damage or signs of rot;
- Leaf petioles should be fresh and not curled.
After collection, you must immediately begin drying.
If the collected foliage will be used to make garlands and other crafts that imply a three-dimensional appearance of the plant, then it can be dried on a sheet of paper. To do this, the leaves are laid out in one layer on parchment and left in a dry, dark place. After a few days, the leaves will begin to dry out and curl, taking on graceful shapes. With this drying method, the color of the foliage will change. It will become dull and faded, but this situation can be easily corrected with a can of glitter paint.
Drying plants in a book is the easiest and most familiar method. To do this, the leaves are placed between the pages of the book, without overlapping. The book is closed and a weight is placed on top of it. To protect the surface of the pages from moisture released by the leaves, additional sheets of perforated paper or paper napkins are placed between them.
This method is considered professional, as it involves the use of a special device - a press for drying plants. The use of such equipment allows you to preserve the structure of the plant, its shape and texture as much as possible.
A plant press is quite expensive, so you can look for alternative options for drying leaves at home. For example, a press made from books and sheets of paper will do. The plants are laid out in one layer on a sheet of parchment and covered with another sheet on top. For these purposes, you can use regular old newspapers. Now you need to put a load on the workpiece, for example, books.
The plants will dry under this pressure for 2–3 weeks.
This is, one might say, an express method. It allows you to dry the leaves in record time, while preserving their natural color.
The collected leaves are laid out on paper, trying to arrange them so that they do not touch each other. Cover the top with another layer of paper and begin ironing the plants at medium iron power. The drying procedure lasts only a few minutes. It is very important to turn off the steam function before ironing!
The disadvantage of this method is that leaves dried with an iron become thin and brittle, which does not allow them to be stored for a long time.
To preserve the herbarium as long as possible, the foliage can be “sealed” in wax. For this method, in addition to the iron, you will also need wax paper. To avoid staining the ironing board with wax, first place a sheet of plain paper. Then a waxed sheet is laid out on it, and the plants that need to be dried are placed on it. On top, the sequence of layers is maintained: wax paper is laid on the foliage, and ordinary paper is laid on it. Instead of sheets of paper, you can use soft fabric, which also conducts heat well.
You need to iron this “sandwich” at maximum power for 3 – 5 minutes. In order for the wax to stick to the plant evenly, the structure must be turned over and ironed on both sides. After the wax paper has tightly stuck together, you can turn off the iron. Cooled sheets of paper are carefully cut out along the contour of the plant, leaving a few millimeters from the edge. The paper is then removed and the dried sheet is laminated in a thin layer of wax.
How to dry prepared material
There are several methods that allow you to obtain plant samples while preserving their original appearance as much as possible. This:
- Between sheets of paper under pressure.
- Using an iron.
- In bulk materials.
- Naturally.
Methods 1 and 2 produce flat samples. When dried in sand or naturally, the plants become voluminous. For a herbarium (but more for beautiful crafts), leaves or flowers can be soaked in a solution prepared from glycerin (0.5 l), water (2 l) and 3-5 drops of detergent. Natural material should remain in this preparation for 4-5 days. After this treatment, the leaves become voluminous and plastic. Their natural color becomes more saturated. Let's look at methods for drying samples in more detail.
Drying flowers with bulk materials or volumetric
There are many substances that absorb moisture well. They are ideal for creating herbariums and flowers. Bulk materials help preserve the beauty of the petals. The most popular substances are silica gel, perlite, and borax. An alternative could be absorbent cotton wool. When dried in granular substances, the petals do not wrinkle and acquire a rich color.
Flowers are cut on a sunny day. If there is too much precipitation, drying will take longer. Therefore, it is recommended to plan the preparation of a herbarium exclusively during the dry period, before the rains begin. The best time is noon or a little later, when the dew has already evaporated.
Flowering plants are cut off along with the stem. Most of the latter is cut off, leaving very little. Carefully thread a thin wire inside. The end of the wire is wrapped in a ring. This method allows you to calmly connect the flower with the stem, which is dried separately.
The selected material is poured into a deep cup. You can take any cardboard box. Perlite, silica gel or borax are poured in a layer of one or two centimeters. The flower is placed on top so that the lower small piece of the stem is at the bottom. The petals are carefully sprinkled. It is necessary to ensure that they are separated from each other, and the substance penetrates deep inside.
On a note! Bulk material can be used repeatedly. The main thing is to leave it in an open container, for example, on a windowsill to dry.
When the flower is completely covered, the container is tightly closed. It should stand in a dry place for three to five days. The larger the inflorescences, the longer they take to dry. The dried flower is removed from the box using tweezers. The remaining powder on the petals is shaken off or blown off using a rubber bulb. The flower is connected to the stem.
Hot drying
It is an express method for obtaining a herbarium. The dried plants are ready the next day. This option is best suited for cornflowers. Other types of flowers may turn pale, losing their attractive color.
Hot drying is not only fast, but also simple. Flowers and leaves are laid out on paper. Cover the top with another leaf and iron it until the plant loses all moisture, that is, steam stops flowing. Large inflorescences, the petals of which contain a lot of moisture, can be dried in the microwave or oven. The temperature should not be high. It is necessary to carefully monitor the entire process and prevent the petals from turning brown.
river sand
It perfectly absorbs excess moisture and dries, but has one drawback. It lies in the fact that drying takes from two to three weeks. In addition, sand cannot be used immediately. It is first sifted and calcined over fire. The advantage is the availability of the material and the absence of the need to pay for the substance.
For containers, it is best to take a container with an opening bottom. This allows you to quickly get rid of sand. If zinnias, calendula, and gerberas are dried, the flowers are placed face down. The rest, on the contrary, are placed in inflorescences on top. Otherwise, there is no difference between the previous method.
How to dry flowers for a herbarium?
Special attention should be paid to drying the buds along with the stems. They do not dry as they grow. If a stem is needed for a composition, it takes a very long time to dry, but eventually becomes very brittle.
How to dry flowers for a herbarium:
- For compositions where the stems are glued to the surface before drying, they are cut into two halves lengthwise. Thus, a semicircle is obtained. It is in this form that the stems can be dried.
- If it is necessary to dry the buds for a volumetric composition, then volumetric drying is carried out. For these purposes, it is first necessary to separate the buds from the stem. Moreover, the cut should be diagonal, that is, oblique.
- Now the stem is split into two parts lengthwise to make a half. It is necessary to place the stem between the books and clamp it with a weight. In this state it will dry for 3 weeks.
- The bud is dried separately. To do this, you need to take a container and fill it with 2 cm of river sand. Next, the bud is laid out and with the help of a scoop, the petals are filled in one by one with rocking movements from side to side.
- In this way, it is possible to preserve the color, as well as the volume and shape of the petals. It is necessary to leave the rose or other flower for about 2 weeks. You can also use other fillers such as starch or semolina.
- Please note that river sand, before being used to dry plants, is first calcined for 1 hour in the oven. It is necessary that it becomes completely dry.
- It can be sifted to remove any heavy inclusions that may damage or cause dents in the petals.
Dry leaves
Selecting a dehumidifier
There are several popular desiccants - substances that quickly absorb moisture. Each has its own characteristics:
- Borax, corn and white flour. They are characterized by low cost. The duration of drying in desiccant is 8-18 days.
- Semolina. More suitable for small and medium flowers. Large petals may fall apart. The medium-sized inflorescences are perfectly preserved and keep their shape.
- Silica gel. Allows you to dry small colors in 2-4, and large ones in 6-7 days. It can be used repeatedly. The downside is the cost. For five liters you will have to pay 150-300 rubles. Before use, be sure to bake in the oven at 100 degrees for about 2-3 hours.
- Salt. Absorbs moisture well and has a low cost. It is often used to dry the herbarium, but you will have to wait about a month until the flowers dry. It is best to use fine salt, which can penetrate deeply into the petals.
If speed of drying of the herbarium is of paramount importance, it is best to use silica gel.
Storage and care
- In what places should the herbarium be left for a long period of time?
- In a sunny place
- In the attic,
- In the garage,
- In the trunk of a car,
- In a dark room
- In the closet,
- In the safe
- In the chest of drawers
- Under the bed.
Samples that are not fleshy dry within 5-7 days. The absorbent paper may need to be replaced every few days for denser plants. And save fleshy specimens after cutting in the longitudinal or transverse direction. In some cases, the inner fabric will have to be cut out, and only the outer part will be left for the beauty of the picture.
Is it possible to keep dried flowers at home?
The question is quite vague, as it affects several areas of life.
From an esoteric point of view, a herbarium is a treasure of energy that can give a person natural warmth. They improve immunity, maintain health and prolong life.
According to the teachings of Feng Shui, any cut plants bring withering and death, so it is not recommended to keep dried flowers at home.
There is an opinion among scientists that dry buds accumulate a lot of dust, which is difficult to remove from the surface, so keeping a herbarium in an apartment is contraindicated for asthmatics and allergy sufferers.
Photo gallery: dry plants in the interior
Herbariums look very nice in the interior
Framed dry plants blend very harmoniously into the interior
A large dried flower on the wall of a room can become an eye-catching spot of color.
Features of drying different types of flowers
For the drying procedure to be effective, please note that some varieties of flowers should only be dried in a certain way, as well as properly prepared. For example:
- Before drying, hold roses over steam for 15–20 minutes;
- to preserve small lilac flowers, use semolina, lowering the branch with the buds down, or put them under a press;
- It is better to dry bird cherry in separate branches, so they dry faster;
- Jasmine petals are very fragile and delicate, so they can only be dried naturally, without heat treatment;
- White apple buds may turn brown after drying, so choose pink varieties.
Tips for preserving a dry bouquet
To make dried flowers pleasing to the eye for a long time, follow these simple recommendations for storing them:
- do not keep bouquets in places exposed to direct sunlight, otherwise they will become too fragile;
- It is better not to place compositions in highly lit places at all, as they will quickly lose color;
- Ventilate the room regularly and monitor the humidity level, since neither living nor dried plants like dry air.
Caring for dry buds is not difficult, but since they quickly accumulate dust on the surface, remove it regularly using a rubber syringe. To reduce dust on your plants, coat the petals with hairspray or store them under a glass cover or in a transparent box.
Drying in water
Some flowering plants wilt quickly. They do not have time to dry out before withering. These include hydrangea, almost all bulbous, completely unblown carnations, lavender and so on. To obtain a herbarium from such plants, it is necessary to use combined drying - water plus air. Take some water into the vase. Four to five centimeters is enough. There should be a diagonal cut on the stem. Place the plant in the container, which will dry as the liquid evaporates. When the buds wither, the plants are removed. To prevent mold from appearing, the ends of the stems are trimmed. The plant is dried on cardboard, paper, or a napkin.
We create decorations with flowers
Often, not only people who collect flowers for the herbarium are involved in the procurement of plants. Some craftsmen are interested in preserving them and making exquisite jewelry, for example, a brooch with a dandelion, chamomile or rose hip flower. You need to know how to properly cope with such a task.
To begin with, the flowers are simply dried - using any of the methods listed above. Most craftsmen use books or a hand-assembled press from two thin planks and several bolts and nuts.
The main work consists of several stages:
- Selection of base. This can be a blank for a brooch or a small plastic container - at your discretion.
- Preparation - a white background is placed on the bottom. Some people use polymer clay, while others simply apply white enamel paint. In any case, you need to let the material dry.
- Using glue, fix the flower. There is no need to use a lot of glue - one drop is enough, just so that the element does not move during further work. It is advisable to use quick-drying glue. It saves at least a few hours.
- Pouring epoxy resin. Sometimes they install a small formwork around the flower to prevent the resin from spilling out. Pour a very thin layer of epoxy, being careful not to get it on the petals. Then their shape will be more natural and attractive.
- Removing air bubbles. The easiest way to deal with them is with a needle - the voids are carefully adjusted to the surface and pierced. However, experienced craftsmen rarely develop bubbles.
- After 48 hours, the epoxy resin will have gained sufficient strength for the decoration to be used. Transparent as water, it creates the illusion that the flower is stuck in a drop of dew.
As you can see, the process of drying leaves and flowers can be not only simple, but also quite interesting. Follow simple rules to get the perfect option.
DIY crafts
The herbarium can also be used to make beautiful decorative elements (usually dry leaves are taken). Children enjoy making appliqués. There are a lot of ideas for creativity.
To make a cute tree you will need:
- dry leaves;
- gouache (you can also use watercolors);
- glue;
- pencil.
Work order:
- On a landscape sheet, draw the outlines of the tree.
- Paint the trunk with brown gouache. Draw a face on it.
- Make the crown from dry leaves (just glue them in the right place). They can be arranged randomly.
- To create an autumn landscape, stick on several leaves as if they were plucked from the branches and carried through the air by the wind.
You can make the craft a little more complicated. To do this, draw a hedgehog under the tree. Instead of needles, glue brown leaves. You can make a hedgehog, as well as other animals from colored paper. Place a red squirrel on a branch and glue some mushrooms under the tree.
When creating applications, you can do without paints. In this case, all parts of the body of animals, birds, and fish are made only from dry leaves. They should be placed on paper so that the intended image is obtained. You can use not only leaves, but also plant seeds. If the shape of a leaf is not quite suitable for the craft, you can correct it a little with scissors. You need to work carefully, as dried natural material is very fragile. Any careless movement causes it to break and crumble.
Involving children
Children will certainly be interested in what you do with herbs and flowers. Doing a herbarium will help your child learn more about the types of plants that he sees during walks.
Kids will have fun decorating dried flowers using coloring paper. Grasses with small veins and details are suitable. To prevent thin ink paper from becoming wrinkled, it is placed on thick cardboard. The child places the dried leaf on dyeing paper, covers it with glass and takes it out into the sun. After a few minutes, the emerging imprint of the plant will become clearly visible on the blue leaf.
You can invite your child to make an unusual herbarium: an imprint of a plant on salt dough or modeling clay.
Wild onion herbarium
Autumn leaves decor
Leaves panel
Sources
- https://vplate.ru/hobbi/gerbarij/
- https://handskill.ru/478874a-gerbariy-iz-listev-svoimi-rukami-foto-poshagovaya-instruktsiya-sozdaniya
- https://www.NeoLove.ru/articles/housewife/Needlework/gerbarij_vybor_rastenij_sushka_oformlenie_gerbarij_v_shkolu_dets.html
- https://godacha.ru/bez-rubriki/gerbarij-iz-tsvetov-kak-delat.html
- https://godacha.ru/bez-rubriki/kak-pravilno-delat-gerbarij-iz-listev.html
- https://landshaftnydizain.ru/kak-eto-sdelat/1396-gerbarij-krasota-nepodvlastnaya-vremeni-kak-sdelat-gerbarij-svoimi-rukami.html
- https://suseky.com/gerbarij-iz-listev-kak-pravilno-sushit-listya-dlya-gerbariya/
- https://superarch.ru/usadba/posadki/kak-byistro-vyisushit-gerbarij
- https://hoznauka.ru/poleznye-sovety/kak-zasushit-cvety.html
- https://FlowersHoliday.com/sushka-cvetov-i-rasteniy-obzor/
- https://mschistota.ru/sovety/cvety-i-listya-dlya-gerbariya.html
- https://RoomPlan.ru/dekorirovanie/gerbarij/
Volumetric compositions
What other crafts can you make from leaves? A herbarium framed under glass is an effective decorative element. But dry leaves are great for creating other original compositions. The most popular is the panel.
You can do it with your children. To make an autumn panel, you will need:
- sheet of plywood or thick cardboard;
- glue;
- leaves;
- acrylic paints;
- brush.
Follow these steps:
- Cut a rectangle from plywood or cardboard. Choose its sizes yourself.
- If you used plywood, sand the edges with sandpaper.
- Make the background of the future panel. To do this, cover the rectangle with paint of the desired color. Wait until it dries.
- Glue bright leaves onto the rectangle. Arrange them randomly, creating an abstract picture. You can decorate the panel with rowan berries or dry ears.
If you don't like abstraction, create more realistic images. For example, you can draw a girl’s face and glue beautiful leaves instead of hair. There are a great many ideas for panels.
Dry leaves make luxurious autumn wreaths. As a base, the easiest way is to take a donut-shaped figure cut out of thick cardboard. You need to glue bright leaves to it. Add berries, dried flowers, and ears of corn to the wreath. It will turn out incredibly beautiful.