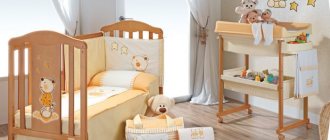
The bumpers for cribs are a kind of fence that protects the baby. They perform several functions at once: firstly, they prevent the child from falling, secondly, they protect him from cold and drafts, and thirdly, they prevent him from injuring himself on the crib railing as a result of an unsuccessful movement. The price of bumpers in stores in most cases starts from 1,500 rubles. A little expensive, especially considering that after 1.5 years they will no longer be needed. Therefore, it is better to make the sides yourself. Let's talk about this in more detail.
Why do you need bumpers in a crib?
The main purpose of crib bumpers is to protect the baby from injury. Young parents should understand that for the first couple of weeks the baby lies almost motionless in his bed, but before you know it, he will begin to crawl and roll around his crib, and will constantly beat his delicate arms and legs against the hard walls and headboard of the bed.
It’s better to sew a crib protector with your own hands, putting all your mother’s care and love into the product.
For protection, special soft sides are sewn - in the form of pillows, a continuous soft strip of fabric, or in the form of unusual shapes and even animals. They are attached from the inside around the entire perimeter of the children's bed and reliably protect the child from pain and bruises, and the sleeping place will become even more comfortable and beautiful!
Classic protective edges vary in height.
The sides also protect the child from drafts, which is also extremely important, because the baby’s immunity is still very weak, and the baby is susceptible to illness from the slightest draft. Dense soft fabric also provides partial sound insulation, and the crib will be calm and quiet, the child will be calm and will be less capricious.
Low sides (their height ranges from ⅓ to ⅔ of the total height of the crib) do not limit the baby’s view and look very neat.
The sides are made from natural cotton fabric or other soft and natural material suitable for the child, for example, from a flannel. Sintepon or holofiber is used as a filler, but it is not recommended to use foam rubber, as it does not dry well and can become a breeding ground for fungus.
Low protection is relevant for babies who have not yet tried to get up in a crib.
Fastening rules
The bumper can be easily attached to any type of crib, as they have fasteners in the form of ribbons, zippers, buttons or Velcro. After attaching the side, you need to make sure that the fasteners are secure.
The dimensions of the protective sides of a standard 140x70 crib are individual and have their own dimensions for each side. Before purchasing a bumper, you should consider the size of the crib.
Protective sides must consist of an anti-allergenic coating and real silicone filler. If you are not sure about the composition and material of manufacture, you should refuse the purchase.
Types of bumpers for newborns
Before sewing the sides into the crib, you should choose its type and shape. They may differ in size, height, and complexity of manufacture. And most importantly, they look different, so choose according to your personal taste.
When a child begins to climb and inevitably fall, it is more appropriate to use a reliable high protection.
Snake
An excellent choice for you if you are comfortable with thread and needle. A snake is a long round roller that is laid out at the bottom along the perimeter of the bed and looks like a funny toy.
You can make several rollers of different sizes and colors to create a composition, then they will be easier to wash.
The snake can be made in the form of just a bright multi-colored roller made of beautiful fabric, or in the form of an animal: a funny long dachshund, a family of cats, fish or a boa constrictor from a cartoon. The main thing is to show your imagination!
Particularly interesting are the bumpers in the shape of animal pillows, houses or cars.
Cloudy
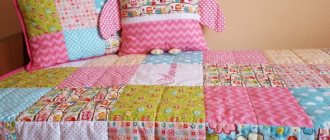
Clouds are a very popular form of sides among mothers. These are essentially bumpers in the form of small pillows in a crib for a newborn baby, but each pillow is shaped like a cloud. It is better to make such bumpers from fabric of a delicate shade, combining white with blue, pink, and cream. These clouds look incredibly delicate and are very easy to sew! You don't even need a pattern, just cut out a cloud from the fabric - the bottom is flat and the top is bumpy, and you're done!
Protective pillows for a baby crib are one of the affordable and simple ways to create the most comfortable conditions for your baby.
The clouds can be the same shape and size, or they can be different. It's up to your discretion. More often they make the same shape, cutting out all the clouds from one template, but they take different fabric and alternate, for example, white and blue clouds. It turns out very beautiful.
Prevents the child from being injured from contact with hard parts of the crib while awake and sleeping.
Pigtail
The name speaks for itself: the braided side looks like a large soft braid woven from three thick fabric rolls. It is easy to do, especially if you have a sewing machine. You just need to sew three long sausages from soft fabric, and it is better that the fabric stretches a little, then it will be easier to weave a braid. Fill the “sausages” with soft filling, sew at the base and tie a pigtail, and also secure the other end with threads.
They create a cozy and comfortable atmosphere for growth and development.
For a braid, you can use fabric of three related but different shades so that they combine harmoniously with each other. For example, soft turquoise, sky blue and cream. One of them may have a small pattern, but not all of them, otherwise it will turn out too colorful.
Modern young mothers strive to find for their babies not only high-quality and reliable, but also impressive-looking bumpers.
Animals
Another type of pillow is animals. There is room for your imagination to run wild! And making them with your own hands is much easier than you might think at first glance. The easiest way is to make square, rectangular or round pads, and make an animal out of them using fabric applique - to create the original face of a cat, dog, or owl.
When choosing sides, pay attention to the fastenings: elegant ties can come undone, and the baby can get confused in the ribbons, so the simpler and more reliable the fastening, the better for the baby.
You can make ears or horns, even paws. But you should not use decorative elements made of plastic and other hard materials: sew on eyes, nose and other details only from fabric, because the side must be safe, and any hard parts can injure the baby.
Borders for a newborn's bed are not only a way to protect the baby from shocks and drafts, but also an excellent option for useful decor for a child's room.
Fabric and fillings
A bumper on a bed for a newborn should consist only of natural fabrics, such as baby calico, chintz, synthetic padding. Natural quality fillings have a stitched seam that does not form lumps or unevenness, even after washing.
You should not purchase bumpers made of foam filling due to the high likelihood of developing allergies in children. Fillers with chemical fibers also tolerate washing well, but are not safe for children, so they should not be used.
Towels for newborns are made from natural materials.
How to choose a blanket envelope for discharge in the summer?
Photo of orthopedic pillows for infants: .
How to sew bumpers into a crib with your own hands
Once you have decided what your border will look like, choose the fabric. It should not only be beautiful and suitable in style, but most importantly, it should be safe, soft and pleasant for the child. Synthetic fabrics lead to allergies, irritation of the child’s skin, fungus develops on them, and other troubles. So the material must be exclusively natural and high quality, this is the main requirement. The following materials are suitable:
- Satin;
- Cotton;
- Plush;
- Bike;
- Calico;
- Ranfors;
- Chintz;
- Bamboo.
Modern fabrics and a wide range of different designed crib bumpers make it possible to choose the ideal option for any interior.
Be sure to touch the fabric, make sure of its natural composition, pay attention to the threads, their strength and weave.
As for the filler, there are several options:
- Sintepon is the most inexpensive, accessible and widespread material for children's toys, handicrafts and pillows. It is sold at any fabric store and is perfect for making borders.
- Holofiber is a more modern material, similar to padding polyester. It is more expensive, but its quality is also higher: the product will dry instantly, is completely non-toxic and safe for children, holds its shape perfectly and is highly durable.
- Periotec is another new material that is being used to make a variety of soft goods. It is also similar to padding polyester, but much more expensive and better in quality. Perfectly keeps its shape after washing, does not wrinkle, does not deform. Hypoallergenic, suitable even for sick children prone to allergies and irritations.
The best thing for a child is natural.
This rule also applies to crib bumpers. When you have selected the fabric and filling, you should choose a pattern. There are many ready-made patterns and diagrams on the Internet, but in fact, you can make the bumpers for a baby crib with your own hands, without a ready-made pattern, but on your own. Simply decide what shape the border will be, draw the shape on a large piece of paper and cut it out. That's all! You have a blank that you will need to trace on the fabric, cut out, sew the halves together and stuff with filler.
Pattern for a baby pillow in the shape of a cloud.
It is more important to choose the right size. Determine it yourself. Take a centimeter and measure the height of the side: the product does not have to reach the very top of the sides of the bed, it can only reach half, the main thing is that the baby does not hit. Measure the desired length around the perimeter of the crib. You have received the right size.
Sewing protective bumpers for a newborn's crib is often done by expectant mothers, their close relatives or friends.
Multiply the resulting amount by two, since the sides will be made of two halves. And if you make a braid, then do it in three times, because it is made from three long strips. Only when you calculate the size, go for the fabric, knowing how much of it you will need. Take some extra fabric, just in case.
Proper combination of high and low sides, as well as their timely use, will make the baby’s life as comfortable and safe as possible.
Choosing fabric for sides
When choosing bed rails, you should start by studying their composition. After all, no one wants the presence of harmful substances to negatively affect the health of the child.
First you need to analyze the fabric of the thing. She must “breathe” to maintain the air temperature in the crib, which, in turn, must influence the baby’s temperature. Also, such fabric is necessary so that if a child rests his face against it, he can breathe relatively calmly. There are several optimal choices:
- Chintz.
- Calico.
- Satin.
How to tie bumpers on a baby crib
There are several ways to attach the bumpers to the crib. It is important that they stand firmly in place and do not crawl all over the bed. So the most reliable and easiest way is ties. You will have to cut small strips from the remaining fabric, sew them along the edges and turn them inside out, and then iron them. Sew the resulting laces on the back side of the sides, where the crossbars of the crib are located, so that each lace is firmly tied to the crossbar. The more of them there are, the stronger and more securely you will tie the sides.
Buying or sewing protective crib bumpers for your baby is a parent’s decision for their baby.
The second option is Velcro. You will have to tinker with them, but when you remove the sides for washing, you will not have to untie the knots on the strings. To make Velcro sides, you need to sew thick strips of fabric with Velcro sewn onto them from the back. In the same way, you can use snaps, buttons or even a zipper.
Removable covers are made separately, and it is important to measure the workpiece correctly so that the cover fits - does not tighten the pillow and does not dangle on it.
To sew fastenings in the right places, first sew the sides and try on the finished product on the crib. This way you will see exactly where to sew ropes, Velcro or other fasteners.
Step-by-step instruction
The work of creating a side for a crib can be divided into several stages:
- creating a pattern and preparing fabric in accordance with it;
- directly sewing and filling the finished product;
- decorating things.
Let's look at each of these stages in more detail.
Preparing and cutting fabric
Before you start working, you need to create patterns from thick paper. They should repeat the outlines of the pieces of fabric that will make up the future product. To avoid confusion with sizes, it is better to download pattern layouts on the Internet and then transfer them to paper.
DIY crib protection
We’ll tell you in more detail how to sew a “bumper” for a crib with your own hands without a pattern, the easiest way for those who rarely sew and don’t want to spend too much time on this process.
- So, take several types of fabric, for example, three colors. Using a centimeter, measure to what height the “bumper” should reach, and take this figure as a basis: this will be the height of the side of the square. Take one type of fabric and fold it in half, right side inward.
- Cut out a square (the side should be the size you got when measuring the crib).
- Separate the two halves, fold the edge on one side about 5 mm on each, and stitch. Then reconnect the halves.
- Sew three sides together and leave the fourth (with the finished edge) unsewn.
- Sew a zipper, Velcro or buttons to the fourth side so that you can remove the filling or wash the pillowcases separately if desired.
- Turn the pillowcase right side out.
- Take four pieces of fabric or wide satin ribbon, about 30 cm long, and sew them to each corner of the pillowcase.
- Now fill the pillow with filling and fasten it. You will get a square pillow with ribbons at four corners.
- Sew a few more pillows in the same way.
- Now, using ribbons, tie your pillows into a long round dance, alternating by color.
Your bright and beautiful side is ready!
What is it needed for
Borders for the crib are necessary for parental concern for the baby. They will help eliminate the need to check the child several times a night, as well as from constant monitoring and distraction from household chores during the day. After all, when the baby is active, he can toss and turn, roll from one side to the other, and this is fraught with bruises. The bumper helps prevent the development of traumatic situations.
In the photo - a bumper in a crib for newborns:
Among other things, a child may roll over and hit the bed frame while sleeping or resting, which will contribute to his fear, moodiness and restlessness. With the bumper installed, this will not happen, and parents will be calm about the physical and mental health of their child.
Sides made on the basis of soft filler have gained considerable popularity. But do not forget that in addition to advantages, they have disadvantages. They are made in the form of pillows with ribbons, which are attached to any part of the crib and have certain functions.
For security
The main purpose of this protection is to protect the child from through blowing and all kinds of falls. If the crib is located near open sources of cold air, the installed side will serve as reliable protection from external factors.
Also, the bumper on the crib will not allow the baby to stick through its bars, which will help avoid getting stuck and bruised between them. A protective side, hung throughout the crib, promotes a peaceful sleep for the baby, since the fence can distract him from external irritants.
The disadvantages of a protective side for a baby, which is attached along the entire length of the bed, is that it blocks the outside world from the child, as a result of which every approach of the parents can frighten him. It is better to use only a partial bumper.
Read here for size standards for children's blankets.
For development and motor skills
An important component of the bumpers is its functionality, which will serve as a developmental factor for the baby. If you hang bumpers with printed drawings on the crib, the child will begin to develop faster and will be able to distinguish objects and details. Protective pillows of different colors will contribute to the child’s ability to quickly shift his gaze, and will also help develop concentration.
The main rule when buying bumpers is to choose not flashy colors with a small pattern, so as not to irritate the baby’s not yet fully formed eyeballs. Developmental boards are often equipped with different sound signals, light illumination, and small adhesive toys for training fine motor skills of the fingers.
Product care rules
You need to take care of the bumpers in the same way as you take care of children's bedding and pillows. They need to be washed regularly; you can simply wash them along with your baby’s bedding. If the sides are made of natural fabric with good filling, then they will dry quickly and will not cause any trouble. You can wash them entirely without removing the filling from the covers.
It is important that what you make yourself is of high quality and reliable and safe enough for the child.
Wash as soon as it gets dirty, and if your baby doesn’t get dirty, then just wash it once a week. Choose the washing mode yourself - the usual one, as you usually wash children's clothes. Feel free to machine wash, but use a special powder or gel for washing children's clothes. Dry the product thoroughly. With such simple care, the bumpers will last a long time, and when the baby grows up, they can become decor for his bed!
The fabric for the bumpers should not only be natural and safe for the child, but also pleasant to the touch, because the delicate baby skin will come into contact with it.
How to choose fabric
The choice of fabric for bumpers that you plan to make yourself must be approached responsibly. It must meet several criteria on which the comfort and health of the child depend. Here they are.
- Softness. Textiles should be soft. Under no circumstances should it rub the baby’s skin or cause him any discomfort when touched.
- Hypoallergenic. Under no circumstances should the fabric cause allergic reactions in the child. Many synthetic or semi-synthetic materials suffer from this, so for sewing it is better to give preference to natural textiles.
- Color. At first glance, this is not the most important parameter. However, with bright sides, on which interesting drawings will be applied, the baby will have much more fun. For girls, soft, warm colors (for example, pink, light purple) are more suitable. For a boy - more contrasting and dark (blue, red, green).
The following types of fabrics best meet the listed criteria:
- natural cotton;
- calico;
- flannel;
- chintz.
It can also be sewn from linen. However, it must be selected very carefully. Linen has a rather rough texture that can cause discomfort for the little crib occupant. To create a side it is necessary to select the material where it is least expressed.
Ideas for beautiful bumpers for a newborn crib
Open pictures on the Internet, and you will be surprised at how many unusual and beautiful bumpers you can make with your own hands! Owl, dogs, cats, flowers, bright pillows, quilted “bumpers”, clouds, bright braids – a huge choice. The main thing is your ideas!
Take a walk through a fabric store and bright, beautiful children's materials will definitely inspire you with ideas. Treat this process as a creative flight of fancy, and a successful idea will come to you, and the result will delight you for a long time!
LiveInternetLiveInternet
Wednesday, September 04, 2013 15:05 + in the quote book HOW TO SEW A BAND ON A CHILD'S CRIB. Author: Olga Dudoladova, based on the website Having visited many stores in order to buy a bumper for a crib of exactly the configuration I would like, and not finding one, I decided that it would be much easier and cheaper to sew such a bumper myself. In my model I could do everything I needed. This is what ended up happening. And now - detailed instructions for making a bumper with your own hands: You will need fabric - 5 - 5.5 m (width 110cm) and foam rubber - 2 m (width 150cm). The thickness of the foam rubber is 1 cm. The amount of fabric depends on its width. The fabric needs to be washed for it to shrink. Cut the fabric according to the PATTERN. In principle, I didn’t make a pattern - I just drew the crib’s measurements directly with a pencil on the fabric. I advise you to measure your crib first, as sizes may vary. Sew by sewing in the frill. You don't sew up one edge. You don't have to do the frill. And you can make it either from ribbon in color, or from the same fabric. Mark the foam rubber. I drew with a thin felt-tip pen. Cut it out. The size of the foam should be slightly smaller than the size of the fabric - about 0.5 cm on each side. Stuff the foam into the case. When I sewed the headboard in the first version, I cut out the entire foam rubber for the entire headboard. And then I got tired of putting it in the case and adjusting it to size. Therefore, in the second option, I cut the foam rubber vertically in half, and accordingly made a seam on the cover and it looked like two halves. For the same reasons, the solid sidewall is divided into 2 parts by a seam. In the first version, I left the side seams unsewn and realized that it was much easier not to sew the bottom - it was easier to stuff the foam rubber in. Sew up the bottom (what was not stitched). You can use a machine, but I sewed it by hand, since you can quickly rip it open and wash it at any time. Sew on ribbon ties. It is better if at this moment you already have a crib at hand so that you know exactly where to sew. But as a last resort, you can sew on the corners and in the middle. In addition to the whole side panel, I also sewed the same thing, but cut in half - two separate halves. You can put it in a crib, you can have 1 part on the side, the second as a second headboard, or you can just take it with you as a rug - in case your baby needs to be swaddled. Source: yamama.ru 1. How to sew bumpers/bumpers into a crib - master class, diagram, patterns, description. Author: Yulia Lisichkina Time: 10-12 hours Cost of materials: 400-500 rubles. Fabric: I chose calico fabric in the store at the Trekhgornaya Manufactory. They have a good selection of children's colors at very low prices. True, calico is a bit harsh for children's bedding, but for borders this is the best option - the fabric is smooth, has not faded, shrinkage is 5%. You will also need padding polyester and Velcro. The quantity depends on the thickness of the padding polyester and the size of your crib. The store also had baby calico with padding polyester already attached on one side - an excellent option that simplifies sewing the borders. Diagram and Patterns: Approximate diagram of the sides, designed for a crib with a berth 120x60cm. The pattern is given with allowances for seams and the volume of the sides (1cm for the sides, for other parts - 0.5cm): short side - 4 rectangles 43x64cm long side - 4 rectangles 38x126cm ties - 20 strips 7x53cm Velcro fasteners - 16 rectangles 7x10cm short ruffles - 2 strips 90x12 cm long ruffles - 2 strips 180x12 cm Description of work. Velcro: Mark the Velcro locations on the side patterns in accordance with the design of the crib. Fold each rectangle in half along the long side, stitch on both sides, turn it inside out, and iron it. Sew the soft half of the Velcro onto the fastener. Sew the prickly halves of Velcro onto the side. Fold in the fourth unsewn side of the fastener and sew along this side to the sides. Ties: Fold each rectangle in half along the long side, stitch on both sides, turn inside out, press. Ruffles: Fold each strip in half along the long side and gather the ruffle to the length of each side. Sides: Place the two patterns right sides together. Don't forget to add a ruffle and ties to the top side. Sew from the top and sides, turn inside out. Place a layer of padding polyester inside and stitch the bottom. You can stitch the padding polyester at the same time as the top ruffle, if the padding polyester is not very thick. Stepping back approximately 4 cm from the edge, make a seam around the perimeter of the entire side (blue line in the diagram). This will prevent the padding polyester from bunching up when washing. Source: blog “My Sunshine” on sunnymichael.blogspot.com Comment: Instead of padding polyester, you can use holofiber. This is almost the same as padding polyester, but Holofiber does not need to be quilted, it does not bunch up when washed. 1. 2. 3. Border for the crib from Yulyasha Double border with a base made of synthetic padding, covered with white calico and a top colored cover. This design allows you to wash only the cover. In addition, several different beautiful covers can be sewn onto a padding polyester base. In the photo (from left to right): side, fastening in the center and side of the bed, patterns (click to enlarge). The dimensions of the crib are 60*120 cm. The height of the side is 30 cm. On the side where the baby’s head lies, the height is 45 cm. You will need: 1) thick padding polyester 180 cm long (usually it is 150 cm wide, that’s enough). 2) white calico with a width of at least 135 cm and a length of 235 cm. 3) colored calico with a width of at least 135 cm and a length of 235 cm. 4) Velcro, buttons, threads. If you want to make a side higher than 30 cm, then you need more fabric. All descriptions are given without seam allowances. From colored calico we cut 2 canvases each (make sure that the pattern on both canvases is upside down) see Fig. 1: 1) size 180*30 cm - part A 2) size 140*30 cm - part B 3 ) 60 cm long, at the top there is a semicircle, the extreme points of which are at a height of 30 cm, and the middle point is at a height of 45 cm. - part C 4) In addition, you need a long strip of fabric 7 cm wide (this is for frills, the long one should be stripe) Fig. 2. — Part D Sequence of work: 1) Fold a 7 cm wide strip lengthwise with the front side up, make folds and stitch them at the bottom (from the cut edge). See Figure 2. 2) Sew parts A and B to part C on both sides. For each part C there is one part A and B. See fig. 3. 3) We fold our canvases with the right sides, put our frill inside, baste and sew. How to attach the edge of a strip. 4) Cut out 8 strips 6*20 cm and 8 strips 6*10 cm. Don’t forget to allow seams. Fold it in half lengthwise, fold the seams, sew, and attach Velcro 3 cm wide and 1.5-2 cm long to one end. See Fig. 4. 5) On one of the canvases we attach Velcro (long), on the other side - Velcro from Velcro. See fig. 3. 6) On the same canvas (on the outer side of the side) we attach Velcro from Velcro, next to one end we sew stripes (holders). At the same time, we sew long strips (20 cm long) to the place where the side is attached at the corners of the bed, and short strips (10 cm long) in the middle of the sides; with these strips we will attach the side to the bars of the crib. See fig. 5. 7) Turn the fabrics left side up, stitch the bottom and one side (at part B). On the side of part C, fold the edge, baste loops on one side and sew buttons on the other side. It looks like a pillowcase with a fastener on the side of side C. See fig. 6. We sew additional support tapes to throw over the top bar of the bed. Otherwise, the side shrinks and gathers at the bottom. In addition, you need to sew the side itself. The details are the same as the pillowcase, but you don't need the frill strip or the Velcro strip. We cut out one piece A, B and C from padding polyester. From white fabric (calico) we cut out two pieces A, B and C. We sew together the padding polyester parts. We sew a pillowcase from fabric, insert padding polyester into it, and sew up the edges. It is necessary to sew in several places on top of the pillowcase. It looks like a quilted blanket. This is the side itself. We put our colored pillowcase on top and attach it to the bed. Source: solnushki.ru Comment: It is inconvenient to stuff padding polyester sausage into a case. It would be easier to make the synthetic padding parts separate, then stuffing them into the case would be easier and faster. But this is only for those who are not too lazy to sew on a couple of extra buttons. Well, instead of padding polyester, you can use holofiber, it does not come off when washing. 1.
2. 3. 4. Bumper with embroidery for the crib. You will need 1 m of natural fabric for the outer and inner sides of the bumper, 1 m of padding polyester (quilted according to the pattern with the fabric of the outer side), Aida-14 canvas fabric according to the embroidery size (60*60 cm), DMS floss. Embroidery: As an option - a fragment of the design A Little Birdie told me... from Stoney Creek Description of work We cut out and stitch the canvas, do the embroidery. Next, we cut out the remaining parts and sew them together. From the fabric for the inside we cut out bias tape for facing (5 cm wide and 5.5 m long), we use it to cover the bumper around the perimeter, and 9 ties of 40 cm each, 4 cm wide. 1. Stylized side made of toy cats-pillows. Zoom in with a mouse click. 1. 2. More photos for ideas: 1. 2. 3. 4. 5.
6. 7.
8.
9. 10. 11. 12. 13. 14. 15. 16. 17. 18. 19. 20. 21.
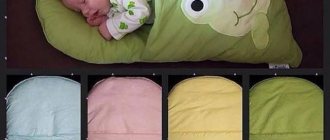
22. New person kit. I’m showing you the beginning of a crib set for a little guy who’s still kicking around in his mother’s tummy. At the ultrasound they said the gender, but... There are all sorts of surprises, so we decided to choose a universal color scheme. I really like this combination (orange-light green-linen). It turns out bright, but not too much. This is not the entire set, there will be more items. As long as there is a cover, an adapter pillow and pockets. A flannelette blanket was placed inside the bedspread. Size 120*82 cm. The adapter pillow is quite long - 180 cm. Inside there is synthetic down. It is expected that it will be located along the edges of the crib, protecting the baby from encountering hard walls. Later, you can use it to limit the person’s field of activity on a large bed, sofa or on the floor. The size of the canvas with pockets is 60*70 cm. Inside there is padding polyester. According to the idea, the locomotive will be in tune with the large locomotive on the sides (which are in the plans). I made the pockets large, which in my opinion is more practical. They can hold diapers, toys, and books... Velcro fastening on top. There are 3 of them - they hold the entire structure. There are ties on the sides for extra support. 1. 2. 3. 4. 5. 6. 7. 8. 9. 10. 11.
12. https://almuhametova.blogspot.ru/2012_03_01_archive.html Master class. Crib bumpers are not a fashion statement, they are a necessity. By putting the sides on the crib, you will ensure a restful sleep for your baby. He or she will feel very comfortable, cozy and warm. Sewing such sides is not at all difficult. You just need to measure the perimeter of the crib and buy the required amount of material. And so let's get started. What do we need to sew bumpers for a baby crib? 1. Fabric - calico. Having measured the perimeter of the crib, you can ask the fabric department to calculate the amount of material you need. 2. We also need quilted padding polyester. 3. White threads. First we will make a pattern and transfer it to the material. Our pattern consists of rectangles, these will be the parts for the large sides of the crib, and squares, these will be the parts for the smaller sides. We make the same details on padding polyester. Leave 2 centimeters for allowances and cut out all the details. After this, we cut out the details for the ruffles. To do this, we make them 15 centimeters wide and 15 centimeters long, the same length as the large side of the crib. Then we stitch them, folding them in half using a machine stitch. The line should not be frequent. Next, we tighten the ribbon, thus making ruffles. Now we fold, as shown in the photo, the fabric face to face, a ruffle between them, and a padding polyester on top. Thus, our padding polyester lies on the fabric from the inside out. Let's baste. We baste so that later we can sew it more conveniently. Next, we sew only the top and bottom of the sides on a machine. We turn it inside out and iron our parts. Then we sew the sides, which are smaller. The next step is to stitch all the pieces on the side. And after that, we measure out the ribbons to process the edges, and in order to connect parts 1,2,3 with each other. We cut off the ribbon, iron it. We attach it to the fabric with a pin. We sew it on a machine. At the end, we do it as shown in the photo, bend it and stitch it. We sew in the next part in the same way. Then we process the edges of the parts with tape. Thus, we should have two parts. One big one - consisting of parts 1,2,3. and one piece for the front side of the bed. When everything is done, we wash our product and iron it. This is important because we were making a little thing for kids. And this is what we got. 1. 2. 3. 4.
5.
6. 7. 8. 9. 10. 11.
12.
13. 14. 15. 16. 17. 18. 19. https://masterclassy.ru/rukodelie/313-bortiki-svoimi-rukami.-master-klass.html Bedding set for a crib. Bumpers. To sew a set consisting of a sheet, duvet cover, pillowcase, bumpers and a “pocket” you will need 7 m of fabric, 1.5 m wide. The set was sewn for a crib with a mattress 1 m 20 cm x 60 cm. Sheet Dimensions of the finished sheet 1, 84 m x 1.24 m (mattress hem - about 20 cm on each side) A piece of fabric measuring 1.85 m x 1.25 m is processed along the edges with an overlock (zig-zag seam), folded 0.5 cm and let's put it off. Duvet cover I sewed a duvet cover based on the dimensions of the existing blanket 1.3 m x 1 m. To sew a duvet cover you will need 2 rectangular cuts with dimensions suitable for the existing blanket, plus 0.5 cm for the side seams, as well as plus 3 cm for edges with loops and buttons (see fig. Duvet cover) We process the edges with an overlock (zig-zag seam), fold 3 cm from one edge and stitch. We make buttonholes on one part of the duvet cover. Fold the duvet cover pieces right sides together and stitch around the perimeter, leaving one side unsewn. Sew on the buttons. Idea: Instead of buttons, you can use Velcro or a zipper. The pillowcase is sewn similarly to the duvet cover. Bumper. You can sew a “circular” bumper, the length of which is equal to the length of the crib along the perimeter. I sewed a separate bumper for each side of the crib. Dimensions of the finished bumper: 1.2 m x 0.25 m – 2 pcs. 0.62 m x 0.25 m – 2 pcs. Pockets are sewn onto one of the bumpers. Performance. Ties. Sew a strip 4 cm wide and 40 cm long so that the finished tie is 1.5 cm wide. Make a decorative stitch at a distance of a few millimeters from each edge. Fold the edges 0.5 cm and carefully sew with a zig-zag seam. In total you need to make 14 ties. Frill. You will need a strip 4 cm wide, which must be overlocked on one edge (zig-zag seam), folded and stitched (see photo 1). Next, we make markings at a distance of 2 cm. Connecting adjacent marks, fold folds and make a stitch (see . photo ). The finished frill must be ironed. see photo. Bumper. For a long bumper you will need 2 rectangular pieces of fabric measuring 1.2 m x 0.25 m. For a short bumper you will need 2 rectangular pieces of fabric measuring 0.62 m x 0.25 m. IMPORTANT: do not forget about the seam allowances of 1 cm each sides. On the rectangular part of the bumper, face to face, we fasten a strip of frill around the perimeter (see photo). We fasten the ties (see photo). For a short bumper, the ties are secured at a distance of ≥20 cm from each edge (2 pcs) (see Fig. Small bumper) For a long bumper, the ties are secured at a distance of every 30 cm, starting from the corner (5 pcs) (see Fig. Large bumper) On top, face to face, another rectangular bumper part is placed (see photo 6) and 1-2 layers of synthetic wool. It is necessary to sweep and stitch everything, leaving the bottom edge unsewn, through which we turn the bumper to the front side. The bumper must be carefully ironed, the bottom edge basted and a bias tape made from the same fabric applied. Bumper with pockets. You will need a strip of fabric 62 cm long and 14 cm wide (+ 1 cm seam allowance). Finish the top edge with an overlocker (zig-zag stitch), fold and stitch. Connect the bottom edge of the pocket blank to the bottom edge of the rectangular bumper blank, baste. Topstitch vertically at a distance of 20 cm from each edge (see Fig. Small bumper with pockets and photo 7). Next, assemble the bumper as described above. Finished bumper - photo. View of the crib with a ready-made set of bed linen - see photo. 1. 2. 3. 4. 5. 6. 7. 8. 9. 10. 11. https://maminsite.ru/school.files/school9.html How to sew a bumper (protection) for a crib. The size of the bumper depends on your crib model. Dimensions of my bumper: 60 cm x 35 cm – 2 pcs., 120 cm x 35 cm – 2 pcs. Using these dimensions, it is necessary to cut out parts from foam rubber and fabric, not forgetting about 1 cm seam allowances on each side. Finish the edges of the fabric with a zigzag stitch. If you don’t have foam rubber (you can buy it in the furniture department of the Central Department Store), use padding polyester. Only in this case will it be necessary to additionally stitch the details in several places so that it does not download. Prepare 35-40 cm ties from satin ribbon, finishing the edges. A total of 25 ties need to be made. For decoration, I used a frill made of the same fabric, a lace ribbon, a border, and embroidery (you can use a ready-made applique). For the pocket you need a rectangular piece of fabric 40 cm x 25 cm and an elastic band. I used the same fabric, about 45 cm x 30 cm in size, as a background for embroidery so that the picture could be “read” well. Making the side (long) side of the bumper On the front side of the fabric, at a distance of 5 cm from the top edge, sew a lace ribbon, slightly seating it. Secure the ties. Place the fabric pieces right sides together. Sew around the perimeter, leaving 20 cm of the bottom edge unsewn. Make sure that the tie strips do not get caught in the stitching. Unscrew the bumper through it, put foam rubber inside, and stitch it shut. Making the back (short) side of the bumper Finish the edges of the pocket fabric. Fold the top edge inward by 1 cm, iron it, and insert an elastic band into it. Sew the elastic using a zigzag stitch. Attach a lace ribbon to the front of the pocket. Place the pocket on the front of the bumper. Sew it with a double stitch and divide it into 2 halves. Sew the bumper, inserting the ties, turn it inside out, insert foam rubber, sew up the hole. Making the front (short) side of the bumper Process the edges of a plain fabric, place it in the center of the bumper part, and stitch it. Decorate the top edge of the background with a frill. To do this, you will need a 4 cm wide strip of the same fabric as the entire bumper. Finish one edge of the strip, fold it over and stitch. Make marks every 2 cm. Connect adjacent marks, forming folds. Iron, make a line at a distance of 2-3 mm from the top edge. Connect the frill to the top edge of the background fabric and cover the seam with a satin border. The embroidery must be framed with a lace ribbon and attached with a double stitch to the front part of the bumper. Assemble the bumper as described above. Egorka liked looking at the patterns on the fabric of the bumper, touching the frills, and then untying the ties)) In the summer, when it was very hot, I removed the side parts of the bumper. And when it was 28-30 degrees in the room, I hung a wet diaper on the bed to keep him cool while the baby slept. Very effective. The diaper even dried completely while he slept. 1. 2. 3. 4. https://creative-ki.blogspot.ru/2010/09/blog-post_17.html Educational side-book for a crib. MASTER_CLASS. The master class will, of course, be of interest to those who have very small children nearby and who like to sew something for them. The idea of the border is 7 colors of the rainbow and 7 weather and natural phenomena: red sun, orange autumn leaves, yellow flower, green grass, blue raindrops, blue snowy sky, purple cloud. Length 175 cm, height 24. To get what I got, I needed: - 7 squares of different colors measuring 25 by 25 cm. I have fleece. - padding polyester, or a piece of fairly soft thick fabric for the insides, total size 175 by 25. - fabric for the back side of the side - ribbons: - for fastening (preferably stronger) - any color to match - for a green square, green of different thicknesses and shades - for the red square - red ones of different thicknesses - a couple of shreds of orange and yellow shades. - plastic stationery folder (white or blue) - rustling bag - beads, buttons, white beads - purple mesh fabric - threads, scissors, sewing machine. If you have collected everything you need, then everything else is very simple and fast :) (all fabrics are pre-washed and ironed) In squares. Red. Cut out 2 circles of different diameters and ribbons for the rays. We fasten it. Sew it on. 2. Orange. We cut out different leaves from different fabrics of different shades and textures and sew them on. 3. Yellow. Cut out the shape of a petal from cardboard. We apply it to the scraps and trace them. We fold the 2 parts of the petal with the right sides inward, put the rustling bag down, and sew everything together. Turn it inside out. I only have 6 petals. We lay out the fleece circle as you like, in the middle, and sew only it. The petals can be bent and they rustle. 4. Green. As planned, this is green grass :) We lay out ribbons of different widths and shades (you can add different laces and all that), first we just sew them tightly. And decoratively cover the top with a strip of fleece. 5. Blue. Cut several holes in the shape of drops. We put a stationery folder under them, carefully fasten it all with pins (the folder is slippery and can wiggle), and sew it with a machine around the perimeter of the drops. 6. Blue. The simplest thing is a snowy night sky). We randomly sew on beads, beads, if there are buttons in the shape of snowflakes - generally great. We sew it very, very tightly! 7. Purple. Cut a hole in the shape of a cloud. Under it are a couple of layers of mesh, and another layer of purple fleece. I put a bead inside so that little fingers could touch it. We ended up with 7 squares with different tactile developmental elements. We sew them together in order. Now we need to finally assemble everything into a side. We cut the fabric for the outer side (I have blue gabardine) the same size as it turned out into 7 plots, approximately 175 by 25 cm. This may not be a single piece of fabric, but different flaps sewn together, or even other plots, then the side will be double-sided. The same size padding polyester, or a layer of soft thick fabric. You can do without this if the side is not a side, but just a toy-decoration. We fold the fabric and stitched plots right sides down (and don’t forget about the fastening ribbons), plus a layer of padding polyester. Sew, leaving an unsewn space for turning. Turn it inside out. Ready! We are looking for a place to hang it :) I hope that MK will not just be an instruction, but will inspire and suggest a lot of other ideas that you can implement for your kids. 1. 2. 3. 4. 5. 6. 7. 8. 9. 10. 11. 12. 13.
14.
15. 16.
17. 18.
19. 20. 21. 22.
23. 24. 25. https://master-klass.livejournal.com/589805.html Another master class: https://zigzagom.com/odezhda/detskaya-odezhda/pridannoe-dlya-malyisha/bortiki-dlya- detskoy-krovatki-svoimi-rukami.html Side for the nursery. Master Class. We will need: - a sewing machine - wide satin ribbons - scissors - threads in color - Fabric of 2 colors: I chose a cheerful IKEA calico 120X300cm and thick fleece 150X300cm (does not allow light to pass through and matches the interior in color) - the insides of an old side or padding polyester . We measure and cut each fabric, it should be on 4 sides of the bed: 120X60 fleece (2 pcs) + seam allowance of approximately 1 cm on each side 120X60- calico (2 pcs) + seam allowance of approximately 1 cm on each side 60X60- fleece ( 2 pcs) + seam allowance of approximately 1 cm on each side 60X60 - calico (2 pcs) + seam allowance of approximately 1 cm on each side But I only needed the sides 120X60 (the light does not fit on the side for the purpose of air circulation ). We apply calico and fleece according to the sizes. Do not forget that we apply the calico with the wrong side, because then we’ll turn it inside out (and the fleece doesn’t care, no matter how you turn it). We put ribbons of about 40 cm, folded in half, into the corners: And we stitch, leaving a space in the middle of the side for “shoving in” the filler (sintepon or old side). We turn it inside out and insert the filling. My side was sagging a little, so I had to rip it open and sew a pink ribbon into the middle of the top side. Good night and sweet dreams! I hope the master class will be useful! 1. 2. 3. 4. 5. 6. 7. 8. 9. https://www.livemaster.ru/topic/92677-bortik-v-detskuyu-krovatku Sides, bumpers or protection (called differently) in crib 1. The crib is very old (I didn’t bother with it for the younger one and bought a used one), you can throw it away later without regret and without thinking about what to do with it. The need for protection arose when he began to suddenly roll over onto his tummy and hit the crib. Just finished it for my son's birthday!!! We turned 5 months old today! 2. I sewed it from what I had. I only had to buy padding polyester. and improvise so that there is enough bright chintz... 3. I used old narrow orange curtains, at the end, where there are 2 pillowcase pockets. A few months ago I bought a small piece of chintz with Disney characters and it came in handy. It turned out to be 7 pockets, 4 in front, 2 at the end and 1 on the side. 4. It’s very convenient to put diapers, onesies and toys in your pockets—you don’t have to run far. 5. He really liked the bright drawings; he tried to grab them when he tried them on during the sewing process. But my son decided to update his old updated crib 6. So they marked it :))) I only have sewing knowledge from labor lessons at school, so I’m looking forward to comments from you, the craftswoman... 1.
2.
3. 4. 5. 6. https://stranamasterov.ru/node/152041 Cheat sheet Bumper Textbook. I made my bumper from 6 separate panels that tie together the space on the outside of the crib. The piping around the edges was the perfect finishing touch! And they are completely reversible, which I love so much! If the chevron gets too stimulating for my little guy I can just flip them around and yellow on the inside instead. I can't even tell you how much I LOVE this fabric!! I have a portable crib, but I also included the material requirements and measurements, standard crib sizes in parentheses.torqouise 1 1/4 Yards (2m) Chevron in Bermuda 1 1/4 Yards (2m) Bella Solids in Yellow 3/4 Yards (1 1/2 Yards) Bella Solids in Torquoise (for ties and piping) You also need beading/batting. I recovered, old kit. Mine were 8″ tall so add a little extra fabric if your pads are taller Cut the following Portable Crib Pieces: 2 panels in each fabric measuring 25 x 9″ (remember to add in height if your pads are taller) 4 panels in each fabric measuring 20 x 9″ For a standard Crib: 6 panels in each fabric measuring 27 x 9″ (be sure to adjust for your pad thickness and height and then add seam allowance) Either Size: 24 ties measuring 3 x 10″ (increase length to 16″ , if you want Bows instead of knots ) 1.5″ strips, cut into bias, bias. I ended up using about 7 meters total.1. Fold each tie piece in half with the long edge together. Sew along the long edge and created tapered points on one short side. Trim excess fabric 2. Turn to the right side and press flat. Repeat 2-3 times 3. Wrap your offset strips around a piece of cord and punch into place using your zipper foot. Sew as close to the pipes as possible. 4. Baste the length of the pipe to the top and bottom edge of each inside or outside panel. Baste your belts in place. You need 2 straps on each end. 5. Add a panel to the top of your 2nd fabric and stitch together to the right along the edge piping using your zipper foot. Leave a 4-6″ gap to include one short edge. 6. Turn to the right side and slide the bumper trim/batting inside. and then the hand sewing the opening closed. 12.
3. 4. 5. 6. 7. 8. 9. https://www.naptimecrafters.com/2012/10/crib-bumper-tutorial.html Crib pockets. Initially, on the changing table, on a small spread, there was everything necessary for the baby: oil, cotton wool, cotton swabs, napkins, etc. The table is covered in layers: a blanket, oilcloth, a diaper - everything is clean and beautiful! But for some reason, after a week or two, it slowly began to grow: + another cream, now for diapers, + D-panthenol cream for diaper rash, + thin socks on top of the rompers, + warm socks so that the paws don’t freeze, + more some are so plush and fluffy, but you also need to find a place for the mittens, etc. and so on. I looked at all this disgrace and decided: I need to use the available space wisely, namely, sew pockets for all this wealth and hang them near the table on the edge of the crib, both beautifully and in some order! So, I take a newspaper, cut out a piece of the desired size, and attach it to the back of the crib. Next, I laid out on this piece everything that I wanted to put into pockets, i.e. not just several identical pockets, but for each item its own individual house of the required size, although I made a couple of pockets “just in case”, for unexpected “tenants”. For socks and mittens, voluminous pockets were needed (one of them subsequently contained cotton wool right in the jar), for a thermometer and creams, the pockets were narrow and long, and for scissors, a simple jumper was enough. To make all this splendor truly splendid, it was decided to decorate the pockets. I found the outline of such a cute hare somewhere on the Internet, adjusted it in Word to the size I needed, and printed it in several copies. Then I decorated each pocket separately, in layers: the main fabric, nylon (a piece of a bow from a happy childhood), and a piece of paper with a picture of a bunny, all held together in English. pins and stitched along the contour with a small zig-zag. I removed the paper and carefully cut off the excess fabric with nail scissors: in the main fabric - inside the outline, and the nylon - excess from the edges, so we got a transparent window. Some of the hares were caught by a piece of netting that was lying around. Some of the pockets were made from a wide nylon tape with a mesh pattern (from the same happy childhood), and a couple more from a thin and already ancient vest. The base is feather teak (it is dense and holds its shape well). I sewed strings on top and tied them to the bed, although it could have been attached to a wooden plank and hung on the wall. I present the result to your attention. I hope my experience will be useful to someone. Have fun with your crafts! 1. 2. https://www.u-mama.ru/read/article.php?id=5234 Pockets for the crib “Locomotive from Romashkov” author: Matryoshka Yesterday I finished this interesting order. These are pockets for the crib. Customer's idea. “The Engine from Romashkov” is Matvey’s favorite cartoon, who completely refuses to sleep in his crib. Tanya (the customer) came up with this idea in the hope that Matveyka would happily fall asleep with her favorite engine.) A mandatory condition is that the engine’s two eyes are visible. There are 7 pockets in total in the locomotive. The engine is blowing the whistle (there is a squeaker in the pipe). At the back of the engine there is a bell instead of a flashlight (like the original). Without even looking, I eyeballed the pockets, and when I tried them on, it turned out to be not even pockets, but pockets, exactly the size of a crib. There are 10 numbers on the carriages - we learn to count. There are pockets on the non-woven fabric, there is a little padding in the pipe and wheels. Closer. There is a squeaker in the pipe. In the first carriage there are embroidered children. In the second carriage, instead of windows, there are three pockets for Matvey’s favorite little things. In the third carriage, the windows open, and animals hide behind them: a cat, a horse and a sheep. 1. 2. 3. 4. 5. 6. 7. https://www.liveinternet.ru/users/anaxy/post251368540 Links to the master class: - caterpillar pocket - https://masterclassy.ru/shite/ shite-igrushek/1490-bamper-karman-na-detskuyu-krovatku-gusenica-master-klass.html - educational pockets: https://masterclassy.ru/shite/shite-igrushek/1634-detskie-igrushki-svoimi-rukami -karmashki-razvayuschie-master-klass-s-poshagovymi-foto.html - pocket train - https://masterclassy.ru/shite/shite-igrushek/1634-detskie-igrushki-svoimi-rukami-karmashki-razvayuschie-master -klass-s-poshagovymi-foto.html Here are more photos of ideas: 1.
2.
3. 4. 5. 6. 7. 8. 9. 10. 11.
12. 13. 14. 15.
16. 17. 18. 19. 20. 21. 22.
23. 24. 25. Curtain for a crib. Grab a few sheets and let's get started! The twin sheet was a lot for me, but if you do all 4 sides of a standard crib or want that extra one you might want the queen. 1. Cut 1 top panel to the size of your crib plus seam allowances. 2. Measure the length from the bottom of your mattress to the floor, and the width to each side of the crib. Add seam allowance and hem to length, then multiply your width by 1.5 for minor gathers. For a fuller look, the skirt can be multiplied by 2 or even 3. ***If you want to save some time and don't plan on moving your crib, you can simply cut the panels for the sides that will show 3. Finish 2 sides of each piece by folding over 1 /4″ and double topstitching and then bottom hem. 4. Sew the top edge of the panel onto the top panel. If you are only doing 2 or 3 panels instead of 4 you can finish the other edge(s) in the top panel with a serger or zig zag scissors. ***These were so easy that I made my Mom's crib as well. We used a blue striped two sheet for her standard crib size and it was enough to make 3 sides (I added one on the right side after taking this photo) 5. And that's it! Super easy and a great way to get a custom look for just a few dollars. And now you can hide your laundry basket under the crib and no one will ever know 1. 2. 3. 4. https://www.naptimecrafters.com/2012/09/crib-skirt-tutorial.html Another curtain. 1. 2. 3. 4.
5. 6. 7. 8. 9. 10.
11. 12. 13.
14. 15.
16. 17. https://karat773.ru/post231741588/# 1. 2. 3. 4. 5. 6. 7. 8. Sew a bed skirt. Master Class. 1. 2. 3. 4.
5. 6. 7.
8. 9.
10. 11. 12.
13. 14. 15. 16. 17
| Categories: | ~ EVERYTHING FOR THE HOME ~/ Sides, pockets, curtains for children's bed |
Cited 97 times Liked by: 10 users
Like share
0
Like
- 10
I liked the post - Quoted
- 2
Saved
- Add to quote book
- 2
Save to links
Liked10
0
[MASTER CLASS] Simple and quick sewing of square bumpers
To make a square bumper, prepare:
- 2 types of fabric;
- scissors;
- sewing machine;
- needles or pins;
- filler.
Step by step process:
| 1 | First you need to prepare a pattern measuring 32*32 cm. To do this, you can glue 4 A4 sheets together with tape. | |
| 2 | Then cut the sheets to size, leaving small gaps of 1 - 2 cm on each side for seams. | |
| 3 | Prepare the fabric for the sides, iron it well and fold it in half. Next, attach the pattern to it, with the fold positioned at the top, carefully trace and cut out the part. | |
| 4 | Do the same with the white fabric, which will act as a permanent pillowcase for the border. This detail will help keep the filling in the pillow. | |
| 5 | Then you need to make ties - 4 pieces for the 1st side. To do this, prepare 1 layer of main fabric, measure the length (70 cm) and width (3 cm) for each ribbon, draw and cut. Make marks in the middle of each piece. | |
| 6 | After this, fold each product in half along the long side and make a stitch, departing from the edges about 5 mm. In the center of each tape, leave a small indent of 2 - 3 cm from the mark. Then cut off a little fabric at all corners of the ties (as shown in the photo), leaving 2 - 3 mm before the seam. | |
| 7 | Turn the pieces right side out through the center hole. Then iron each tie well and sew up the indentations. | |
| 8 | Next, start assembling the side. To do this, fold the prepared fabric with the pattern inward and place it in a white “pillowcase”. | |
| 9 | Then unfold the piece and place the ties inside it, folding each in half. Using a pin or needle, secure one end of the tape in one of the corners of the fabric, retreating 2 - 3 cm, and the other in the middle. This must be done with the remaining ties. | |
| 10 | Next, cover this half of the fabric with the other, smooth it out and pin it together. | |
| 11 | Sew all sides of the border, leaving one small hole (about 8 cm) for filling the pillow. And carefully cut the corners, retreating 3 - 4 mm from the seam. | |
| 12 | Then turn the piece right side out, place the filling inside and carefully sew up the hole. | |
| 13 | Follow the same steps to sew the remaining pillows. |
[MASTER CLASS] Fence sides - a fashionable option
To sew a side fence, you need to prepare:
- 5 ties 66 cm long, 4 cm wide;
- 2 types of fabric;
- scissors;
- thin padding polyester (100 g);
- holofiber;
- sewing machine;
- ruler;
- needles;
- chalk.
With a width of 150-160 cm, you will need 1.4 m of fabric (excluding ties) for a round crib or 120*60 cm on three sides. For an oval crib or on all sides 120*60 2.1 m of fabric. The same amount of insulation. Holofiber from 1.5-2 kg.
Step by step process
| 1 | First, you should prepare 2 pieces of different types of fabric, 33 cm high and 120 cm long. | |
| 2 | Then iron the ties well, folding each one 1 cm inward (on the sides) and then in half. After this, stitch them, making bartacks at the ends and retreating 1 mm from the edge. | |
| 3 | Next, mark the stitches with chalk, departing from the edges on the right and left by 18 cm, dividing the rest of the space by 17 cm. Do the same on another piece of fabric. | |
| 4 | Then place the marked part on the padding polyester, secure it with needles along the edges and carefully cut the product along the contour. Sew the workpiece on all sides using a sewing machine, leaving 5 mm from the edges. Do the same with another piece of fabric. | |
| 5 | Place the ties on all sides of the part (as shown in the photo), folding them in half and making an indent of 1.5 - 2 cm. | |
| 6 | Place the remaining part on top with the right side inward, secure with needles and sew, retreating 1 cm from the edge on three sides of the side, without touching the bottom part. In this case, the ties must be removed by sewing only their tail. After this, trim off the excess fabric from the corners without touching the seam. | |
| 7 | Turn the product inside out and straighten the corners. Next, fasten the parts strictly along the previously outlined lines and sew a line along them on a sewing machine. | |
| 8 | After this, start stuffing the side through the lower holes, carefully leveling the filler inside. | |
| 9 | Secure the unstitched sides with needles, turning 1 cm of fabric inside, and make a stitch on a sewing machine, not forgetting about the bartacks. | |
| 10 | If necessary, make several more such sides according to a similar pattern. |
[MASTER CLASS] Sewing a velor braided side
To sew a braided border you will need:
- velor fabric in 2 colors;
- filler;
- scissors;
- 2 plastic pipes for stuffing the product with a diameter of 50 mm and 35-40 mm;
- light threads;
- needle.
Step by step process
| 1 | To begin, prepare 8 pieces of fabric 20 cm wide, 180 cm long in two colors. After this, sew the parts of each color together along the short side into one long strip. Make sure that the pile on the product is in one direction. | |
| 2 | After this, sew the blanks lengthwise, turning the fabric right side inward and fastening each with needles. Next, measure the length of the resulting product, which should be 6 m 80 cm, cut off the excess. | |
| 3 | Turn out the parts and start stuffing using a plastic pipe. To do this, put one of the strips on it and place the filler inside. | |
| 4 | You can fill the side first from one side to half, and then from the other. Push the material with a stick or a regular handle. Do the same with the remaining strip. | |
| 5 | You need to make a pigtail from the finished parts. To do this, carefully stack the products on top of each other, leveling them if necessary (as shown in the photo). | |
| 6 | Then sew the edges of all strips by hand, gathering the fabric inside. It is better to use light threads. | |
| 7 | Complete the braid and fasten the ends of the parts with hand stitching. | |
| 8 | If necessary, make another such side according to a similar pattern. |
Ready-made pattern diagrams for protective edges
At the last stage, when all the exact calculations have been made and the necessary material has been purchased, you need to make patterns for future bumpers. You can do them yourself or use our options.
[MASTER CLASS] Sewing borders from panels with ties
To sew one soft side from panels with fabric ties you will need:
- panel;
- thick fabric;
- scissors;
- light threads;
- pins;
- thin padding polyester (60 g);
- filler;
- 4 ribbons 33 cm long, 6 cm wide.
Before making the side, it is advisable to iron the panel and other type of fabric well.
Step by step process
| 1 | To begin with, you should cut out a square measuring 33*33 cm from thick fabric and prepare the panel. | |
| 2 | Place the square-shaped piece on the panel and trim the edges along the contour. | |
| 3 | Next, you need to make ties for the side, folding each ribbon inward along the edges by 1 cm, then fold it in half and stitch. It is advisable to iron them before doing this. | |
| 4 | Then fold the padding polyester in half, place the panel on top with the front side up, and then fix the ties in the central part of the workpiece, placing them on top of each other (as shown in the photo). | |
| 5 | Place the remaining cut on top with the wrong side, level it, secure with needles and cut out the part along the contour. Trim the corners without touching the seams. | |
| 6 | Sew the side on all sides, departing 1 cm from the edges. Leave space at the bottom in the middle for stuffing the pillow (about 7 - 8 cm). After this, turn the product right side out. | |
| 7 | Smooth out all corners with your hands. Then, from below, through the unstitched part, fill the part with holofiber or other hypoallergenic material. | |
| 8 | Rub the pillow with your palms to remove any rough edges. Next, manually sew up the hole with a hidden seam using light threads and iron the product on both sides. | |
| 9 | The remaining sides can be made in a different color or alternated. |
[MASTER CLASS] Animal bumpers with patterns
To sew a side in the shape of an animal, you need to prepare:
- pattern;
- sewing machine;
- thick fabric in 2 colors;
- threads;
- a needle;
- 2 satin ribbons 60 cm long, 1 cm wide;
- felt, felt of different colors for making elements;
- hypoallergenic soft filler;
- ruler;
- scissors;
- thermal pen for drawing (can be replaced with chalk or soap);
- pins for fixation.
Step by step process
| 1 | To begin with, you should print the pattern in real size on 4 A4 sheets and cut it out according to the drawing. Then glue the parts together with tape or glue. Patterns can be found on the Internet or drawn yourself. | |
| 2 | Place the finished stencil on the prepared plain fabric, folded in half, and cut along the contour. | |
| 3 | A strip 12 cm wide and 32 cm long should be cut out of another material, placed on a single-layer base of the side and secured with pins or needles. Trim the excess fabric along the contour. | |
| 4 | Next, carefully sew the strip with a zigzag. | |
| 5 | Then cut out the elements of the animal’s face on a piece of felt (ears, tail) and stitch them. Draw eyes, mouth, mustache on the product using soap, chalk or a thermal pen that can be easily erased. For better symmetry, it is better to use a ruler. Next, sew the drawn facial features with a thick seam. Make the cheeks out of felt and stitch them with a light thread. | |
| 6 | Place both pieces of plain fabric on top of each other, right sides facing inward. Then bend the prepared strips in half and insert them into the sides of the product. Fix the folded end of each tie to the side, and place the others below in the center of the part. | |
| 7 | Fasten the fabric with needles, then sew all sides of the workpiece, retreating 1 cm around the perimeter and leaving a hole at the bottom to fill the side of about 8 cm. | |
| 8 | Then make small cuts with scissors in the corners of the ears and on the top of the head so that the toy remains symmetrical when stuffing. Next, turn the product right side out and place the filling tightly through the hole left, which at the final stage must be carefully sewn up by hand with light threads. | |
| 9 | Using a similar pattern, sew other pads, and you can change the shape and color of the sides. |
Ready-made patterns (to download, right-click and select “Save link as”):