Requirements for hair bands
Such accessories are a must for long hair. When planning to make hair bands with your own hands, you must comply with a number of requirements:
- The product must be made of elastic and elastic material that can retain its shape well and hold hair.
- The rubber band must be safe to use. It should not injure the hair and scalp.
- For work it is necessary to use materials that are safe for health.
The elastic band for fixing the hairstyle should not catch the hair or have protruding sharp decorative parts. The product should be comfortable and safe for hair.
Why add borax?
Let's figure out what tetraborate is and why it is needed. This is another important component. In another way it is called “borax”. This substance is used as a thickener. Chewing gum for hands using it is more durable. The product is sold in any pharmacy at an affordable price.
When using borax, you need to be careful not to get it on your mucous membranes or in your eyes. The drug is chemical and can cause severe poisoning. It is advisable to use gloves and safety glasses.
Materials for hair-fixing elastic bands
You can use various available materials to make decorative elastic bands to secure your hairstyle:
- ribbons;
- braid;
- grosgrain ribbon;
- satin fabric;
- velvet;
- any other beautiful fabrics.
For additional decoration, it is easy to use beads, beads, buttons, lace, and rhinestones.
A non-standard approach to work will help you make stylish and beautiful hair ties from any leftover fabric.
For the base of the product, it is easy to use existing rubber bands, old hairpins, or purchase an inexpensive option for remodeling.
Often, underwear elastic is used for crafts. Much depends on the design of the future product.
It’s easy to make elastic bands to decorate your hair and hold your hairstyle in place. Making baby rubber bands will take no more than an hour. Detailed master classes will help you cope with the work.
Reviews
This toy is quite popular among children and their parents, and also arouses interest among teenagers. There are more positive reviews than negative ones; many are satisfied with its properties, colors, and smell. Handgam is great entertainment on the road or in long queues and relieves stress. But there are people who were dissatisfied. For what reasons were customers disappointed?
- Insufficiently elastic, hard. But this also has advantages - hardness develops arm muscles.
- Collects dust and dirt. Yes, handgams are difficult to clean, but you can teach your child to play at the table or there will be an extra reason for cleaning.
- It is difficult to clean clothes, hair and furniture. Such a flaw will help develop accuracy during the game.
- It has a pleasant fruity smell that makes little children want to taste nanogam. Handgam is not intended for children under three years of age, and children under six years of age are recommended to give this toy under adult supervision.
- Some people expected more, and the toy did not live up to their expectations and quickly became boring. The only useful thing here is experience.
Tools
Working on decorative rubber bands to secure your hairstyle does not require the purchase of special tools.
You will need:
- regular ruler;
- sewing needle;
- small scissors with sharp tips;
- a burning device or a simple lighter;
- glue gun
When creating bows, it is convenient to use stationery clips to fix the workpiece on a piece of cardboard.
Archives
ArchivesSelect month January 2022 December 2022 November 2018 October 2022 April 2022 March 2022 February 2022 December 2022 July 2017 June 2022 May 2022 April 2022 March 2022 February 2022 January 2017 December ь 2016 November 2016 October 2016 September 2016 August 2016 July 2016 June 2016 May 2016 April 2016 March 2016 February 2016 January 2016 December 2015 November 2015 October 2015 September 2015 August 2015 July 2015 May 2015 April 2015 March 2015 February 2015 January 2015 December 2014 November 2014 October 2014 September 2014 August 2014 July 2014 June 2014 May 2014 April 2014 March 2014 February 2014 January 2014 December 2013 November 2013 October 2013 September 2013 August 2013 July 2013 June 2013 May 2013 April 2013 March 2013 February 2013 January 2013 December 2012 November 2012 October 2 012 September 2012 August 2012 July 2012 June 2012 May 2012 April 2012 March 2012 February 2012 January 2012 December 2011 November 2011 October 2011 September 2011 August 2011 July 2011 June 2011 May 2011 April 2011 March 2011 February 2011 January 2011 December 2010 November 2010 October 2010 September 2010 August 2010 July 2010 June 2010 May 2010 April 2010 March 2010 February 2010 January 2010 December 2009 November 2009 October 2009
A simple elastic band made from a piece of fabric
The simplest elastic band for fixing hair from a shred is a sewn strip of fabric, inside of which an ordinary underwear elastic is inserted.
It’s easy to use a flap for work:
- velvet;
- knitwear;
- suit fabric;
- chiffon;
- silks.
The width of the textile blank varies from 30 to 45 cm. The length of the blank for a narrow elastic band is 7-8 cm, and for a wide one it is better to measure 12-14 cm.
Note!
- DIY satin ribbon bows: photos of original design ideas, step-by-step DIY master class
- DIY shadow theater: step by step how to do it at home! 175 real photos
DIY photo frames | How to make a simple and beautiful photo frame as a gift or for yourself from scrap materials
After cutting the workpiece, it is sewn along the seam by hand, leaving room for threading the elastic. Having passed the elastic inside, it is sewn together with several stitches. The remaining seam is carefully sewn up.
What you need for work
First you need to decide where the elastic (ribbon) will be located: inside the belt or outside, that is, instead of the belt. If this element is inserted inside a belt sewn to the skirt, then you can buy any waist or linen elastic. The main thing is that its width is slightly less than the width of the belt. Otherwise, it simply won’t fit inside the belt. The standard width of the waistband is 2-2.5 or 4-6 centimeters.
If this detail will be sewn to the top of the skirt instead of a belt, it is advisable to pay attention to the color. The elastic tape should match or contrast with the main product
Usually they buy a wide (5-6 cm wide) waist or cuff elastic. You can buy a ribbon with lurex.
To work you will need scissors, a centimeter, a sewing machine, and matching threads. You can buy elastic braid at any sewing accessories store.
In addition to color, you need to pay attention to density. For thin chiffon, silk or cotton fabrics, a soft braid is suitable
For wool, knitwear or leather, it is better to buy a thicker elastic band. The length of the braid should correspond to the waist circumference, then this value can be adjusted.
Children's master class on making rubber bands
Even a child can beautifully decorate an elastic band from satin ribbons with his own hands. Detailed instructions will help with this.
To work you will need:
- satin lilac ribbon 5 cm wide;
- crimson satin ribbon 2.5 cm wide;
- sewing needle and thread;
- a piece of glass;
- a device for burning;
- steel ruler;
- button or bead;
- universal glue;
- scissors.
Operating procedure.
- Cut 5 pieces of 7 cm length from the raspberry ribbon.
- Treat the sections with a burning device and place them on glass.
- Fold each piece in half, shiny side up.
- Run a running stitch and pull it together a little.
- Combine the petal blanks into a flower.
- Make 5 pieces of 10 cm long from lilac ribbon.
- Repeat the work according to the previous scheme, obtaining a slightly larger flower blank.
- Straighten the resulting flowers, glue or sew them.
- Secure a button or bead in the middle.
- Sew an elastic band on the wrong side.
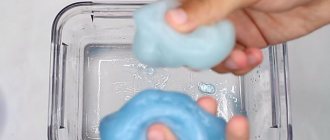
What is hand gum
Chewing gum for hands is a plastic mass (inorganic polymer) that easily takes any shape, wrinkles, stretches, breaks and tears. This mass has several names:
- Handgam;
- Nanogam;
- Neogam;
- Smart plasticine;
- Gum for hands;
- In the US it's called stupid putty;
- Happygam.
What is smart plasticine? What are its properties? What can you do with it? Answers in the video Chewing gum and slime are not the same thing. Chewing gum for hands has a denser consistency and has a number of contradictory properties :
- It tears and stretches . Take the chewing gum and pull it sharply in different directions - it will tear, but if you stretch it smoothly, it will stretch.
- It spreads and sticks . It is easy to sculpt various shapes from handgam; it is soft and flexible. If you leave this figurine on the table for a while, it will spread.
- Jumps and crashes . Roll a ball out of smart plasticine and throw it on the floor - it will bounce like a ball. But after hitting it with a hammer, the ball will break.
Hand gum can act as a liquid or as a solid (properties of a non-Newtonian fluid). In the first case, the property manifests itself when you act on it slowly or not at all - it becomes pliable or blurred. In the second case, the handgam, when you act sharply and apply force, tears, breaks or jumps.
Table 1. Pros and cons of chewing gum for hands
| pros | Minuses |
| Develops fine motor skills of the hands. | Easily gets dirty and difficult to clean. |
| Relieves tension and stress. | It is difficult to clean handgum from things made of synthetic fabric and a little easier from clothes made from natural materials. |
| It is harmless, but it is important to ensure that a small child does not swallow it. | Not recommended for children under 3 years of age. |
| Does not dry out because it is made on a silicone basis. | |
| Long shelf life. With proper care it will last up to five years. | |
| It does not require special care. |
"Strawberries"
It’s easy to make your own hair bands in the shape of berries. The child will certainly be pleased with such decorations.
DIY elastic bands made from satin ribbons look elegant and very attractive.
Note!
DIY bird feeder - interesting ideas on how to make it quickly and easily from scrap materials- Do-it-yourself cold porcelain: the best options for porcelain products, step-by-step instructions and recipes for making it yourself (photo + video)
- DIY curtains - types of curtains, choice of materials for sewing and design + step-by-step instructions and simple patterns for beginners
To sew interesting strawberries you will need:
- red satin ribbon 20 cm long and 5 cm wide for a pair of products;
- green satin ribbon 5 cm wide and 10 cm long;
- a pair of elastic bands for the base;
- soft stuffing material;
- beads of light brown or yellow color.
Operating procedure.
- Make two pieces of red ribbon, 10 cm long, and two green pieces, 5 cm long.
- Cut 5 cm twice from a narrow ribbon.
- Carefully process the cuts with a lighter.
- Fold the red ribbon in half, right side inward. Sew the edge by hand so that you get a berry-shaped piece.
- Place the filling inside and sew it up.
- Cut leaves from green ribbon. Burn the edges with a lighter.
- Sew a narrow braid to the elastic band.
- Attach a berry with a leaf to the braid.
- Sew the second strawberry in the same way and sew it to the elastic band.
- Add berries with beads.
It will take no more than an hour to make these berries.
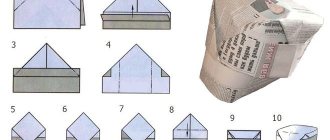
Twister hairpin
About ten years ago, an unusual hairpin – a twister – came into fashion. It is a flat stick 2 cm wide with rounded ends and a hole in the middle. The hole is about 10 cm long, and the entire hairpin is 15-20 cm.
A bunch of hair is inserted into the hole, then the ends of the hairpin are twisted towards the middle, or bent in another way. The flexibility of the hairpin is given by a wire frame, which is wrapped in beautiful fabric or leather.
We offer instructions on how to properly make a twister hairpin. To work, you will need a piece of insulated copper wire or regular wire, but then you will need tape for winding. You need to close the ends of the wire and secure them to make a circle with a diameter of 20-25 cm.
For a twister hairpin, you need to sew a cover in the shape of a very elongated oval. Fabrics such as velvet, brocade, organza or any other that looks beautiful are suitable. You can sew fringe into the ends of the cover. There should be a hole in the middle of the cover.
After sewing the parts of the cover together, you need to turn it right side out. Insert a wire frame through the unsewn end, after folding the circle into 2 sticks. All that remains is to sew up the edges of the hole in the middle with a neat seam and the edge through which the wire was threaded. The hairpin is ready.
Elastic band made from ribbon
Using ordinary nylon or satin ribbons, you can beautifully design an elastic band to secure your hair in literally half an hour.
There are many ways to make elastic bands from ribbons with your own hands.
What is hand gum used for?
This polymer was a by-product of an experiment to produce a synthetic rubber substitute. But later they found a use for it in the form of a toy for children. Fans of smart plasticine have come up with several more ways to use it :
- To relieve stress and tension.
- Development of fine motor skills.
- Development of dexterity.
- Take impressions of keys and fingerprints.
- Use as plasticine.
- Use as a massage product.
- Replace the expander with it.
- Playing with pets (not a very good idea, the animal can get poisoned and the handgum can get dirty).
- Create a unique waterproof phone case.
- Some doctors prescribe it to develop arms after injuries.
- Clean your computer keyboard from dirt.
Ribbon rose
To make a lush rose you will need:
- any tape (the longer the better);
- elastic band for base;
- sewing needle and thread.
Operating procedure.
- The prepared ribbon will need to be folded in half along its entire length.
- The edge at the junction of the halves is stitched manually with strong thread.
- The thread is pulled together to form a lush flower.
- The resulting rose is sewn to an elastic band.
Having a pair of identical ribbons, it is not difficult to make a beautiful set of two decorative rubber bands.
We sew an elastic band into the waistband of trousers or trousers
Before sewing an elastic band into the waistband of your trousers, it is worth noting that doing this manually is very difficult. Therefore, if you don’t have a machine, it’s better to give the item to the studio.
Using a machine, sewing elastic into the waistband of pants is as follows:
- Take an elastic band at least 2 centimeters wide. To determine its exact length, you first need to wrap it around your waist and pull it to the required girth.
- On the machine you need to set the “knitted seam” mode and set the interval on the scale to 3. Set the presser foot to zigzag.
- Bring the edges of the elastic band together and machine stitch.
Pins help ensure even sewing
- Turn the trousers inside out and sew elastic along the edge of the belt. To ensure that it is sewn evenly, you need to pin it to the belt in some places.
- Finish all edges so that the elastic band cannot come out of the seams. To do this, you need to set the presser foot to the overcasting mode and select the overlock stitch.
- At the very end, it is recommended to put the foot on the usual sewing method and stitch the elastic from the bottom, retreating 1-2 centimeters from the edge.
Before you start sewing, you need to pin the tape evenly
Casual option
To fix your hairstyle at home, it’s easy to decorate a boring elastic band with tape.
- To do this, just wrap the elastic band with a ribbon, securing it with hand stitches.
- It is easy to sew a sausage from a wide ribbon, then passing a regular linen elastic band through it. Fasten the elastic band and stitch the edges of the sausage manually.
Skirt design
To calculate the design of a model cut on the bias, it is enough to measure the waist circumference and the length of the finished product.
- Prepare paper, pencil, long ruler. The silhouette pattern is built on paper or directly on the material.
- From the left corner, set aside the waist length measurement + 2 cm, divided by the number 6.28.
- Draw an arc to the perpendicular side of the paper. To control, measure the resulting arc with a measuring tape placed on the edge: its length should be ¼ of the waist measurement.
- Place the desired length of the product down from the arc.
- Bring the arc of the bottom edge to the perpendicular edge of the paper and cut out the resulting pattern.
- Fold the fabric lengthwise, creating four layers. Lay out the pattern and add seam allowances.
- Cut out a solid part of the product without side cuts. When unfolded, you should get a full circle with a hole, the length of which is equal to the length of the waist.
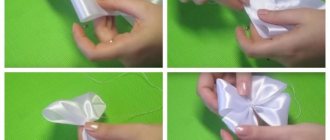
Elastic band with bow
Various bows are a classic option for decorating hairstyles.
To create an elastic band with bows you will need:
- a pair of rep ribbon blanks 20 cm long, 4 cm wide;
- a piece of tape 52 cm long, 2.5 cm wide;
- a pair of blanks made of narrow 0.6 cm tape, 20 cm long;
- elastic band for the base.
Operating procedure.
- Singe the cuts to prevent material shedding.
- Fold a wide ribbon 20 cm long in half. Iron the fold.
- Unfold the piece and fold the edges inward. Place them overlapping at the fold.
- Sew.
- Using a similar pattern, make a second bow and connect them together.
- Wrap a long ribbon three times around a cardboard blank, placing the turns sequentially.
- Sew exactly in the middle.
- Remove the cardboard to form a bow.
- First sew the first bow to the elastic band, taken as the base, then fasten it on top of the second one and straighten it.
- Make a bow from a narrow ribbon, add rhinestones, and glue it to the center.
Showing your imagination, it’s not difficult to make various bows with decorative additions from grosgrain ribbon.
Ways to play with the toy you received
Handgam is an amazing polymer. If you squeeze it quickly, it will begin to become hard and can be separated into several parts. If you squeeze it slowly, it will become soft and begin to spread on the surface.
What to do with the toy:
- Stretch. The toy is flexible and can be pulled without breaking.
- Use as a jumper. You can form a ball from the handgam and throw it onto the surface. He will jump.
- Give the gum different shapes. Use molds. This game will be interesting for young children.
- Break up. Hardened chewing gum can be broken into several pieces with a hammer.
- Tear. With a sharp movement of the hands, the chewing gum is separated. Reconnecting the toy is not difficult.
All these games are aimed at developing motor skills and improving hand function. Exercises and games can also be used by those who want to restore the use of their hands after injuries.
Kanzashi elastic band
To create a delicate chamomile using the kanzashi technique, you need to prepare in advance:
- white satin ribbon 0.5 cm wide;
- yellow tape 1 cm wide;
- a piece of yellow felt;
- glue;
- elastic band;
- sewing needle and thread.
Operating procedure.
- Make 29 pieces of white ribbon, 8 cm long.
- Fold in half and burn the edges with a lighter.
- Sew a yellow ribbon and assemble it on a thread.
- Sew a circle from the resulting accordion.
- Cut a circle of felt 4 cm in diameter. Cut, retreating half a centimeter.
- Glue the petals in rows to the felt base.
- The first row consists of 16 blanks.
- For the second one you will need 13 petals.
- Glue the yellow piece of tape in the middle.
- Sew an elastic band on the back side.
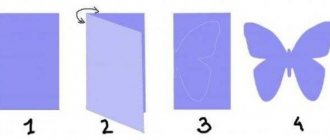
If desired, you can complement the magnificent daisies with buttons in the shape of butterflies or ladybugs.
Making rubber bands with your own hands is a fascinating process, and it’s easy to involve a child in it. There are a lot of options for decorating rubber bands. They are limited only by the imagination of the master.
Basic techniques for creating petals and leaves
An ordinary sharp kanzashi flower petal is made from a square piece of ribbon. It is folded in half diagonally. Repeat the procedure again with the resulting triangle. The tail and base are cut off, the edges are singed.
Rubber bands using the kanzashi technique are made from different petals. For lush flowers, volumetric elements are appropriate. Take a square piece of tape and fold it in half horizontally. Each side is folded in half twice more. The edge is cut at an angle of 45° and treated with flame. Make two folds on the opposite side, hold with tweezers, and run the fire along the edge.
To create a flat petal you will also need a square of tape. It is folded in half diagonally, then again. Holding it with tweezers, the sharp lower edge is pulled to the base. The tip is cut off and soldered.
Kanzashi rose pins are made from other petals. You will need a piece of tape 2.5 x 6 cm. Two adjacent corners are bent down, aligned with the edge, and sealed. Additionally, the edges are folded and scorched with fire. For a small rose you will need 12 petals.
Leaves will help diversify the composition. A piece of green ribbon is turned wrong side out. The left side is bent 90° and the right edge is placed on top. They cut it off, form two folds at the base, fix it, and scorch it with fire. The size of the leaf depends on the length of the ribbon.
Hair ties can be made from bows. You will need a candle, ribbons, cardboard, glue, scissors and decor for the central part. The following are the instructions:
- A U-shaped template is made from cardboard (it is needed for the convenience of forming a bow). Insert the tape and wrap it three times, securing it with a paper clip.
- Sew the future bow in the middle and carefully pull it off.
- Two bows made of red ribbons are fastened crosswise in the center and secured with a beautiful bead.
The template can be used to create a brooch, hairpin, headband, or hair tie. Kanzashi bows and flowers can be either a central element or part of the overall composition. Two identical bows with elastic bands look good.
Petal for a rose Petal from a 1.2 cm ribbon Leaf A soft petal can be made by carefully melting the ribbon over a fire A sharp petal with a curved end
Simple round petal Simple sharp petal
Photo of DIY hair ties
How to sew a skirt with elastic
22 Mar 2016
Do you love knitted items as much as I do?
And I also have knitted skirts. They can be sewn in an hour, and are comfortable and practical to wear.
They can be cut according to skirt patterns made from ordinary fabric, or without darts at all, if the buttocks are not very protruding.
A zipper can be inserted if the fabric is thick, or not inserted if the fabric is stretchy enough
I needed to change the stretched elastic on my skirt, and at the same time I’ll show you how to design an elastic waistband for a skirt without a zipper.
There is an option when the line runs along the top. This option is suitable if you wear blouses over a skirt.
Everything is simple here:
1. Sew the elastic into a ring. We divide the elastic band in half, put marks, divide it in half again, put marks. You get 4 equal parts and 4 marks at equal distances from each other.
2. Divide the top of the skirt in the same way
3. Apply the elastic to the underside of the skirt (the edge of the elastic to the top edge of the skirt), aligning the marks on the skirt and on the elastic, and pin it. We sew along the edge with an overlock or zig-zag, connecting the skirt and elastic, and at the same time processing the cut
4. Turn the elastic on the wrong side, pin it, and sew a stitch using an overlocker. The stitching in this case is visible on the face of the skirt
And there is an option when the stitching on the front side of the skirt is not visible. This is also very simple:
The first steps are the same as in the first option: we connect the elastic band to the top of the skirt using an overlock or zig-zag stitch.
We wrap the elastic inside out and secure it with stitches ONLY along the vertical seams (pink lines in the picture below). We place the stitch exactly in the seam groove of the front and back panels of the skirt. These can only be side seams, or there may be some other raised seams. At the same time, sew on the hanger loop.
The second method I spotted on a ready-made skirt in a boutique.
The elastic band on the figure is stretched and does not turn outward. There are no stitches on the front side, and you can wear the blouse tucked into a skirt.
There are also ways to process the top of a knitted skirt. I'll post master classes later
Measurements, pattern making and sewing of a knitted skirt are discussed in detail in the course “Mini wardrobe made of knitwear”.