Imagine that you are reading a magical book with photos that will make your soul freeze. Page after page takes you to unknown lands, tells a story about something wonderful and how beautifully this world works. Who is the author of this work? Nature. And the name of the masterpiece is “Herbarium of leaves with flowers.” Let's read this book together to understand who it is intended for? And for those who have a desire to try their hand at it and help the Author continue this grandiose work, we invite you to learn how to make a herbarium with your own hands.
Let's find out together: what a herbarium is and what its goals are; little secrets of the herbalist: suitable plants, what conditions for drying a particular plant, how to distribute the herbs; how to collect a herbarium and what are the rules for its design.
How to make a herbarium with your own hands for school: application of autumn leaves
To make a herbarium for school, you need to use your imagination and think about what kind of picture or craft you want to depict. The easiest way is to collect the leaves of trees, which acquire a variety of colors in the fall, dry them, and then arrange them on the leaf in the form of an interesting composition and glue them with glue.
From the leaves you can easily form various animals, figures and other elements.
Thus, you can make all kinds of applications.
What is a herbarium and what does it look like?
The word "herbarium" is of Latin origin and means "grass". The modern world has two different interpretations and designations for herbarium:
- A way to preserve (in order to subsequently view and present for others to view) the natural beauty of living plants outside their seasonal development period and the distribution area of each individual species. The traditional way to create herbariums is the usual drying of plucked plants, collected leaves or flowers.
- According to the second definition (more scientific), the word “herbarium” is a special center (house) where you can view entire collections of unique (possibly even disappeared from our land) representatives of the flora. Here are presented plant compositions from different parts of the globe. Each species is stored in special temperature and climatic conditions, strictly under glass and is available only for contemplation (touching with hands is prohibited!).
Compositions from dried plants, previously popular only among botanists, can now decorate almost every home or apartment.
Very often, collections of plant herbariums collected at various latitudes of the planet Earth are supplemented with an entomological collection of insects living in a given area. These dried sets are also called insect herbariums.
They are used to make paintings, bouquets, albums, and even postcards.
The purpose of the herbarium is that thanks to a special method of drying plants + insects and storing these exhibits, a person gets a unique opportunity to contemplate in its natural form and at any time the entire richness of the natural world. Such collections are especially valuable in order to get a real picture of already extinct plants.
To create such beauty, you must not only have a sense of taste and imagination, but also perseverance.
How to make a herbarium from flowers, how to dry flowers for a herbarium
Immediately after collecting flowers, you need to start preparing for the drying process. Lay it out on paper, straightening each petal.
Drying should take place under pressure. If there is no special herbarium, you can use books. It is important to lay paper on both sides of the plant; if the flowers are large, there should be several sheets. The paper should be changed every day. The entire drying process takes from 7 to 14 days.
How to use dried samples
After the most difficult stages of preparing the herbarium have been completed, you can begin to create original interior decorations and make beautiful crafts. Rare specimens can be added to the collection or put aside for storage until the right moment. There are many interesting ideas for using dried plants for practical and aesthetic benefits.
Creating an Album
A special album for samples can be used as a place to store them or to display collection vegetation. You can purchase a ready-made special-purpose product in a store or make it yourself. Absolutely any design - with the ability to group by color, type, size. Plants can be firmly attached or temporarily fixed.
A good herbarium album can only be made of paper. Natural materials will be better preserved if they come into contact only with tracing paper and cardboard. There can be one instance or a group on one page. If a herbarium is being created for future use, specimens can be placed in transparent files and collected in a binder.
Creation of paintings and panels
Flat wall or floor decor is one of the simplest interior decorations. A panel of dried herbs or flowers can be of any size, represent a rare single specimen or various compositions. Small paintings of yellow leaves are made in schools with the onset of autumn.
To create a flat craft, you will need a wooden photo frame, a sheet of paper, two identical A4-sized glasses and strong adhesive. We cover one glass with a white sheet and arrange the plants on it according to the planned pattern. It is easier to lay out from the middle of the sheet, gradually moving towards the edges. We cover the plants with a second glass and place them in a frame, having previously coated the edges with glue.
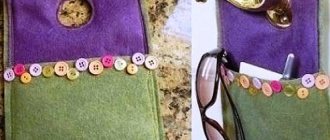
Postcard design
A handmade postcard made from natural materials will be the best gift. You can use voluminous flowers or flat leaves as decoration. We select a suitable size and color of cardboard and place the dried blanks on it. They must be secured with glue. To prevent the leaves from falling and becoming deformed, we cover them with self-adhesive film for books. The top layer of the card should be pressed and ironed well with the handle of scissors, getting rid of voids. We cut off the excess film around the edges.
A gift card does not have to have standard sizes. As a base, you can use a regular sheet of paper or a thin strip of bookmark. You can design it in landscape or book form, with the addition of a drawing.
Making decorative wreaths
Original interior decoration does not have to be timed to coincide with a specific holiday. This beautiful craft can be hung on a door or wall at any time. Herbarium collected in summer and autumn is used as the main parts. Properly dried samples can be attached to the ring at any time of the year.
To create an autumn wreath from dry material, you will need to stock up on a large number of bright flowers and leaves. For the frame you will need wire, thread, and cling film. Bows, beads, butterflies and other small items are suitable as additional decor. You can make a natural wreath quickly and correctly if you follow the following instructions:
- Preparing the foundation. We twist the wire into a ring several times. At this stage, it is necessary to provide a loop for hanging the finished product.
- We divide the herbariums into bouquets and attach them to the frame.
- Cut a 5 cm roll from a roll of cling film.
- We wrap dry plants one by one with film to the base, trying to add volume to the product.
If the dry preparations have lost color during storage or there simply are not enough of the necessary types for the craft, the finished wreath can be coated with paint of any color from a spray bottle.
Compositions: rules for composing from dried flowers
Plants that have an attractive appearance after drying are intentionally grown by many summer residents. They can remain on the site all winter for decorative purposes or can be picked green and dried to create stunning 3D arrangements. More often they plant lunaria, immortelle, heathers, haretail and others.
To create a composition of dried flowers you will need a low and wide pot. The container does not have to have holes at the bottom; it serves a purely decorative function. To make the plants last longer and not crumble, place a floral sponge at the bottom of the vase. Using scissors, we give the foam flora the required shape and insert plant stems into it. The design of the composition must follow the following rules:
- The largest elements should be placed first according to the plan. It's better to place them in the center.
- We distribute dried flowers of the original shape, color, or the smallest quantity, evenly.
- Insert vertical elements. The best place for spike-shaped plants is next to the most inexpressive flowers.
- Along the edges of the composition we place bushy branches, for example, heather.
- The remaining voids should be decorated with low, small plants.
Paintings from dried flowers: interesting ideas for herbarium
You can make paintings from flowers, first paint the canvas, and then come up with a composition.
What you need
To make a wall decoration you will need:
- frames with glass (take any size you like; you need to take two identical ones, since the picture will need two pieces of glass);
- refractory bricks (2 pcs.);
- cotton fabric or paper towels (under no circumstances should you use synthetic fabric, as it may melt);
- flowers (they can be collected from the yard, park or field; even weeds will do);
- hot glue.
Now that everything is ready, you can get to work.
How to make a herbarium from leaves: application of autumn leaves:
A wide variety of compositions are made from leaves; for example, armed with scissors, you can create interesting applications, as in the photo below.
The leaves are cut out before drying, the desired configuration is assembled and fixed on the sheet, then placed under the press. After drying, the figures are carefully glued to paper with ordinary glue.
It’s not at all difficult to make a beautiful wreath from autumn leaves.
To do this you will need the following materials:
- dense wire;
- scissors;
- wire cutters;
- film;
- the plants themselves;
- threads
A frame with a hanging loop is made from wire. Next, the leaves are distributed in bunches and attached to the frame, cut into pieces, with film. The wreath can be decorated with any decor. Drying takes place under natural conditions.
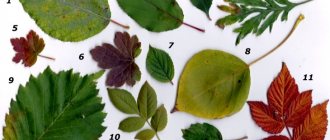
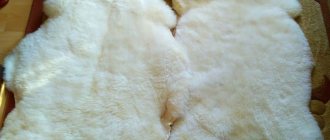
Suitable plants
- Herbarium leaves must be healthy and undamaged by insects.
- Carefully dig them out along with the roots; free the rhizome from the ground.
- You can make a high-quality and durable herbarium from leaves only if you collect them during the day in warm sunny weather.
- The sample must have blooming flowers, preferably fruits too.
- Don't limit yourself to just one sample. It is advisable to collect in reserve so that you can choose the best option for making an herbalist.
Necessary tools and materials for collecting material to make a herbarium of flowers: a spatula, a knife, an excursion folder (they can be made from two sheets of plywood/cardboard), newspaper “shirts” for drying, a label and a pen.
What to note on the label: name of the plant, name of the area and its designation (forest, field), date, who collected it (if there was a group trip, and if you collected it yourself or with your children, you don’t have to make such a note).
DIY herbarium album
It is convenient to use a folder with files for the herbarium.
If you don't want to buy a special album for some reason, making your own is quite simple. Thick album sheets on which plants are attached using tape or glue are suitable for this. The sheets are fastened together in any convenient way, for example, using rings.
Thick cardboard can serve as a cover for the album; sheets of whatman paper and tracing paper should be placed between it, and holes should be made with a hole punch.
Place an inscription under the plant indicating its name, date and place of collection.
The cover is designed at your discretion.
Drying
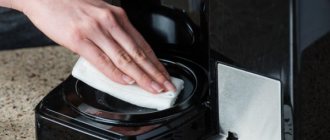
Take a brick and place a piece of cloth on it. Now place flowers on it.
“We are still friends”: Derevianko commented on the breakup with his wife
Rare shot: Viktoria Isakova showed her grown-up daughter from Yuri Moroz (new photo)
Smooth and fresh skin: dermaplaning, or why a woman needs to shave her face
Cover the top with a second piece of fabric and place a second brick.
The result was a structure that looked like a sandwich. Now all that's left to do is put it in the microwave.
One important tip: don't try to push down on the bricks when you put the flowers between them, otherwise they will just break. Applying additional pressure will not help them smooth out, but will only damage them. Don't worry about them squashing. They will do it on their own. The heat will cause the water to evaporate and the weight of the brick will flatten them.
"Dad is offended." Agata Muceniece about her relationship with Priluchny after the divorce
If there is little snow, there will be no harvest: December 16 is Ivan the Silent Day
It’s good to wash often: myths about shampoo and hair care that only harm
DIY framed herbarium
Framing your herbarium couldn't be easier. To do this you will need a thick sheet of paper, glue and scissors.
If desired, a drawing is applied to the sheet, after which plant specimens are glued and placed in a frame.
Why is it so important to involve children in collecting herbariums?
The school curriculum for such general education subjects as biology, natural history, and natural history necessarily includes the topic of the herbarium. As homework, the teacher often asks students to collect a herbarium and make interesting crafts from a herbarium made up of plants from their area or some specific plants.
Translated from Latin, herbarium means “grass.” It is a collection of plants dried according to the rules.
To do this work correctly, you need to study the following points in detail:
- how to collect a herbarium,
- what are the features of the subsequent design of such a collection,
- how you can creatively modify the collection,
- how to preserve your herbarium for a long time so that memories from childhood remain.
The herbarium can contain either a single flower or branch or a whole plant.
The answers to all the above questions are described below.
DIY herbarium in glass
Using glass for a herbarium is an original and interesting solution. The easiest option is to buy ready-made glass frames that can be hung or placed on any surface. Special glass for the herbarium has a convenient lock; you just need to place the plant elements and close it.
Let's look at how to prepare plants and secure them between two glasses.
Prepare specimens of plants in accordance with the picture you have in mind. If you insert flowers into glass, the stems need to be cut as short as possible and the leaves removed so that the flower is well compressed.
To create a brighter picture and please the eye, add flowers of different colors.
Place all the elements on a paper towel; the flowers should not touch each other. Next, place under a press and leave for a week. The moisture must leave the flowers, this is important.
Once drying is complete, place the flowers on the glass.
Use glue or a hot glue gun to hold them in place.
Then cover the flowers on top with another piece of glass.
Frame it.
The herbarium under glass fits well into the interior.
How to make a herbarium under glass yourself, see the video below.
How to dry collected plants
Why a thick book is considered the best way to dry plants for a herbarium is not difficult to understand.
Firstly, between the sheets of the book the temperature is almost optimal for high-quality drying of plant elements (leaves, flowers, roots).
This variety is suitable for those people who create voluminous compositions.
Secondly, the plant placed in the book will never be exposed to sunlight.
ATTENTION! If sunlight falls on it while drying a plant at home, the color of the leaves, stem and flower changes dramatically. It simply fades in the sun, turns yellow-brown, and the shape of the plant shrinks, as if it came out of an oven! It is clear that albums or paintings cannot be made from such burnt plants.
You can use leaves from trees, flowers of different sizes, berries, and even moss or tree bark.
It takes at least 2-3 weeks to properly dry the herbarium so that the internal moisture from the leaves and stem is absorbed into the book sheets, keeping the color, shape and even the aroma of the plant unchanged. Depending on the juiciness of the selected plant, more time may be needed.
The herbarium should only be collected in sunny weather; if it has recently rained, you need to wait at least 2-3 hours.
For example, fallen leaves dry in a matter of days, because they have already lost most of their internal fluid. But a plant like a rose, which needs to be dried in a standing vertical position (in a vase) and in a dark, dry, cool place, will dry for the herbarium in more than a month.
Before harvesting, you need to carefully inspect the entire plant and make sure that there are no damage or insects that could damage it.
Great idea for a gift or room decor: make a picture with a herbarium
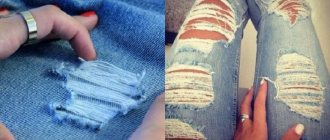
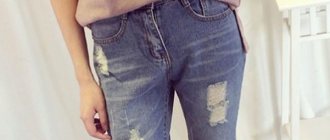
Flowers are one of the most favorite motifs for decoration. They can be found everywhere - on transparent blouses, jeans, phone cases, light skirts and nylon tights, and the list goes on. In many of these images they look just like the real thing. Naturally, flowers are one of the best gifts. Especially fresh ones. But they eventually wither and end up in the trash. However, there is a way to keep them fresh for a long time and make an original gift or decoration for the room.
Homework: making a herbarium
taxi and photo
Is it possible to catch summer by the tail? Our author, decorator and jack of all trades Tina Khabarova is sure that it is possible! Only memories remain of the calendar summer, but you can still walk in the parks, collect yellow and red leaves and make a beautiful herbarium.
Indoor monstera leaves, fragrant eucalyptus from a loved one’s bouquet, white lilies and peony roses - flowers and plants that grow at home or are sold in flower shops can also be dried and used for a herbarium. And here are a few secrets on how to properly dry plants.
If you want to collect leaves and flowers in parks, then follow these rules:
Having collected flowers on a walk, hurry to immediately place them in a book or under pressure before the delicate petals curl up. Since this is not always possible, I came up with the idea of taking a thick book with a beautiful cover with me on a walk with my daughter. Inside the book I placed many sheets of plain white paper, folded in half.
Arrange the flowers in the book carefully and straighten each petal: their appearance depends on this. Paper is needed so that the flowers do not spoil the book with the juice released during drying under a press, and the ink does not print on the flowers (and vice versa). If the plants are large and dense, it is better to lay several leaves. And it’s very important to find a comfortable elastic band and put it on top of the book to create a press effect and not lose all the treasures on the way home.
As soon as you get home (or during this day), transfer the plants to a home press and free the book for new finds. Plants need to be dried under weight so that all the moisture comes out of them. To do this, they usually use stacks of books and all kinds of improvised means.