Since ancient times, the Fox has developed a reputation as a cunning and resourceful cheat, who, with her charm and sharp mind, was able to charm even the extremely cautious Kolobok. She is also a real traveler, wandering from one folk tale to another, and in all their stories she constantly confirms her intelligence and intelligence.
Because of the nationwide love for this bright red beauty, the little fox-sister always remains a welcome guest at all costume events. Your little girl will surely love Chanterelle's fancy dress costume, as her bright image will not leave anyone indifferent. Moreover, if you sew it yourself, you will be able to translate our advice into it, as well as your fantasies.
Little fox
The fox is one of the most common folklore characters. Her presence is observed in many beloved fairy tales. Accordingly, the little fox often plays an important role in children's events.
Of course, you can rent a carnival costume at the right time. But this is a troublesome matter and requires strict adherence to return deadlines, which is not always convenient. As an alternative to renting, you can make a fox costume for a girl with your own hands.
The portal https://dnevnikmastera.ru/ offers many non-standard handicraft options - instructions, diagrams, new items, original designs, secrets from craftswomen.
Homemade fox costume
It is quite possible to make such a costume yourself. All it takes is a little effort and a little patience.
The photographs of DIY fox costumes show many options. All that remains is to choose the most suitable one.
Main components
The only prerequisite when creating a fox costume is color.
Orange (red) should predominate. Otherwise there are no strict restrictions. A standard simple costume consists of three parts: top, bottom and head part (mask, ears or face painting). A T-shirt, turtleneck, or blouse are suitable as a top. The bottom is a skirt or trousers.
A more complex model can be a dress or sundress. In any case, how to sew a fox costume with your own hands will have to be determined based on the possibilities.
Skirt sun
A fluffy skirt is perfect for a fox costume. Any available fabric can be used as material.
Note!
Wood burning for beginners: tips and secrets for burning pictures
Plasticineography - interesting options for creating pictures from plasticine on cardboard for children
- DIY scrapbooking for beginners: what it is and how to do it. What you need to create a beautiful album or notebook (photo + video)
After taking your child’s measurements, draw a pattern diagram on special graph paper or on a large piece of wallpaper.
In total, you will need to take two measurements: waist circumference and product length. A visual example of a sun skirt pattern can be found on the Internet.
- Using chalk or a piece of soap, transfer the finished pattern onto the fabric and cut it out;
- turn the top edge of the product 6 - 8 cm inside out and sew, forming a place for pulling the elastic through:
- insert the elastic band and connect it into a ring:
- Hem the edge of the product with a hidden seam.
Skycloud's Diary
- Architecture (114)
- Bodyflex, yoga (57)
- Videos (1,397)
- All about coffee (492) Sunday coffee with newspaper (45)
- Knitting (226) My knitting items (7)
- Pancakes (57)
- and talk? (258)
- Interior things (149)
- Cat housing (19)
- Restaurants (46)
- Yellow Brick Road (13)
- My MKs (11)
- Shoes (67)
- Maidan, Ukraine, Crimea (109)
- Interesting places on the planet (85)
- Other materials (128)
- Jewelry (115)
petticoat
To make the fox's skirt fluffy and beautiful, you need to sew a petticoat for it. It is best to use tulle as a material.
The length of the petticoat should be 2 - 3 cm shorter than the main skirt. The width is 2-4 times the waist circumference. The greater the difference, the more fluffy the skirt will look.
After cutting off the required amount of tulle, stitch the sides. Fold and hem the top edge and thread the elastic through. Hem the bottom edge. All that remains is to steam the finished product.
Note!
- How to make a craft with your own hands: what you can do with your own hands at home
DIY foam crafts: snowman, Christmas tree, sculptures, original figures with instructions (photo + video)
Papier mache from egg trays, boxes, cassettes: the best ideas on what can be made from egg packaging
Tail
Without this element, the fox costume will not look complete. The tail can be made from any material, including fur. If you don’t have one at hand, it won’t be difficult to sew a tail from fabric.
Cut two blanks from a suitable color of fabric. Their size must be calculated individually. To make the ponytail look more natural, make the pieces slightly rounded.
Cut two pieces of arbitrary shape from white fabric. This will be the tip of the tail.Sew the product, leaving an opening for stuffing. Place the filling inside. The tail is ready.
This ponytail can be easily attached to the waistband of a skirt or trousers.
Note!
DIY vase: step-by-step photo instructions, master class for a beautiful and unusual craft
- Paintings from buttons, panels, appliques and compositions with your own hands: how to make flowers, a butterfly, a fish or a tree craft from buttons
- Flowers made of wool (85 photos) - how to felt a flower from felt or a wool brooch. Step-by-step instructions for beginners
Bookmarks in the shape of animals
For those who love animals as well as bookmarks, paper origami allows you to combine your preferences by creating funny paper animals that will carefully ensure that the right place in the book is not lost in the bustle of everyday life.
The cute faces of these origami crafts will not only serve their intended purpose, but will also certainly lift your spirits, both during the assembly process and during intended use. Making such bookmarks is very easy, especially if you have detailed instructions with photos and video tips at hand.
Bookmark in the shape of a cat
To work you will need:
- square sheet of paper, it is better to use colored one-sided paper;
- patience.
The process of assembling a bookmark step by step. For ease of use, the sheet is folded diagonally and then unfolded. The marked fold lines will help you navigate your work. The sheet is placed with the angle up, then folded to the horizontal fold line, as shown in the figure number 1. Then the remaining “ears” are also folded towards the center, connecting on the same fold line.
After this, the sharp nose is bent twice along the dotted lines, first inward, then outward. The resulting figure is folded in half along a horizontal line. Fold according to the dotted line indicated in the figure at number 5. The folded part is opened and leveled. The almost finished cat is turned slightly.
Form a tail by bending the part outward. The triangles at the bottom, which prevents the cat from sitting upright, are bent inward. Now you can start folding the muzzle. The lower part is folded along the dotted line (Fig. 10). The tip of the curved part is bent back to form a nose.
The ears are made with a double bend (first the triangles are bent back, then forward, forming a fold). The origami bookmark in the shape of a cat is almost ready. All that remains is to provide him with eyes - you can draw them yourself or use store-bought ones.
Another version of a bookmark in the shape of a cat, made using the origami technique, can be seen in the video.
Video: Origami cat bookmark
Origami bookmark in the shape of a panda
The materials used are the same as those used by the cat. The paper must be colored (black) and one-sided to get the correct coloring for the panda.
Scheme for assembling a bookmark: fold the sheet in half, iron the fold, and fold it back. Then one half is also folded in half, ironed and unbent. And after that, a quarter of the sheet is folded in half again, the fold is ironed, and folded back.
The sheet is turned with the corner at the top. Fold in half, forming folds. The upper and lower corners are folded inward towards the center fold line. And then fold it again towards the center. The sheet is unbent to its original position. Finally, the preparatory work is completed, the process of folding the panda itself begins. The lower corner is folded along the third fold line.
Then the part is folded along the dotted line (Fig. 10) and the fold is ironed. The top corner is folded in the same way. The side parts are bent inward by about 1 cm along the dotted line (Fig. 12). The blank is folded in half with the black side of the paper facing inward. Turn counterclockwise. The part marked with a white arrow is opened and ironed. The result is a panda face.
The workpiece is turned face down (the muzzle is at the bottom). Make a fold along the dotted line and bend it back. Again, the corner is bent along the dotted line, the fold is smoothed out and returned to its place. The part marked with a white arrow (Fig. 19) is opened and smoothed. The panda is turned face up again. Pull out the panda's paws (in the place marked with red stars in Fig. 21). The lower “tail” is folded inward and hidden under the paws. The upper part of the head is folded back, forming a flat “top of the head.”
The entire process of assembling the bookmark can be viewed in detail in the video; everything is shown there very slowly so that it is easy to see.
Video: Panda using origami technique - bookmark
Final stage
To complete the look, think about the head of the suit and its trim.
If you have a headband under your arms, you can sew ears on it, made from the same fabric as the tail. A more difficult option would be to sew a hat - a fox mask. For lack of time, you can simply buy both.
You can use fur or tinsel to trim a fox costume. It is enough to make a trim along the bottom of the skirt, sleeves and neck of the upper part of the suit.
A great addition to your look would be an orange vest or cape.
If time before the event allows, you can see examples of how to make a more complex fox costume with your own hands.
Makeup and attributes to create an image
Makeup
If you or your child do not want to use a mask to create the image of a fox, you can use artistic makeup and draw a cute little muzzle on the face.
To do this you will need orange, white and black paint. The orange base is applied first. Then a white image is drawn near the mouth. The last to be applied are the black strokes of the mustache, the contours of the drawing and the speck of the nose. If you add an image of ears to the face, then do not forget that the inside should be white.
Attention! Makeup can be applied as a mask to the entire face or cover only the upper part.
Attributes
As an additional attribute, you can also sew hand seals that will symbolize fox paws. They can be either closed or mitts that do not cover the fingers.
To create the second option, take a rectangular piece of fabric, the width of which will be equal to the circumference of your arm. And the length is the distance from the base of the middle finger to a place 5 cm below the elbow.
We measure the distance of the palm from the smaller edge and cut the fabric diagonally from the center to the sides. Then we sew the sides. We insert an elastic band into the smooth edge, and sew a loop onto the sharp edge. This loop will secure the glove on the middle finger.
The Chanterelle costume is ready! The adult costume is performed in a similar way.
DIY autumn costumes for boys
How to make a cap for a doll?
Fox costume
Having orange items in your wardrobe will be a great help in this matter. A skirt, dress and blouse of the appropriate color are half the success. All that remains is to complete the look with additional finishing.
If a fashionista has an orange dress or blouse in her closet, it is enough to add a white breast.
To do this, cut out a piece of any shape from white fabric and sew it onto the front of the dress (blouse, T-shirt).
The tail and ears will also become necessary components of the image. It is best to make them from fur, but failing that, fabric will do.Images
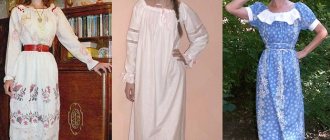
Costume for kids
Mask in the shape of a fox's face Brown or orange socks
Bright dress
A cute costume that will delight your guests
Suit for boy or girl
An option that is suitable not only for girls, but also for boys, very convenient and practical
Bright hat with ears
Comfortable soft overalls
For an adult woman
Fluffy fox ears
Blue stockings
A playful option for ladies. The suit is modern and stylish
An interesting image for women. Perfect for leading children's matinees and family parties
Fox Alice
The famous fairy-tale character from a well-known fairy tale is a frequent guest at costume events. To make an Alice fox costume with your own hands, you will need to take into account several nuances.
Unlike the standard nameless fox, Alice requires a long skirt and jacket. The upside is that these things don't have to be orange. Stretch your memory, remember the image of an insidious cheat from childhood.
A necessary element of Alice's fox costume will be her signature hat. To make such a hat yourself, pay attention to the master classes presented on the Internet.
If creating such an important attribute turns out to be difficult, simply rent it or purchase it at a specialized store.
Heart shaped bookmark
One of the simplest paper bookmark options using the origami technique is a cute heart. It is so easy to make that both beginners and children can handle it. The step-by-step instructions are extremely clear, especially if you study the meaning of the symbols used to record the assembly diagram using the origami technique. Step-by-step photos will show beginners learning the art of origami how to make a cute heart-shaped bookmark for their favorite books.
Materials for creating an origami bookmark:
- colored double-sided paper (you can use regular or special for origami);
- scissors;
- good mood.
Description: To work you will need a square piece of paper of any color. Two-color paper works best, although you can make a few test copies from regular office paper for practice. The sheet is folded in half. Then again to make a square again.
Unfold the resulting origami figure to its original state. The bottom edge is folded inward toward the horizontal fold line in the center of the square to mark a new fold line. The sheet is turned face down, the lower corners are bent to a vertical line. Then the origami blank is turned over again to face itself.
The triangular lower part is folded upward, towards the upper edge. Turn it face down again. Using your finger, slightly open the fold, as in photo 10. Smooth the resulting corner. Repeat the same steps with the left one.
The triangular edges on the left and right need to be folded inward. Bend the bottom triangle (it will be very tiny, so you will have to act carefully). For the last time, turn the origami bookmark blank over to the front side, bend the excess, following the hint of the dotted line (Fig. 15).
The heart-shaped bookmark is ready. This is one of the simplest options, which gives quite a lot of room for creativity. Ready-made origami hearts can be assembled into a flower or clover leaf, you can decorate them or select paper with patterns, designs, or prints. Using this master class as a template, you can embody your own ideas on paper.
Especially for those who prefer to see it once, a master class on creating a heart bookmark with your own hands is presented in video format.
Video: Origami hearts for books
Photos of DIY fox costumes
Please repost
0