Share on social media networks:
A child who is one year old becomes very curious, he begins to show his interest in everything, including books. The mother, in turn, must not only support the baby in his endeavors, but also help him get to know the world around him. Therefore, taking into account the age of the child and his impatience to “try everything”, purchased versions of books are short-lived. In order not to constantly spend money in used bookstores, it is enough to learn how to make a folding book with your own hands from paper, and apply this knowledge in practice. The benefit of this option is not only that it is budget-friendly, but also that you will do it with pleasure and love.
Books are useful not only to read, but also to do
If a child is not inclined to active games and prefers quiet fiddling with toys, then the opportunity to do something interesting together with adults will be good entertainment for him. Such tasks are good for developing not obvious, but important qualities in children:
Volume book with fairy tales
- fine motor skills and manual dexterity;
- rapid formation of the speech apparatus - in the brain, the centers of motor skills and speech are located nearby and stimulate each other;
- acquisition of communication and collaboration skills;
- the ability to focus one's attention on an interesting task.
Fun folding book
IMPORTANT! When the child grows up and goes to school, these skills will help him learn better. He will be less distracted in class, think logically and make the right decisions, and will quickly learn to read aloud expressively and write in beautiful handwriting.
Getting ready for work
The process of making such books in itself is not complicated. Before you start working, you should decide what information you want to convey, accordingly, what pictures should be placed in it, what to draw the baby’s attention to. Choose images that will suit the age of your child. You can take pictures and drawings from the Internet, or you can use “surviving” fragments of children’s books.
Important! As your child flips and scans the pages, he improves his fine motor skills.
There are a lot of examples of such books. Therefore, it will not be difficult for you to choose what your baby needs. We bring to your attention the most popular and easy-to-make ways to make a folding book.
Important! The topics can be very diverse: from the study of domestic animals to fragments of fairy tales.
What is a flip book
The folding book itself is a book that contains three-dimensional pictures. Books of this format can be on any topic. These could be educational materials or children's fairy tales.
The simplest option is a do-it-yourself folding book that folds like an accordion.
The voluminous figures that the child finds among the pages attract attention. Reading becomes more exciting and interesting.
Advantages and disadvantages of the toy
The flip book certainly has its advantages. First of all, strength. Since such toys are made of thick cardboard, a child will not be able to tear it. The second is the brightness of the design. This version of the book is much more interesting and attractive than paper ones. Bright and voluminous pictures attract children's attention.
The child can learn new professions.
If we talk about shortcomings, there are practically none. Perhaps your child will not appreciate such a toy, because he is more interested in cars or dolls.
Show your imagination and place the second fairy tale on the other side, then the back cover will become the beginning of a new book.
Creating such a book with your own hands in the company of your child is a great way to spend time. Try to give your baby such a gift, believe me, he will be happy to receive it.
Modular origami book
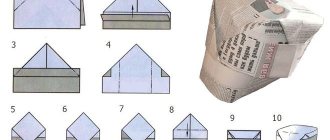
Here's a beautiful and practical gift idea, a handmade mini paper book for your friends and family. Add a metal ring and you have your very own modular origami book keychain. This is one of the easiest paper craft ideas for beginners. If you have ever wanted to learn how to make a mini-book out of paper, carefully look at the master class with step-by-step photos. If you have any questions, the video and instructions are on the website, link under the gallery.
Photo source: www.instructables.com/id/DIY-Project-Ideas-How-to-Make-a-Mini-Modular-Origa/
How to install the door leaf of a folding interior door on a track.
(photos, instructions, video master class)
So, let's assume that you have prepared the doorway, installed the guide and are ready to install the door leaf. Well, then let’s not delay, let’s start the installation right now!
First, check whether everything corresponds to the required size, if so, then great. You need to install rollers on the door leaf - the main part of the moving mechanism, by the way, here is another difference between a folding accordion interior door and a sliding sliding door: its rollers are located not vertically, but horizontally, relative to the ground, so they move along the walls of the guide, in addition, accordingly, the rotating axis is directed in the other direction, and, in addition, the rollers also have a rotating roller assembly, it is needed so that the door can be was folded. Otherwise, the steps are the same as for installing a sliding door, that is, one roller is installed on its two parts at the upper end of the door leaf. After the rollers are installed, you need to install the lower axis on which one part of the door leaf will be attached. Now you can insert the rollers into the guide.
What you need to do for this:
You remember that the guide had to be secured, so far, with only one screw, which had to be placed in the center of the doorway? So, now, due to such an unstable fastening, you need to unfold the guide and, when folded, install the door leaf on it, then the guide unfolds along with the door leaf, one extreme part of which is fixed on the lower axis. Well, that's all, now all that remains is to secure the aluminum guide with a few more screws and lubricate it for better sliding of the rollers. Your sliding door is ready, you can safely use it!
Here's another thing, I told you how important it is to prepare the doorway and that it is best to do it with a false frame, this model is the clearest proof of my words, just look at this broken doorway!
Step-by-step installation photos
Link to video master class: https://www.youtube.com/watch?v=w6vJZtGeR9QOriginal title: Door Accordion. DIY installationVideo author: Repairman School
Watch the video master class:
Paper book with cover
These little origami books are hardcover and the text block is made from a single sheet of paper folded compactly inside. How to fold a book out of paper is shown in detail in step-by-step photos. All you need is one sheet of paper for the pages, a binder for the binding, and decorative paper for the cover. For the final part, place several pieces of wax paper inside the book, one inside the front cover and one inside the back cover. This will prevent moisture from getting in while the glue dries. After this, close the book and place something heavy on top until the glue dries.
Photo source: myhandboundbooks.blogspot.com/2007/11/secret-fold-notebook.html
Master class on making an information folding bed
Svetlana Golikova
Master class on making an information folding bed
And today I would like to bring to your attention a master class on making an information folding bed . I have a huge variety of them, covering almost all thematic periods. Making them is very simple , you will need:
- cardboard packaging from colored paper and colored cardboard
- sheets of cardboard (uncommon colors)
- strips of colored paper
First, we select covers from colored cardboard or paper, in this case I needed three pieces, I select them by size.
I glue them together so that it looks like an accordion.
If necessary, I level the top and bottom of the folding bed , draw an even line with a pencil, cut off all excess
I’m trying to install it, you can already see how smooth and beautiful everything is
Now it is necessary to strengthen the sheets so that they become denser, otherwise they will bend with the propeller during use. For this I used sheets of black and brown cardboard. I paste a piece of cardboard onto each page.
This is what happened
At this stage, I fold the cot and put something heavy on top of it and leave it for a couple of hours.
Next is the decorative finishing. To prevent the dark color of the base of the pages from showing through, I glue them with album sheets. I cut the white sheets to the required size.
This is what my clamshell looks like at this stage
I glue strips of colored paper along the edges of the pages for beauty.
This is what happened. I think it's very cute!
And here is the finished information folding bed in its place .
I will be glad if my idea is useful to someone!
Master class on making flowers. A path runs through the meadow, dives to the left, to the right. Everywhere you look, there are flowers all around, and knee-deep grass. Green meadow, like a wonderful garden, fragrant and... Master class on making postcards First, you need to prepare all the necessary elements for the application. We trace children's palms on colored paper with a simple pencil. Master class on making plasticine roses We usually think about gifts on the eve of the holidays. Currently, stores offer a rich assortment and selection of different ones. Master class on making “Chamomile” I bring to your attention a master class on making chamomile. March 24 is World Tuberculosis Day. Since 1912, chamomile has been around. Master class on making screens There was a need to acquire screens in the group to divide the space. All options offered on the Internet, as a rule. Master class on making an owl Master class on making an owl from cardboard and autumn leaves. + Photo report. Autumn gives us a lot of surprises. The weather is changing. Master class on making Topiary Topiary is a fairy-tale tree, a decorative original work, the crown of which can take on a wide variety of shapes and be made. Master class on making decoration DECORATION FOR A HALL OR GROUP “FLOWER”. This is what a lush flower can be made from scrap material. To make it you will need:.
Source
Educational accordion book
It's no secret that little children love everything bright and unusual. A hand-made accordion book with love can become not only entertainment for a child, but also educational material.
You can fill the pages of the book with letters of the alphabet, numbers from one to ten, names of animals, fruits or flowers. You can print out a small children's fairy tale and draw illustrations in it with your own hand, or together with your child.
Such children's books, made by the mother or together, will certainly become the child's favorite. He will look at them again and again, receiving developing information at the same time.
A first-grader with the help of his parents can make such a craft about the seasons for his little brother or beloved grandmother.
Making a baby book with your child
Sometimes children even get bored with cute felt bunnies and rattles, but they love to create and come up with new ideas themselves. Choose a theme for a baby book together, draw, collect interesting facts, use pictures and stickers!
You will need:
Paper, glue, paints and pencils, old magazines and printouts, stickers, needle and thread.
How to do:
Instead of making fabric pages or printing out backgrounds, design them yourself! For example, to make a book about animals, first draw their habitats. To do this, fold sheets of A4 paper in half and hand them to your child along with the pictures - let the child choose the animals he wants to live there, while you find something interesting about them.
Older children can fill out the text in the baby book themselves - at the same time this will be a short training in their writing skills. All that remains is to stick all the animals onto your pages and sew the book in the middle with regular thick thread.
Description of the production process
- First you need to cut out the size of the page from cardboard. This is already arbitrary, it is desirable that all pages are the same.
- We will need strips of fabric that are about 4 centimeters wide and their length is equal to the length of the page.
- You need to connect all the resulting pages by gluing them onto these pieces of fabric, and then bend the workpiece like an accordion.
- Now you should carefully place the book on its edge and make sure that it opens and closes well.
- After which it needs to be folded and pressed down with something heavy so that when it dries, it remains flat.
- Pages can be decorated with beautiful frames made of colored paper or with fabric strips.
Done, now you have a frame for a children's book. The decorating process can take a long time. It is important to be creative and original while creating. If you don’t have any ideas, then involve the rest of the family in the process or create a book together with your child! This will leave warm memories in his memory.
Required materials and tools
Hydraulic press: application, how to make it yourself
In order for bridges made of paper and cardboard to be of high quality, you should correctly select the tools and materials for the work. The main ones are:
1. Paper. It is optimal to opt for white and colored office paper. It is quite dense, non-slippery, and holds its shape well. Also suitable for modular bridges. Pollen office paper is colored on both sides, so the folds do not stand out. Another option is kami. This is special paper for origami. It is sold in the form of squares of different sizes. There are sheets painted on one side or both, and also equipped with ornaments. For simple models of bridges, you can take regular sheets of writing, colored paper for children's creativity, or wrapping paper with a matte surface.
2. Glue. Adhesive is rarely used for modular bridges. It is only needed for attaching or gluing small parts. In other cases, the glue serves to strengthen the strength of the product. You can use PVA, glue stick, adhesive mass.
3. Scissors. You should only choose sharp scissors with free movement of the blades. It is recommended to prepare several pairs with blades of different shapes and lengths. For example, nail scissors with curved ends are suitable for cutting out small parts.
4. Pencil. Needed for work to mark parts. It must be sharpened or with a replaceable lead in order to draw a very thin line.
5. Ruler, triangle, protractor. These devices are necessary for drawing parts or folding them at a certain angle.
You may also need a cutter (for cutting several sheets at once), a knife or an awl.
Models of popular bridges made of paper and cardboard
Although the models differ in appearance, they have the same components:
- supports are the structures on which the bridge rests;
- spans - the body of the bridge through which traffic passes.
The models differ in the structure of the spans and are:
- beam;
- arched;
- hanging;
- pontoon
Externally they look like this:
We can highlight the most popular models of bridges made of cardboard and paper, which are made more often than others.
These include:
1. Railway. For example, a model of a single-track bridge is made without scissors and glue. The assembly parts are connected to each other without gluing.
Side view:
2. Another model is Tower Bridge. The diagram can be found in ours. Then print it out and follow each step exactly.
3. A simpler option using additional materials is a bridge made of cardboard and matches.
Process:
4. A bridge as an element of a large structure.
Origami album
This origami book is a six-page book folded from typical origami paper (15cm x 15cm).
The size of each page will be 2.5 cm x 5 cm. This means that if you want to place two 10 x 12 photographs on each page, then the paper size must be at least 75 x 75 cm. Making an origami album starts with horizontal and vertical Z-folds.
Photo source: www.origami-make.org/origami-album.php
What you need to make a book at home
If you choose the classic version of a book with paper sheets and hardcover, you will need a careful selection of materials:
- sheets of paper with a fairly thick texture (for example, A4 office paper);
- thick cardboard (not corrugated);
- fabric or strong paper for cover and binding;
- PVA or stationery glue;
- ruler, scissors or breadboard knife.
If the book is made using non-traditional technology, then stationery folders with plastic file inserts, photo albums, and simple sketchbooks with thick covers will come in handy. Even felt or similar non-flowing dense fabrics are suitable for creating a book. They make nice, beautiful, durable books for little ones.
Let's make a book together
The simplest option is a do-it-yourself folding book that folds like an accordion. It consists of pages sequentially fastened with flexible corner joints. To make a folding book you will need:
Multi-colored shiny cardboard
- thick sheets of cardboard;
- adhesive tape;
- scissors, glue;
- ruler;
- a cloth for smoothing pictures;
- text and pictures printed on a color printer.
Stationery Self-adhesive film
Think about the contents of the book. It can consist of color pictures, small and simple text that convey the content of your favorite fairy tale. Images should be bright, large and understandable to a child. Type the text on the computer in large letters. Make it with one and a half line spacing and a font size of at least 14. At 4 years old, study
How else can you make a book?
If you don't like boring sticky paper, use paper, border tape, or pre-made scrapbooking kits. They include ready-made pictures, beautiful frames and adhesive tapes. Stickers, paper, labels, rubber and silicone stamps, special markers will allow you to expand your arsenal of expressive means.
Scrapbooking kit Scrapbooking
There are also a large number of electronic scrapbooking sites on the Internet that offer interesting backgrounds and designs to print. Go to any of them, download and print the image you like. Glue it onto the cardboard before you start pinning the pages together.
Scrapbooking sheets
FOR YOUR INFORMATION! Choose sets with a children's theme. Set simple tasks for your child and ask him to help you.
Little artist
A folding book made by a child with his own hands or with your help will be his first work experience and will make his hands more dexterous. In the process of communication, he will acquire useful skills and learn many new words. You will learn to understand children and find a common language with them.
Book of Seasons Book with a winter fairy tale Book with funny pictures
DIY folding folder
In the same way, you can make a folding folder with your own hands. For kids, fairy tales with pictures can be placed on such folders; they will be interested in looking at the characters.
Cut the text and pictures into fragments that correspond to the pages.
For older children, the folder can be placed at the table where they do their homework; the school schedule, rules for some school subjects, etc. can be placed there.
It is not at all necessary that the content of a folding book be a fairy tale.
To create a folder, you will definitely need cardboard, transparent or colored film and decorative items for decoration.
Variant of the semicircular book model
An interesting version of a folding book is a semicircular folding bed decorated with braid, which is easy to make with your own hands:
- 2 colored sheets of paper;
- decorative paper for finishing (such materials can be purchased in craft stores);
- compass and pencil;
- transparent stationery tape or quick-drying glue;
- satin or silk ribbon.
It is necessary to draw 2 circles with a compass and a pencil, with a diameter of about 100 mm. Then they are cut out and each drawn into 4 triangles. When folding in half, you need to secure the upper part in the form of a corner, and fold the lower part inward. It turns out to be an original figure with an interesting design. Various figures and pictures are glued inside and the top part is decorated with decorative paper. You can create a folding book with a large number of sheets. A satin ribbon is attached to each, you can pull it together and the book closes itself.
Such a folding bed can be used not only as an educational book for small children, but also as a more adult version - a photo album or a decorative element for the office.
Making a pattern
Before you start assembling, you need to draw a pattern. To do this, you need to decide what size the folding bed will be. The optimal height is 25 cm, length is 2 meters, and width is 1 meter.
Using simple mathematical formulas, you need to calculate how much material you need to take. If the distance between the folds (zigzags) is 20 cm, then for a two-meter folding bed you will need a piece 5 meters long and 1 meter wide, respectively. The second piece should be 2 meters by 1 meter in size.
Scheme of a folding leg for a book table
For a better understanding of the “mechanism” for unfolding the inner leg of a mini book-table, which you can make with your own hands, I will provide more drawings and diagrams.
This will be the diagram of the folding table-book support itself, folded and unfolded.
The planks are attached to each other using long 4x30 screws or furniture ties. The movable part of the leg is made into narrow card loops (you can use a cut long piano loop).
The folding leg is attached to the very base of the book-table with a long piano loop.
Additional drawing of the inside of the book-table from different sides.
Project preparation
The sofa-book diagram includes drawings of each part separately and general dimensions of the product .
- Seat – consists of 2 parts: a box for linen and a frame. Slats are attached to the frame. You can also use a plywood sheet as a base, but lamellas are a more convenient and practical option. Even if the box is of medium size, it is reinforced with crossbars - their thickness and the distance between the slats are indicated in the drawing.
- The back is a flat frame and slats. The upper structure is strengthened in the same way as the lower one, since when laid out it acts as a sleeping bed. The frequency of installation of lamellas is the same.
- If homemade furniture has armrests , a template is shown on the drawing indicating the dimensions.
When drawing up a diagram, it is recommended to immediately indicate the location of the attachment mechanism for the layout. Based on the finished drawing, it is easy to calculate the amount of fasteners needed: this can also be immediately indicated on the sketch.
You can use ready-made drawings on relevant websites and forums. But at the same time it is necessary to strictly observe the specified dimensions and proportions.
How to make homemade books
A gift book, diary or notepad can be easily made using the traditional method. Bookbinding is not difficult to master, and the main thing required is accuracy. Any book is collected like this:
- Make several thin notebooks, folding 3-4 A4 sheets. Each of them needs to be folded along the central transverse line and smoothed. Sew the assembled notebooks along the fold lines, and then make stitches across, connecting all the notebooks into a common block.
- Coat the stitched spine with glue and dry.
- For the hard cover, cut out 2 cardboard rectangles slightly larger than the pages of the block. The cover should extend beyond the edges of the pages by 3-4 mm.
- Lay out the base of the covers on fabric or paper so that between the rectangles there is a distance equal to the thickness of the block of notebooks with an allowance of about 5 mm. Trim the edges so that you can wrap them onto the inside of the cardboard by 2-3 cm. Wrap and glue.
- Cut a strip of paper to stiffen the spine. Apply glue and place it on the fabric between the cardboard rectangles, under the folded edges. Press and leave until dry.
- Assemble the book by placing a block of notebooks in the cover. Make 2 endpapers from paper: you can take decorative, thick paper (for gifts, etc.). The size of these parts is equal to A4 format; they are folded in half and glued to the back of the covers, covering the unpasted part. Apply a bead of glue to the edge of the notebook block and glue the endpaper to it as well. Do the same with the other side of the cover. Dry the finished book.
Pictures and text in a homemade book can be drawn, pasted or printed in advance, taking into account the sequence of pages in the notebooks.
It’s easier to make a baby book: from 1 small notebook, connecting all the pages along the fold with a stapler. The outer sheets will serve as covers.