An origami paper hat is one of the most practical and popular models. During repairs or on the beach, you have to make all kinds of hats from newspaper, since ready-made ones are not always at hand. However, this is not the only use of origami hats. They can complement a costume for a themed party or Halloween, an outfit for your favorite doll, or the look of a pet for a photo shoot. Of course, instead of a newspaper you will need beautiful paper: craft paper, packaging paper, “kami” or a piece of wallpaper. Basic models are easy to vary and improve. In a word, we turn on our imagination and... it's in the bag!
Newspaper tricorne hat
One of the simplest and once popular hats that can be made in a hurry is the well-known triangular cap made from newspaper for repair and painting work.
A comfortable headdress perfectly protects your hair and forehead from dust, paint and whitewash. It is easy to dispose of after use.
By turning on your imagination, you can expand the scope of application of this model. Properly decorated, it will replace a pirate headdress for a children's carnival costume.
To make a simple painter's cocked hat, all you need is newspaper.
Miniature Shapoklyak
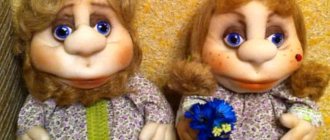
The heroine of the famous cartoon always aroused interest in her person, although she was an evil old woman. The Shapoklyak masquerade costume stands out for its elegance and taste. The petite lady was always stylishly dressed.
The elegant Shapoklyak hat fascinates and intrigues. She misleads others. According to the cartoon, the characters initially thought that only intelligent, well-mannered people could wear such clothes.
A person's appearance does not always correspond to his inner world. The entire wardrobe of the harmful old woman was black. Jacket with white cuffs and openwork collar. Straight skirt with frills. A real lady.
Making a model is not difficult. The base is a cylinder. The width of the fields is chosen by the wizard. The color must be black. There was one more detail from the cartoon. A knitting needle with a drop at the end was sticking out.
You can create it from cardboard if you draw it and choose paint. The decoration may be different, but brilliant. You can use tinsel. In such a suit there is beauty, not a harmful grandma! To complete the bag, there is a Lariska rat in it.
Scheme of work
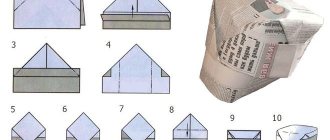
- An ordinary newspaper, folded in half, will be the basis for the work.
- The edges of the newspaper are folded towards the middle of the sheet and the seams are smoothed out.
- The bottom edges of the newspaper sheet should be folded inward.
- The resulting workpiece must be turned inside out. Bend the ends up.
A simple cocked hat for repair work is ready.
If you want to make a pirate headdress, it is more convenient to use a sheet of A3 paper. The product can be painted and added with an emblem.
We recommend reading:
DIY polymer clay jewelry: review of the best master class with step-by-step instructions for beginners (150 photos of original ideas)- DIY polymer clay flowers (120 photos of the best ideas) - simple instructions with full description + master class and video tutorials
- Quilling for beginners (200 photos) - step-by-step instructions with description. The best master class on creating quilling crafts with your own hands
Master classes on creating a hat
Today, the following types of hats are most relevant for children's parties:
- Dunno paper hat.
- Pirate headdress.
- Hat for a hussar.
- Women's hat for a beauty contest.
- Original sombrero.
All submitted works are accompanied by detailed instructions with step-by-step descriptions of actions.
What paper can you use to make a hat?
Paper hats are good to make because you can use almost any large enough piece of paper you have on hand as the base material, for example:
- full spread of the newspaper;
- A4 sheet of cardboard;
- a piece of paper wallpaper;
- office or landscape paper;
- colored paper or cardboard.
Important! Do not use paper that is too thin or soft - it will not hold its shape.
Repair hat made from newspaper
During repairs, construction dust and plaster tend to settle on the hairstyle. To prevent this, you can make a simple boat hat from newspaper.
And it is simple precisely because it is really very simple to put it together:
- Fold a sheet of newspaper in half. Mark the middle longitudinal line of the sheet by bending it in half lengthwise.
- Considering the fold of the sheet as the top, bend the upper corners to the middle line.
- Bend the bottom strip outward butt to the bottom line.
- Fold the bottom corners of the lapels.
- Fold the flaps up from the outside.
- Pull the center points of the bottom. You will get a square.
- Fold the bottom corners outward, bending along a line slightly below the center of the square.
- Pull the center points of the bottom again.
- Fold the flaps outward again.
- Grasping the corners, pull them apart.
- Add volume to the hat.
Having learned how to make such a headdress, you will not have to worry about your hairstyle during any dirty work.
How to make a hat with a visor from a newspaper with your own hands
Another interesting version of a newspaper headdress is a cap.
It is also done by folding paper without using scissors and glue as follows:
- Fold a sheet of newspaper in half. Fold the top corners, closing them in the middle.
- Fold one of the bottom strips in half.
- Bend it from the outside, forming a side.
- Turn the workpiece over and bend the protruding corners of the side. Fold the sides, forming the size of the future cap.
- Fold the bottom strip up to the hem line.
- Fold in the bottom corners.
- Tuck the free corners of the curved triangles inside the side.
- Turn the workpiece over and bend the top corner.
- Tuck it under the side.
- Straighten the cap and give it volume.
This cap can be worn on a sunny day somewhere in the country.
Paper cylinder
The young gentleman will definitely love the paper cylinder.
To make it you will need a sheet of colored paper. You can take the packaging. And also a thick paper or cardboard sheet of A4 format, scissors, glue, paints, a pencil, two circles of different diameters.
After preparing everything you need, you can start working:
- Cut a strip from a colored sheet. The width of the strip is the height of the future hat, the length is equal to the circumference of the cylinder.
- Roll the strip into a pipe and glue it together.
- On a sheet of cardboard, draw two circles of different diameters with a common center. The inner circle should be equal in diameter to the glued pipe. The difference between them is the width of the cylinder fields.
- Color the resulting fields and cut them out.
- Cut the bottom edge of the pipe into a fringe 1 cm deep and wide.
At this stage, all the parts are ready, all that remains is to connect them. To do this, you need to bend the fringe of the pipe outward, put the cut ring on the pipe and glue the fringe along its lower side.
On a note! For a neater look, you can cut out a second ring and glue it underneath, covering the fringe.
You can diversify the hat with additional fun decor.
Magician's Top Hat
For a children's party or carnival, you can quickly make a hat in the shape of a cylinder. Depending on the idea, the top hat can complement the stylish image of a young gentleman or become a magician’s prop.
Detailed instructions for making stylish paper cylinders will help you complete the task without any extra effort.
In order to make a cylinder, you need to prepare:
- cardboard (or a sheet of Whatman paper),
- pencil,
- masking tape,
- PVA glue,
- paint,
- colored paper.
It is better to make a cylinder from thick cardboard, since it holds its shape better. In the absence of cardboard, you can take whatman paper.
In order to make it comfortable for a child to wear a homemade top hat at a party, it is important to make it the right size.
We recommend reading:
DIY paper orchid - a review of the best ideas and tips from craftswomen. Step-by-step instructions + master class (photo + video lessons)- DIY paper hyacinth: the best master class for beginners with step-by-step instructions and diagrams from A to Z (130 photos)
Paper stars - instructions on how to quickly and easily learn how to make beautiful stars with your own hands (100 photos of finished works)
Musketeer - hero
Boys constantly dream of being winners. For the most important holiday of the year, you will need to try to figure out which New Year's hat will become the center of attention. The ability to make crafts and a rich imagination will help you turn your dreams into a craft.
The musketeer's hat is an important, main item of the entire masquerade masterpiece. Without it, the image of this brave warrior will not be fully recognizable. The accessory will be more reliable and durable if it is made from thick paper. After taking measurements from the head there should be the following details:
- Low cylinder.
- Circle for the bottom (top) of the hat.
- Wide circle for fields.
- Feather.
For a finished version, the product can be coated with paint, or covered with fabric and decorated with shiny rain.
Advice! For a better fit of the fabric, sew an invisible seam with a needle.
Don't forget about the pen. This item is required. It complements the image. The feather needs to be glued or hemmed. To make it look neat and attractive, disguise the place of fixation with a buckle.
How to make a pattern
To do this, you need to measure the diameter of the child’s head with a measuring tape and determine the height of the headdress.
Based on the data obtained, a pattern is drawn.
- The rectangular crown is drawn according to the height of the product and the circumference of the head.
- By folding the two edges, it is easy to draw the bottom of the hat based on the resulting blank.
- The easiest way to draw the brim of a cylinder is to use the finished bottom of the hat. It is circled and an internal hole for the head is obtained. By drawing a larger circle, the outer diameter of the cylinder fields is obtained. They shouldn't be too wide.
Operating procedure.
- Cut out all parts of the cylinder from cardboard in accordance with the patterns. Draw the crown 3 cm higher. Mark this stock with a line. For the fields, cut out 2 pieces.
- Cut the remaining 3 cm wide strip into equally sized cloves.
- Glue the crown along the side seam.
- Glue the bottom.
- The brim of the hat must be glued to the cut out teeth so that it is between the two parts. It is more convenient to use PVA glue.
- To further decorate the cylinder, use paint or paste it over with colored paper elements.
It didn't take long to create a stylish top hat. Based on the resulting pattern, you can make different cylinders.
Ski hat
Additionally, you will need a lace or a small piece of twine.
Note!
- Macrame: diagrams, interesting projects and detailed descriptions of making crafts
- Crochet amigurumi - examples of how to make a beautiful toy with your own hands (75 photos)
- Coffee topiary: step-by-step master class on how to make a small decorative tree from coffee beans
- Using a measuring tape over the ears and above the eyebrows, measure the circumference of the head.
- A strip of length equal to the girth plus one centimeter for glue is marked on whatman paper.
- Band width – the height of the hat is equal to the size from the earlobe to the crown of the head.
- The strip is cut out, rolled into a cylinder and glued together.
- After the glue has dried on the cylinder, vertical cuts are made every 1.5 cm with a length equal to half the width of the strip.
- The cut parts are glued to the cut parts on the opposite side, so that an “arc” is formed.
- After the upper part is completely closed, a lace is threaded into the center and secured from the inside with a small paper disk with a diameter of 2-3 cm with glue applied to it.
- At the second end of the lace, 2 disks with a diameter of 4 cm are pinned in the center.
- A knot is tied at the tip of the lace, which will prevent the paper discs from moving arbitrarily.
- Numerous cuts are made on the disks towards the center, 1.5 cm long.
- The resulting strips are bent in the opposite direction to form a tassel.
The same method can be used to make a baseball cap, however, a tassel is not required, but a visor is required.
A headdress is an element of clothing that effectively complements any chosen style. In some cases its presence is simply necessary. However, with all the variety of offers, it is not always possible to purchase the right model that suits a particular image.
This is especially difficult to do when you want to achieve a certain originality, in this case it’s worth trying your hand and the suggested recommendations...
Small decorative cylinder
A miniature top hat will serve as a stylish addition to a young lady’s carnival look or as a decorative element.
We recommend reading:
- A paper crown is a simple instruction for creating original jewelry with your own hands. Templates, diagrams, master class, exclusive design (110 photos)
Weaving from newspaper tubes for beginners: the best free master class, with step-by-step instructions. Photos, diagrams, unusual ideas, videos
- Paper rose - how to make it yourself? Step-by-step instructions, original ideas, photos, videos, master class
Such a miniature hat can be attached to your hair using bobby pins or hair clips.
To make such a headdress you will need:
- cardboard,
- decorative paper for decoration (coated, corrugated, colored, packaging),
- scissors,
- glue,
- simple pencil,
- ruler,
- decorative elements (ribbon, braid, lace).
In this case, there is no need to take measurements; the product is made without them. The pattern is drawn in any size; simple hat templates for beginners can be copied from the Internet.
Operating procedure.
- Draw a rectangle measuring 42 x 9 cm.
- Draw lines 2 cm from the long side of the rectangle at the top and bottom.
- Carefully cut small cloves to the mark on both sides of the rectangle.
- Glue the strip along the seam.
- Cut out a circle with a diameter of 20 cm. These are the margins. Glue them to the cloves.
- Cut out a circle with a diameter of 12 cm. This is the bottom of the hat. Glue it.
The cylinder is generally ready.
Step-by-step instruction
- Cut the cardboard into two pieces of equal width. This value affects the height of the product.
- Take head measurements. Divide the resulting total in half. The result will be equal to the length. Leave about 2 cm for gluing, cut off the excess.
- Fix the edges first in one strip and wait until it is fixed.
- Roll and glue at other ends.
- Having determined the bottom side, make cuts inward by 2 cm.
- For fields, use a wide plate. Place it, circle it. Place the cylinder you made in the middle and outline it too. Cut out the figure.
- Place the craft on the table with the cuts facing down. Attach double-sided tape to each one, or apply a small amount of glue.
- Place the cut out shape resembling a bagel on top and press.
- The glued cuts will be visible on the bottom side. To hide them, prepare another “steering wheel” and place it on the glue from below.
- The resulting cylinder hat will become more expressive if it is decorated with a contrasting ribbon.
The method is accessible and does not require time and effort, special skills or equipment. Saves budget, develops skills and imagination.
Decor options
There are many ways to decorate such a headdress. It is important that the design of the product and its color scheme do not fall out of the general style of clothing, but complement it.
You can decorate such a hat with lace or braid, corrugated paper or fabric.
The product can be complemented with paper flowers, a buckle or a brooch.
To prevent the headdress from moving off the head, it can be glued to an elastic band or hairband.
Musketeer - hero
Boys constantly dream of being winners. For the most important holiday of the year, you will need to try to figure out which New Year's hat will become the center of attention. The ability to make crafts and a rich imagination will help you turn your dreams into a craft.
Note!
DIY paper machine craft: various options for creating a machine
- How to make paper flowers with your own hands for children - a master class on making
- How to make Minecraft figures and blocks from paper: step-by-step instructions
The musketeer's hat is an important, main item of the entire masquerade masterpiece. Without it, the image of this brave warrior will not be fully recognizable. The accessory will be more reliable and durable if it is made from thick paper. After taking measurements from the head there should be the following details:
- Low cylinder.
- Circle for the bottom (top) of the hat.
- Wide circle for fields.
- Feather.
For a finished version, the product can be coated with paint, or covered with fabric and decorated with shiny rain.
Advice! For a better fit of the fabric, sew an invisible seam with a needle.
Don't forget about the pen. This item is required. It complements the image. The feather needs to be glued or hemmed. To make it look neat and attractive, disguise the place of fixation with a buckle.
Dunno Hat
If you want to make a Dunno costume for a carnival, all you need to do is make a blue hat with a large brim with your own hands.
The hat can be glued together from a sheet of Whatman paper and covered with blue paper.
For manufacturing, you need to determine the height of the product.
Operating procedure.
- From the corner of the Whatman paper in two directions, measure the height of the future hat. Add 3 cm to the teeth for gluing the margins.
- Draw two lines. Cut out the resulting triangle.
- Cut the cloves to the same width. Glue the workpiece along the side seam.
- Place the resulting cone with its base on whatman paper and circle it.
- Measure a distance from the resulting circle equal to the width of the margins. Cut two identical parts.
- Glue both parts, placing the teeth between them.
- Paint the hat with blue gouache or cover it with colored paper.
- You can complement the hat with a tassel on a cord.
It will take very little time to make a Dunno hat. You can cope without work experience.
Miniature Shapoklyak
The heroine of the famous cartoon always aroused interest in her person, although she was an evil old woman. The Shapoklyak masquerade costume stands out for its elegance and taste.
Note!
What can be made from a box at home for kindergarten: the best craft ideas + video master class
- How to make flowers from napkins quickly and easily: 15 ways to create bouquets of roses, carnations, peonies
- How to make flowers from corrugated paper with your own hands: step-by-step instructions for creating voluminous bouquets
The petite lady was always stylishly dressed. The elegant Shapoklyak hat fascinates and intrigues. She misleads others. According to the cartoon, the characters initially thought that only intelligent, well-mannered people could wear such clothes.
A person's appearance does not always correspond to his inner world. The entire wardrobe of the harmful old woman was black. Jacket with white cuffs and openwork collar. Straight skirt with frills. A real lady.
Making a model is not difficult. The base is a cylinder. The width of the fields is chosen by the wizard. The color must be black. There was one more detail from the cartoon. A knitting needle with a drop at the end was sticking out.
You can create it from cardboard if you draw it and choose paint. The decoration may be different, but brilliant. You can use tinsel. In such a suit there is beauty, not a harmful grandma! To complete the bag, there is a Lariska rat in it.
Wizard's cap
One of the easiest options to manufacture is a cone-shaped cap.
It’s easy to make without a template or pattern.
- It is necessary to measure the head circumference and height of the product.
- Draw a triangle on cardboard and cut it out.
- Glue along the side seam.
Cover with colored paper or paint. You can stick stars or draw them.
A paper hat can be made with a low or high crown and decorated in different styles. Before you make a paper hat with your own hands, you need to carefully consider its design.
The Elusive Zorro
The mysterious Zorro hat with your own hands will bring success to the boys in the New Year's competition. Make it also on the basis of a cylindrical shape, paint it black, or cover it with fabric. Sew ribbons to the brim so you can fold it back. The distinctive sign will be the letter Z. It would be better to make it out of foil and glue it to the front.
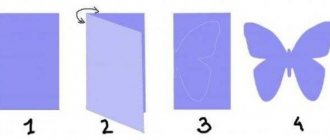
Origami cap
Less common ways to make headwear are caps made by folding paper. Meanwhile, such a cap will be convenient at the dacha, beach or picnic.
There are two schemes for making caps using the origami technique.
Features of paper hats
How to make a cap from newspaper? In fact, everything is much simpler than it seems. Making crafts does not take much time. The technique allows you to make hats for a large number of people. Features of the craft:
- ease of implementation;
- covering your head from construction debris;
- sun protection in hot weather;
- cheap material for manufacturing;
- one-time use.
Paper crafts are suitable for children's games. You can create several hats for your child and his favorite toys. This way, your little one can imagine going camping with his best friends.
Necessary materials
Hats using the origami technique are made from any available paper. They can be folded from newspaper or use unnecessary scraps of wallpaper - the origami hat is so unpretentious in its material. Take yesterday's Izvestia or simple office paper - it doesn't matter. Much more significant is the decor, thanks to which the paper hat will acquire a thematic affiliation (pirate, gentleman, cowboy). To decorate the headdress, use feathers, any appliqués, drawings and inscriptions, buttons and any other available details. So a simple paper cap can easily become a pioneer cap, an army cap, and even a navy cap.
What you need to make a paper hat
To make a paper hat, first of all, you need to prepare a place to work, materials and tools.
It will be most convenient to sit at a table with good lighting. There should be enough space so that you can lay out a sheet of paper and a little more.
For some models of hats, all you need to work with is the material itself - paper. For others, you will need to additionally prepare the following:
- scissors;
- glue;
- paints and decorations;
- ruler, pencil;
- a compass or anything round that can be traced, the right size.
You should immediately clarify what you will need for the work so as not to interrupt the creative process.
Paper cap
A cap made from cardboard is much better than one made from newspaper. It is created on the basis of a sketch, which consists of 6-8 sections. First, they design the drawing in pencil on paper, then cut out the pattern along the marked lines, connect the parts in the center, aligning the holes made with a hole punch. The visor is glued to the main part. If the product is decorated with various decorative elements, you will get a bright and beautiful baseball cap.
Classic
A paper headdress in the shape of a classic cap is easy to make from paper.
Scheme of work.
- A large sheet of square-shaped paper must be folded at an angle of 45 degrees to obtain a triangular blank.
- Turning the wide edge towards you, fold the top corner to the bottom side.
- Raise the folded corner, bend the edges inward, overlapping each other. Press them to the top of the workpiece.
- Bend the element located in the upper part of the corner side down and tuck it under the folded parts. Smooth out seams.
- Turn the workpiece over and bend the remaining element inward as well.
- Unfold the blank to decorate the inside of the cap.
- Straighten the product, the outer corners should be facing each other.
- The visor is folded up, then folded back again.
Making a cap using this pattern takes some practice.
What paper should I use?
First of all, you need to choose the right quality and type of paper, otherwise the product may be hopelessly damaged, and your time and nerves will be wasted.
There are several types of paper that are used in making things:
To create a base or give shape to an object, the following are suitable:
- Whatman paper – the structure is dense and retains its shape well.
- Cardboard – varies in composition and density.
For registration:
- Newsprint has a soft, pliable structure.
- Rice.
- Napkins.
- Packaging.
You can also purchase designer types of paper in specialized stores.
Square cap
To work, you need to stock up on newspaper or a square sheet of paper.
Scheme of work.
- Fold the rai of the sheet to form a triangle. Cut the strip from below and unfold the workpiece.
- Fold again to create a second cross line.
- Turn the workpiece so that the corner faces up. Fold the edges inward.
- Turn the workpiece over and fold the remaining edges in the same way.
- Bend one corner to form a visor, and secure the shape of the resulting cap with the rest.
If you get creative, there are many ideas for making paper hats. These can range from the simplest items made from newspaper to elegant carnival hats.
You can come up with a product design yourself or use a photo of a paper hat found on the Internet as a basis. The work does not require much experience, and as a result you can get an original outfit for a children's party or carnival.
The Elusive Zorro
The mysterious Zorro hat with your own hands will bring success to the boys in the New Year's competition. Make it also on the basis of a cylindrical shape, paint it black, or cover it with fabric. Sew ribbons to the brim so you can fold it back. The distinctive sign will be the letter Z. It would be better to make it out of foil and glue it to the front.
Photo of a paper hat
Did you like the article?
0
Tips for working with paper
To make your creative work satisfying, you should heed a few tips:
- you need to start creative work only in a good mood;
- You should be responsible when choosing a place for creativity: nothing should interfere, there should be enough space and light;
- When working with paper, you need to keep your hands clean so as not to leave marks on the product. If you have to deal with glue or paints, it is better to immediately prepare wet and dry wipes;
- you need to remember that scissors are a sharp tool, you should not leave children with them unattended;
- Before folding life-size origami, you should practice on a “draft” - an unnecessary sheet of paper;
- For a homemade hat to look good, all lines and folds must be neat and symmetrical.
Following these guidelines will help you have fun and enjoy paper crafting.
Sources
- https://tkaner.com/golovnye-ubory/shapka/kak-sdelat-shapku-iz-bumagi/
- https://my-pic.ru/uyut/kak-sdelat-shapku-iz-gazety.html
- https://samodelki.org/kak-sdelat-shapku-iz-bumagi/
- https://kuhniug.ru/stirka/kak-sdelat-shapku-iz-bumagi.html
- https://floridei.ru/tvorchestvo-s-detmi/kak-sdelat-shlyapu-svoimi-rukami-iz-bumagi.html
- https://vsepodelki.guru/shlyapa-iz-bumagi/
- https://megamaster.info/kak-sdelat-shljapu-iz-bumagi/
- https://tytpodelki.ru/shlyapa-iz-bumagi/
- https://rukodelieinfo.ru/shlyapa-iz-bumagi/
- https://www.promyhouse.ru/rukodelie/izdeliya-iz-bumagi/delaem-bumazhnuyu-shlyapu.html
- https://www.tkaner.info/golovnie-ubori/shapki/kak-sdelat-shapku-iz-bumagi/
- https://PosudaIzKamnya.ru/iz-bumagi/shapka-iz-a4.html
[collapse]
Fashion for Vietnamese hats
Asian countries, including Vietnam, have recently become one of the most popular tourist destinations. Gorgeous beaches, seas, summer all year round, exotic cuisine - all this attracts people from all over the world. European and American tourists, along with souvenirs, often bring home the national Vietnamese headdress - the nonla hat: fortunately, it is sold in almost any market and costs mere pennies.
Fashion designers also liked the exotic straw accessory – and more and more often you can see how fashion designers and stylists offer to complement summer looks with a cone-shaped straw hat. A Vietnamese hat can really diversify any woman’s look and attract the attention of others to a fashionista. Examples of how and with what you can wear a straw Asian hat.
This hat looks original as an addition to a standard everyday look consisting of a T-shirt and a mini skirt:
The Vietnamese nonla hat can be an interesting decoration for an evening or holiday look with an elegant maxi dress (great if it is also made in an oriental style):
A triangular straw hat combined with a bright knitted dress:
The big advantage of Vietnamese hats is that all models have the same size, suitable for any head. When choosing or ordering in an online store, you don’t have to worry that the accessory will be too small or large.