Every parent sooner or later faces the problem of cleaning up children's toys. Kids spend a lot of time playing, so the nursery usually resembles a real battlefield. Cubes, soft toys, construction kit parts - putting it all away is quite tedious, and it takes a lot of space. Inventive parents know how to save money and make their own toy basket.
Consumables
A toy storage box can be made from any materials you have in the house. The main thing is that it is roomy, bright and comfortable.
As consumables you can use:
- wooden boards,
- boxes,
- cardboard sheet,
- any fabric,
- foam rubber,
- braid, ribbons.
The product must be made from environmentally friendly materials. To prevent the child from getting hurt on wooden elements, they are sanded.
Primer and varnish will help increase the service life of natural wood products. All fastening connections must be strong.
You should not use synthetic cord to tie the bag, as it slips and will lead to constant untying.
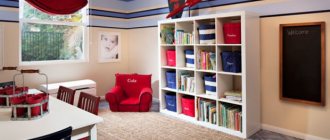
Storage racks
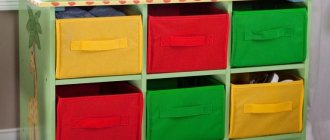
A very convenient option for storing many toys is to make a wooden rack (open). In it, each shelf can be occupied either by pull-out cardboard boxes or standing books, lying soft toys and many children's necessary items. The main thing is that the child can take them out independently and subsequently put them back.
The rack is made of wood with square cells. At first it can be placed horizontally (while the child is small), and then turned over and placed vertically (when he grows up). Subsequently, such racks can be installed in several different sizes and heights, resulting in a whole furniture system for storing not only toys, but also necessary items for study.
Idea for making a toy box (1 video)
Other ideas (35 photos)
Toy storage suitcase
Wooden box
Pockets for toys
DIY toy boxes
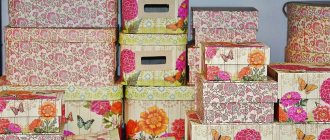
Looking at the not childish prices for cute wicker or plastic baskets in stores, you think that the idea of making colored toy boxes with your own hands is not so bad. You will need cardboard boxes made of thick (not corrugated) cardboard, most likely from household appliances. You can try your luck with your friends: many manufacturers provide warranty repairs only if the packaging is present. So people keep the boxes. The warranty period has long passed, and they forgot to throw away the packaging. These boxes are the best option for children.
Another option is to ask in department stores. They also often receive goods in hard packaging. For example, diapers, wipes, etc. come in these.
Cover with paper
Cut off the lid from the found boxes. We cut holes-handles in the side walls (narrow). We seal all joints from the inside with tape.
Cut off the lid of the box and make holes in the sides for handles
Take colorful paper. The wrapping paper used to wrap gifts is perfect. It is dense, there are a large number of different patterns. You can also use scrapbooking paper. If the trim is made of paper of different colors, we cut it into strips of equal width; if we paste it with one pattern, we measure the strip along the height of the box.
Glue the paper
We take glue (PVA), brush the surface of the box and start gluing it from the corner. We try to glue without bubbles, smoothing the paper gradually, from edge to edge. We place the next sheet with a slight overhang, not the previous one. Continue this way until we have covered all the surfaces.
We design handles
After looking at the light, we cut out the handles with scissors. To make the edge more neat, glue the sections of the handle with a thin strip of paper. We also decorate the top cut with a stripe.
Ready-made homemade toy box
We cover it with fabric
In this case, all corners of the box can be taped on both sides - it will last longer. Next, we take the fabric and cut out two sets of blanks to fit the box. One is strictly in size, plus a seam allowance, the second is 1 cm smaller and also with an allowance. Add 0.5-1 cm to the seams on each side. You can cut the workpiece immediately in the form of a cross, but this way the fabric consumption is greater - it is more economical in separate pieces.
We cut out a double set of blanks from the fabric and sew them together
We first sew the parts together in the form of a cross, then make a bag from the blank. Let's try it on the box. We stretch one (the larger one) from the outside, and straighten the second one from the inside.
Fitting
Now we take universal glue and glue the fabric around the perimeter of the bottom, inside and out. Then we glue it in the corners. This way the fabric will not move.
Glue the fabric along the edges of the box
We fold the edges of both bags inward and trim the box around the perimeter by hand.
We trim the top of the toy box, cut out the handles
Using scissors, cut through the handles. Just don't cut out large pieces. You need to leave about 1 cm of “extra” fabric. We wrap it inside, hemming the handle.
Hemmed handle
Having decorated the handles, we get a ready-made box for storing toys.
The box is ready
Why is it important to use special furniture
From childhood, they try to surround a child with care and comfort, so his toys are also an important part of his education and upbringing. Thanks to toys, you can teach your child many things and, most importantly, simple order in the room.
It is no secret that children copy the behavior of their parents and when mom or dad simply collects toys in a box, the children will naturally see this. As a result, they will simply develop the habit of putting their things away. The closet is the next stage of learning, since you will need to not only throw toys there, but also arrange them.
Making both a box and a cabinet for toys is not difficult, since this is not full-fledged cabinet furniture that stands in the living room or hallway. Therefore, you should not immediately look for options in the store, since you yourself can easily cope with the manufacturing task. And most importantly, all the furniture you make will be ideal for you both in size and functionality, since you will make it especially for yourself. It is rare to find such a combination in stores, since they will only offer you standard furniture options.
Making a wooden box
The technology is not easy, so you need to be especially careful and work according to the instructions. The photo shows what you can do.
The instructions are as follows:
- First of all, make a drawing. In it, indicate the depth, height and width. Consider the design: it will be with or without legs; supplement it with handles and where exactly?
- Buy everything you need for work: materials and tools. Use MDF board, plywood or OSB boards. You can use parts from an old chest of drawers, cabinet or table. Stock up on screws, angles, wood glue or PVA and hinges.
- If you buy panels in a store, you can ask them to be cut on site according to the drawings. Otherwise, do everything yourself, having previously marked the material. You must have the following parts: 4 walls, two of which are longer, so that you get not a cube, but a rectangle, the bottom of the box and its lid.
- When the elements are ready, start assembling the box. Coat the places where the parts will be joined with glue.
- Place the bottom on a flat surface and install the side walls in their places (those that are smaller). Secure them with two corners.
- Then do the same with the other two walls.
- Using the hinges, place the cover in place.
- Wipe off excess glue with a cloth.
At this stage, the box is ready and can be used for its intended purpose. You can decorate it, attach a handle and legs.
Advice! To protect the material, it can be opened with varnish or stain.
Option 2: plywood
The author opalenyj.uzor from the website livemaster.ru suggests making a box-chest for toys from plywood. The photo of the final product amazes with its filigree and craftsmanship. The chest looks neat and will fit perfectly into the interior of any nursery.
What you will need:
- Large sheet of plywood.
- Jigsaw (or plunge-cut saw with guide bar).
- Fraser.
- Groove cutter 6 and 12 dm (for milling grooves).
- Parallel stop with gauge.
- Overrunning cutter.
- Euroscrews.
- Drill.
- Water based varnish.
Manufacturing:
1. On a sheet of plywood you need to mark the dimensions of the sides of the future box.
2. Next, use a plunge-cut saw with a guide bar to cut the sheet according to the markings.
3. Check for the presence of a right angle in the workpieces.
4. Using a router and a 12-inch groove cutter, you need to make grooves in the walls of the box, since the chest is assembled not with screws, but with grooves.
5. For convenience in work, a parallel stop with a proprietary meter is used. Any other device can be used; the main thing is that the groove runs parallel to the wall and is at the correct distance from the edge.
6. Before you start milling, the workpiece must be secured to the machine.
7. To mill grooves in the bottom, a 6-inch groove cutter is required.
8. Using a jigsaw, rounded lines are cut out in the blanks using a template.
9. Next you need to cut two oval handles on the sides of the chest.
10. Using an overrunning cutter, the jigsaw cuts are adjusted to make them look neater.
11. The edges can be additionally “rounded” with a round cutter.
12. The cover is screwed on using euroscrews and a drill.
13. The box is assembled into grooves
In the manufacture of such a product, it is important to correctly mark the places for the grooves so that all the walls and bottom fit tightly to each other and can be easily removed
14. Next you need to coat the product with water-based varnish.
15. A beautiful and modern toy chest is ready!
Interesting selection: 26 shelving options - for books and toys
The big plus of the product is that it is easy to disassemble and assemble, and its capacity is enough to store all the toys in it.
Inspire us - share the material with your friends on social networks:
Read with this article: