Trousers are a universal item in men's and women's wardrobes. For the stronger sex, they have become the main item of clothing. But women have long appreciated and enjoy all the advantages and benefits of trousers. However, this familiar product sometimes unexpectedly fails. They match our figure too closely. And therefore they immediately point out that the owner of the pants forgot about a balanced diet and indulged in excess.
What to do if your trousers become tight? The answer is simple: they need to be expanded .
We have accumulated a lot of experience in such alterations. We will tell you what to do to ensure the required width for your favorite clothes.
Extend the clasp
This option will be especially useful for pregnant women for whom a tight button presses into the stomach. His idea is to extend a regular fastener with an elastic band. To do this, you should buy 5-10 cm of special belt tape with holes. On one side of this cut you need to sew a button of the required size, and then attach the device as in the photo.
The only disadvantage of this method is that you have to hide the elastic under long clothes.
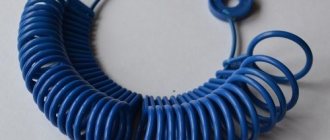
We use an expander
Peculiarities. Purchasing such a device can solve the problem of small things. It is mainly used for denim and stretch.
What we do
- Fasten your pants and soak them in water.
- We place the expander in the middle, fix it, and gradually increase the width of the device.
- We fix it at the maximum level.
- We wait until the trousers are dry.
What you need to know
- The device can be used to lengthen jeans with cuffs, but it is not suitable for increasing length.
- We perform the procedure carefully so as not to tear the product.
- After each wash, you need to repeat the procedure.
You can first take measurements from your belt and check how effective the method is.
Stretching trousers after washing
Many people are familiar with the situation when their pants shrink after washing. It’s not clear what to do in this case, because you really don’t want to throw away the whole product. Of course, if the pants get too long and start to look more like breeches, there’s nothing you can do about it. But if after washing the product has simply become a little narrow, a few tips will help to stretch it. For example:
- Don't wait for it to dry completely. As you know, many modern fabrics have the ability to stretch when worn. If you put on something that is still wet and wait until it dries on your body, then you will have no problems putting on your favorite trousers until the next wash.
- Steam the product. To do this, you don’t have to buy a special steamer or use an iron; just fill the bathtub with hot water and hang your pants over it for half an hour. You can also place them in a steam shower. The method has been tested by many and works 100%.
- Use a special expander when drying. If this is not available, a regular stick will do, which is inserted into the waistband of wet, buttoned jeans and left until completely dry. Thus, the expander will simply prevent the fabric from drying out, and putting on the product will be much easier.
Thus, with the help of these small tricks and ingenuity, you can not only extend the life of your favorite trousers, but also significantly save your family budget.
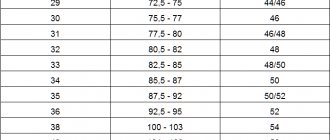
How to increase your trouser size?
What do you need for work?
If the decision is made that trousers need to be enlarged, for example, when they shrink after washing, then this means that the person has at least basic sewing skills. And if so, then in the house there will be the necessary tools and devices for this process, which include:
- sewing machine;
- iron with or without steam function;
- ironing board;
- ironing iron or spray bottle for moisturizing;
- tape measure;
- tailor's scissors;
- a set of colored crayons;
- threads to match the fabric;
- ripper
Colored crayons can be easily replaced with thin soap, which is preferable since traces of chalk marking are difficult to remove from fabric.
Re-stitching options
It is possible to spread out the trousers not much, as a rule, by 1-2 cm. The process is selected according to where the product needs to be expanded: at the waist or in width. Which method of work to choose depends on the specific condition, as well as on the imagination, experience and intelligence of the performer. In a situation where the model needs to be embroidered at the hips, several options are possible, which are used depending on the circumstances.
An elastic band will come to the rescue
You can widen your trousers using an elastic band. An elastic band will come to the rescue in all cases when you need to increase the volume at the waist, when the trousers have become too small with a zipper on the side. Let's look at how to increase volume with a side zipper correctly.
- Steam out the zipper and remove the hard belt.
- Sew the side seam where the zipper was to the stitching done with an overlocker. If this volume is not enough, then insert a wedge of the required size and sew it in.
- Sew fabric to the waistband to fit two or three rows of elastic.
- Sew on a new belt, make two or three lines, insert an elastic band.
Spray and stretch
Peculiarities. The method is relevant if there is no desire to take a bath in clothes or the room is cold for such a procedure. Do not use too hot water, as the product may fade or shrink. We write down step-by-step instructions.
What we do
- Use a spray bottle to spray warm water on the part of the pants that needs to be stretched until it is completely wet.
- Lay out the product on the floor.
- We begin to pull the fabric in the place we are unhappy with.
- After the procedure, leave to dry.
What you need to know
- You can easily stretch jeans in the waistband and buttocks if you pull out the seam that runs from the back to the front of the product.
- If you need to increase the length, then we process the area from the knee to the bottom.
- We do not increase the size of heavily torn or worn trousers in this way.
- Before wetting, we measure the place that we will pull. Afterwards we will be able to understand whether there is a result.
- Stretching the belt means unfastening the buttons and zipper.
- We do not pull on pockets or accessories.
- If the size has not changed, you can repeat the procedure.
Workshop “from Idea to Result”
Now, the Creativity section has moved there. There will be master classes, courses, consultations on sewing, decorating clothes and creating accessories. In the “Blog” section, I publish posts on fashion and handicrafts. I created this platform for our communication. Let's be friends!
Follow the link ideatoresult.com
Progress:
- In the photo we can see the trousers that need to be changed. The first thing we do is try to measure them and mark with soap or chalk to where we need to expand them.
- We turn the product inside out, smooth out the seam allowances, folding them together. We do this in order to draw a beautiful chalk line, expanding the line of the hips. Photo 1.
How to embroider trousers at the waist and hips
To make your pants fit better, you can use any of the following options.
Braid arrangement
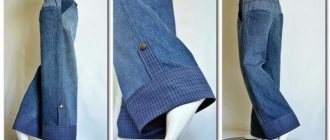
Some men's models have an allowance along the back seam of the seat. It is ripped open and sewn to the required size. If the trousers are too small in the waistband, it is completely removed and a special braid is sewn on the inside.
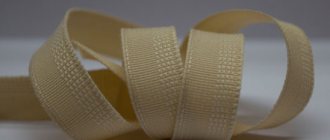
Trouser tape
Fabric insert
This method is used to widen trousers at the hips and waist. You need a piece of elastic fabric. The insert should stretch. A piece of the required size is cut out of the fabric and inserted into the side seams of the pants. For models that are made of dense material, a double wedge is made. To insert correctly, you must follow the following sequence of actions:
- Rip the pants at the sides to the desired length.
- Carefully baste the insert by hand and check its elasticity.
- Sew on with a sewing machine.
- Overcast the cuts.
- Iron seam allowances on the product.
- Decorated with decorative stitching on the outside.
You may be interested in: Simple patterns of baby rompers for newborns
Fabric insert in the waistband
Sometimes the fabric is sewn not only along the sides, but also along the back seam. This increases the product by 2 or more sizes at once. But such an insert does not look aesthetically pleasing, so this option is used only in extreme cases.
If the fabric cannot be inserted at the side, then you can widen the pants in another way. The material is inserted from the inside. Rip out the crotch seam to the length required, as in the previous version. Next, small wedges are inserted. The disadvantage of this method is that you will need to look for fabric, just like the main product.
Increasing size with gusset
To prevent trousers from chafing in the groin, a gusset is sewn in at home - a piece of fabric that is wedged at the intersection of the side and step steps. The material is used on tights, sports models or children's clothes.
Patch between legs
Such products become stronger because they do not have a weak point where many seams meet. Gusset sewing guide:
- A piece of fabric is cut out of a single-color material. Basically it is a rhombus 20-25 cm long and 4-7 cm wide. Dimensions are selected based on the current situation.
- Rip the crotch seam to a length slightly less than the length of the gusset.
- A piece of fabric is basted or pinned on one side and machine sewn with an internal seam.
- They do the same on the other side.
Important! This method is not so labor-intensive and is suitable for trousers with a simple style. To carry out an operation with trousers of a complex design, you will need to make a pattern.
Stripes - the most unusual option
If it is necessary to add not 2-3 centimeters, but more, then they act differently. Reducing the allowances will not help; new parts are sewn in. Stripes are quite popular. In addition to their decorative purpose, they perform a practical function. Stripes can decorate a product.
Original plaid trousers with stripes
When choosing fabric, you can give preference to the closest or contrasting fabric. The main thing is to match the width of the main material. Step by step guide:
- Cut the belt along the side stitches and take out the elastic.
- Carefully rip the seam along the entire leg, including the folds.
- Stripes are sewn on each edge of the trouser legs. It needs to be prepared in advance. First the stripes are basted, then they are sewn on a machine.
- All seams are processed.
- Remove the basting and iron the machine seam.
- Make a turn up on the trouser leg.
- Similar steps from step 2 to step 6 are repeated with the second leg.
- All that remains is to sew on the belt and insert the elastic.
You might be interested in this: Simple patterns and sewing procedures for sheath dresses
Classic trousers with black stripes
Step-by-step guide with photos for repairing jeans that are worn between the legs
- Wash and iron jeans that need repairing.
- Cut out the most intact flaps from another selected item. Wash and iron them too.
- Open the top crotch seam and the middle back seam (to about the middle or a little higher).
- Using a ruler and a piece of chalk or dry soap, mark the part on one front side of the jeans as shown in the photo. The rubbed area should be completely behind the line. Make a seam allowance by drawing a second line parallel to the first.
- Cut along the first marked line.
- Place the cut piece face to face on the second part of the jeans, trace a line, also draw a second parallel line for the seam allowance and also cut along the first line. Seam allowances should be the same. Check that the cut-out parts on both sides of the jeans are the same: all edges and lengths must match.
- Now you need to make a pattern for the insert. Take a sheet of paper (you can use thick polyethylene), place the piece cut out of jeans on it and trace exactly along the contour. On the sewing side of the jeans, make an allowance (the same as on the jeans). Cut it out.
- It’s good if the pattern fits completely on the scraps of denim: trace it exactly along the contour (no allowances need to be made) and cut it out. If not, then the pattern will have to be divided into two parts as shown in the photo. Make a seam allowance. When arranging the details, make sure you don’t make a mistake. The parts must be mirrored.
You can do it differently: fold 2 pieces of denim face to face. Lay out the pattern, trace it and cut it out. You will get 2 necessary parts. Check that they are the same.
You can make a different insert, for example, using this pattern:
The detail on the jeans is cut out along the bold line. Also mark a thin line on the jeans, as in the photo. We make the pattern with an allowance of about 1.5 centimeters. Cut out 2 parts for inserts. We process the edges of the parts, marked with a dotted line in the photo, using a “zigzag”. We also process the cut edges on jeans. To sew the insert to the jeans, you need to tuck its edges along a thin line and stitch, retreating about 2 mm from the edge. Then apply from the front side of the jeans, where the part was cut out, baste so that the part fits exactly into the cutout on the jeans from the side of the middle and crotch seam (if there are any unevenness, straighten them out). The other edges of the panel should line up exactly along the thin line marked on the jeans. Sew along the right side exactly along the first line on the insert.
- Place the top and bottom pieces face to face and stitch along the seam allowance line. If necessary, trim the edges by trimming excess fabric. Finish the edges of the seam with a zigzag stitch. Fold the bottom down and stitch along the right side with threads that are similar to the color of the stitching on your jeans.
- Place the pieces face to face on the back of the jeans and stitch. Make sure that both sides match each other: the beginning, middle seams and the end of the inserts should be at the same level. Finish the edges of the seams with a zigzag.
- Unscrew the inserts and stitch along the right side along them (with threads in the same color as the stitching), folding the seam over the inserts.
- Sew the back middle seam. Fasten the end of the previously opened seam (reverse button on the sewing machine). The edges of the right and left inserts in the seam should match. Finish the edge of the seam with a zigzag.
- Topstitch the seam on both sides using thread in the same color as the stitching on the jeans. Do not forget to secure the ends of the opened seams so that they do not begin to unravel.
- On the inside of the jeans, mark the crotch seam by drawing a line with a piece of soap or chalk. If the jeans are also frayed at the seam, draw a line so that the fray is hidden by the seam: step back a few millimeters from the original seam line, drawing a new line to the bottom of the legs exactly along the original seam. Sew the crotch seam along the marked line, tack the ends of the opened seam and finish the edge with a zigzag. When sewing the seam, make sure that the edges of the inserts are at the same level.
- Now you need to stitch the crotch seam with threads the color of the jeans stitching. Place the seam under the foot of the sewing machine, make sure that the seam allowance lies in the direction in which it was stitched earlier and stitch along one side of the seam, making a neat “tack” of the end of the previously opened seam. Then sew a parallel stitch on the other side of the seam.
Increasing size with gusset
To prevent the pants from chafing in the groin, you can sew in a gusset. A gusset is a piece of fabric sewn in at the intersection of the side and crotch seams. The gusset is usually placed on home pants (tights or sweatpants, for example) or on children's clothes. Such trousers become much stronger, since there is no weak point where many seams come together. How to sew a gusset into pants:
- Cut out the gusset itself from a plain material. In most cases, this is a rhombus 20-25 cm long and 4-7 cm wide. Sizes must be selected based on the current situation.
- Open the crotch seam to a length slightly less than the length of the gusset.
- Baste or pin the gusset on one side, then machine sew with an inside seam.
- Perform the same operation on the other side of the gusset.
It is important to understand that the above describes the least labor-intensive way to sew a gusset, suitable for pants with a simple cut. To carry out the same procedure with trousers with a complex design, you cannot do without a competent pattern: on different models there are quite a lot of differences, both in size and in the location of the seams.
How to hide a big belly
Not all women have a thin waist and a flat tummy. If you have a big belly, it is best to buy maternity pants. What to do if you have already bought the trousers, but your belly has increased? They can also be expanded.
In the trouser model you need to insert a fairly large piece of knitted fabric to match the color of the product. Knitwear should be dense, but have good stretch. The work is delicate, so it can be done by experienced seamstresses, but novice seamstresses can also try it.
- Rip out the side seams.
- In front, cut a piece of fabric from one seam to the other.
- Apply the cut piece to the knitwear. Trace with chalk, making seam allowances.
- Baste and stitch with a zigzag.
- Insert an elastic band on top.
Finally: ideas on how to embroider trousers will definitely help you preserve your favorite item and not reduce your household budget.
Useful information about trouser extensions
Before you begin, you need to determine exactly which place in the product requires intervention.
Which part of the trousers can be widened?
Usually you have to do work in several parts of the pants.
- At the waist . In this case, you need to pay attention to the belt.
- In the hips . If you have extra centimeters on your hips, you will have to work on the upper part of the product.
- The legs have become thicker, which means that intervention will be needed not only in the upper part of the trousers, but also in the legs.
Ways to stretch trousers
There are 3 main ways to increase the width of your pants.
- Reducing seam allowances.
- Using inserts.
- Physical stretching of the material, which does not require alteration of the product.
How far can you stretch your pants?
When starting work, you need to determine exactly how much you need to widen your pants .
Depending on the quality of the fabric from which the trousers are made, and the size of the fabric at the allowances, you can add up to 2-3 cm to the trousers, increasing them by 1-2 sizes.
Reference. The best trousers that can be stretched without alteration are those made from a blend of fabric with the addition of elastic fibers.
To avoid making mistakes in alterations, you can use a comparison of tight trousers with those that fit well. Place the products on top of each other and take measurements .
What you need for work
To remake, you will definitely need scissors, thread, measuring tape, pins, chalk, and a sewing machine.
If the alteration requires inserts, you need to prepare a suitable material in advance .
Having dealt with the preliminary information, let's move on to specific ways of doing the work.